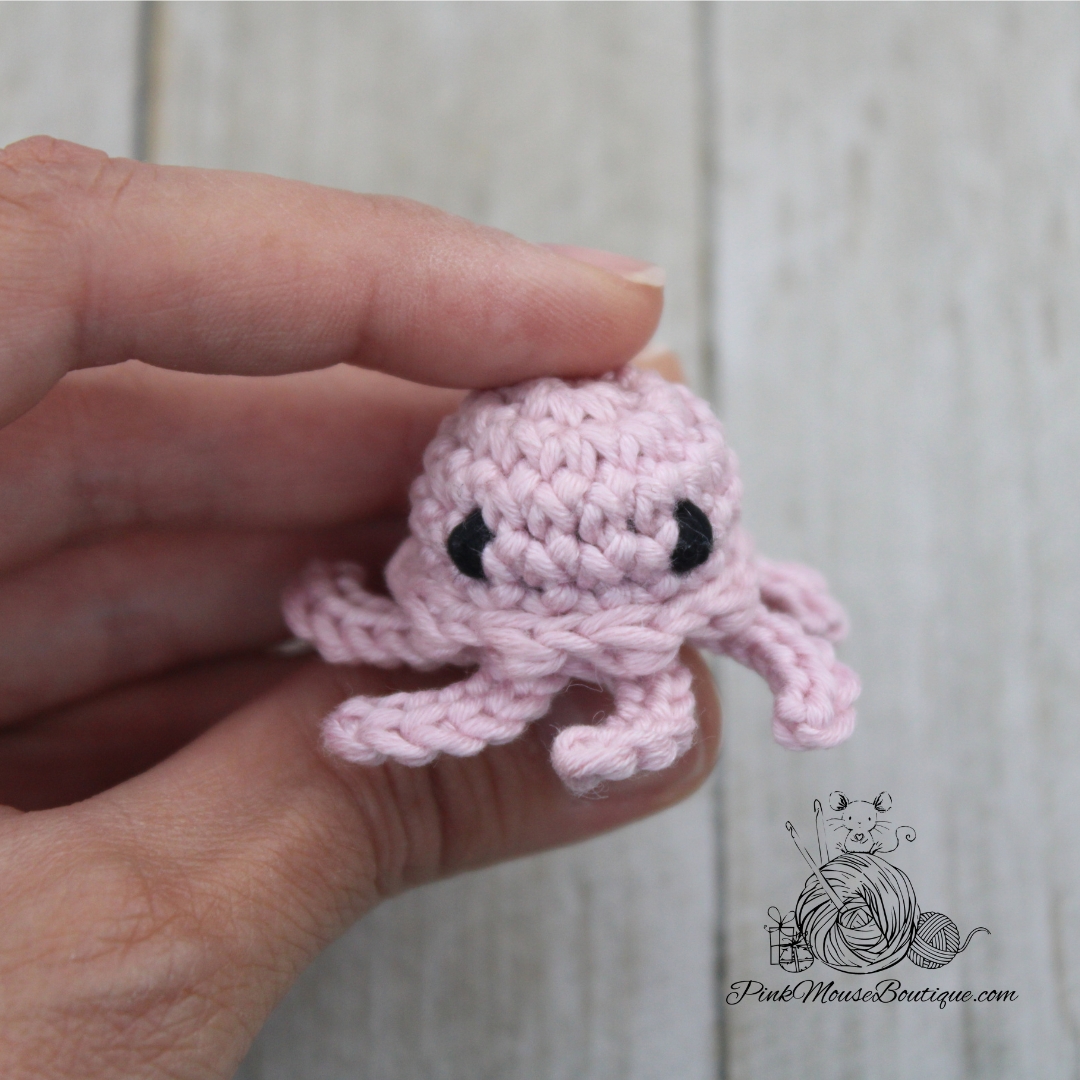
This jellyfish is super tiny and so quick to make! You only need a little bit of thread and about 20 to 30 minutes (depending on how quick you crochet). There are a couple of interesting techniques in the pattern like invisible decrease in the BLO and the invisible join. But this pattern, especially because there is a video tutorial as well, is beginner friendly. I hope you enjoy it!
If you prefer watching the video or at any point, you need a little help, click the link: JELLYFISH VIDEO TUTORIAL
MATERIALS:
Aunt Lydia’s size 10 (two colors – one for the body and one for the eyes)
Crochet hook, 1.5 mm
Stuffing
Sewing needle and scissors
NOTE: For the step-by-step photos, I used Drops Muskat yarn with a 3.25 mm hook.
ABBREVIATIONS:
MR – magic ring
Ch – chain
St(s) – stitch(es)
Sl st – slip stitch
Sc – single crochet
Dc – double crochet
BLO – back loop only
FLO – front loop only
Inc – increase
Dec – decrease
NOTE: Do not secure the tails until the very end. We’ll secure them once Round 8 is finished.
PATTERN
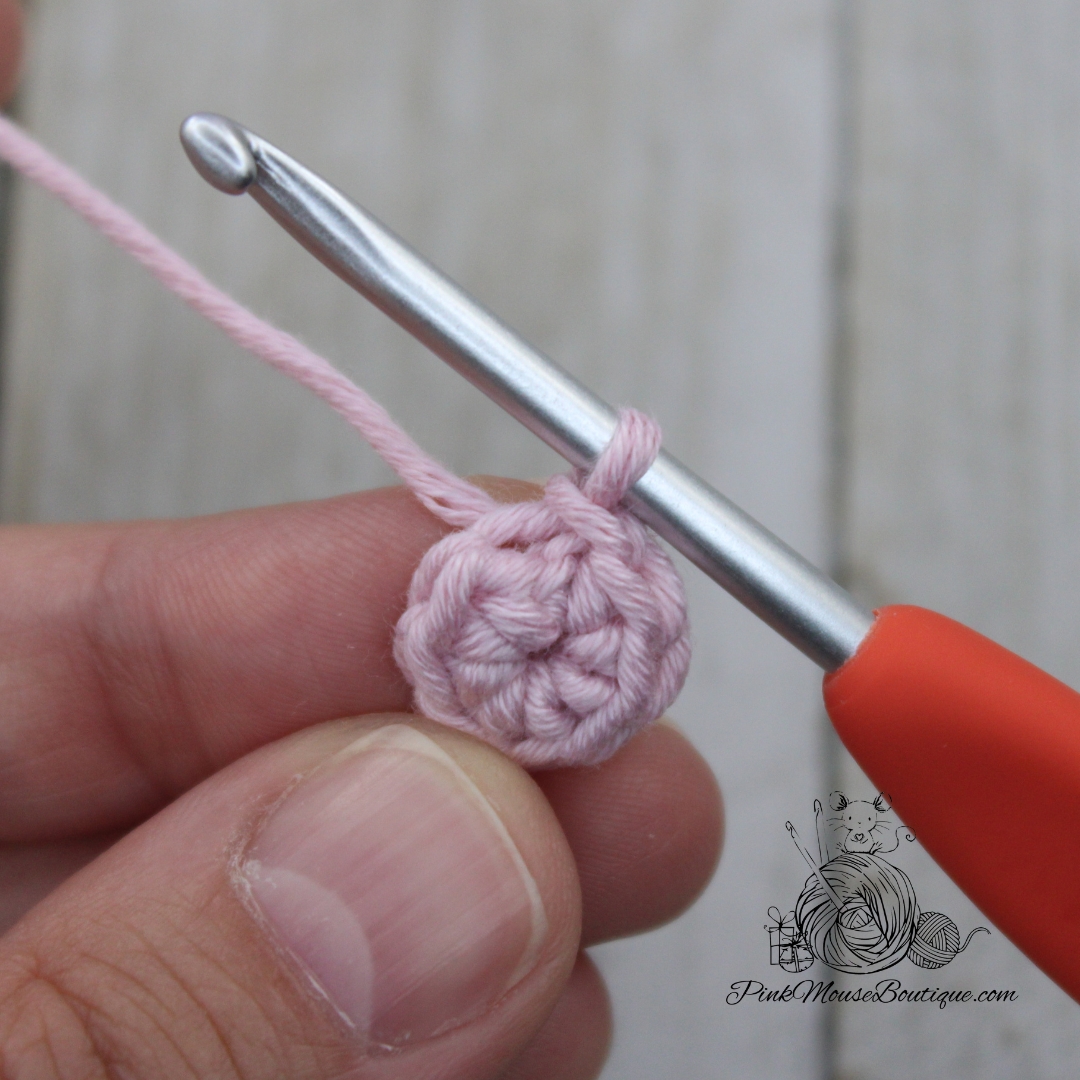
Round 1: 8 sc in a mr; sl st in BLO – 8 sts
Round 2: in FLO 1 inc; continue in both loops 7 inc; sl st in BLO – 16 sts
When joining rounds as described above, an extra stitch is created (refer to the image below). Skip that stitch and continue with the next round.
Rounds 3 – 4: in FLO 1 sc, continue in both loops 15 sc; sl st in BLO – 16 sts (2 rounds)
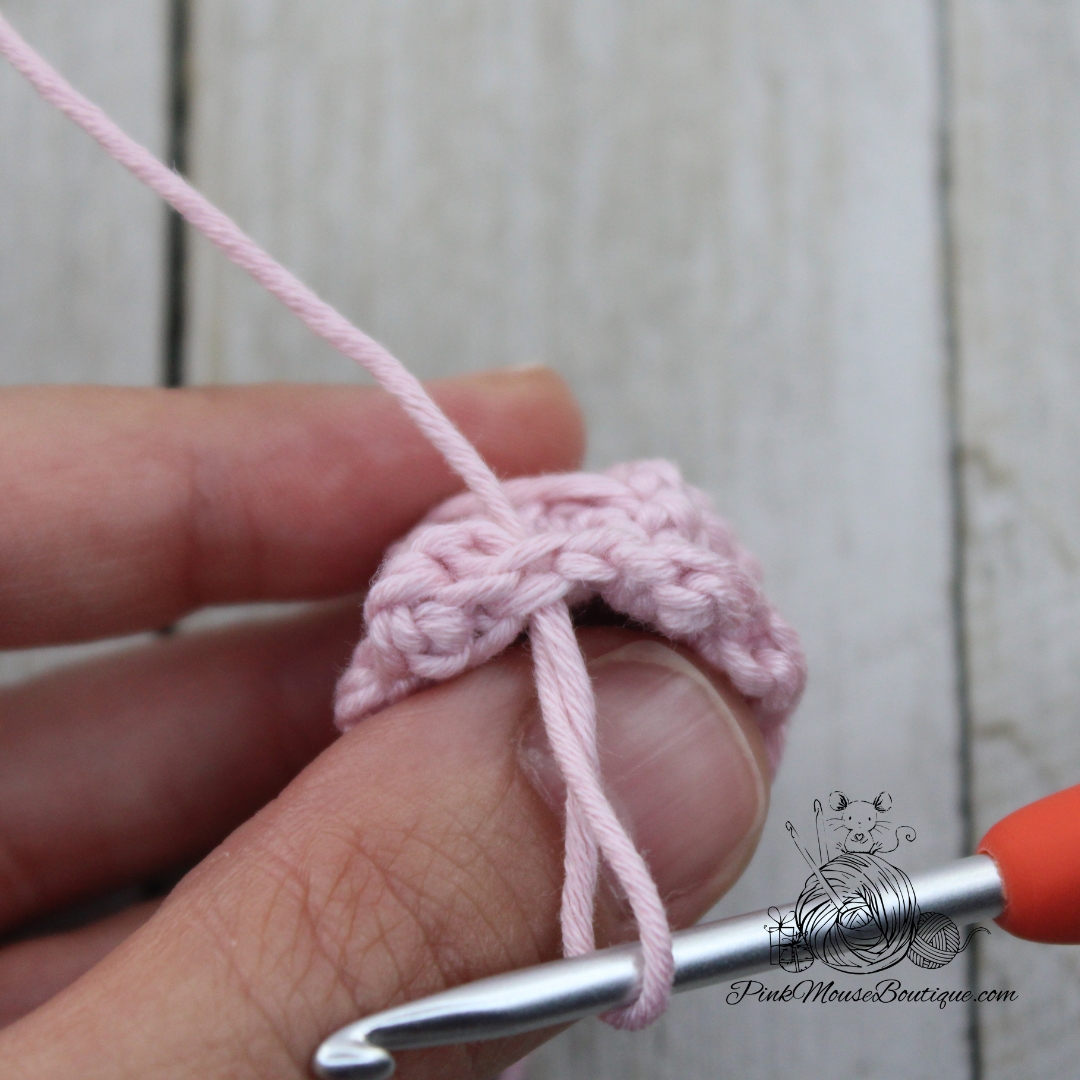
Round 5: in FLO 1 sc, in both loops 15 sc; sl st in both loops to join and ch 1 – 16 sts
Round 6: in FLO (dc in 1st st, sl st in next) x 8 – 8 shells
Fasten off. Bring the end tail inside the body and then pull it through a space of the body. Repeat for the beginning tail.
EYES
With black thread, sew the eyes on Round 4, 4 stitches apart.
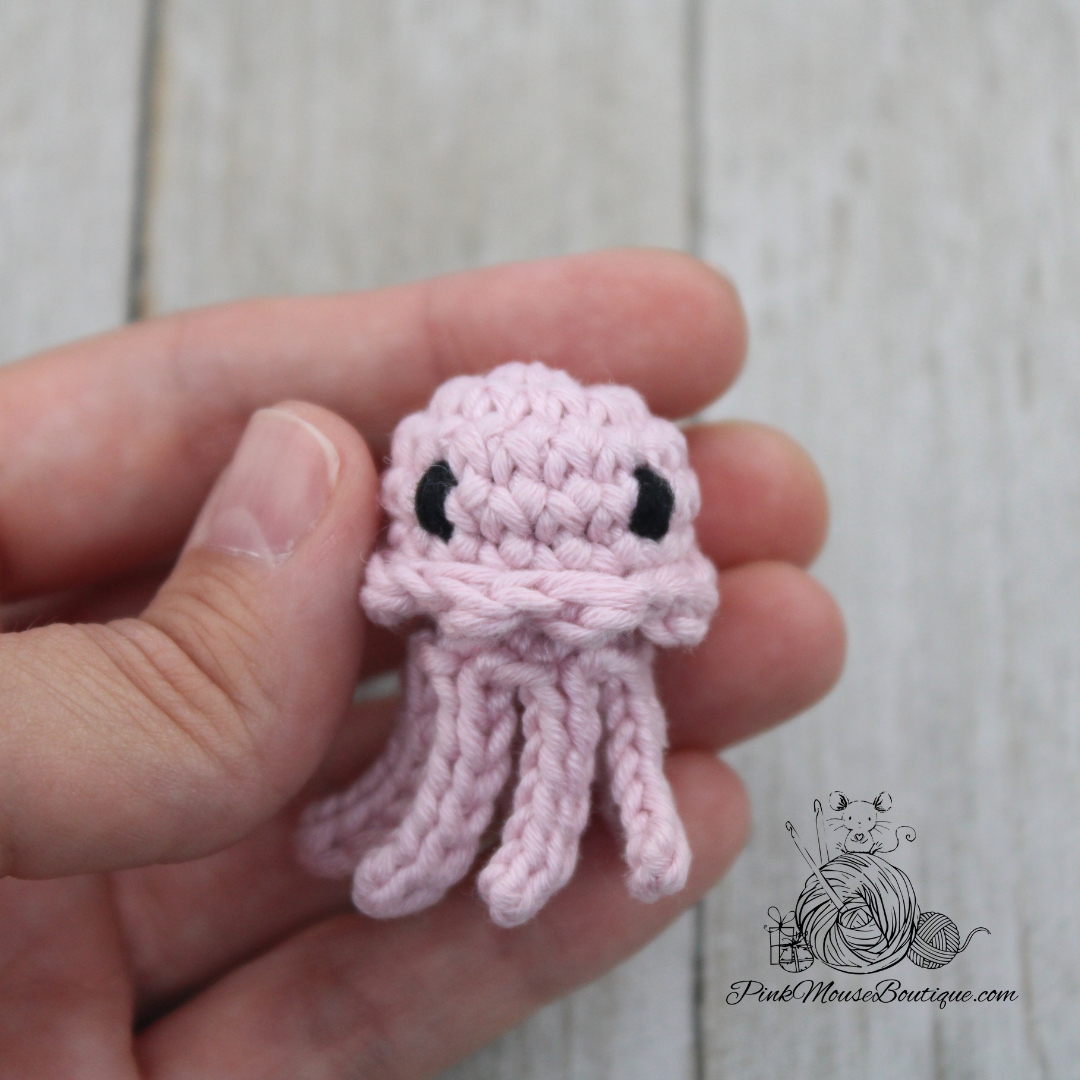
BODY – CONTINUED
Round 7: join yarn to any of the unworked loops of Round 5 with a sc (counts as 1st st of Round 7); 1 sc in next loop; dec (invisible dec in BLO is done the following way: skip 3rd loop, insert hook in 4th loop, go back and insert hook in 3rd loop; 1 sc – video at 17.21 min); (2 sc, dec) x 3; sl st to join and ch 1 – 12 sts
Stuff the body well.
Round 8: in BLO 6 dec; sl st to join – 6 sts
Fasten off. Insert the end tail through the same space you inserted the 1st beginning tail. Tie a knot and stuff the excess thread inside the body.
Insert the 2nd beginning tail through the same space as the 1st end tail. Tie a knot and stuff the excess thread inside the body.
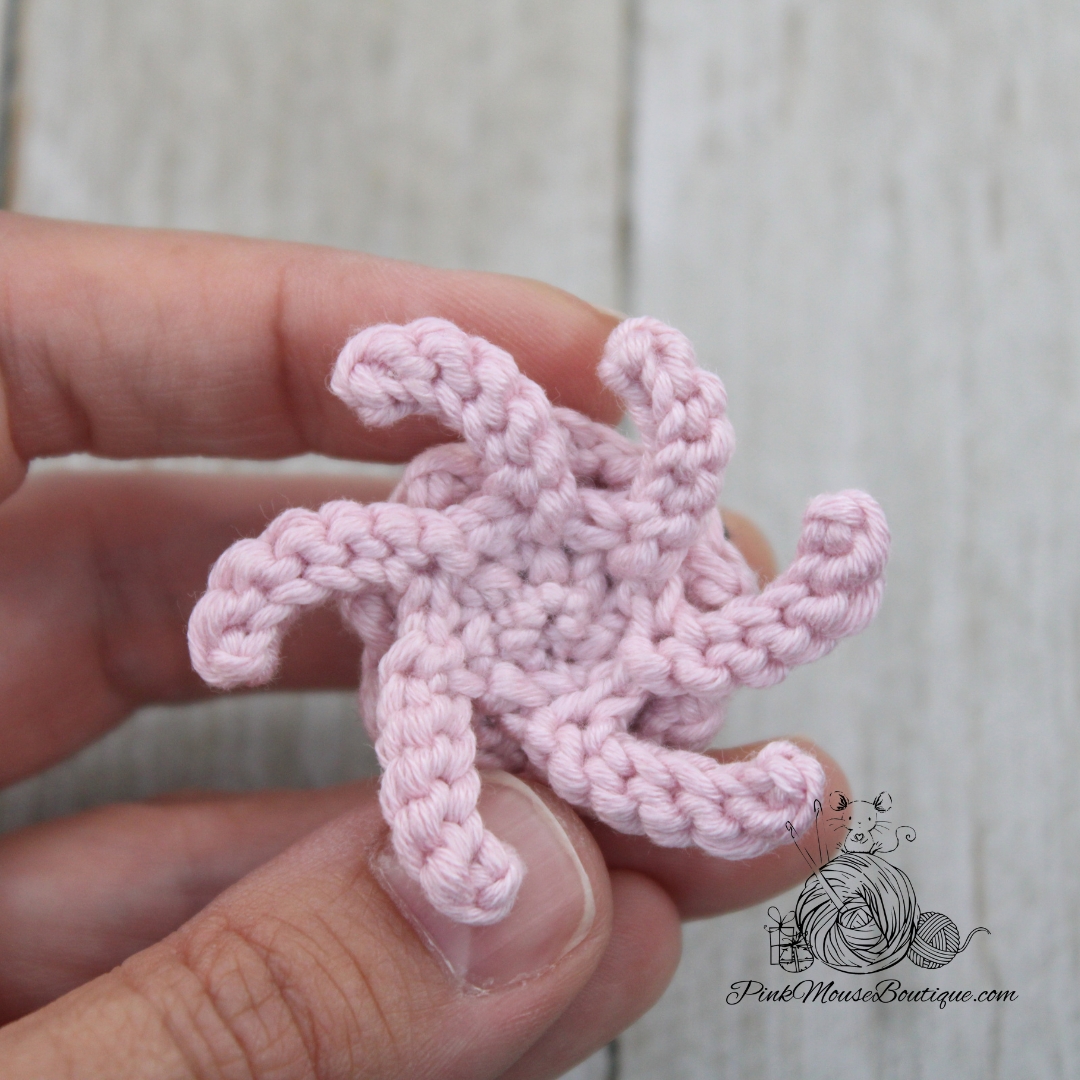
TENTACLES
Join yarn to any of the unworked loops of Round 7.
*ch 7, sl st in 2nd ch from hook, sl st until the end of ch
sl st in the next unworked loop of the body*
*…* repeat 5 more times
You will have 6 tentacles once done with this round.
Fasten off. Insert both tails through the same space. Tie a knot and stuff the excess thread inside.
The idea to create a Unicorn Zombie was given to me by one of my followers on Instagram last year. It took me a while, but finally I was able to make this cute little guy. And I am so happy with the final look! The bone is a challenge though. 🙂
This version of the pattern is FREE. You can also find a PREMIUM version that includes a drawing of the unicorn that you can use to create fun Halloween cards. The premium version is a PDF file that you can conveniently download and print.
We will end Round 16 there. Fasten off, finish off, and secure the stitches.
BODY
Turn the head upside down with the back of the head facing you.
You will notice that there are 2 sets of unworked stitches – 4 that are closest to you (this is where the back of the body will be once you make it) and 4 are further away from you (where the front of the body will be once you make it). Insert the hook in the 2nd to last st beginning with the back (closest to you) and with a sc join Clarity.
Round 1: sc again in same st where you joined thread and inc in next st
Insert hook through the same st as last inc and through the stitch at the front
Inc (but the second sc should be made only in the 1st st at the front; do not grab the last st from the back)
Inc in next 3 sts
Insert hook through the same st as last inc and through the stitch at the front
Inc (but the second sc should be made only in the 1st st at the back; do not grab the last st from the front)
Inc in last st
After you finish Round 1, you should have 16 sts.
Round 2: (3 sc, inc) x 4 – 20 sts
Rounds 3 – 4: sc around – 20 sts (2 rounds)
Round 5: (4 sc, inc) x 4 – 24 sts
Round 6: (5 sc, inc) x 4 – 28 sts
Rounds 7 – 8: sc around – 28 sts (2 rounds)
Round 9: (5 sc, dec) x 4 – 24 sts
Fasten off leaving a long tail for sewing.
Stuff the body well. Leave 8 stitches on each side of the body for legs. Mark the middle 8 stitches (4 at the front and 4 at the back) with thread. Make sure the spaces you are leaving for legs are aligned with the head.
LEGS (x 2)
Turn the body upside down (back side facing you) and with a sc join Clarity thread in one of the stitches you left for the 1st leg.
Round 1: sc in each st until you get to the thread marking the middle sts. Insert hook in same st as last sc and in the st at the other side of the body. 1 sc ; sc until the end of round – 8 sts
Round 2: sc around – 8 sts
Stuff well.
Round 3: 4 dec – 4 sts
Fasten off.
Repeat for the second leg.
Once finished, sew the middle 8 stitches to close.
Secure the stitches.
ARM
Crochet in spiral.
Round 1: 8 sc in a mr – 8 sts
Rounds 2 – 7: sc around – 8 sts (6 rounds)
Round 8: 4 dec – 4 sts
Fasten off leaving a tail for sewing.
BONE
Crochet tight.
Because I used thread, I didn’t need to stuff the bone. If you are using yarn, you may need to stuff a little.
Suggested color – DMC cotton perle 12 with a 1 mm hook (NOTE: I used yarn for the step-by-step pictures)
Ch 4
Round 1: 1 puff stitch in 2nd ch from hook (Please follow the steps below and refer to the pictures)
YO and insert hook through 2nd chain from hook, YO and pull (three loops on hook)
YO and pull through 2 loops (two loops left on hook)
YO and insert hook in same ch, YO and pull (four loops on hook)
YO and pull through 2 loops (3 loops left on hook)
YO and insert hook in same ch, YO and pull (five loops on hook)
YO and pull through all loops (puff stitch created)
1 sc in next chain
2 puff stitches in last ch
Now we will crochet on the other side of the chain
1 sc in next ch
1 puff stitch in last ch
At the end of Round 1, you should have 6 stitches.
Fasten off, finish off, and secure the stitches. Leave one of the tails for sewing later.
EAR 1
Round 1: with light blue 2 sc, hdc, 2 sc in a mr; sl st to join and ch 1 – 5 sts
Round 2: 1 sc in 1st st, inc in next, (hdc, dc, hdc) in third st, inc in next, 1 sc in last st; sl st to join – 9 sts
Fasten off leaving a tail for sewing.
EAR 2
Round 1: with light blue 2 sc, hdc, 2 sc in a mr; sl st to join and ch 1 – 5 sts
Round 2: 1 sc in 1st st, inc in next, (1 hdc, ch 2 and sl st in 3rd st), inc in next, 1 sc in last st; sl st to join – 8 sts
Fasten off leaving a tail for sewing.
EYE
Suggested color: DMC cotton perle 12, black with a 1 mm hook
Round 1: 6 sc in a mr; sl st to join and ch 1 – 6 sts
Round 2: (1 sc in 2 sts, 3 sc in next st) x 2; sl st to join – 10 sts
Fasten off leaving a tail for sewing.
Use DMC cotton perle 12, color white thread to sew a few times in a stitch in the eye to make a large sparkle. Then sew a couple of times in another st to make a second sparkle (a bit smaller than the first one).
HORN
Suggested color – DMC metallic thread (2 or 3 strands)
Round 1: 8 sc in a mr; sl st to join and ch 1 – 8 sts
Round 2: in BLO sc around; sl st to join and ch 1 – 8 sts
Round 3: in BLO (2 sc, dec) x 2; sl st to join and ch 1 – 6 sts
Round 4: in BLO sc around; sl st to join and ch 1 – 6 sts
Round 5: in BLO (sc, dec) x 2; sl st to join – 4 sts
Fasten off leaving a tail for sewing.
TAIL (x 6)
Suggested colors – Curio size 10, Hollyberry and Eggplant
Ch 6
Row 1: in back bump only 1 sc in 2nd ch from hook, 1 sc until the end – 5 sts
Fasten off leaving a tail for sewing.
MANE (5 or 6)
Suggested colors – Curio size 10, Hollyberry and Eggplant
Ch 15
Row 1: in back bump only 1 sc in 2nd ch from hook, 1 sc until the end – 14 sts
Fasten off leaving a tail for sewing.
ASSEMBLY
Sew the eye to the head, right above the muzzle. I sewed the eye on the left part of the face.
Using Curio size 10, black thread and a needle, sew a line going up 4 rounds at an angle on the right side of the head. The bottom of the line should be 7 stitches from the eye and the top – about 4 or 5 stitches from the top of the eye. Once the line is sewn (I sewed twice to make it thicker), sew 3 smaller lines crossing the longer one. Secure the thread.
Sew the horn 4 rounds above the eyes.
Sew the ears about 2 stitches behind the horn, about 3 stitches apart.
Sew the arm one round below the head and the bone – two rounds below the head making sure both align with the legs.
Sew the pieces you made for the tail at the back of the body, one or two rounds above the legs.
Sew the pieces you made for the mane at the back of the head, between the ears.
With black thread, sew a line going down the arm about four rounds. Then sew two smaller lines crossing the longer one.
With the Conch color (also light or salmon pink), cross stitch in 5 stitches below the right ear (about 2 rounds above the eye).
Using a small brush or cotton swab, apply your choice of color of the hard pastel around the scarred eye and arm patch. I also applied some on the broken ear, the bottom of the legs, and a little around the left eye (the round one).
Ce modèle a été traduit en Français par Sylvie Conil.
Alors, l’autre jour j’ai fait un mignon petit elfe (qui fais seulement 2cm de haut) puis après, j’ai pensé que je devais à présent lui faire une petite maison rien qu’à lui. J’avais imaginé faire, depuis longtemps, une petite maison champignon pour une poupée et là c’était l’occasion idéale. Une minuscule petite maison parfaite pour mon micro elfe (base sur mon modèle intitulé “ONE INCH DOLL PATTERN’’). Mais bien sûr vous pouvez aussi vous en servir de coffre à bijoux, y mettre une bague, des petits boutons, ou encore une paire de boucle d’oreilles, des perles, etc… Ou juste vous en servir comme décoration sur votre bureau. Trop fun!
En tous cas, si vous décidez de faire le micro elfe base sur mon modèle “one inch doll pattern’’, utilisez le fil Lizbeth 80, avec un crochet 0.75 mm de la marque Clover Amour. Vous trouverez en note après les explications de la maison champignon, toutes les infos pour réaliser ce mignon petit elfe.
Matériel :
Fil Lizbeth 20 : rouge et blanc
Crochet taille 10 dans la marque « Boye », c’est-à-dire, un crochet en 1,3 mm
Aiguille à coudre
Ciseaux
Abréviations:
CM – cercle magique
ms – maille serrée
mc – maille coulée
aug – augmenter
dim – diminuer
Explications :
Bas
Commencez avec la Lizbeth 20, en blanc. Joignez chaque rang par 1mc puis 1ml. Crochetez serré.
Rang 1 : dans 1 CM, 1 ml, 8 ms dans le cercle – 8 m
Rang 2 : 8 aug – 16 m
Rang 3 : (1 ms, aug) x 8 – 24 m
Rang 4 : (2 ms, aug) x 8 – 32 m
Rang 5 : (3 ms, aug) x 8 – 40 m
Rangs 6 – 11 : 40 ms
Après le Rang 11 joignez par 1mc (qui comptera comme la 1ère m du rang suivant) mais ne faîtes pas de ml.
Rang 12 : 39 mc
Arrêtez le travail et rentrez le fil.
Dessus
Commencez avec la Lizbeth 20, en rouge. Joignez chaque rang par 1mc, puis 1ml. Crochetez serré.
Rang 1 : dans 1 CM, 1 ml, 8 ms – 8 m
Rang 2 : 8 aug – 16 m
Rang 3 : (1 ms, aug) x 8 – 24 m
Rangs 4 – 5 : 24 ms
Rang 6 : (2 ms, aug) x 8 – 32 m
Rang 7 : 32 ms
Rang 8 : (3 ms, aug) x 8 – 40 m
Rang 9 : (4 ms, aug) x 8 – 48 m
Rang 10 : (5 ms, aug) x 8 – 56 m
Rangs 11 – 14 : 56 ms
Rang 15 : (5 ms, dim) x 8 – 48 m
Après le Rang 15, joignez avec 1 mc (qui comptera comme la 1ère m du rang suivant) mais pas de ml.
Rang 16 : 47 ms
Arrêtez le travail et rentrez le fil.
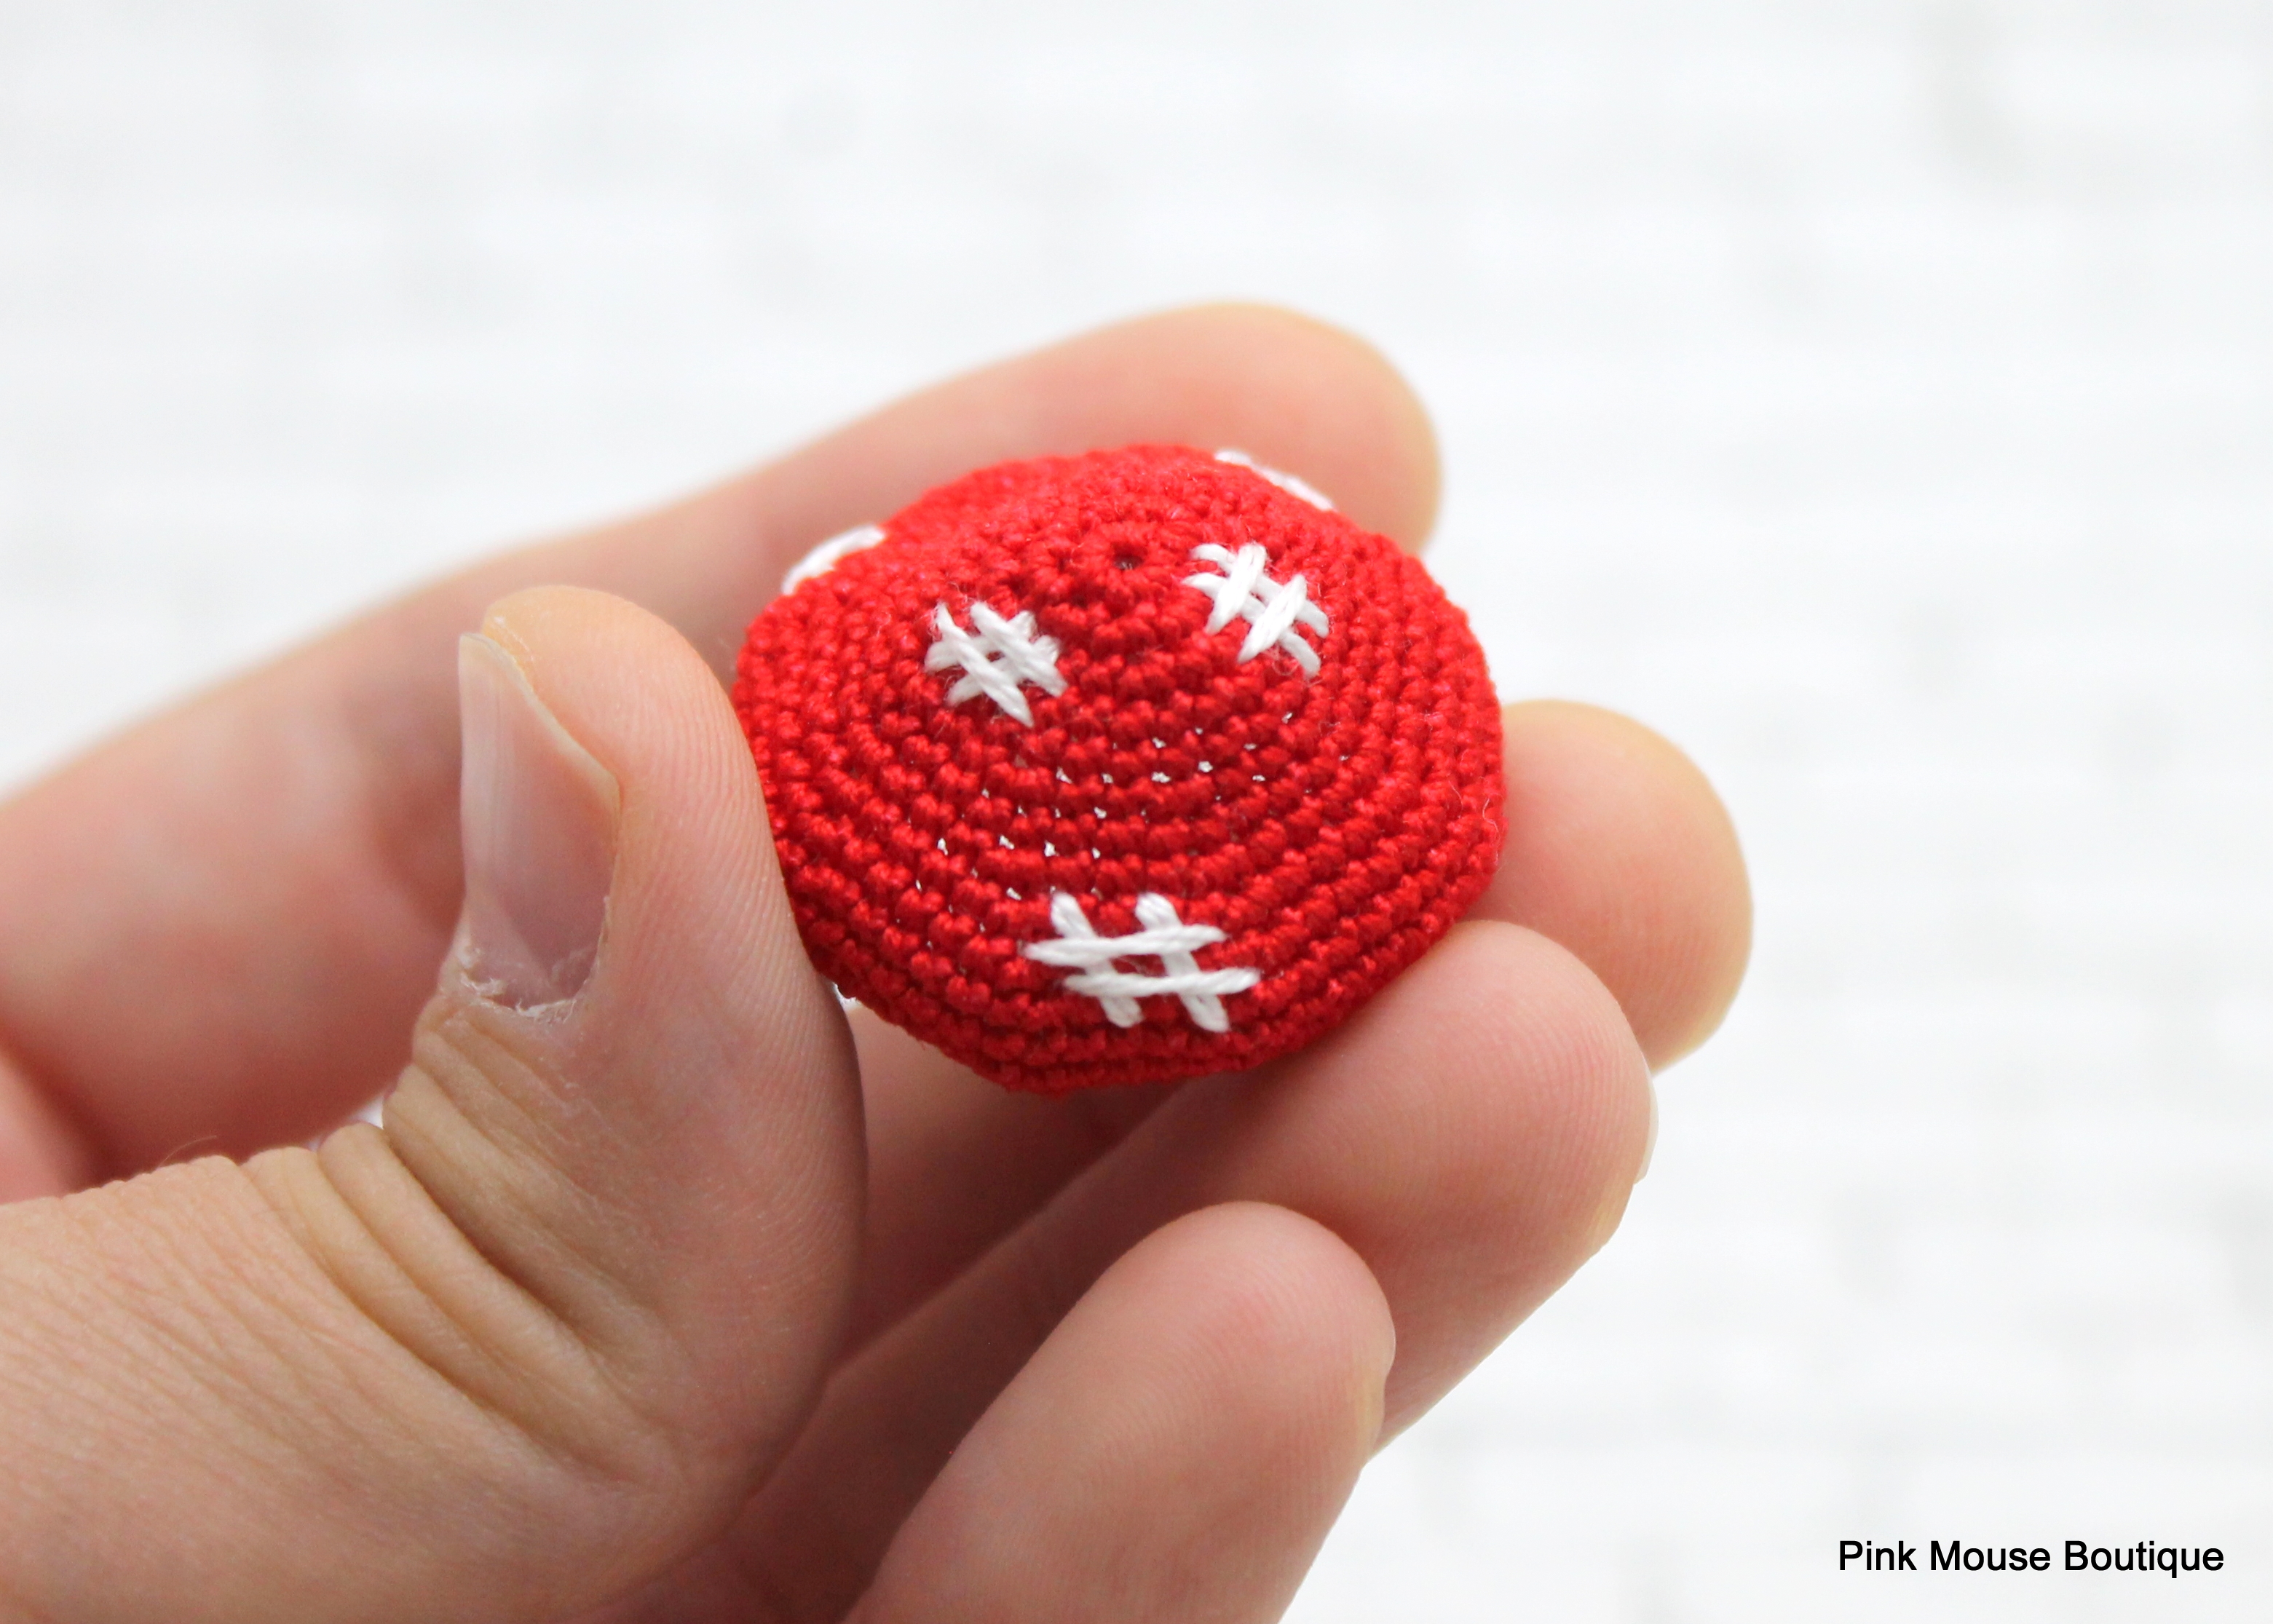
Optionnel : brodez des petits “hashtags” sur le dessus du champignon avec du fil blanc DMC coton perle 12. Après chaque hashtag, coupez le fil et faîtes un nœud. Coupez l’excédent de fil et ajoutez un point de colle pour le fixer de façon plus propre. Vous pouvez aussi rentrer les fils pour les cacher (mais c’est trop de travail pour moi ici ;)).
Et Voila! Vous avez terminé la petite maison champignon.
MICRO ELFE (quelques astuces utiles) :
J’utilise une loupe pour voir les points de façon plus nette. Ils sont vraiment minuscules ! De Plus, utiliser la loupe vous permettra de faire des points plus serrés et consistants.
Utilisez un petit bâton (style cure-dent, baguette) pour rembourrer la poupée avec la fibre polyester. C’est plus facile ainsi pour les mini poupées.
S’il vous est difficile d’utiliser le fil Lizbeth 80, essayer le Lizbeth 40 (DMC coton perle 12) avec un crochet en 0.9 mm ou encore le Lizbeth 20 avec un crochet 1.25 mm. Mais alors, utilisez plutôt pour faire la maison, le fil Aunt Lydia’s 10 avec un crochet 1.5 mm ou le Lizbeth 10 (avec le même crochet).
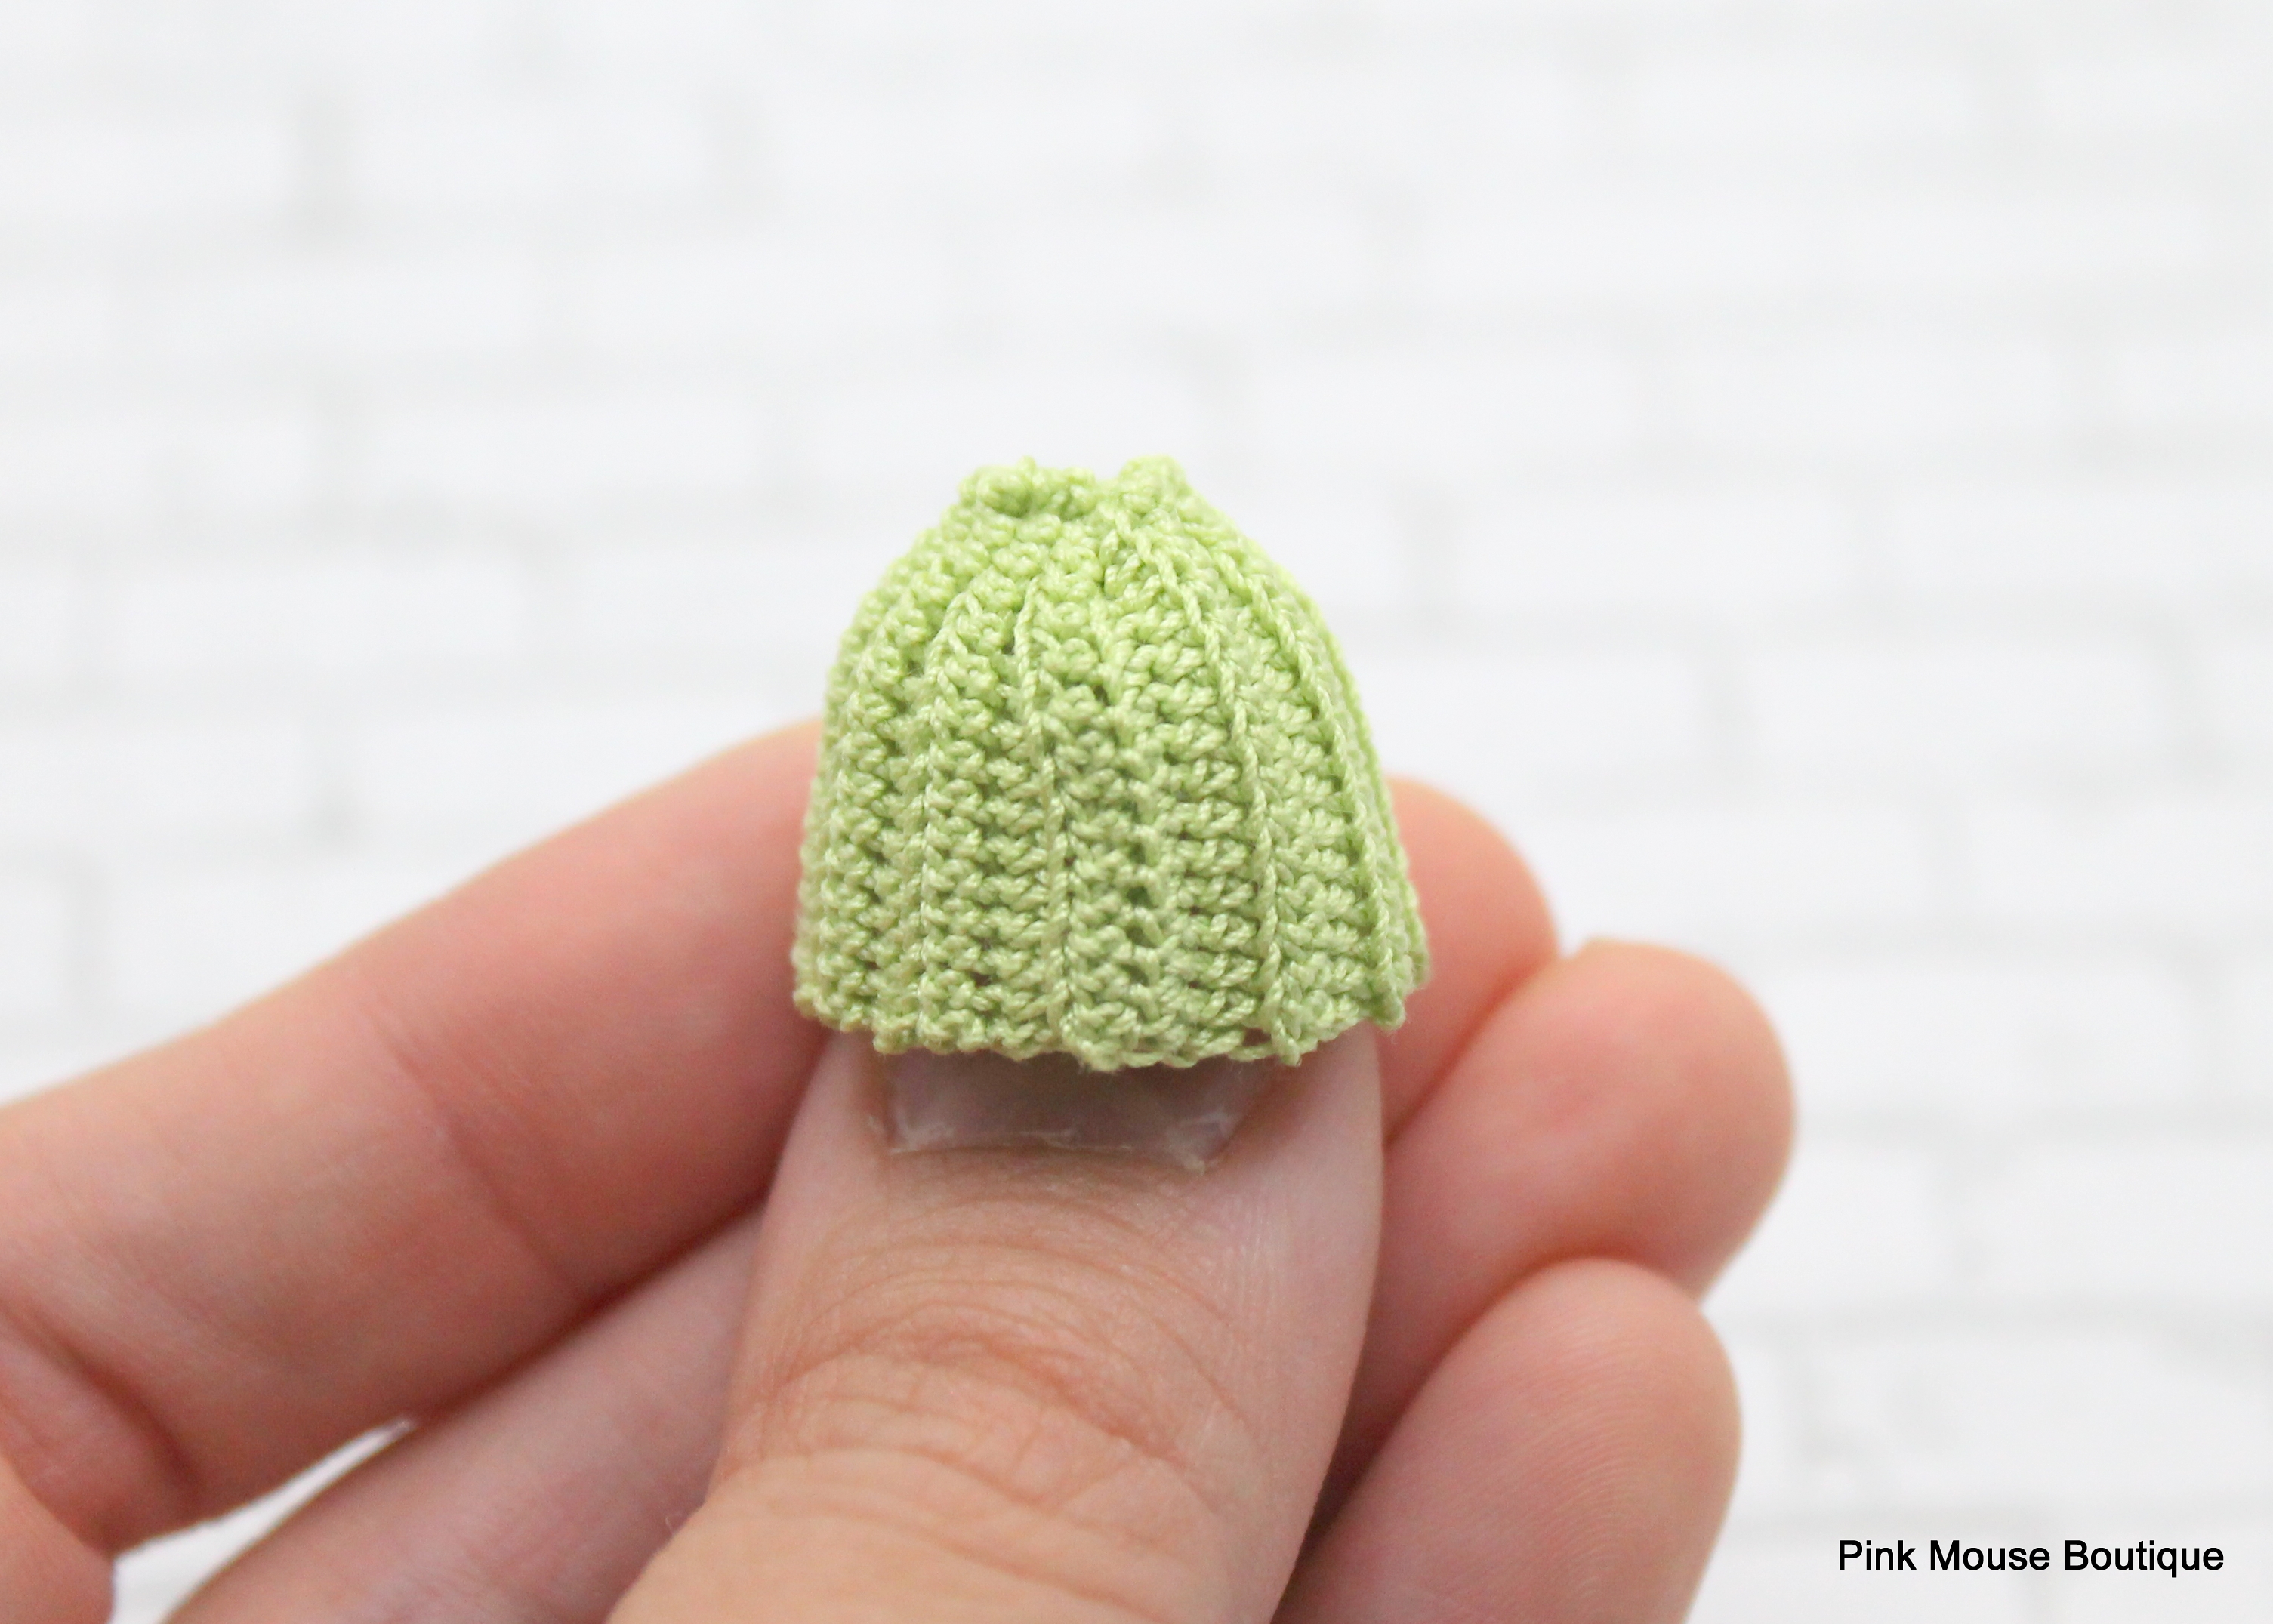
Chapeau de l’Elfe :
Utilisez le même type de fil et de crochet que pour la poupée (modèle ICI). Joignez chaque rang avec 1 mc et 2 ml.
Rang 1 : dans 1 CM, 2ml, 6 demi-br dans le cercle – 6 m
Rang 2 : (2 demi-br, aug) x 2 – 8 m
Rang 3 : (3 demi-br, aug) x 2 – 10 m
Rang 4 : (4 demi-br, aug) x 2 – 12 m
Rang 5 : (5 demi-br, aug) x 2 – 14 m
Rang 6 : (6 demi-br, aug) x 2 – 16 m
Rang 7 : (7 demi-br, aug) x 2 – 18 m
Rang 8 : (5 demi-br, aug) x 3 – 21 m
Rang 9 : (6 demi-br, aug) x 3 – 24 m
Rangs 10 – 11 : 24 demi-br
Ajoutez un Rang supplémentaire de 24 demi-br si le chapeau vous semble trop petit. Enfilez le chapeau à votre lutin, ajustez le pour qu’il soit à la place désirée. Puis faîtes un rang de mc en le laissant sur la tête de la poupée (les mc sont seulement sur le tour du chapeau, pas sur la tête de la poupée). Le rand de mc resserrera assez le chapeau pour le maintenir en place afin qu’il ne tombe pas de la tête de votre lutin. Une fois le rang terminé, arrêter le travail et cousez le chapeau sur la tête de la poupée en quelques points (pour éviter qu’il ne tombe sur les yeux). Rentrez les fils.
A présent votre petit elfe est prêt pour rentrer dans sa petite maison!
So, the other day I made this cute little elf (only about 7/8 of an inch) and then I thought that I should make a house for it. I have been wanting to make a mushroom house for a doll for a long time now and this seemed like the perfect opportunity. The teeny little house is perfect for the micro elf (based on my ONE INCH DOLL PATTERN). But you can also put a ring, some small buttons, maybe small earrings, beads, etc. Or just use it as a cute decor on your desk. How fun!
By the way, if you decide to make the micro elf based on my one inch doll pattern, use Lizbeth 80 thread with 0.75 mm Clover Amour hook. See notes after the toadstool house pattern for more info on how to make the cute elf.
Materials:
Lizbeth 20: red and white
Crochet hook, size 10 (Boye)
Sewing needle
Scissors
Abbreviations:
mr – magic ring
sc – single crochet
sl st – slip stitch
inc – increase
dec – decrease
Pattern:
Bottom
Start with Lizbeth 20, white thread. Join each round with a sl st and ch 1. Crochet tight.
Round 1: mr, ch 1, 8 sc in the ring – 8 sts
Round 2: 8 inc – 16 sts
Round 3: (sc, inc) x 8 – 24 sts
Round 4: (2 sc, inc) x 8 – 32 sts
Round 5: (3 sc, inc) x 8 – 40 sts
Rounds 6 – 11: 40 sc
After Round 11 join with a sl st (counts as 1st st of next round) but do not chain 1.
Round 12: 39 sl st
Fasten off and weave in the ends.
Top
Start with Lizbeth 20, red. Join each round with a sl st and ch 1. Crochet tight.
Round 1: mr, ch 1, 8 sc – 8 sts
Round 2: 8 inc – 16 sts
Round 3: (sc, inc) x 8 – 24 sts
Rounds 4 – 5: 24 sc
Round 6: (2 sc, inc) x 8 – 32 sts
Round 7: 32 sc
Round 8: (3 sc, inc) x 8 – 40 sts
Round 9: (4 sc, inc) x 8 – 48 sts
Round 10: (5 sc, inc) x 8 – 56 sts
Rounds 11 – 14: 56 sc
Round 15: (5 sc, dec) x 8 – 48 sts
After Round 15, join with a sl st (counts as 1st st of next round) but do not chain 1.
Round 16: 47 sc
Fasten off and weave in the ends.
Optional: Sew hashtags to the top part of the mushroom with DMC cotton perle 12 thread. After each hashtag, cut the thread and make a knot. Cut excess thread and glue down the ends for a more cleaner look. You may also weave in the ends (but that seems like too much work to me 😉 ).
And voila! You made a cute little mushroom container.
MICRO ELF (some helpful tips):
I used a magnifying glass to help me see the stitches better. They are tiny! Plus, looking through the magnifying glass will help you have tighter and more consistent stitches.
Use polyester batting to stuff the doll. It is much easier to stuff that micro doll with the batting.
If you are having a hard time using Lizbeth 80 thread, try Lizbeth 40 (DMC cotton perle 12) with 0.9 mm hook or maybe even Lizbeth 20 with 1.25 mm hook. Then just make the house with Aunt Lydia’s 10 and 1.5 mm hook or Lizbeth 10 (same hook).
Elf Hat:
Use the same type and hook you did to make the doll (pattern HERE). Join each round with a sl st and ch 2.
Round 1: mr, ch 2, 6 hdc in the ring – 6 sts
Round 2: (2 hdc, inc) x 2 – 8 sts
Round 3: (3 hdc, inc) x 2 – 10 sts
Round 4: (4 hdc, inc) x 2 – 12 sts
Round 5: (5 hdc, inc) x 2 – 14 sts
Round 6: (6 hdc, inc) x 2 – 16 sts
Round 7: (7 hdc, inc) x 2 – 18 sts
Round 8: (5 hdc, inc) x 3 – 21 sts
Round 9: (6 hdc, inc) x 3 – 24 sts
Rounds 10 – 11: 24 hdc
Add one more round of 24 hdc if the hat seems too small. Put the hat on the doll and adjust it to where you would like it to stay. Slip stitch around while the hat is on the doll (sl st only the hat, not the head of the doll). The slip stitch round will make the hat tight enough so it will not fall off the head of the doll. Once you finish that round, fasten off and sew the hat to the head in a few places (to make sure it does not fall over the eyes of the doll). Weave in the ends.
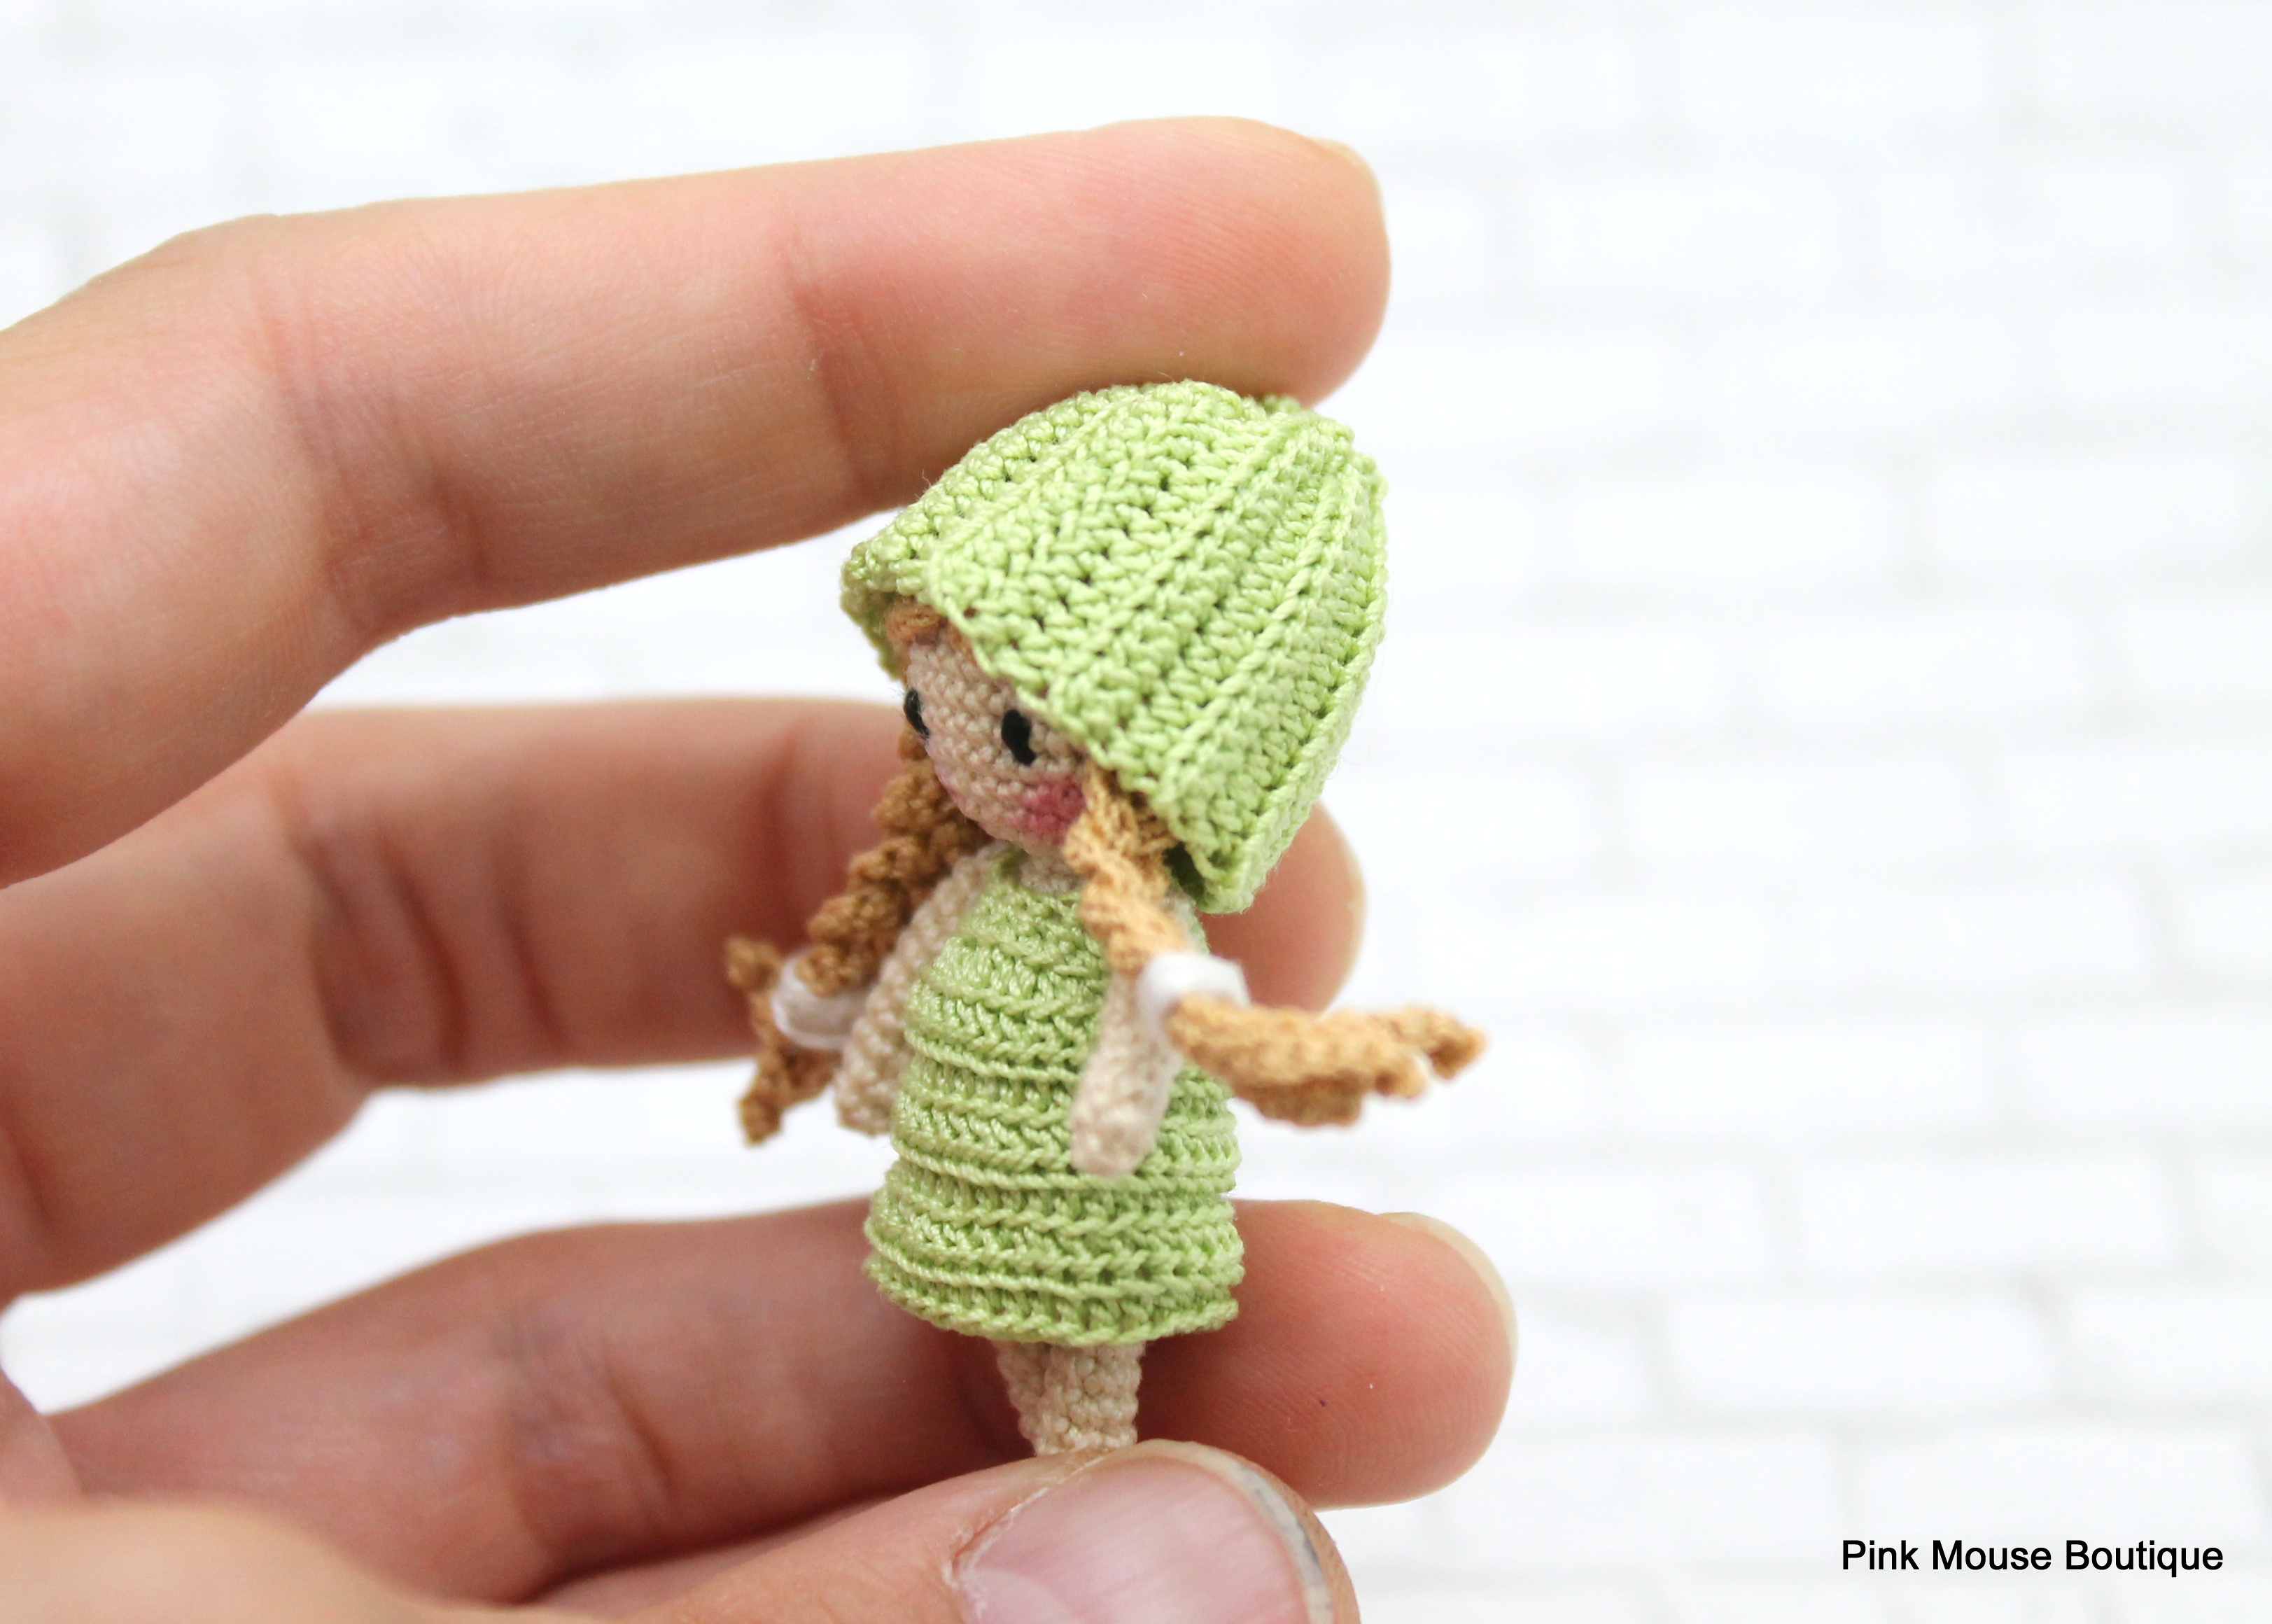
I knew I wanted to make some sort of a necklace house and a doll that would go inside. It took a while to start working on that project and when I did eventually start working on it, it took a few weeks to figure out the house design. I almost gave up. I am glad I didn’t because this new pattern is one of my favorites.
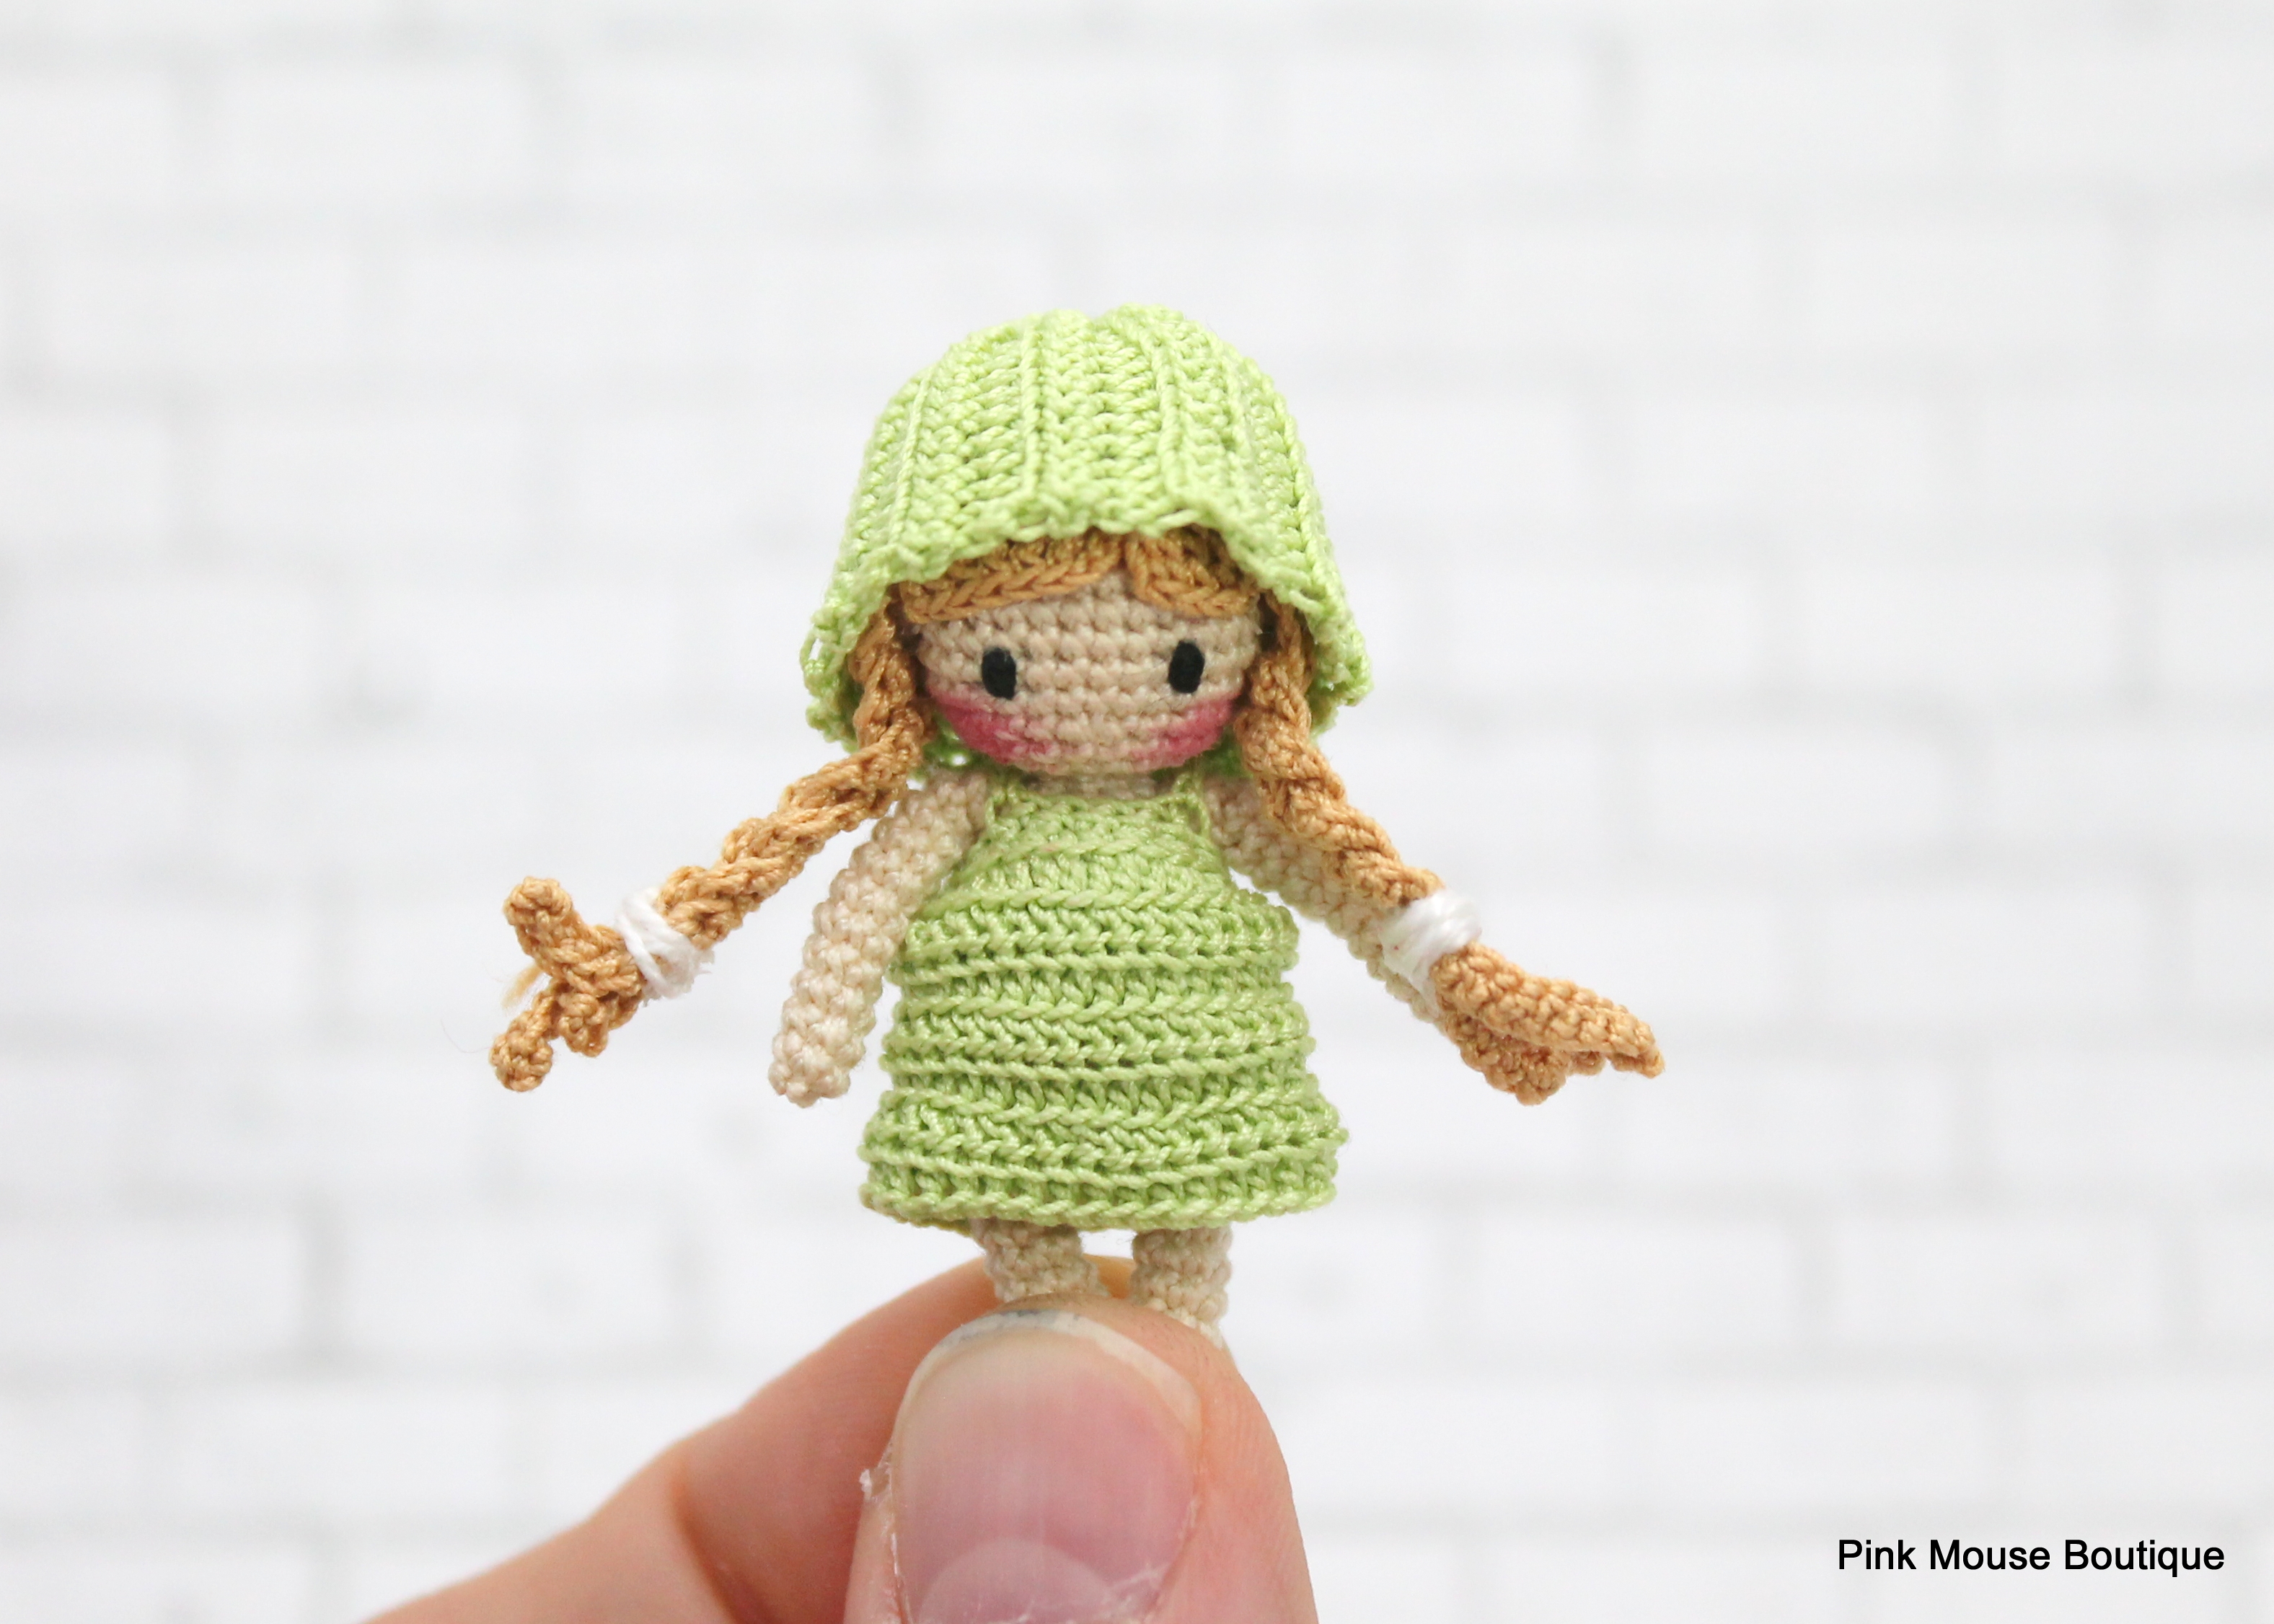
And to celebrate the release of the Tiny People in a Tiny House pattern (and the fact that it was published in the HHM printed issue), I created an extra outfit. I wanted it to be simple but to have more texture. So, I played around with the hdc stitch. Fun!
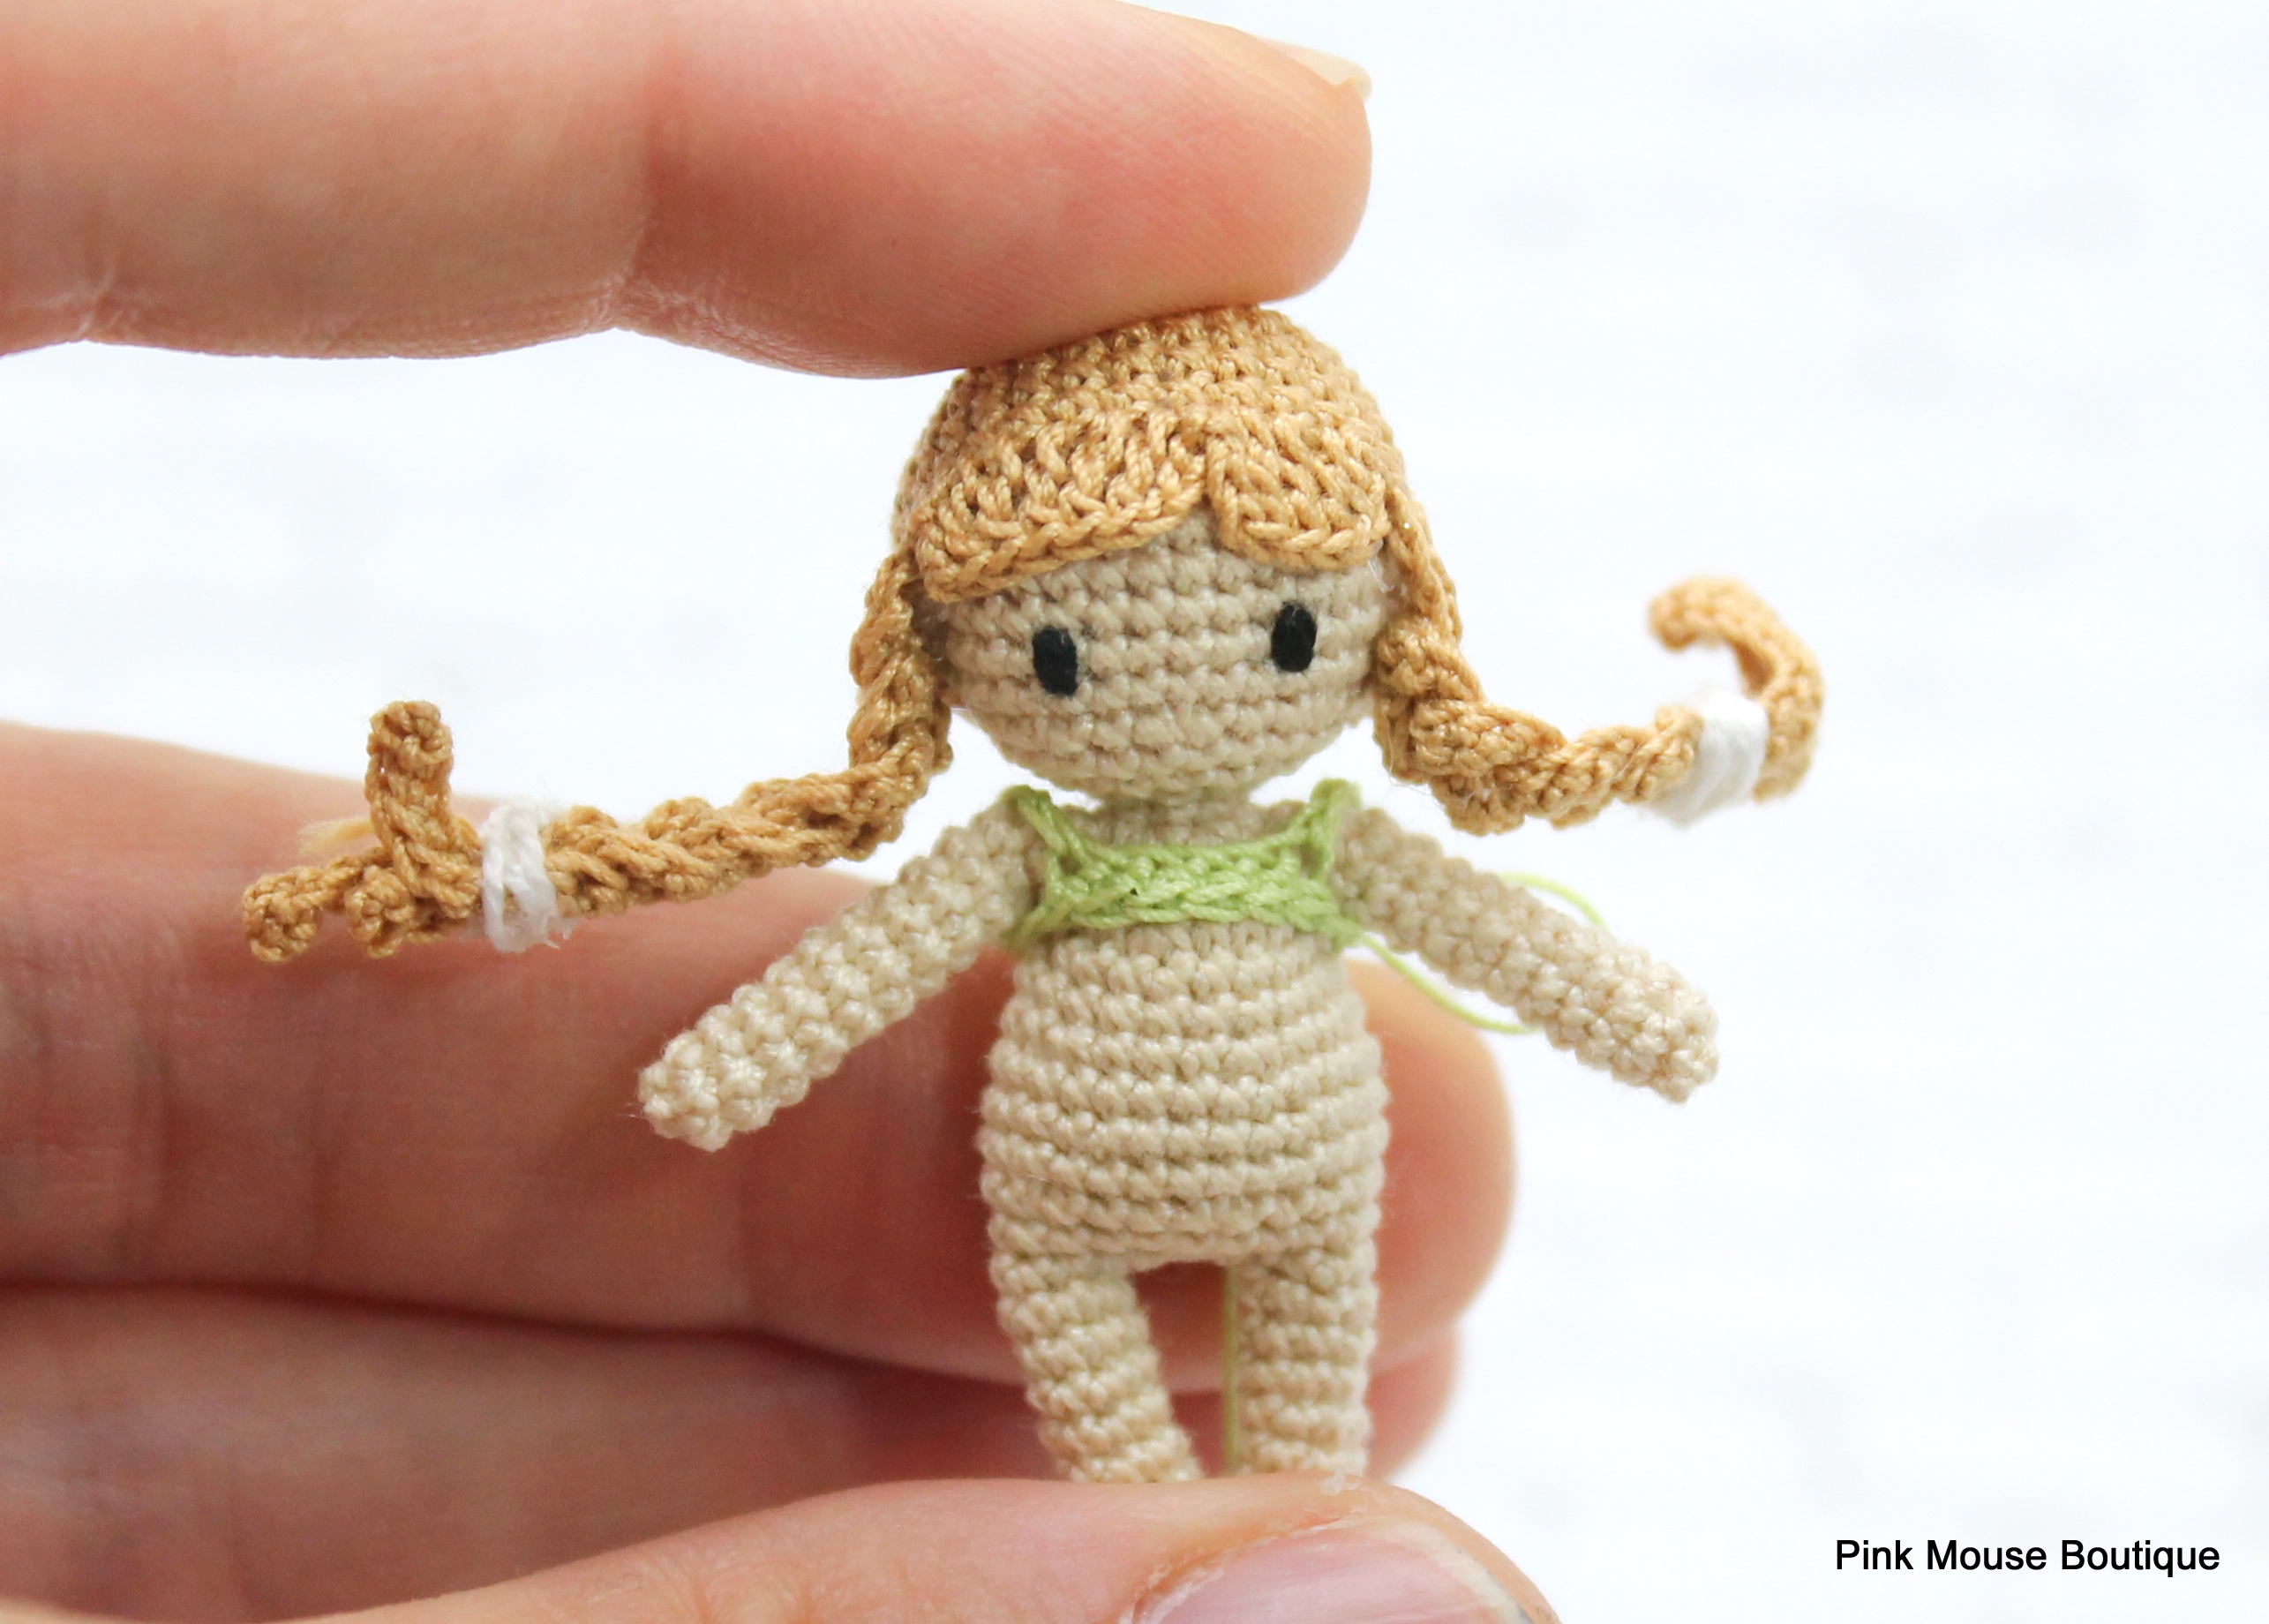
This outfit is specifically design for my newest dolls (see picture below).
Note: I have designed this dress to be permanently sewn to the doll. If you would like it to be removable, crochet in rows until you finished Round 2 (where you will have 32 sts). After that Round (but you will be working it in rows), you can start joining rounds. This should leave you enough opening in the back to be able to put on and take off the outfit. But always measure on your doll to make sure the outfit fits just right.
Pattern:
HAT
Chain 17
Row 1: 1 hdc in 3rd ch from hook; 14 hdc; ch 2 and turn – 15 sts
Rows 2 – 21: 15 hdc in BLO; ch 2 and turn – 15 sts
Row 22: 15 hdc in BLO; ch 1 and turn
Put the 1st and last row together and sc them together.
Leave a long tail for sewing and FO.
Insert needle through each row at the edge of the hat.


")