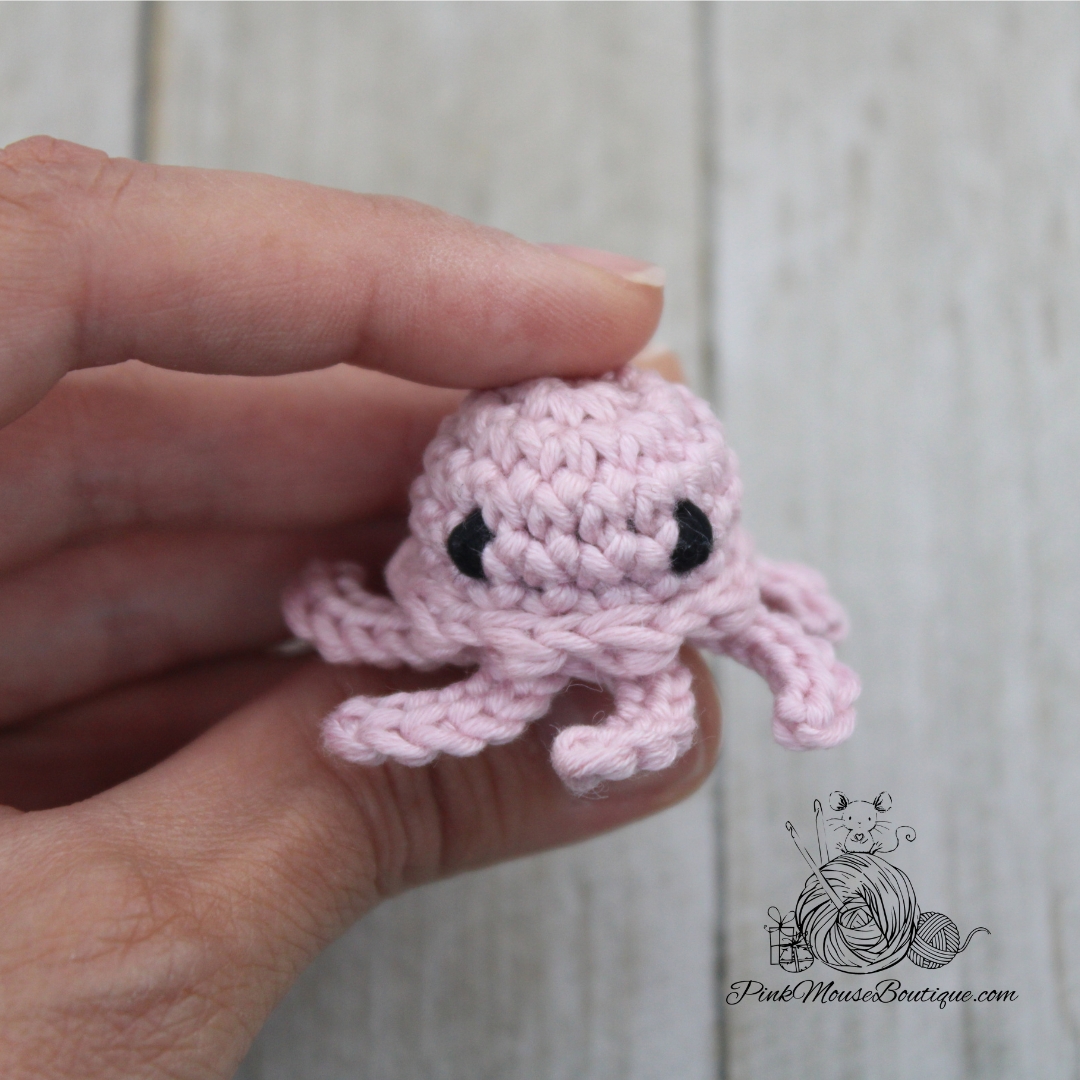
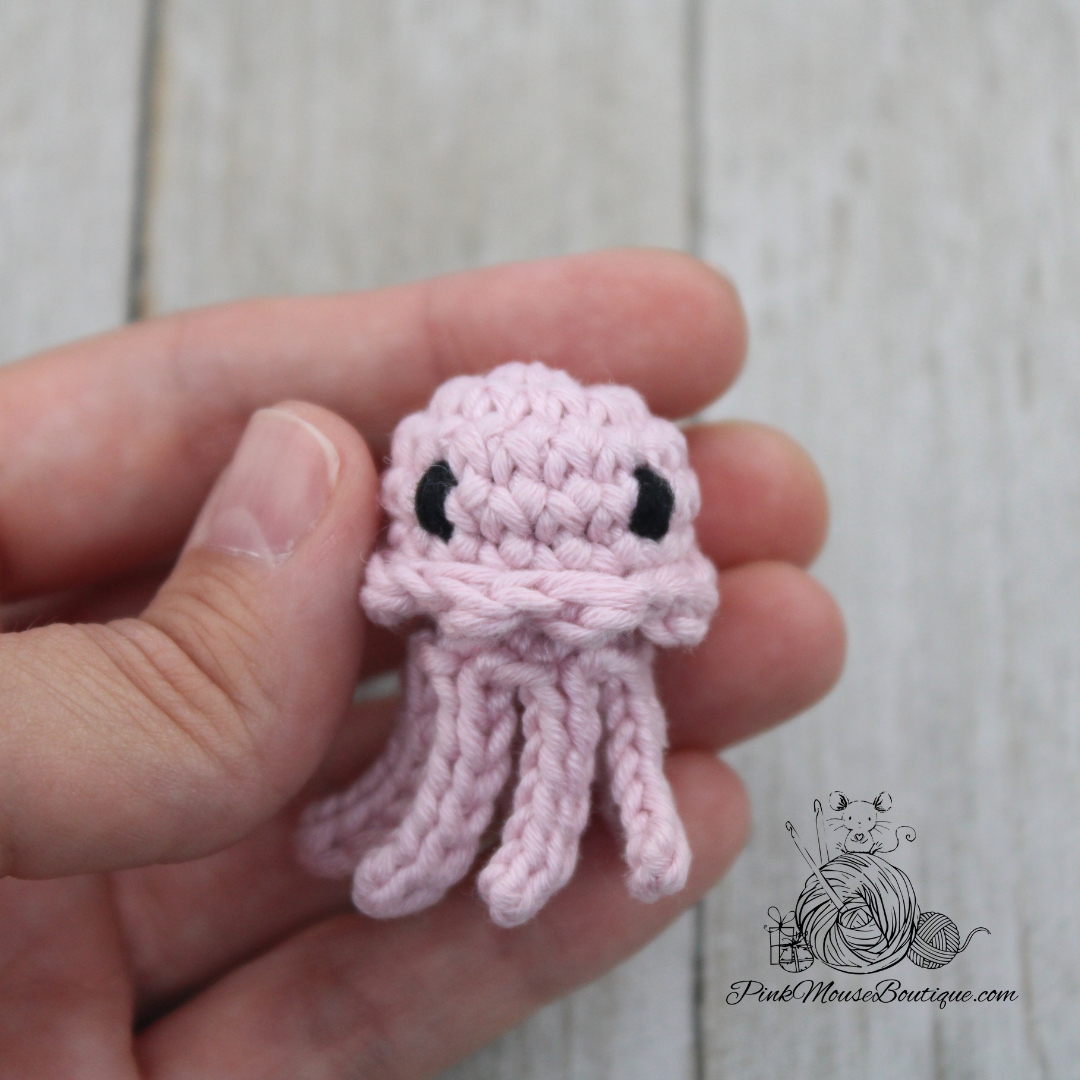
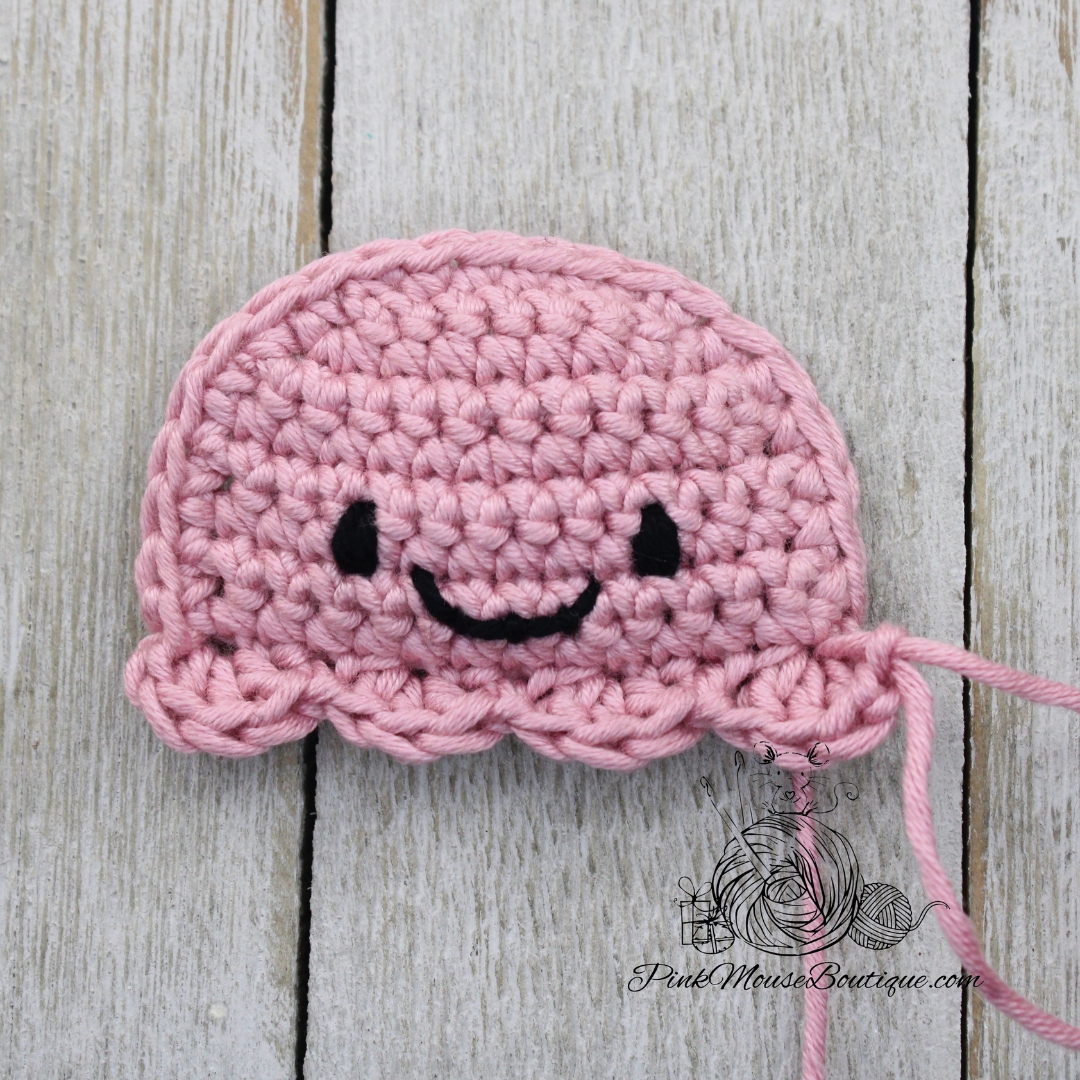
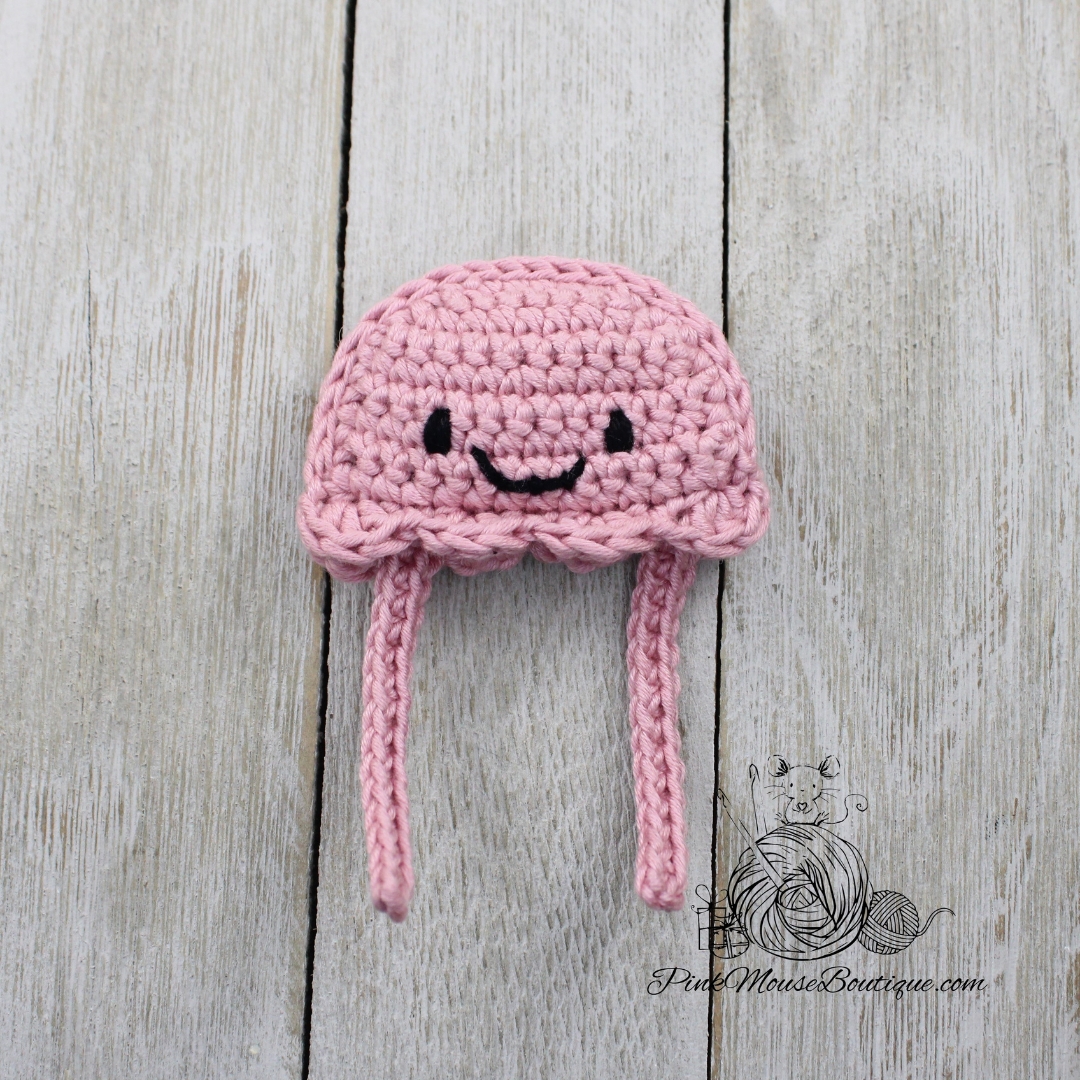
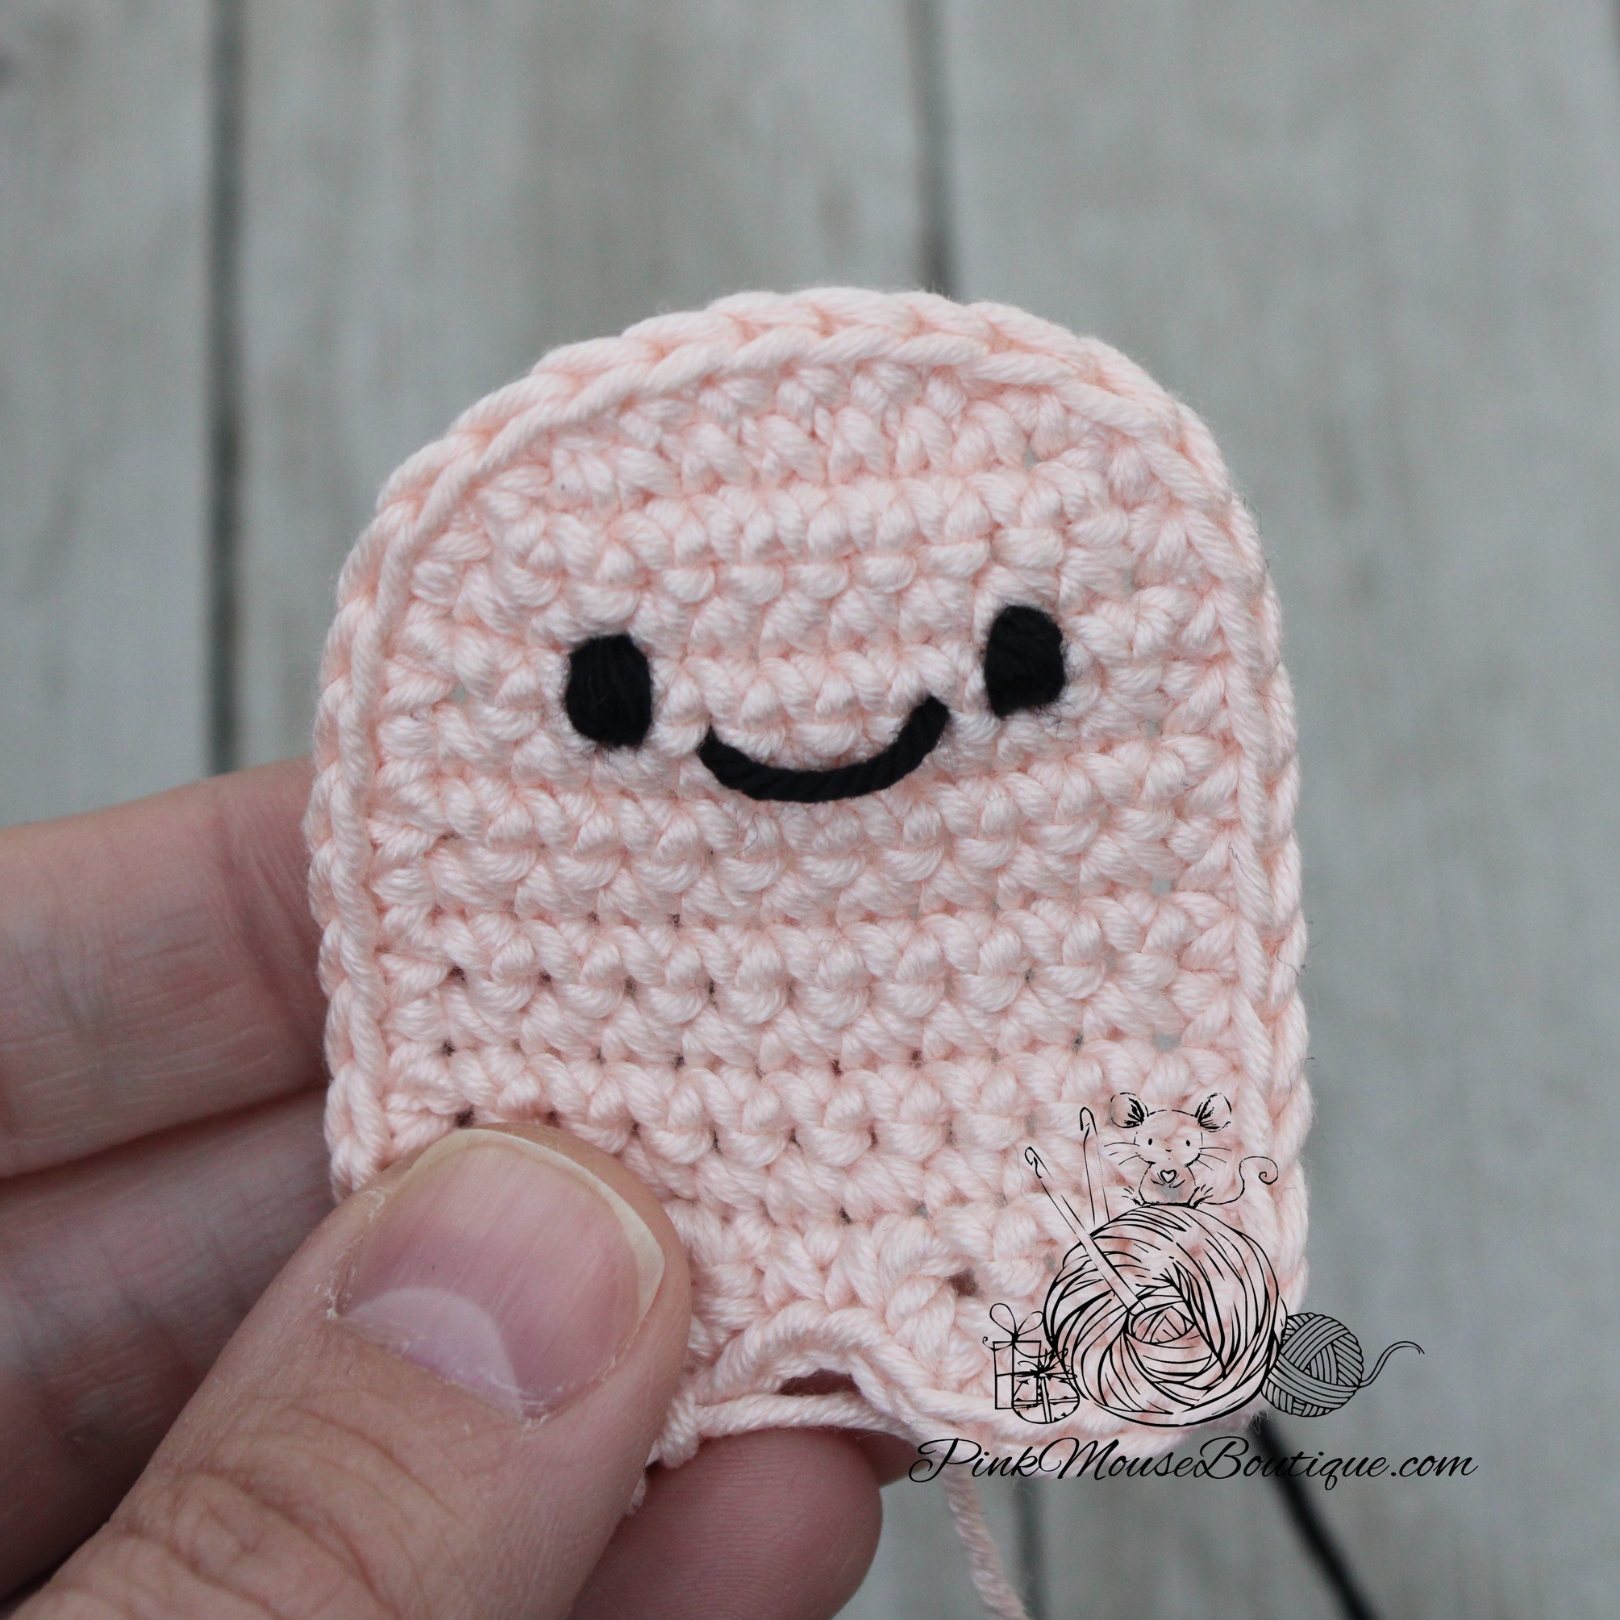
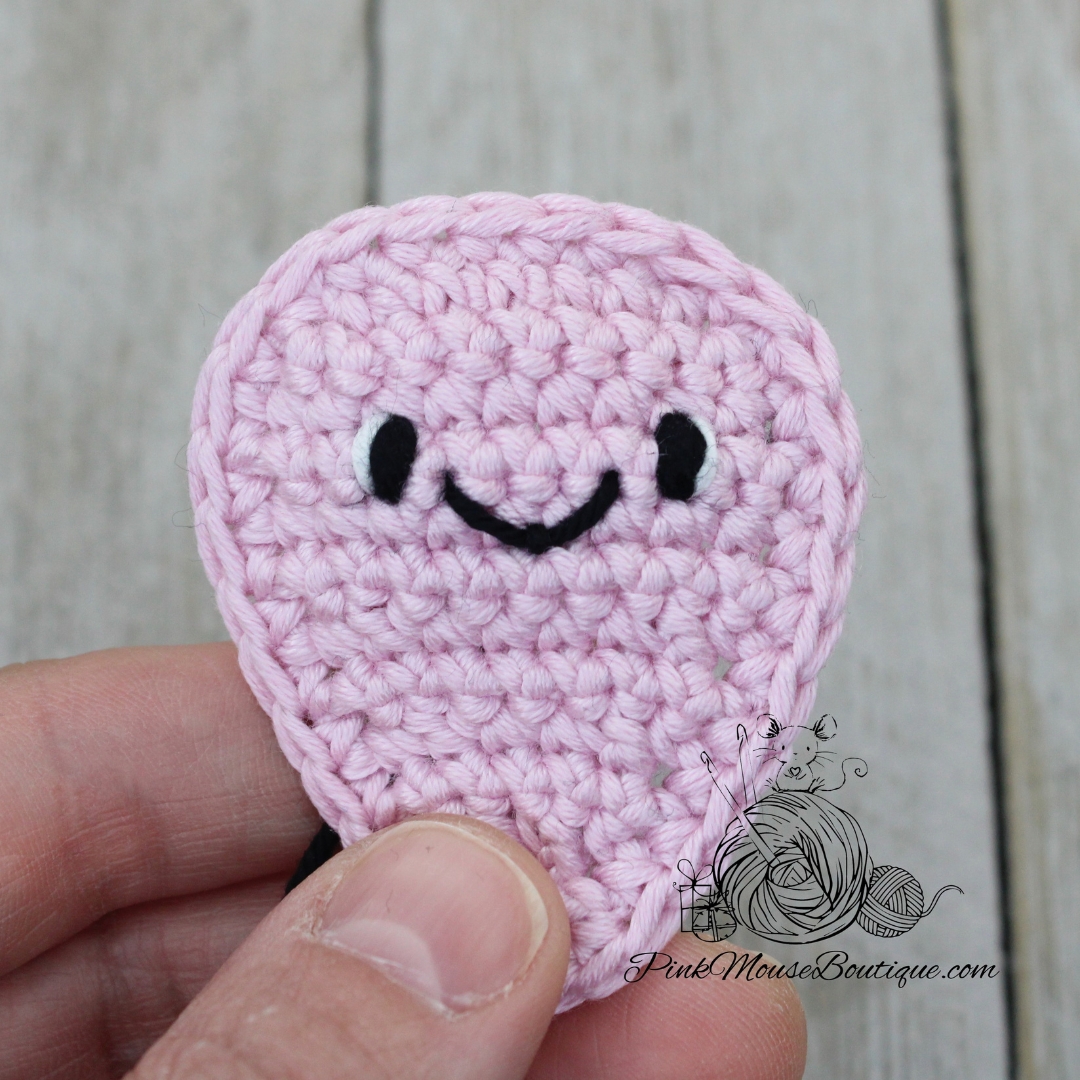
This jellyfish is super tiny and so quick to make! You only need a little bit of thread and about 20 to 30 minutes (depending on how quick you crochet). There are a couple of interesting techniques in the pattern like invisible decrease in the BLO and the invisible join. But this pattern, especially because there is a video tutorial as well, is beginner friendly. I hope you enjoy it!
If you prefer watching the video or at any point, you need a little help, click the link: JELLYFISH VIDEO TUTORIAL
MATERIALS:
Aunt Lydia’s size 10 (two colors – one for the body and one for the eyes)
Crochet hook, 1.5 mm
Stuffing
Sewing needle and scissors
NOTE: For the step-by-step photos, I used Drops Muskat yarn with a 3.25 mm hook.
ABBREVIATIONS:
MR – magic ring
Ch – chain
St(s) – stitch(es)
Sl st – slip stitch
Sc – single crochet
Dc – double crochet
BLO – back loop only
FLO – front loop only
Inc – increase
Dec – decrease
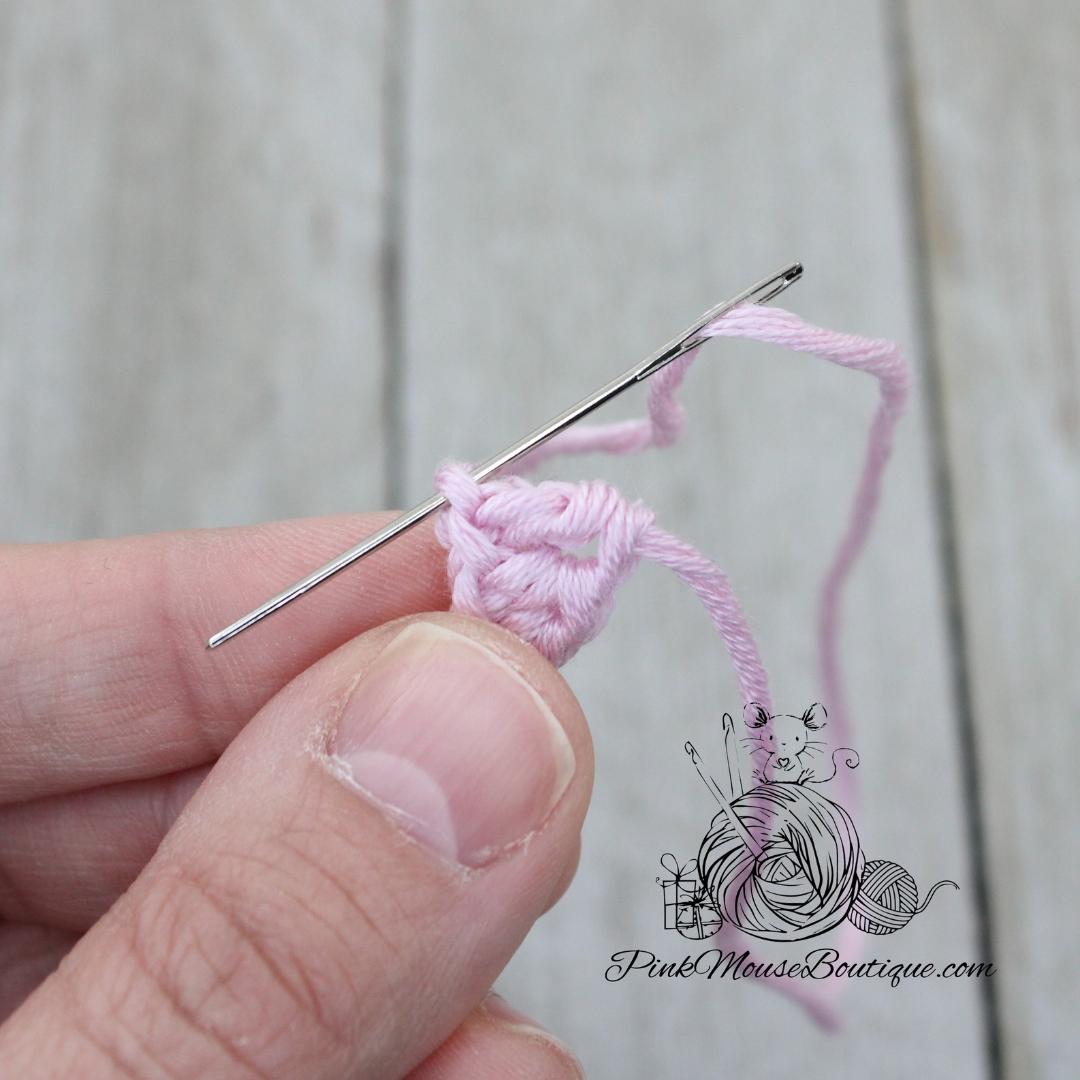
NOTE: Do not secure the tails until the very end. We’ll secure them once Round 8 is finished.
PATTERN
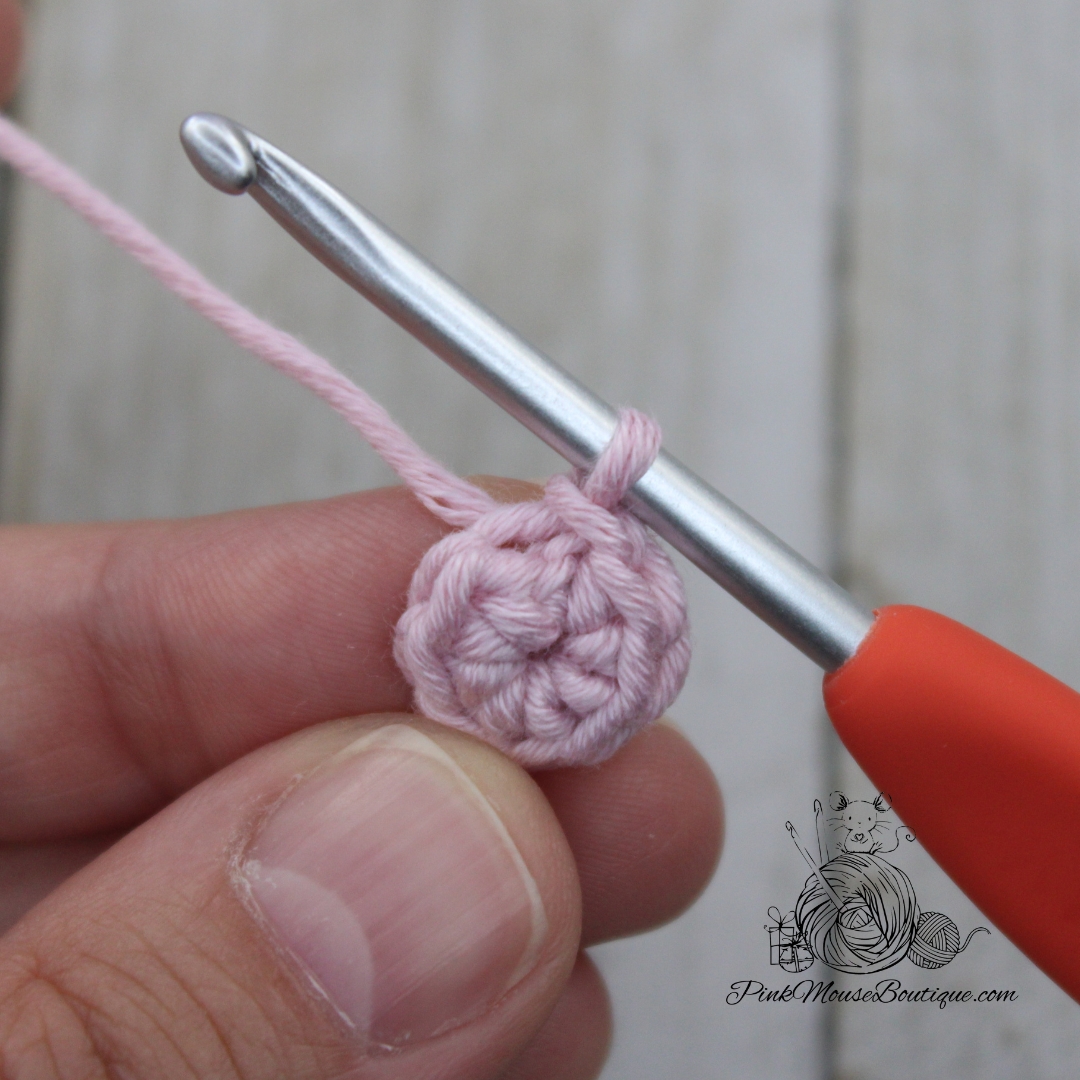
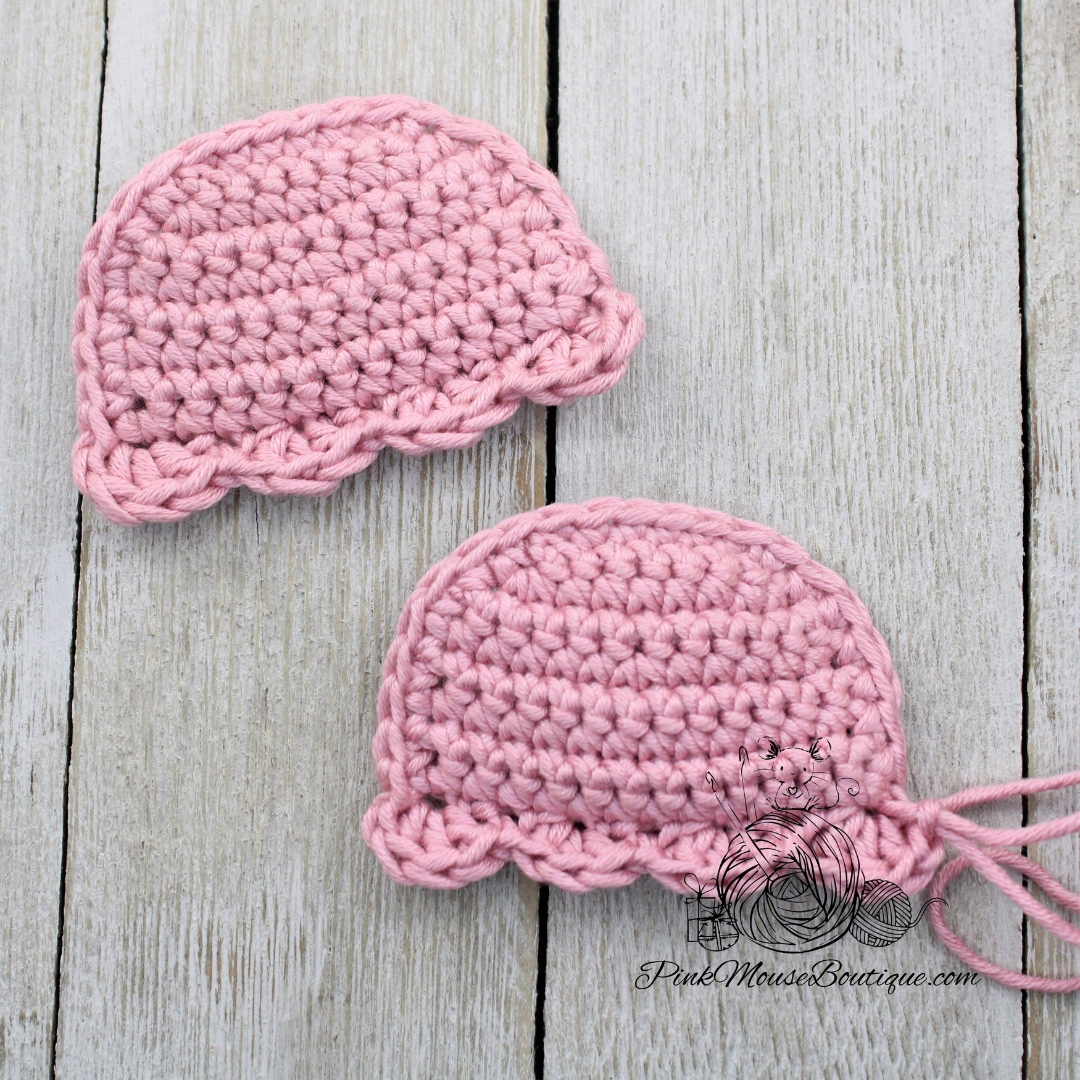
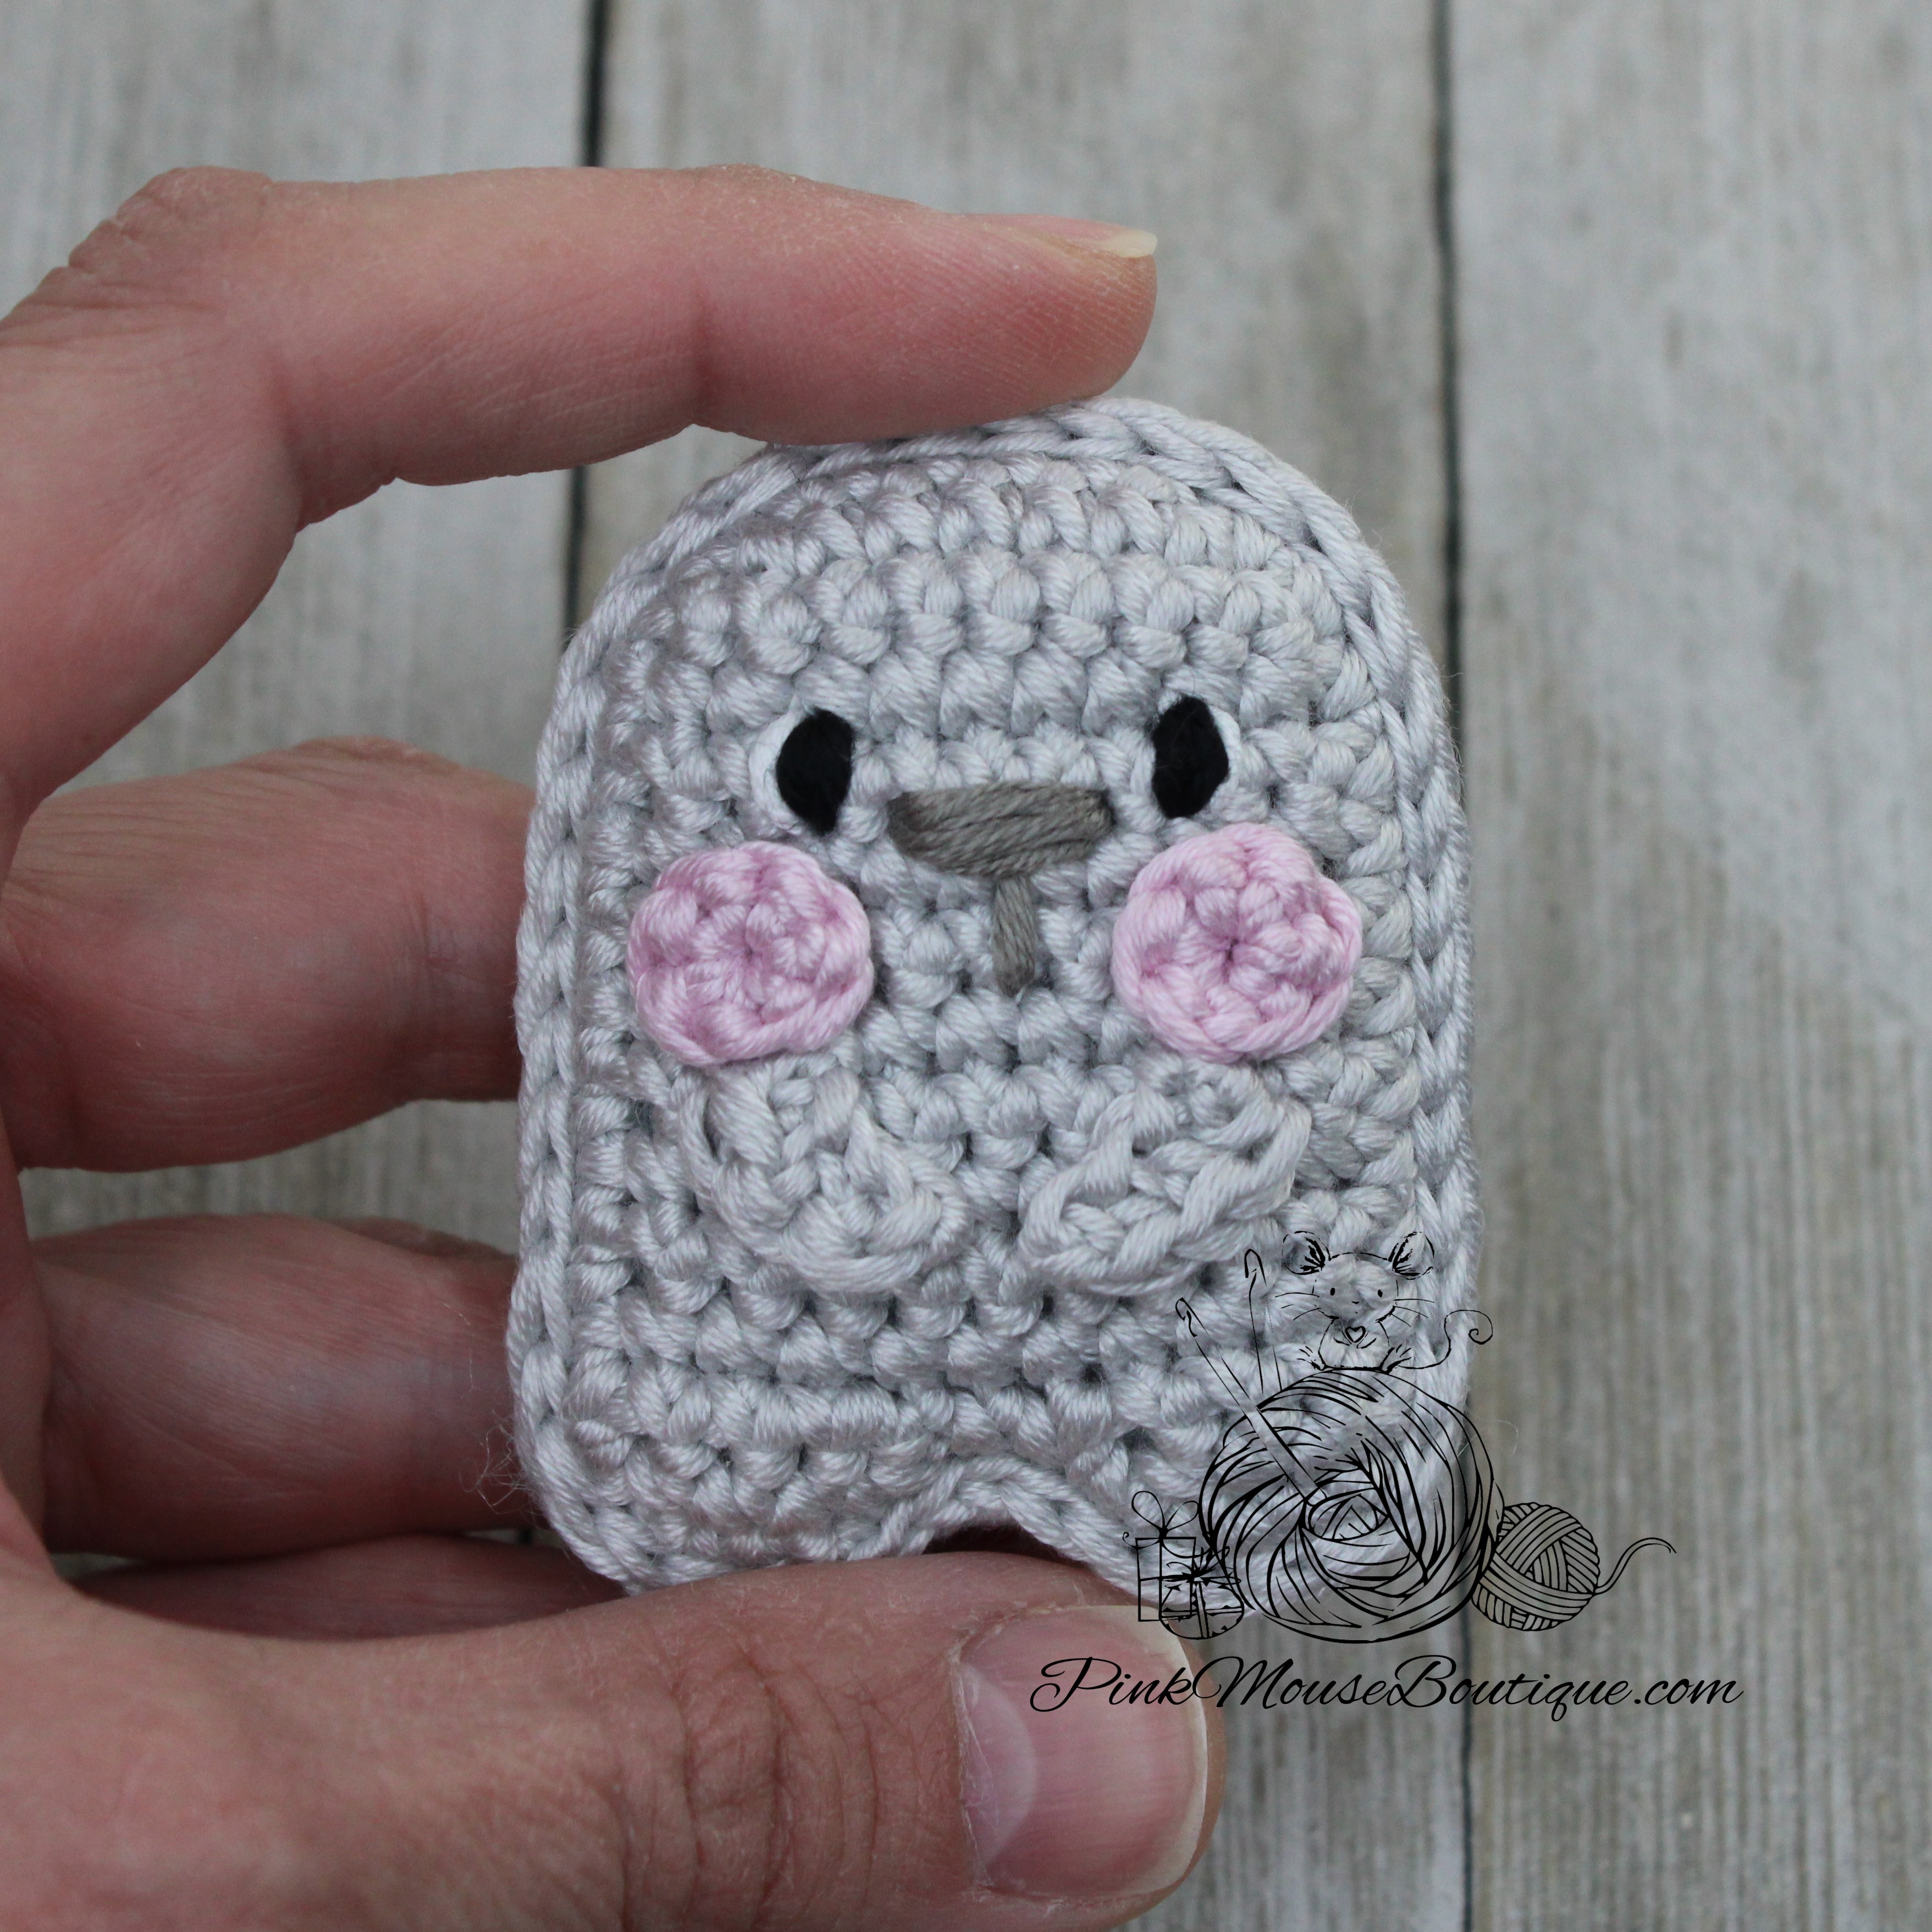
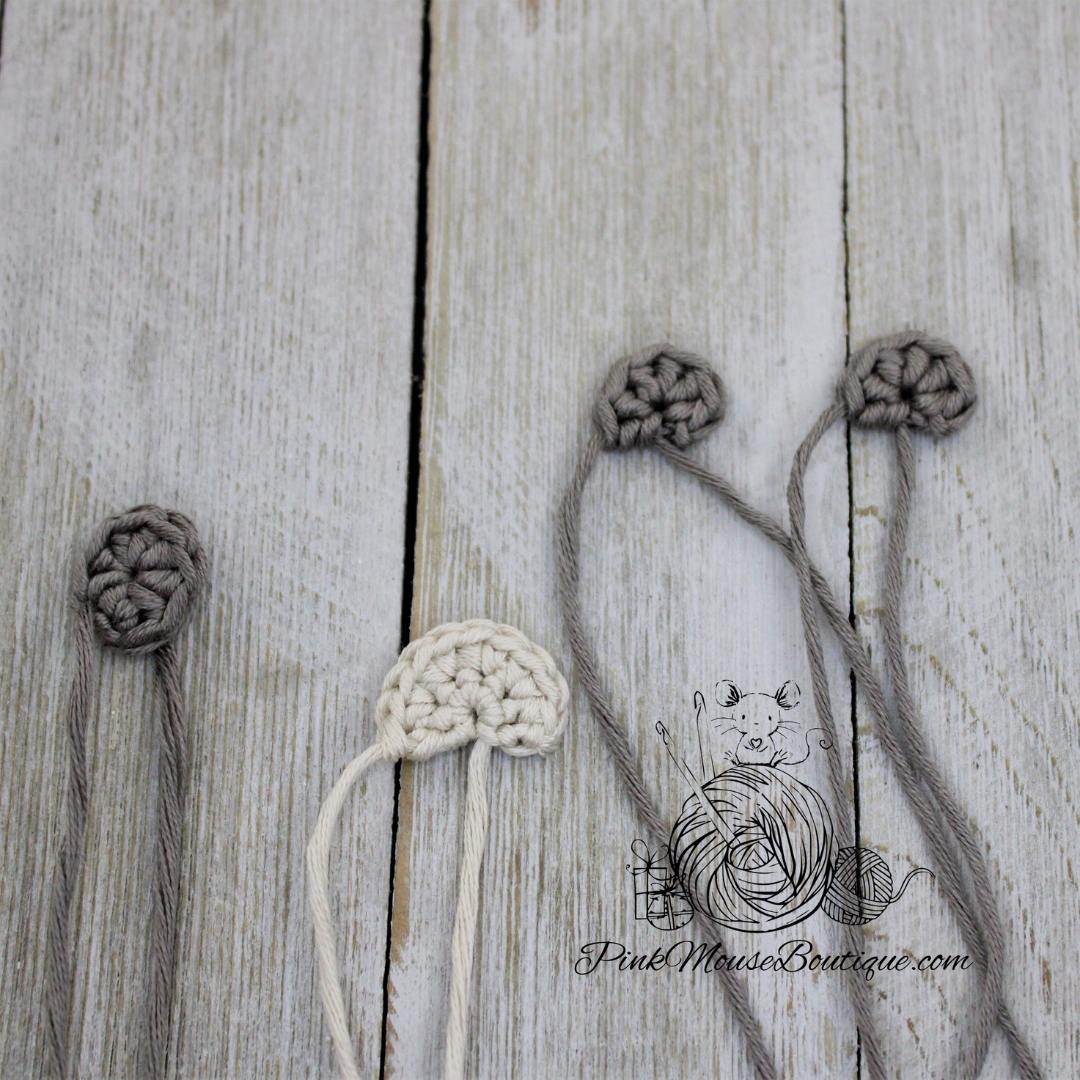
Round 1: 8 sc in a mr; sl st in BLO – 8 sts
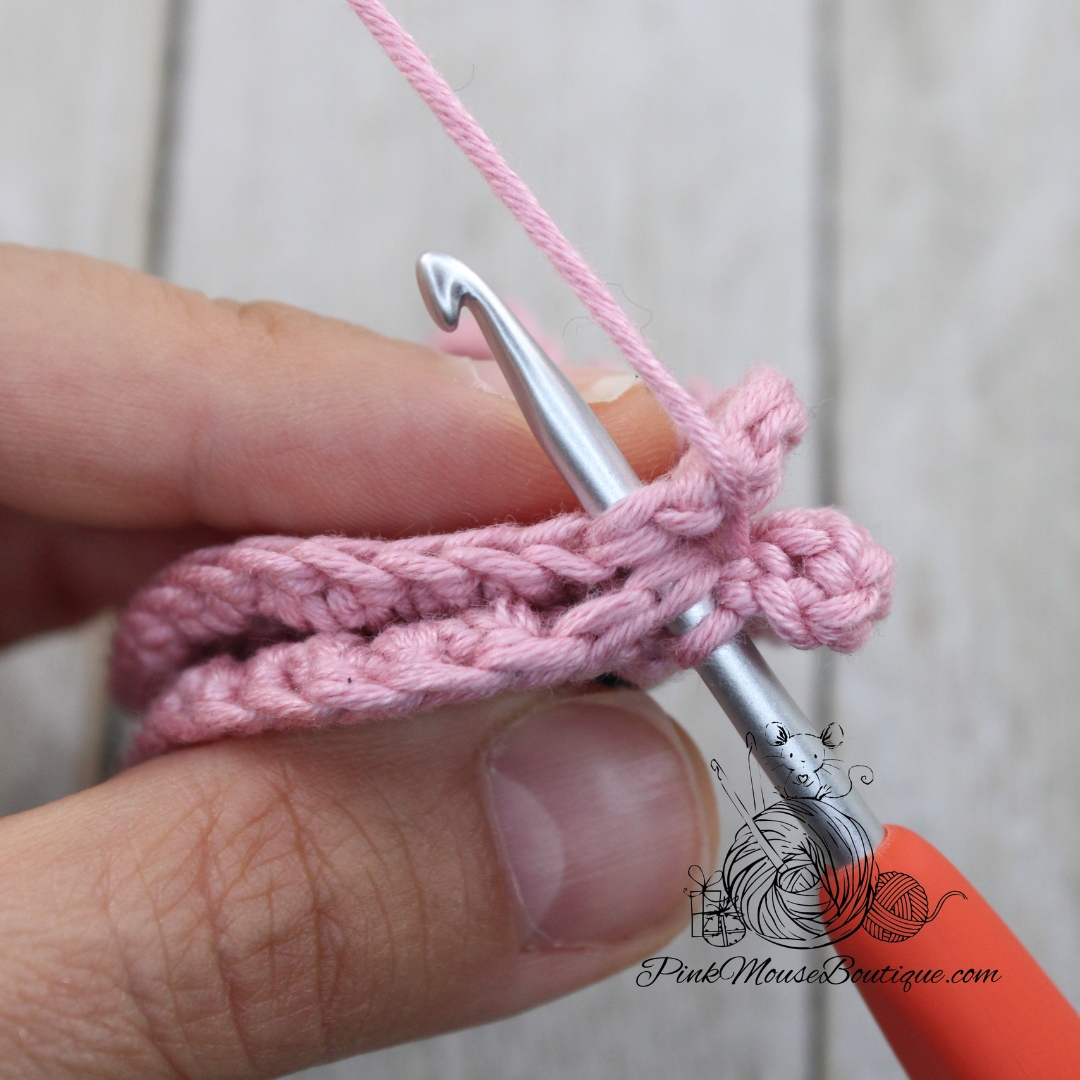
Round 2: in FLO 1 inc; continue in both loops 7 inc; sl st in BLO – 16 sts
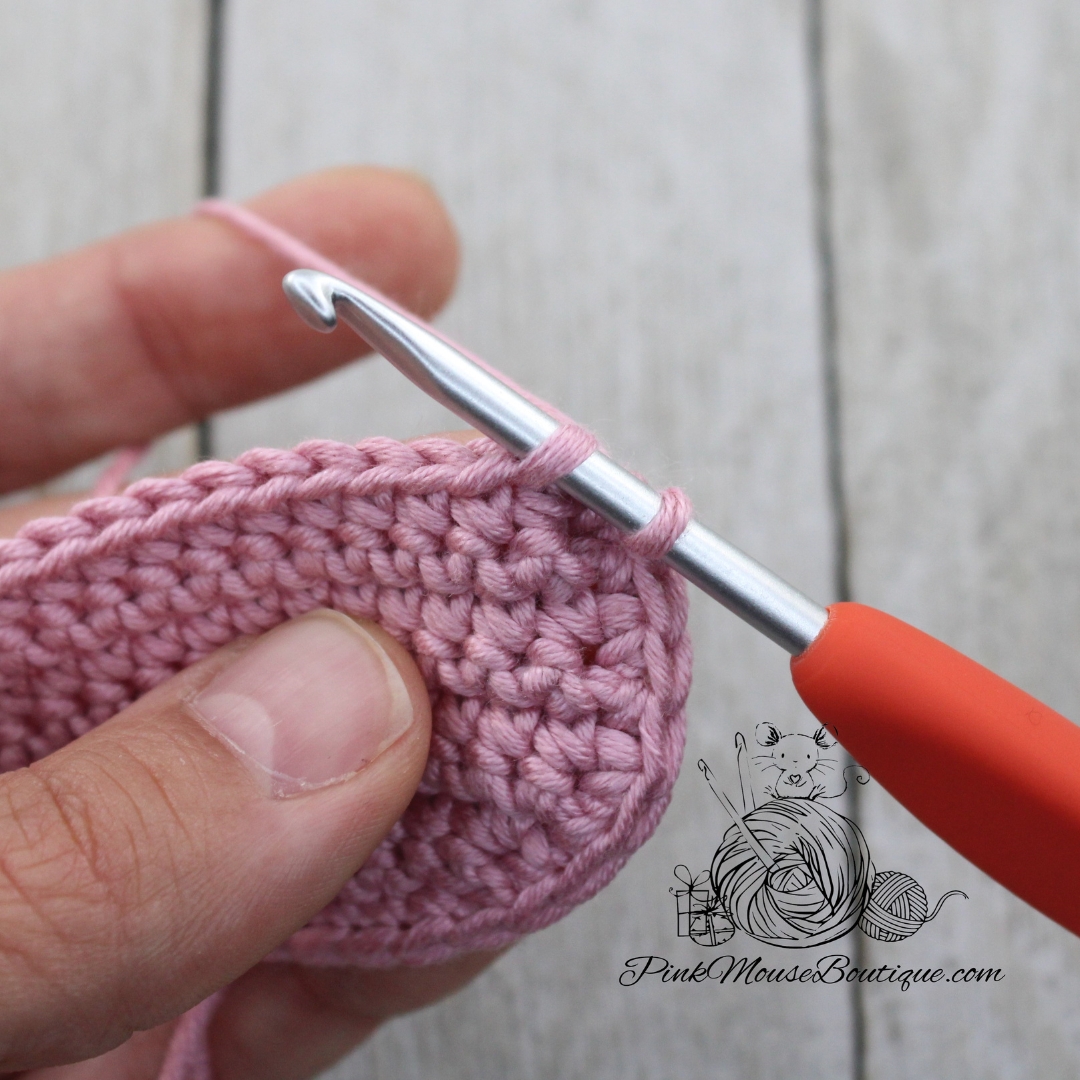
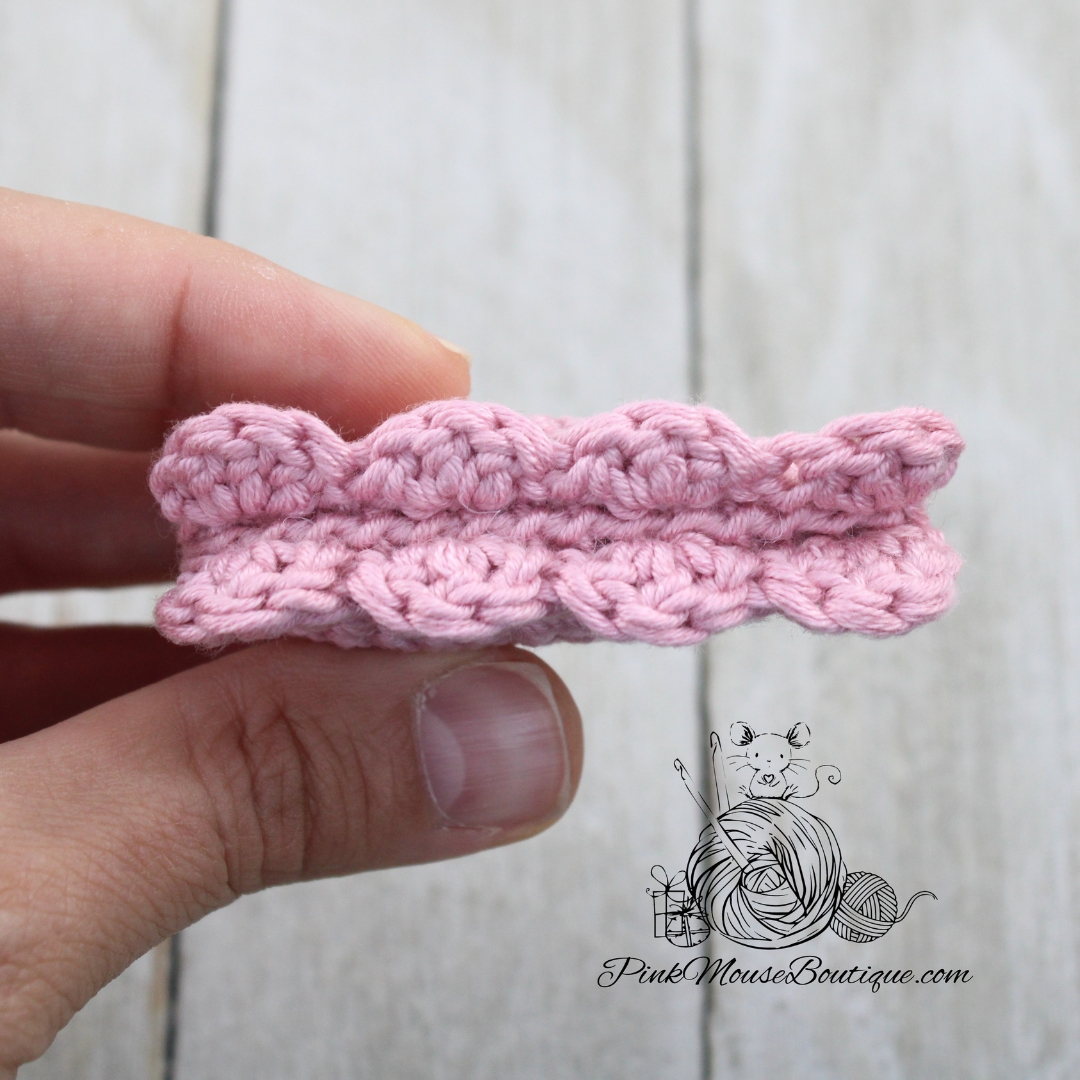
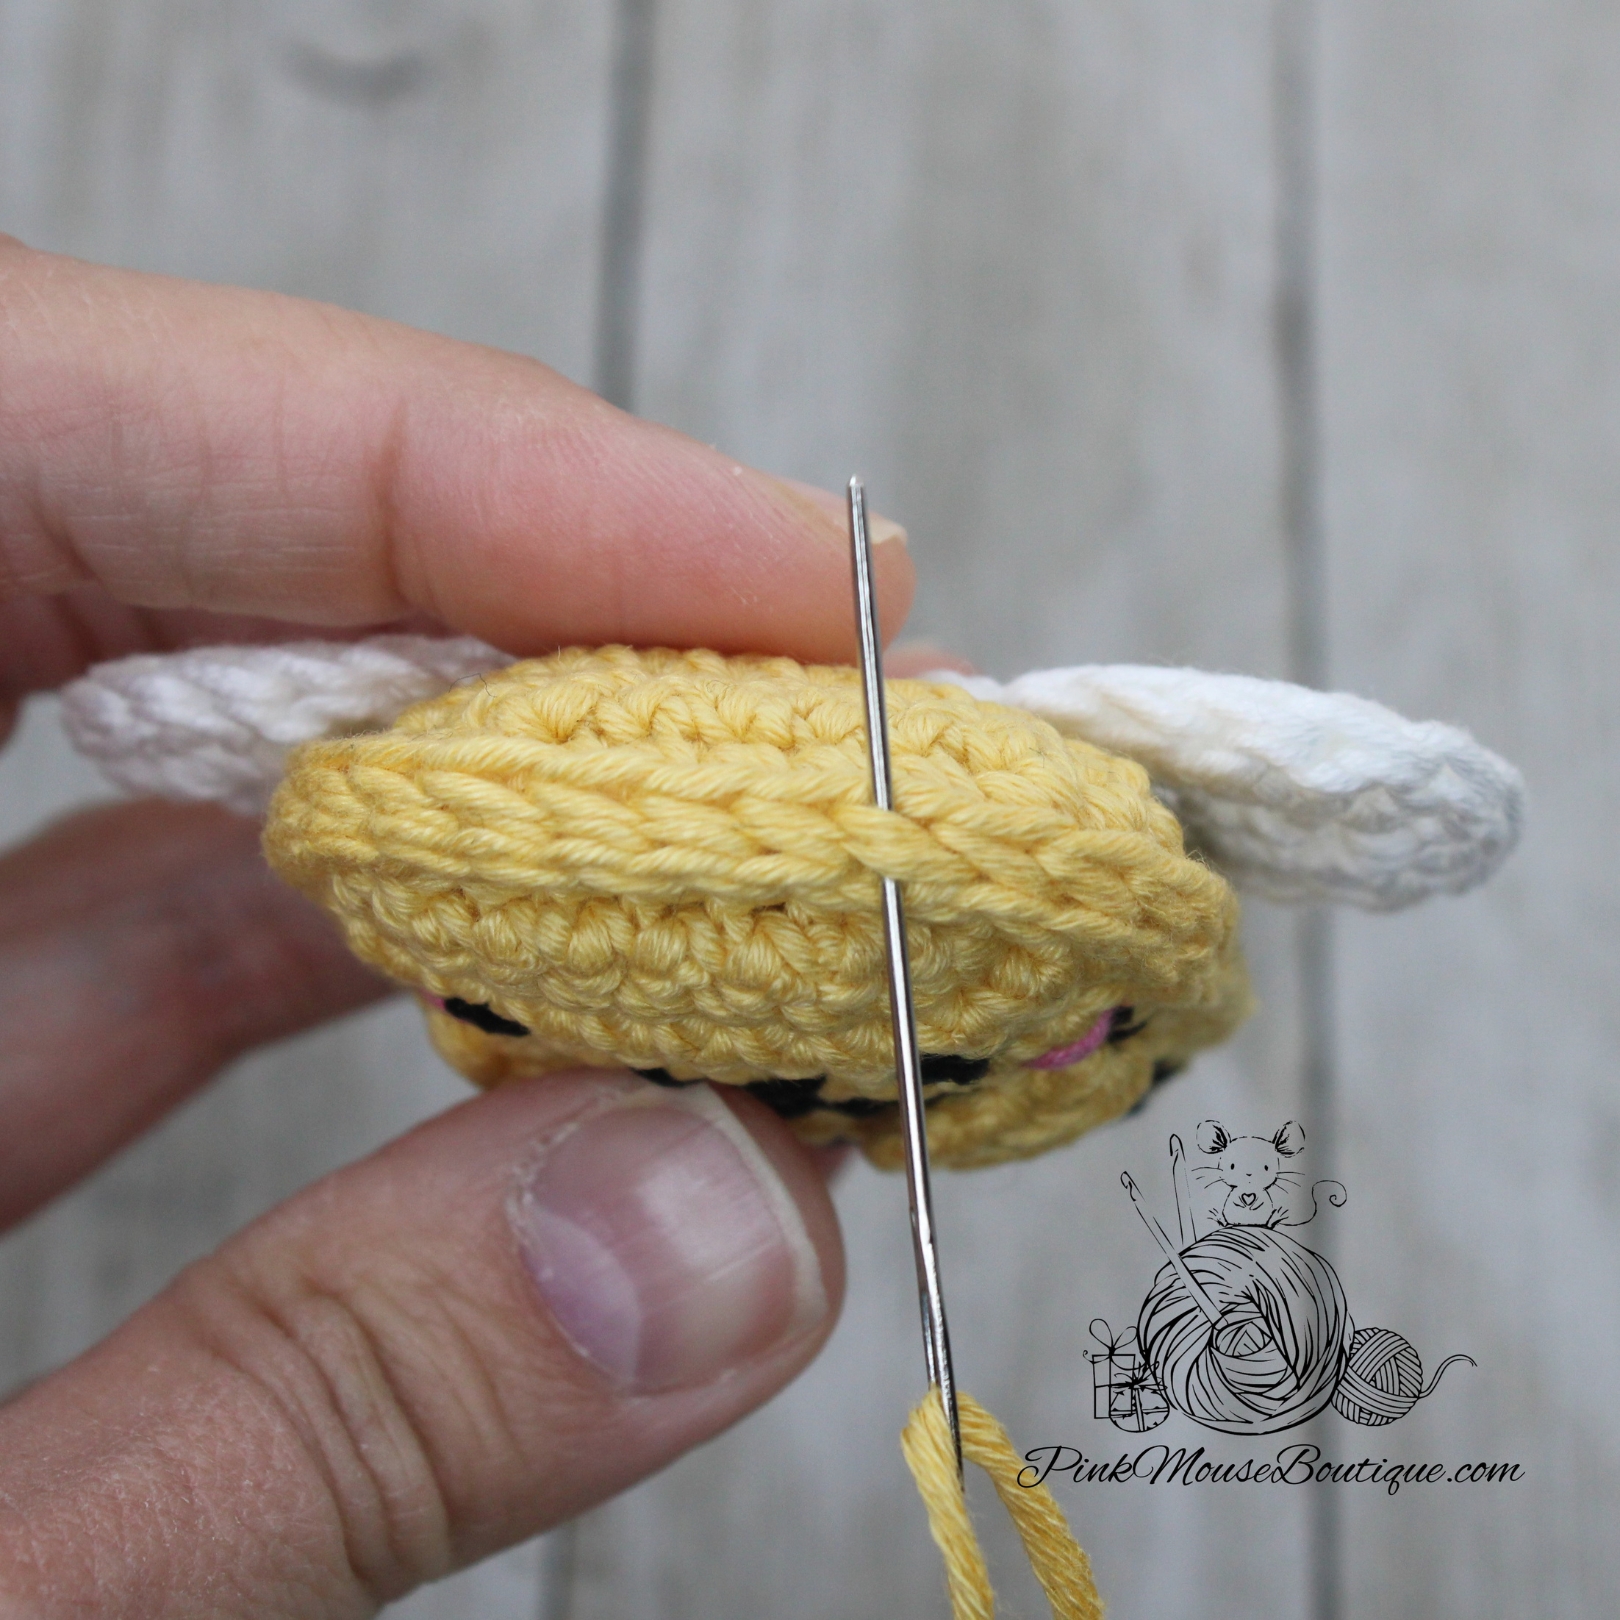
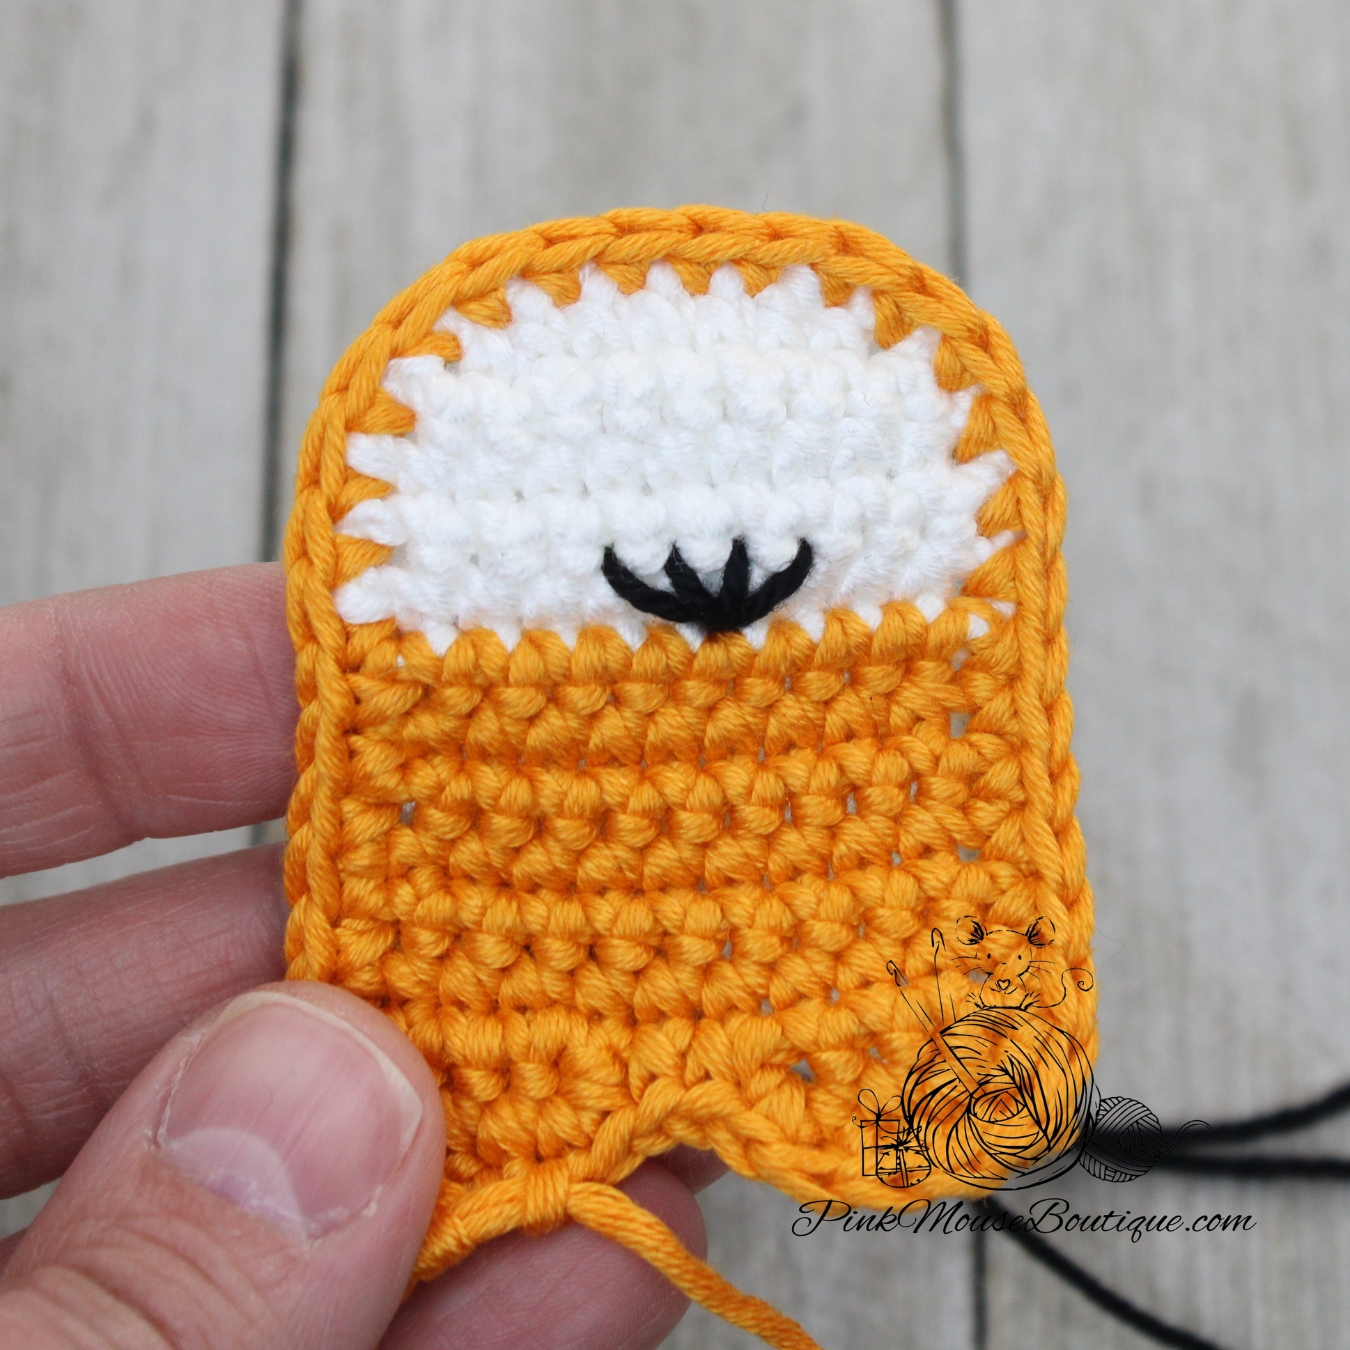
When joining rounds as described above, an extra stitch is created (refer to the image below). Skip that stitch and continue with the next round.
Rounds 3 – 4: in FLO 1 sc, continue in both loops 15 sc; sl st in BLO – 16 sts (2 rounds)
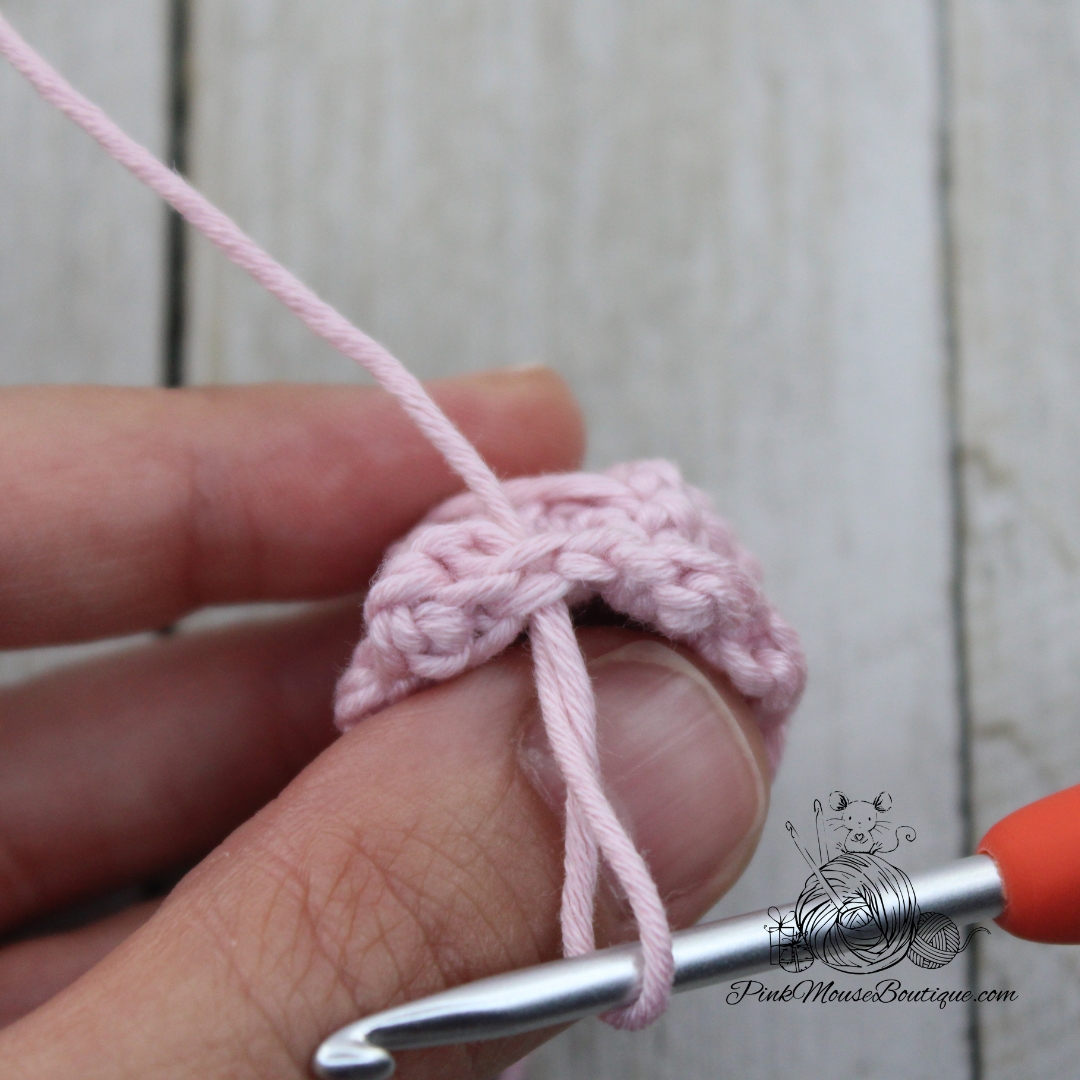
Round 5: in FLO 1 sc, in both loops 15 sc; sl st in both loops to join and ch 1 – 16 sts
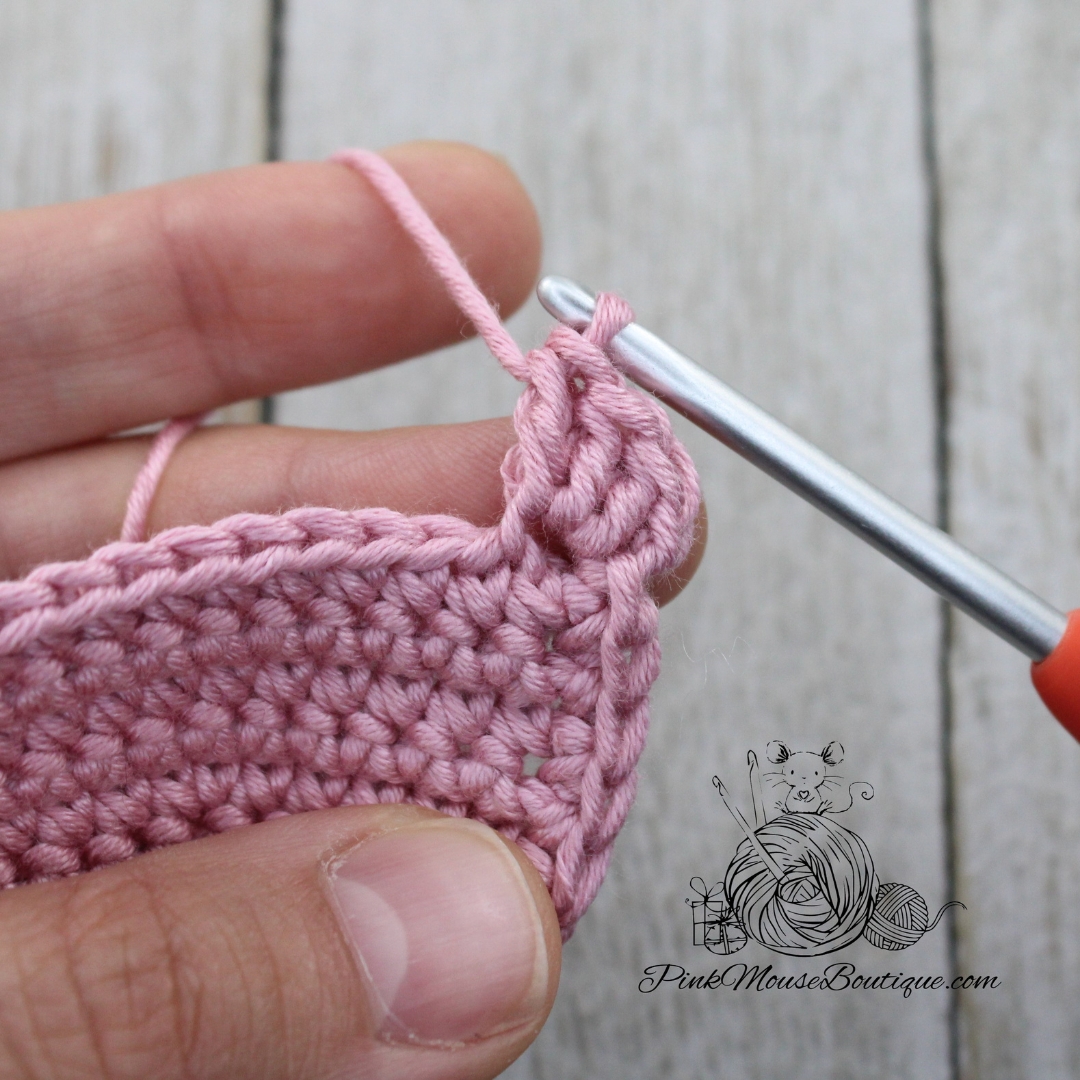
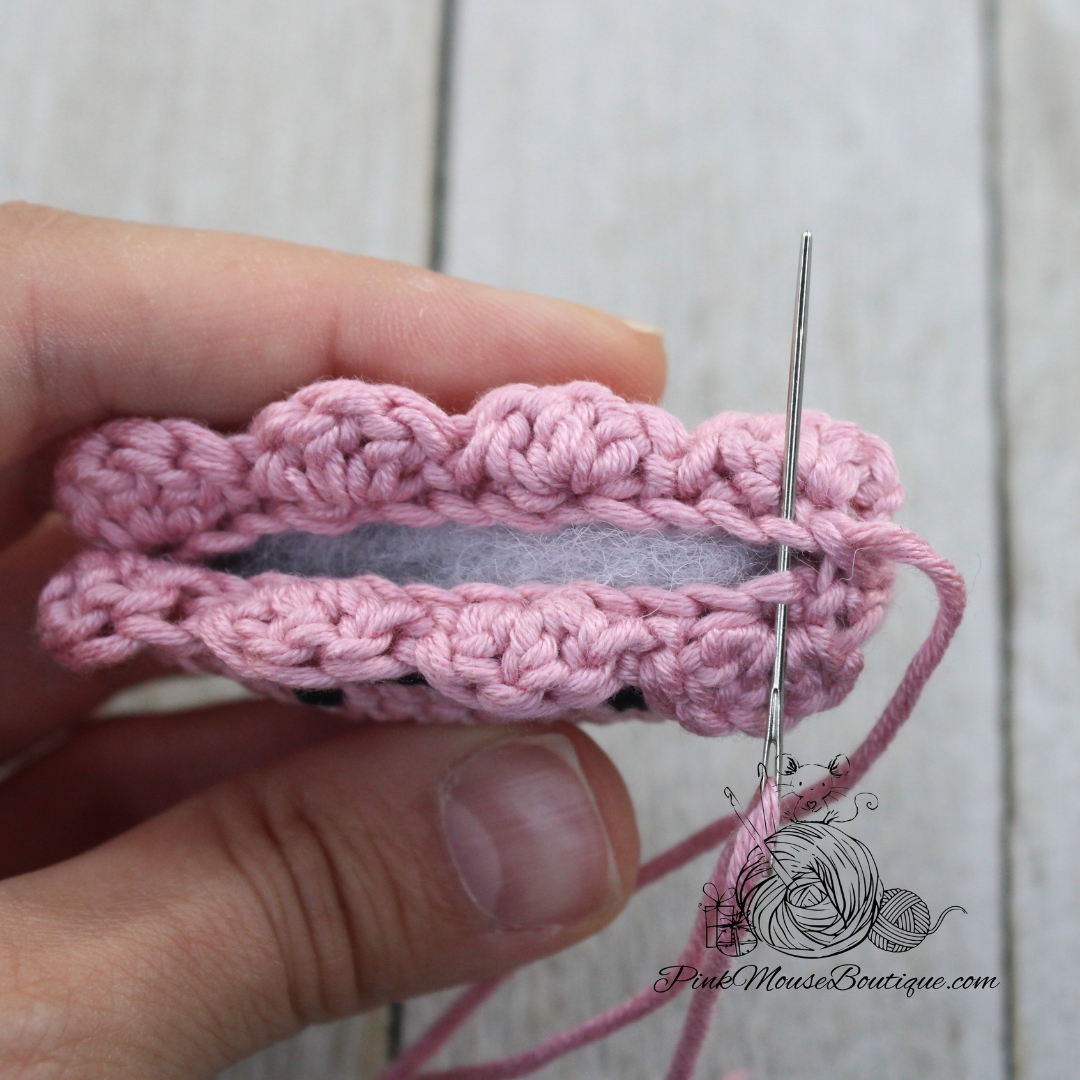
Round 6: in FLO (dc in 1st st, sl st in next) x 8 – 8 shells
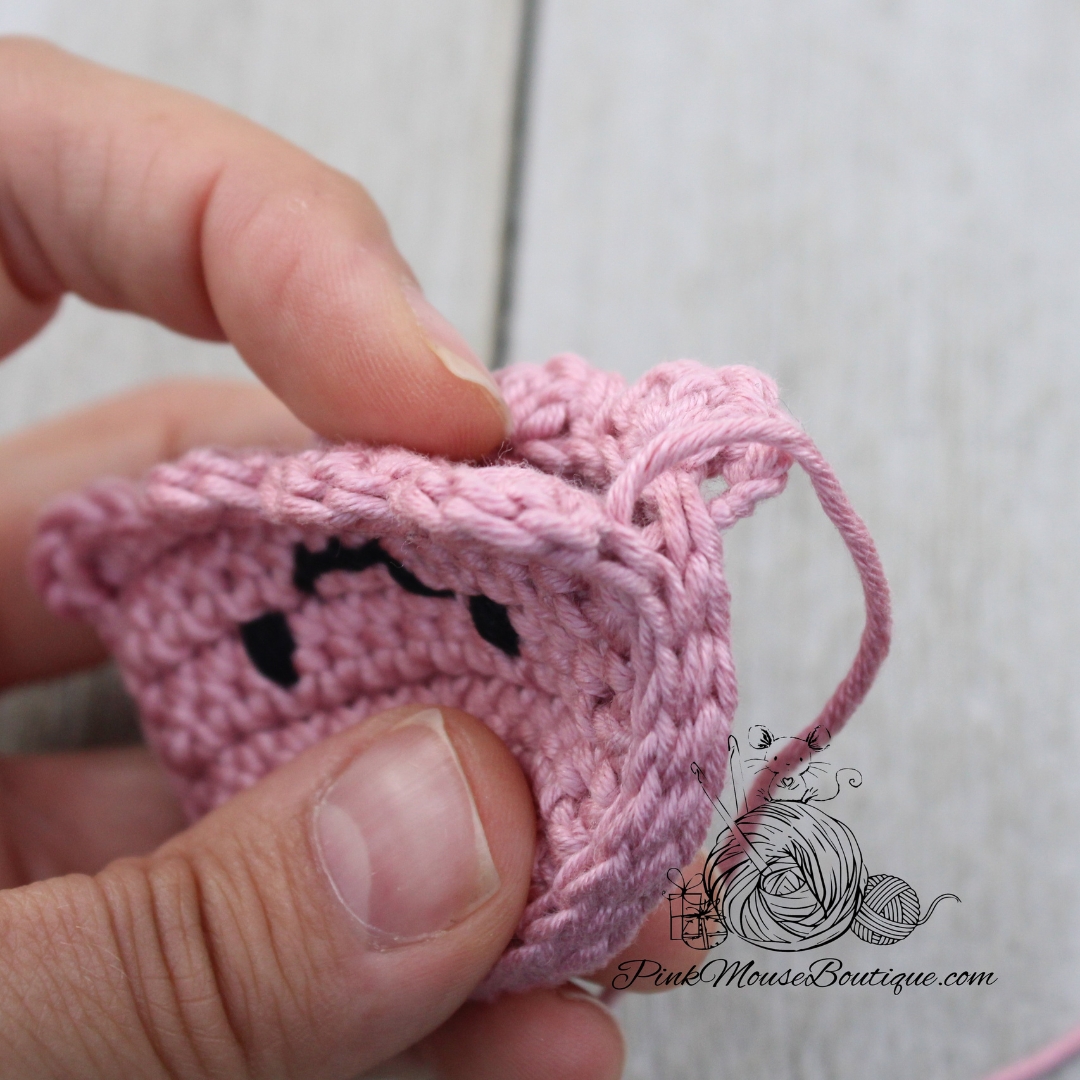
Fasten off. Bring the end tail inside the body and then pull it through a space of the body. Repeat for the beginning tail.
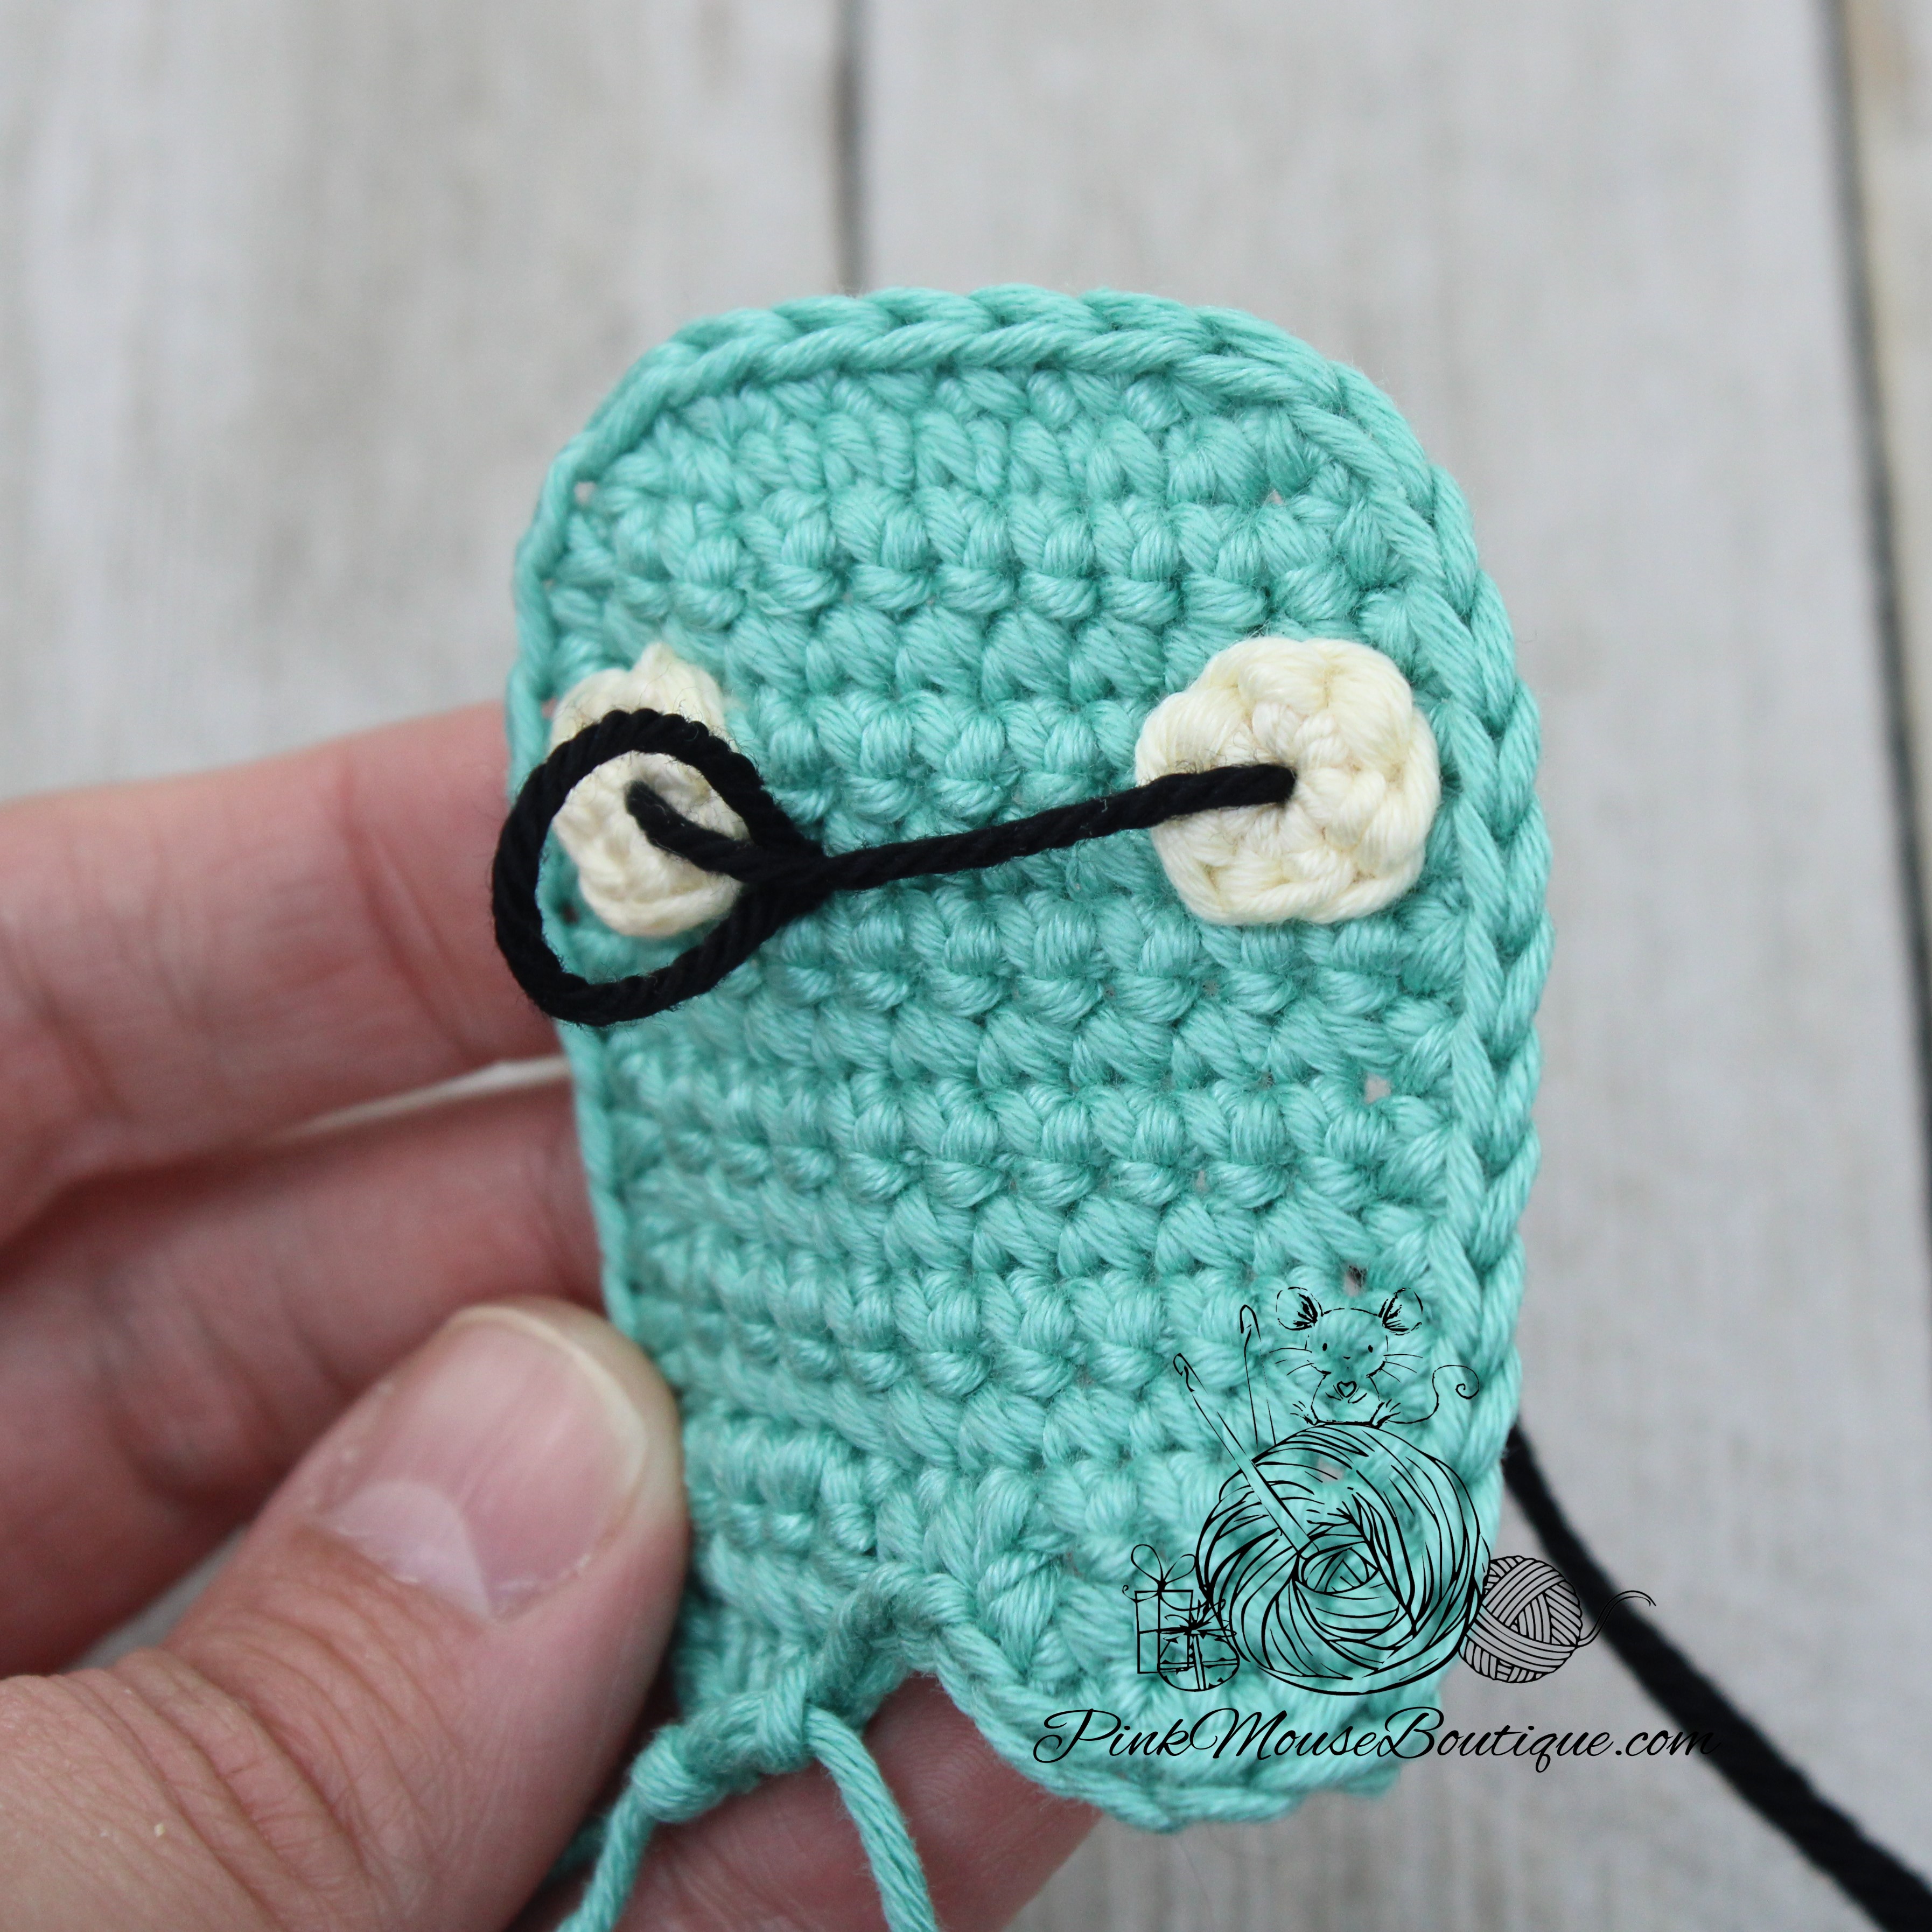
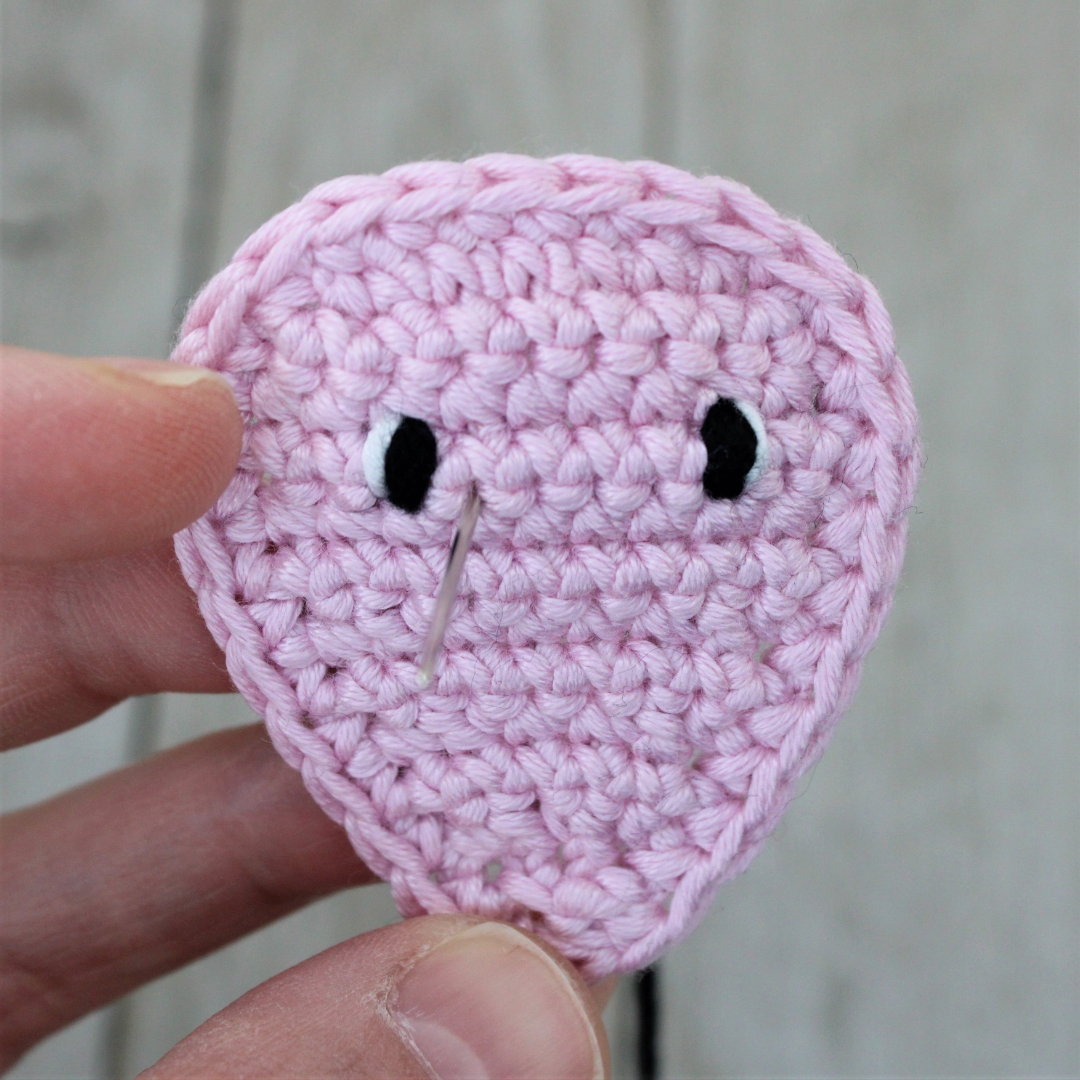
EYES
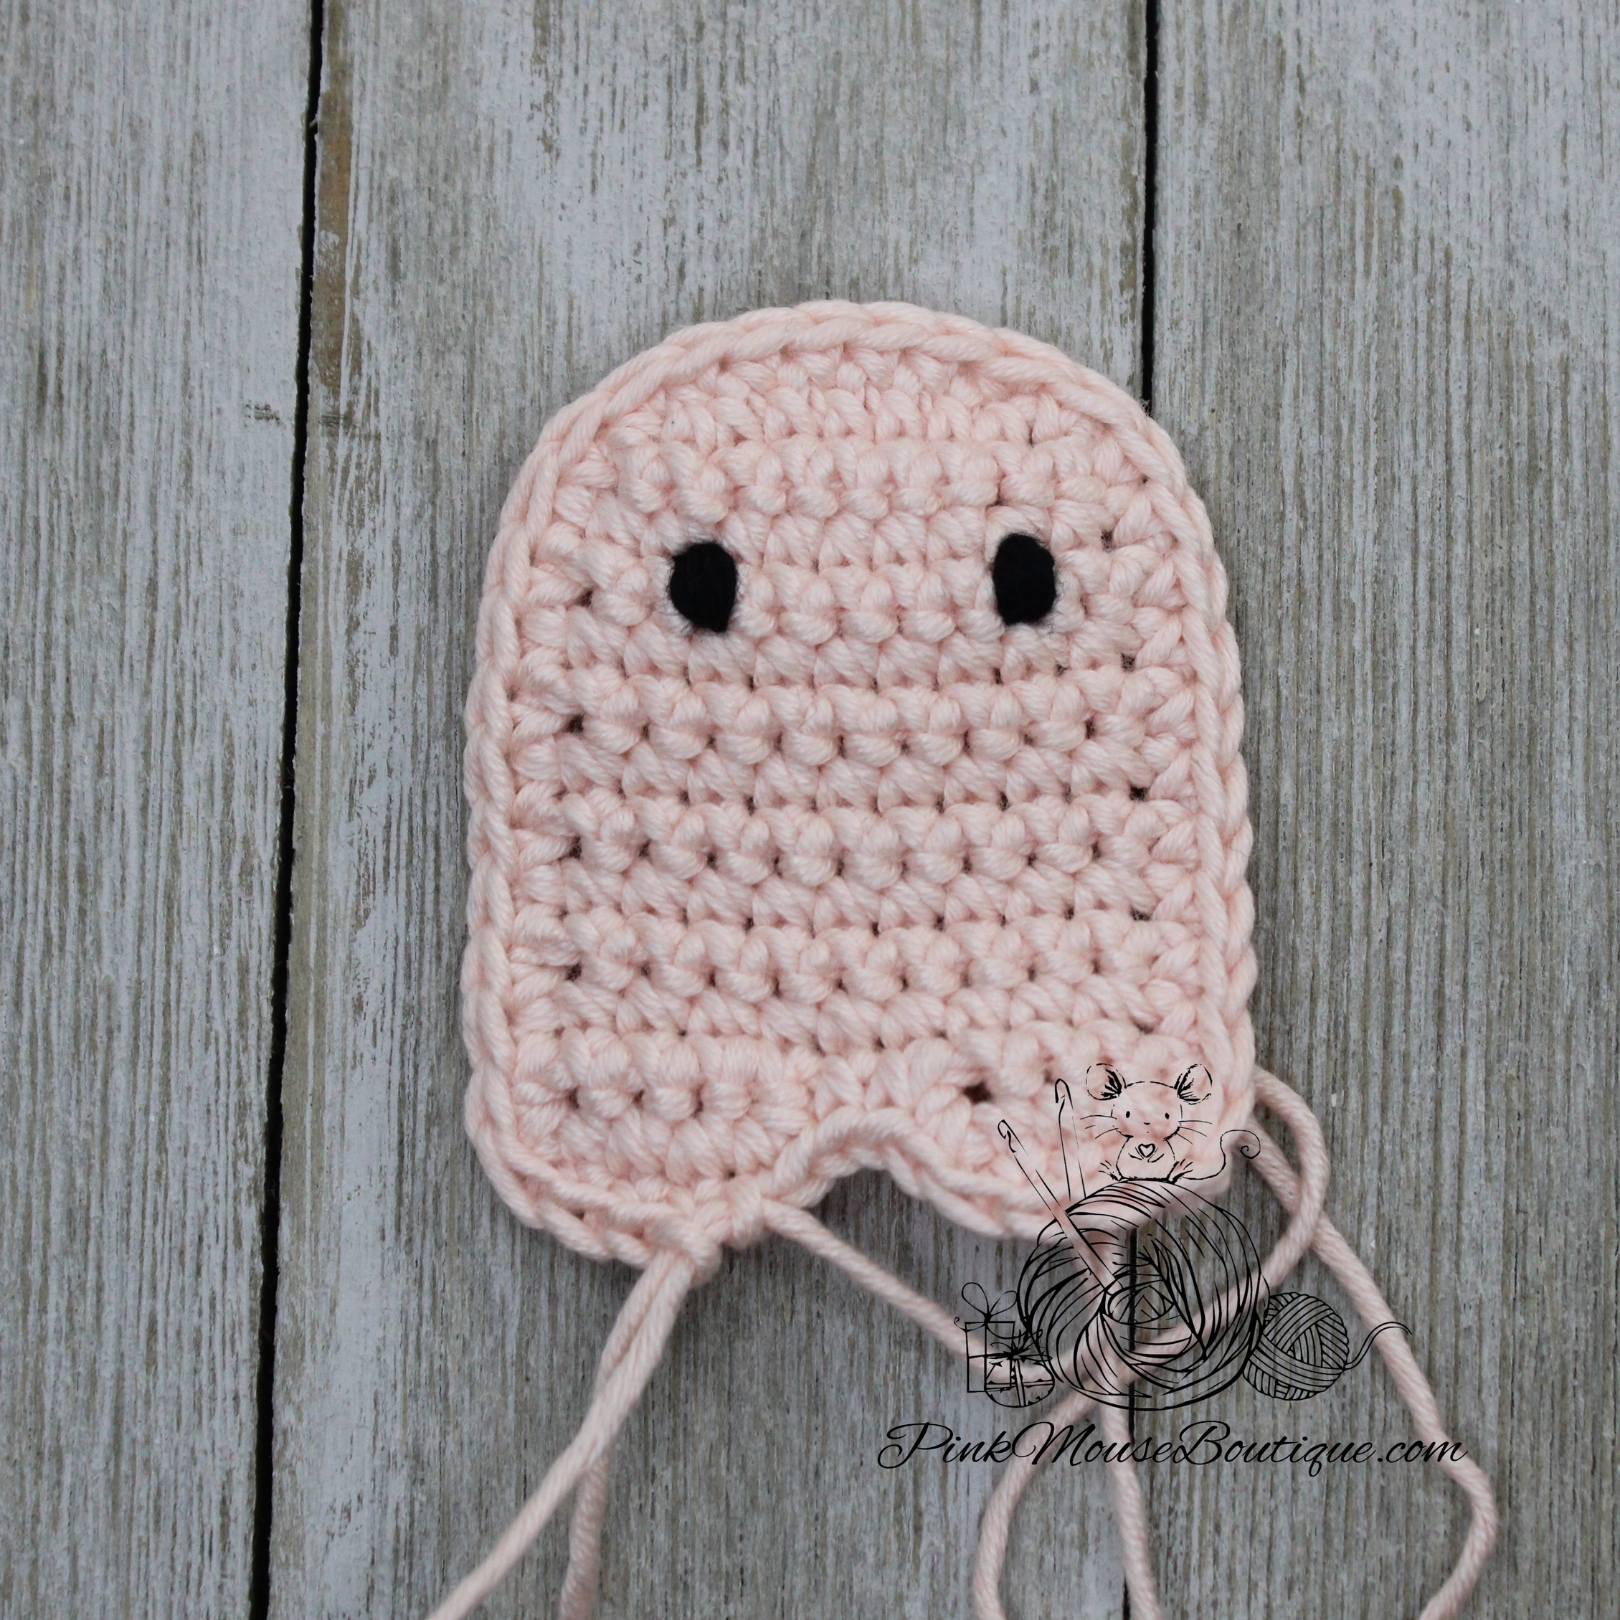
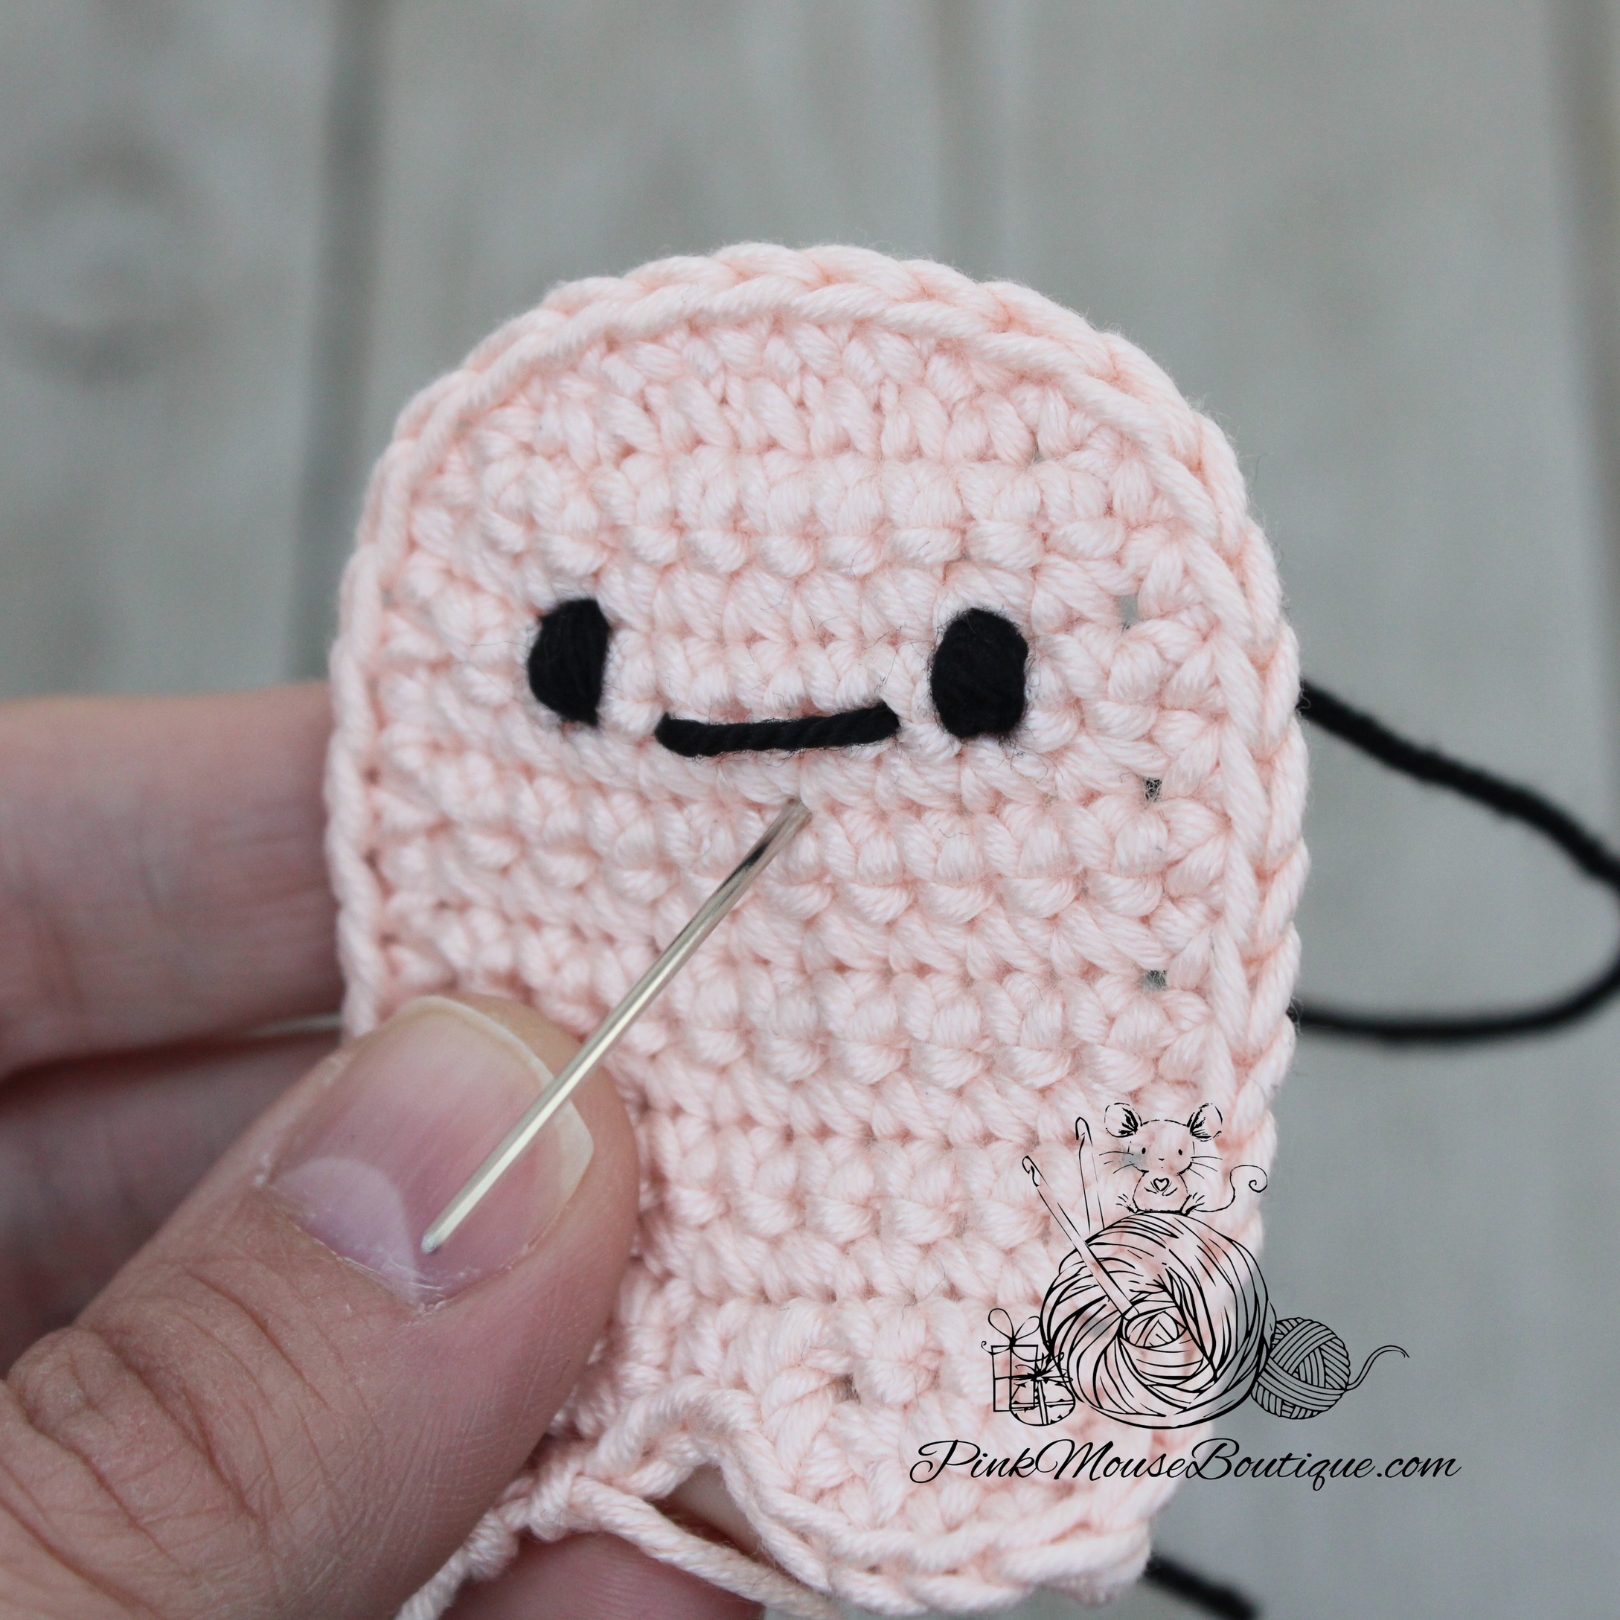
With black thread, sew the eyes on Round 4, 4 stitches apart.
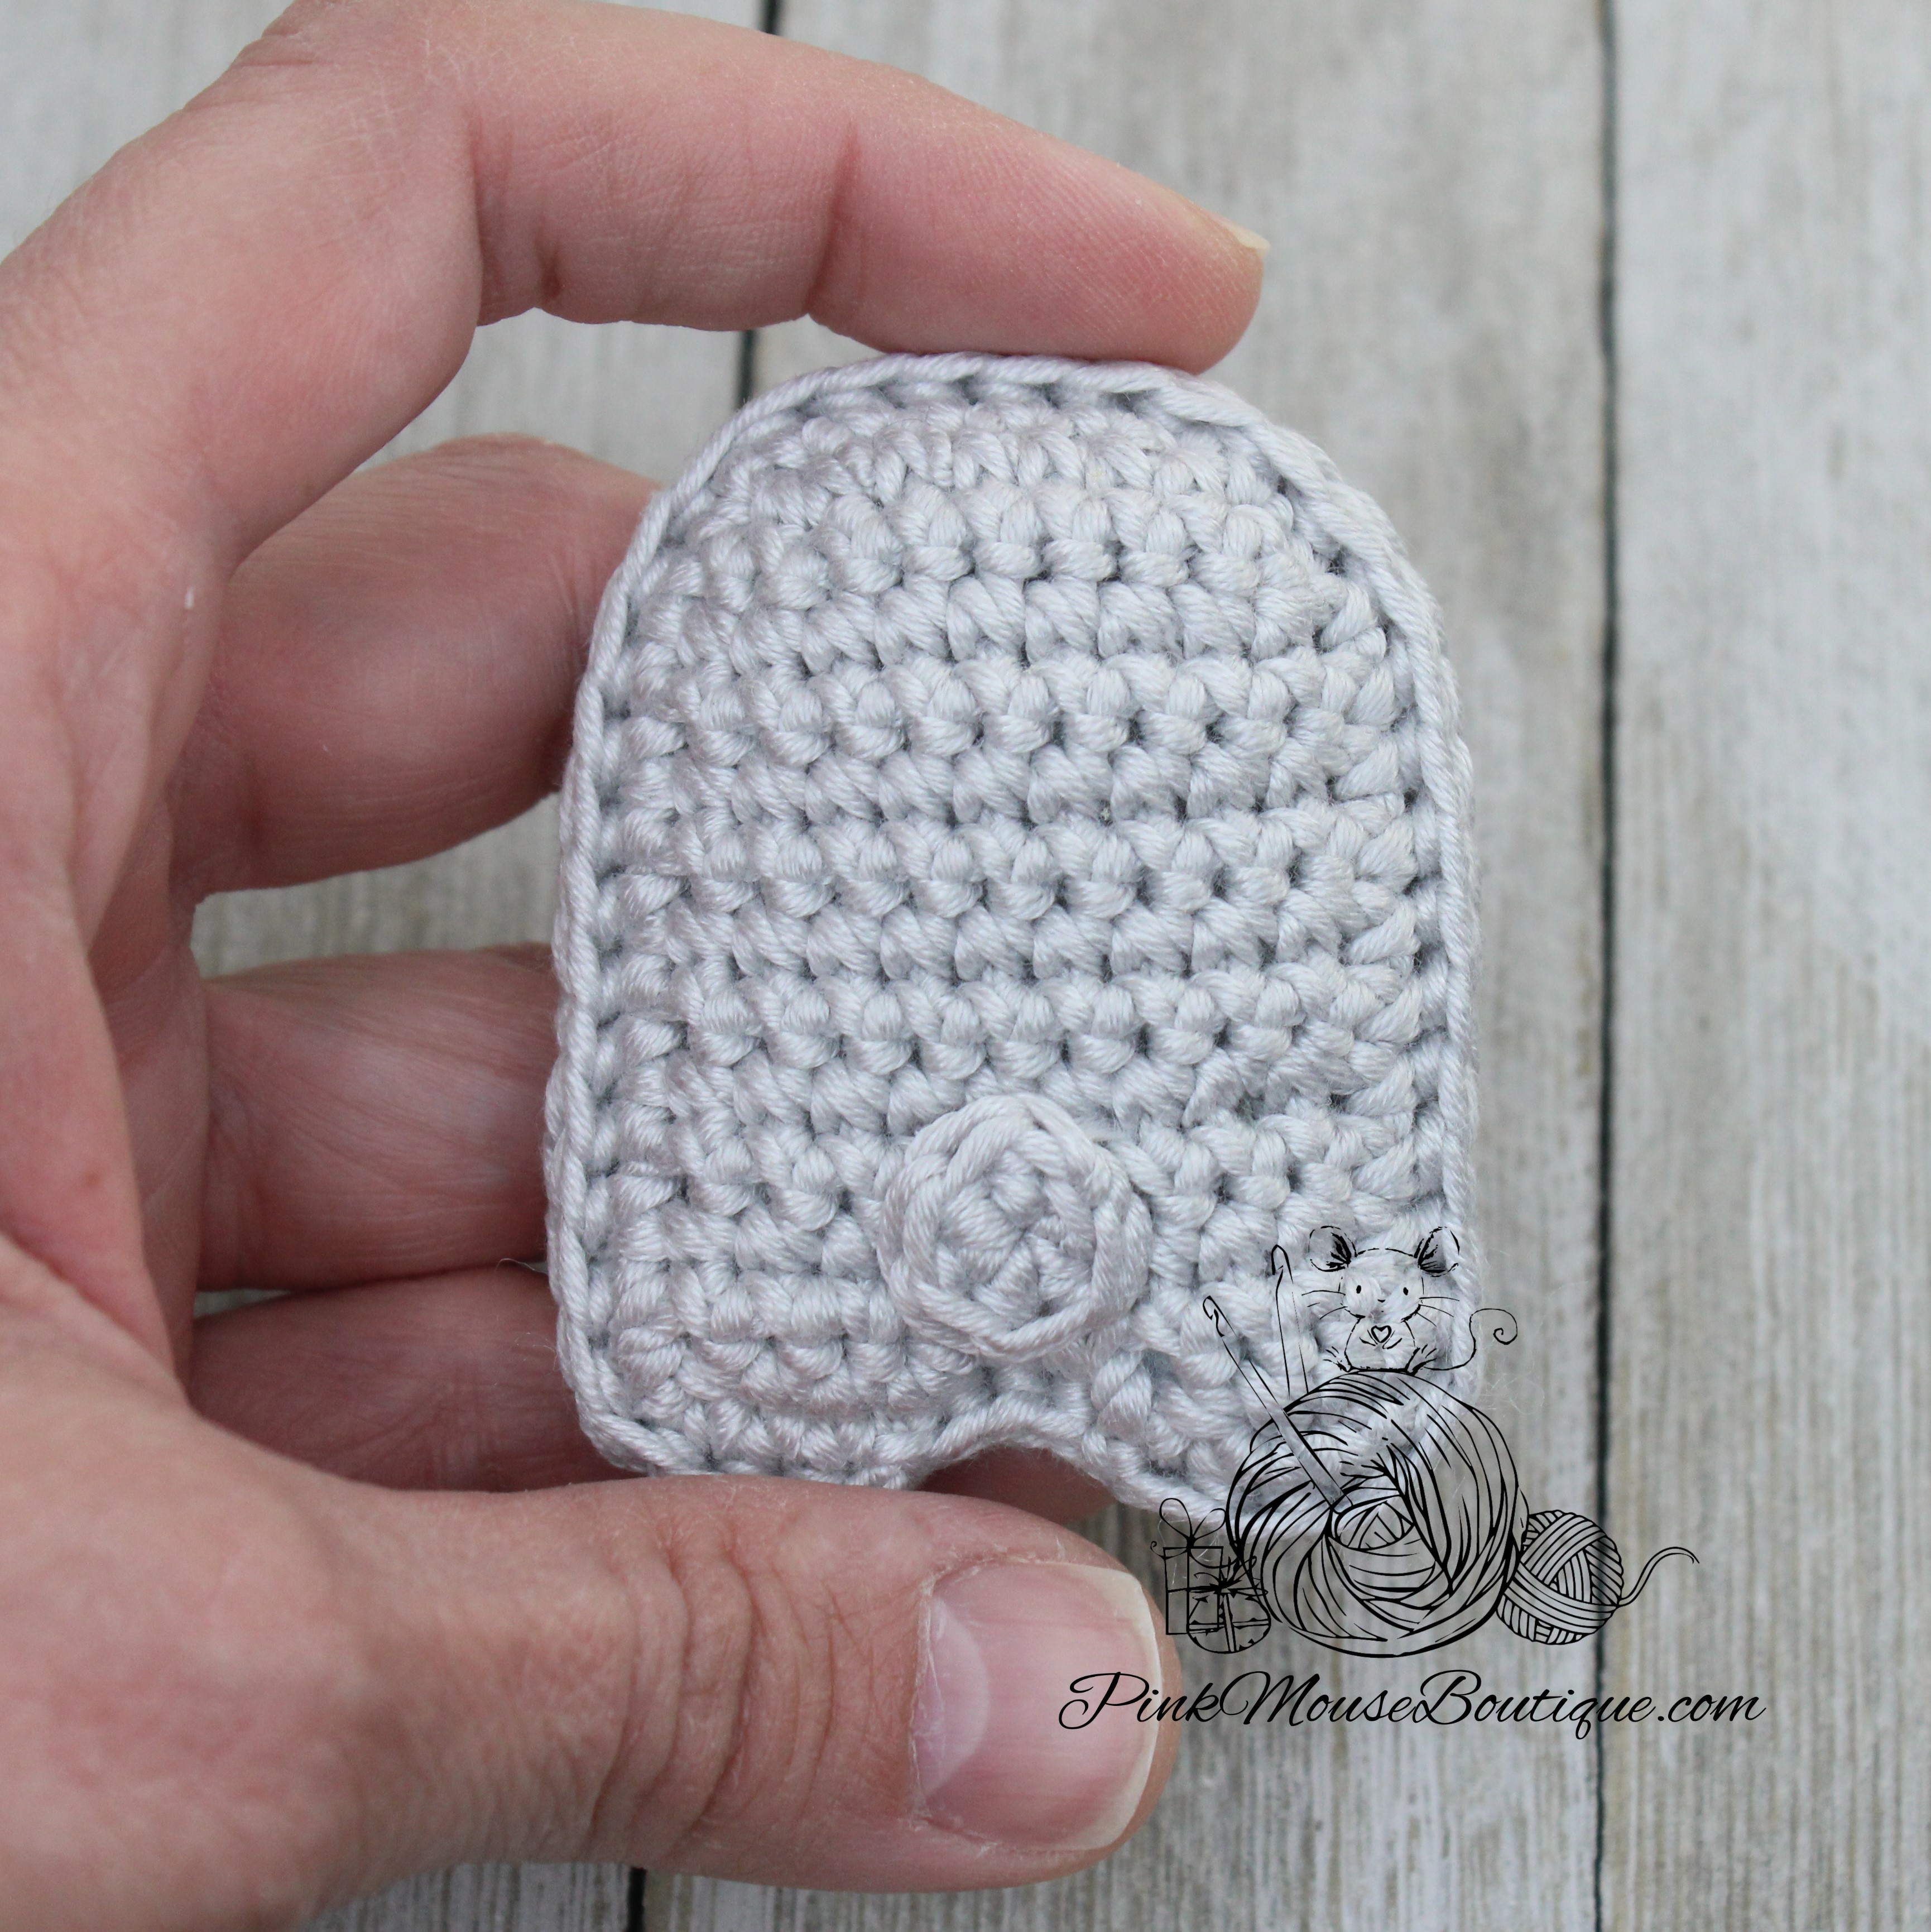
BODY – CONTINUED
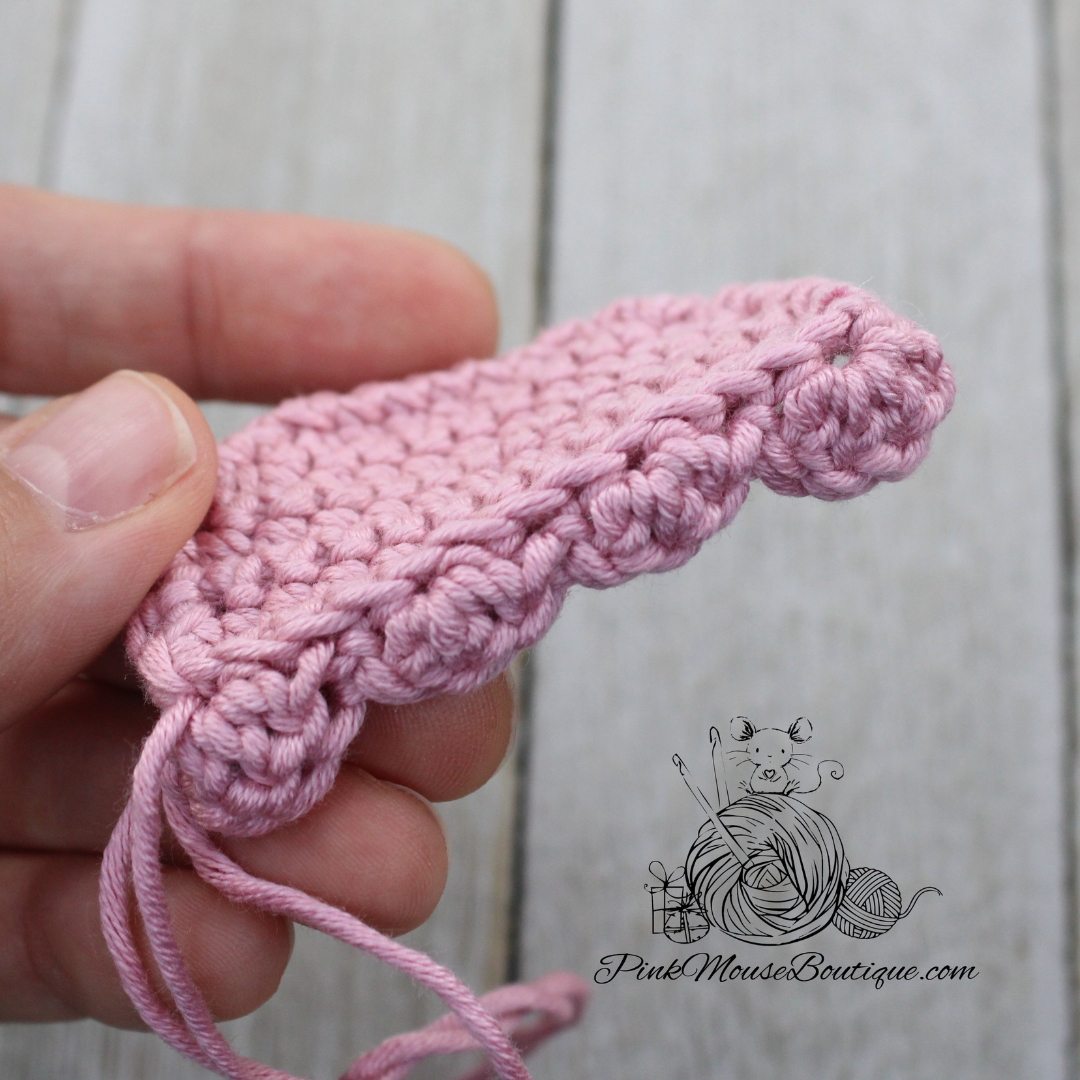
Round 7: join yarn to any of the unworked loops of Round 5 with a sc (counts as 1st st of Round 7); 1 sc in next loop; dec (invisible dec in BLO is done the following way: skip 3rd loop, insert hook in 4th loop, go back and insert hook in 3rd loop; 1 sc – video at 17.21 min); (2 sc, dec) x 3; sl st to join and ch 1 – 12 sts
Stuff the body well.
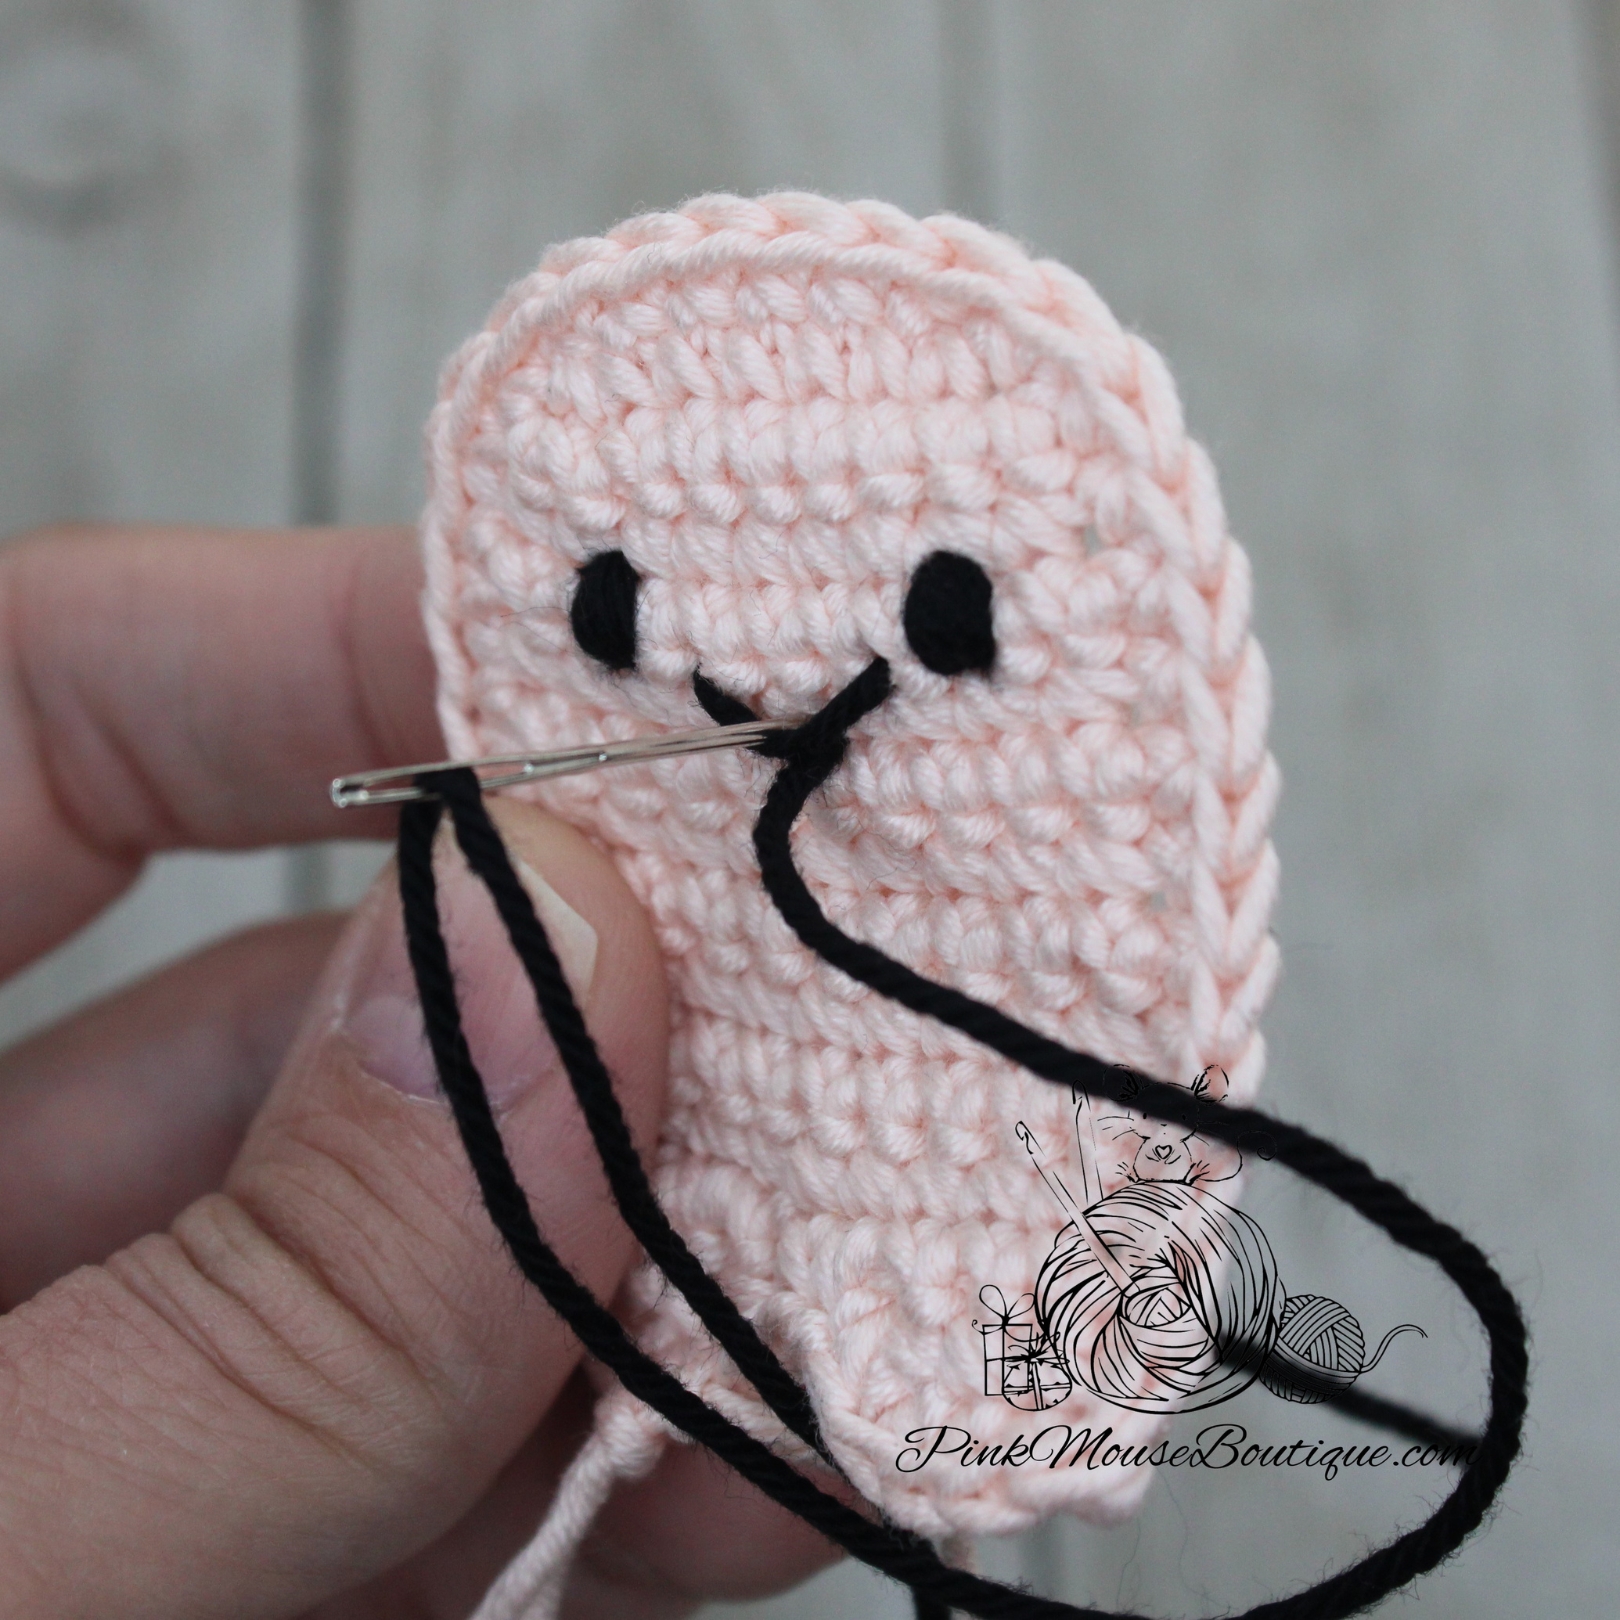
Round 8: in BLO 6 dec; sl st to join – 6 sts
Fasten off. Insert the end tail through the same space you inserted the 1st beginning tail. Tie a knot and stuff the excess thread inside the body.
Insert the 2nd beginning tail through the same space as the 1st end tail. Tie a knot and stuff the excess thread inside the body.
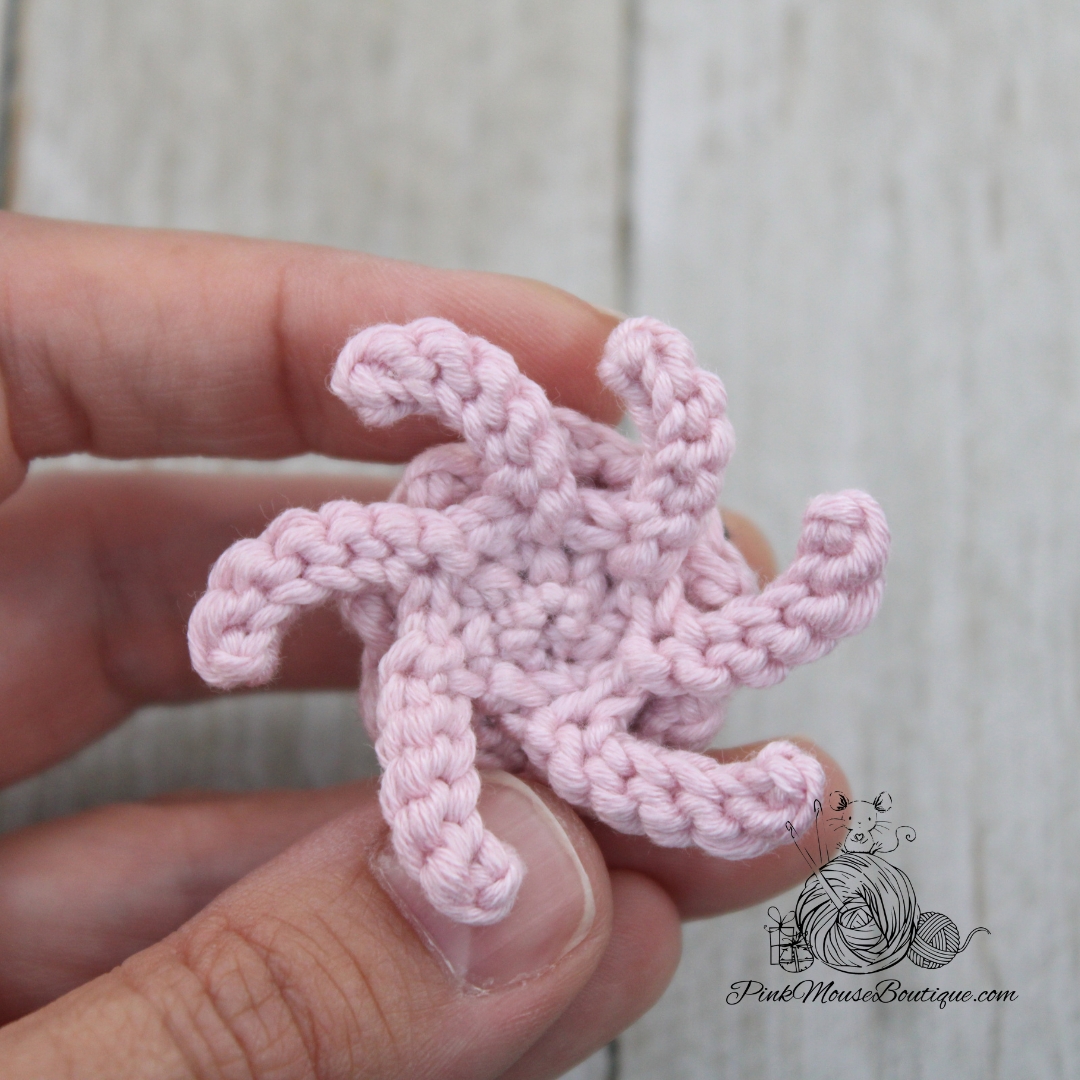
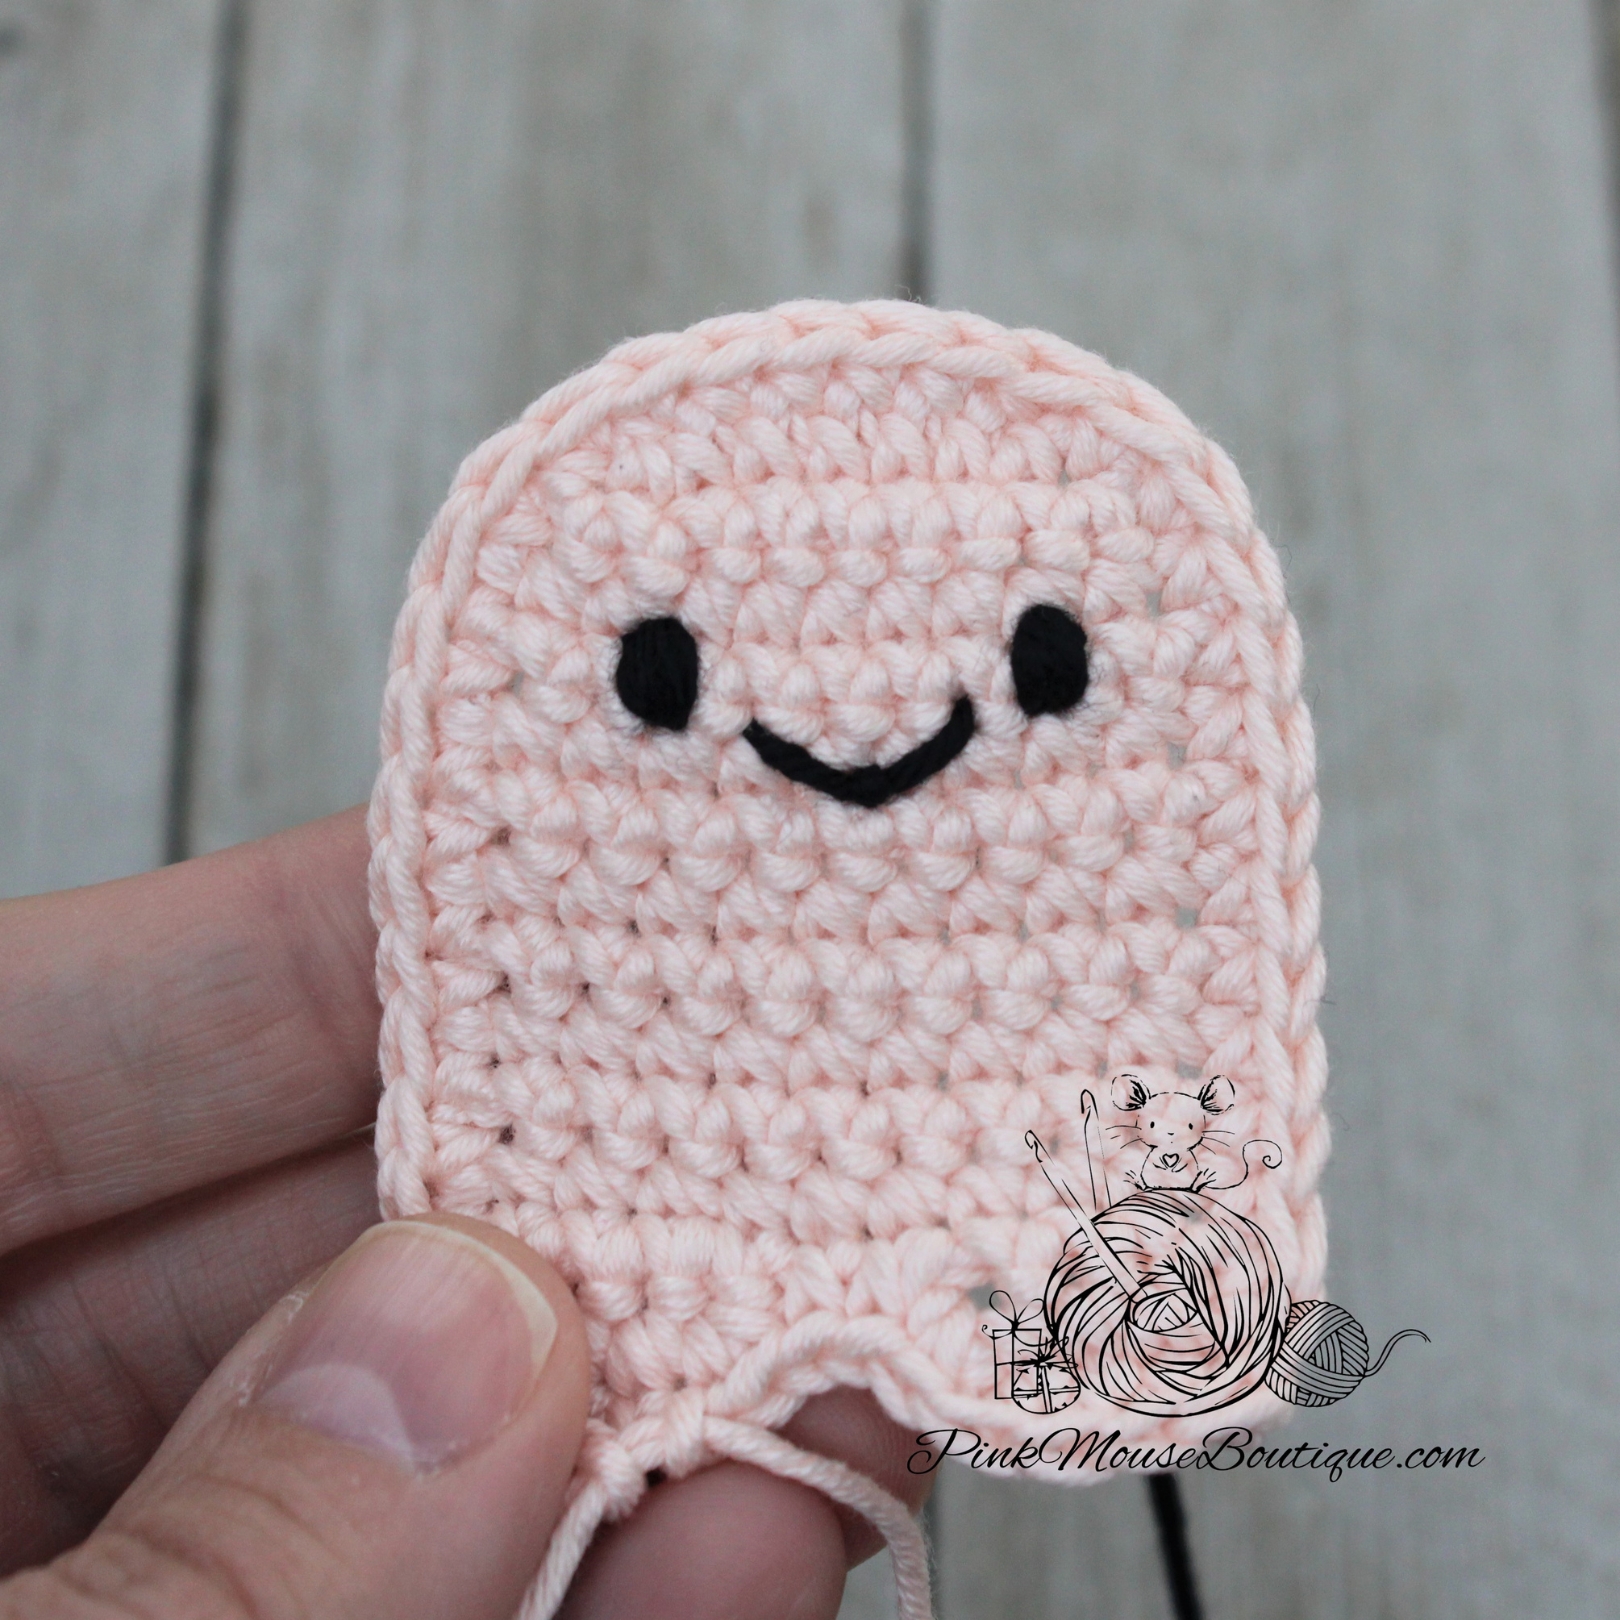
TENTACLES
Join yarn to any of the unworked loops of Round 7.
*ch 7, sl st in 2nd ch from hook, sl st until the end of ch
sl st in the next unworked loop of the body*
*…* repeat 5 more times
You will have 6 tentacles once done with this round.
Fasten off. Insert both tails through the same space. Tie a knot and stuff the excess thread inside.
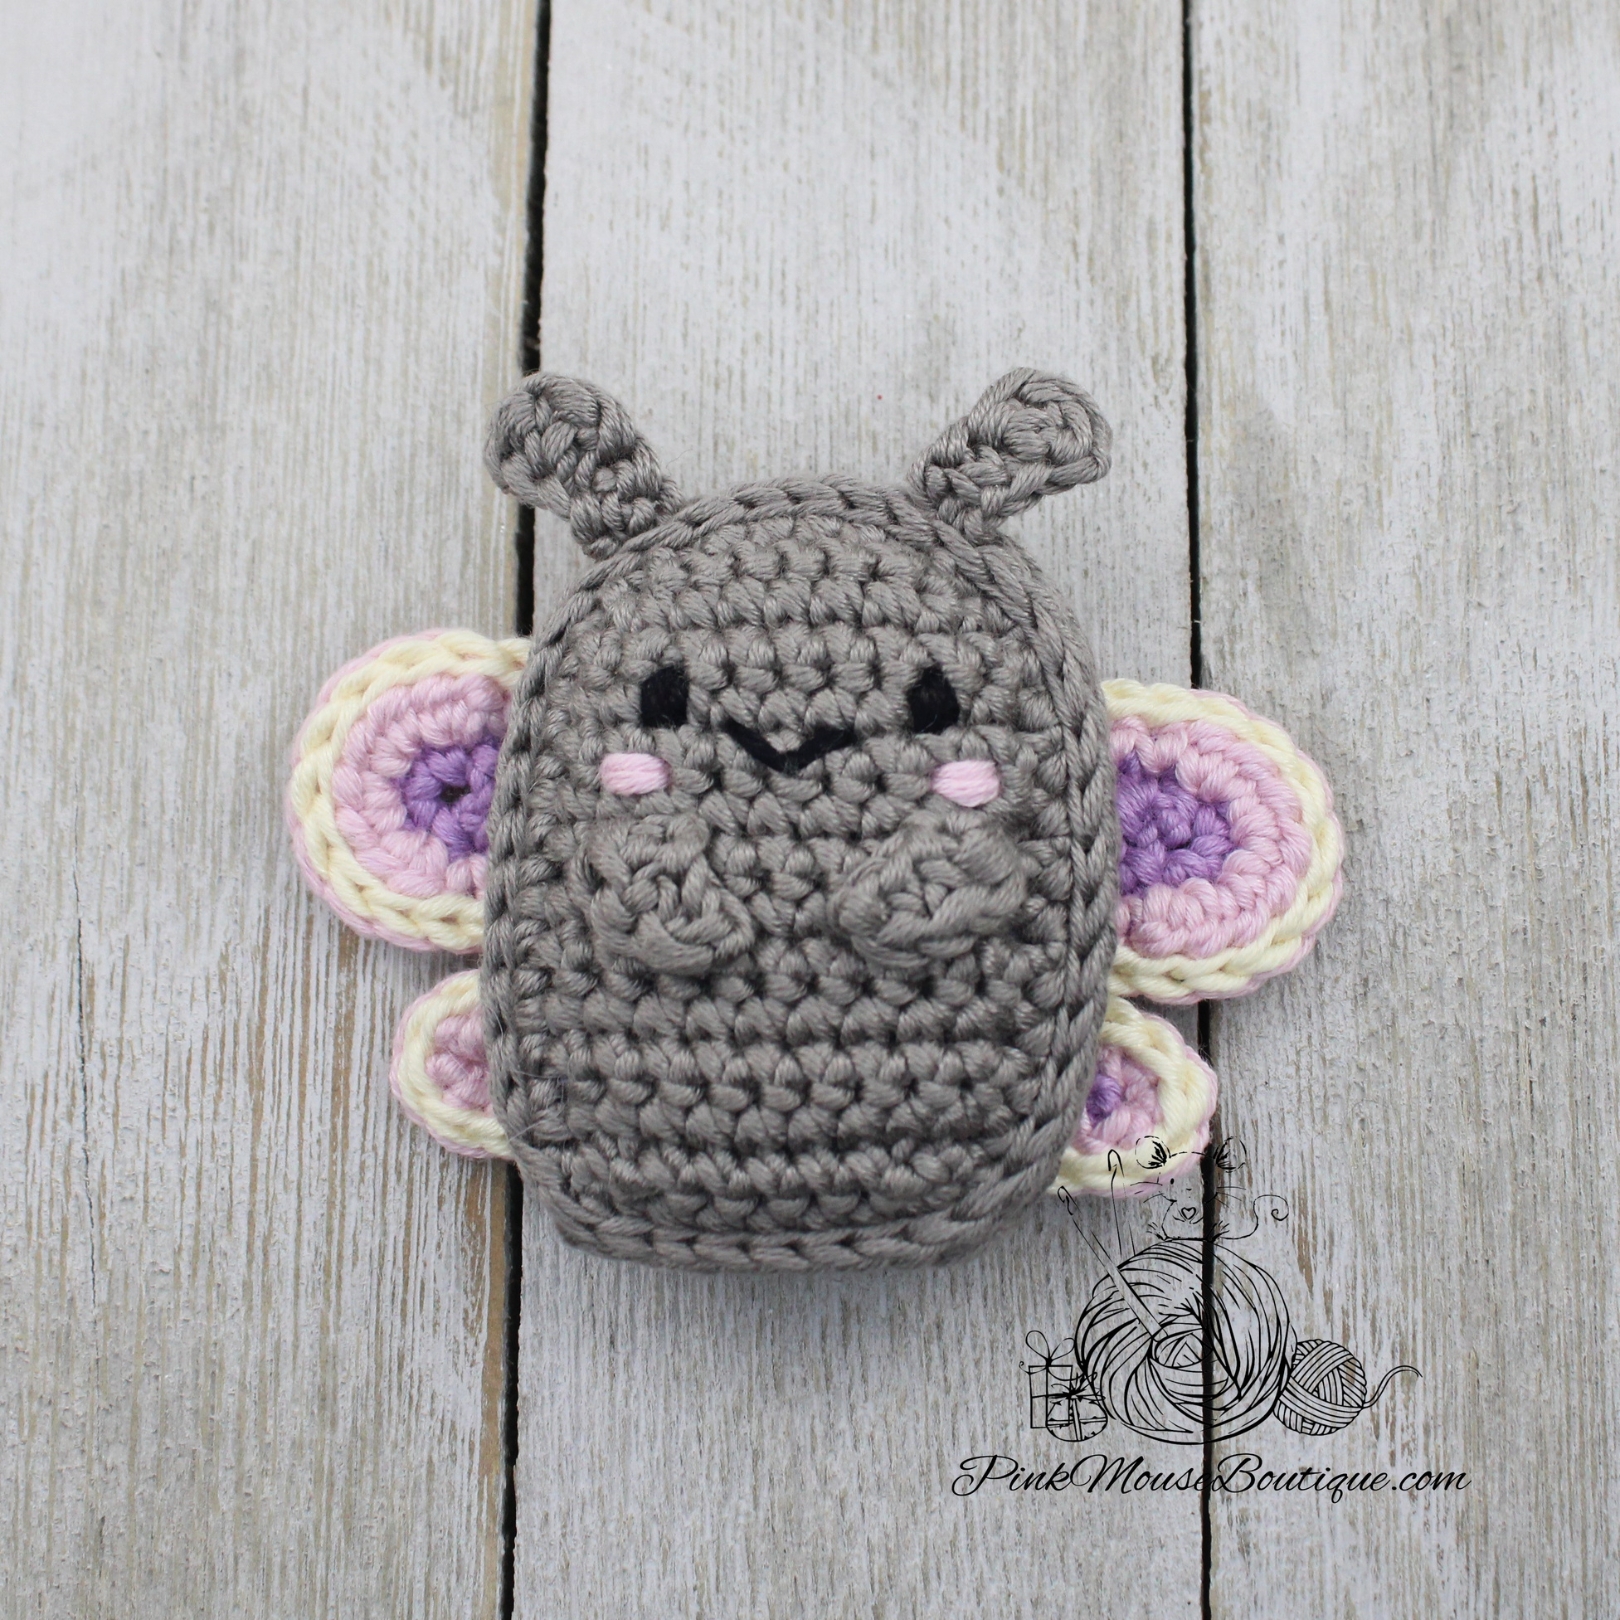
Part 9 of the Pocket Valentines series is a sweet little butterfly. As all patterns in this collection, this one is also beginner friendly and very quick to make. I hope you enjoy it!
Please note that the instructions for all Pocket Valentines will be available on my blog free of charge. If you’d like the PDF version which includes all patterns in a convenient downloadable document, you can visit my shops below.
Suggested Color – Purple, Light Pink, and Light Yellow
With Purple, ch 7
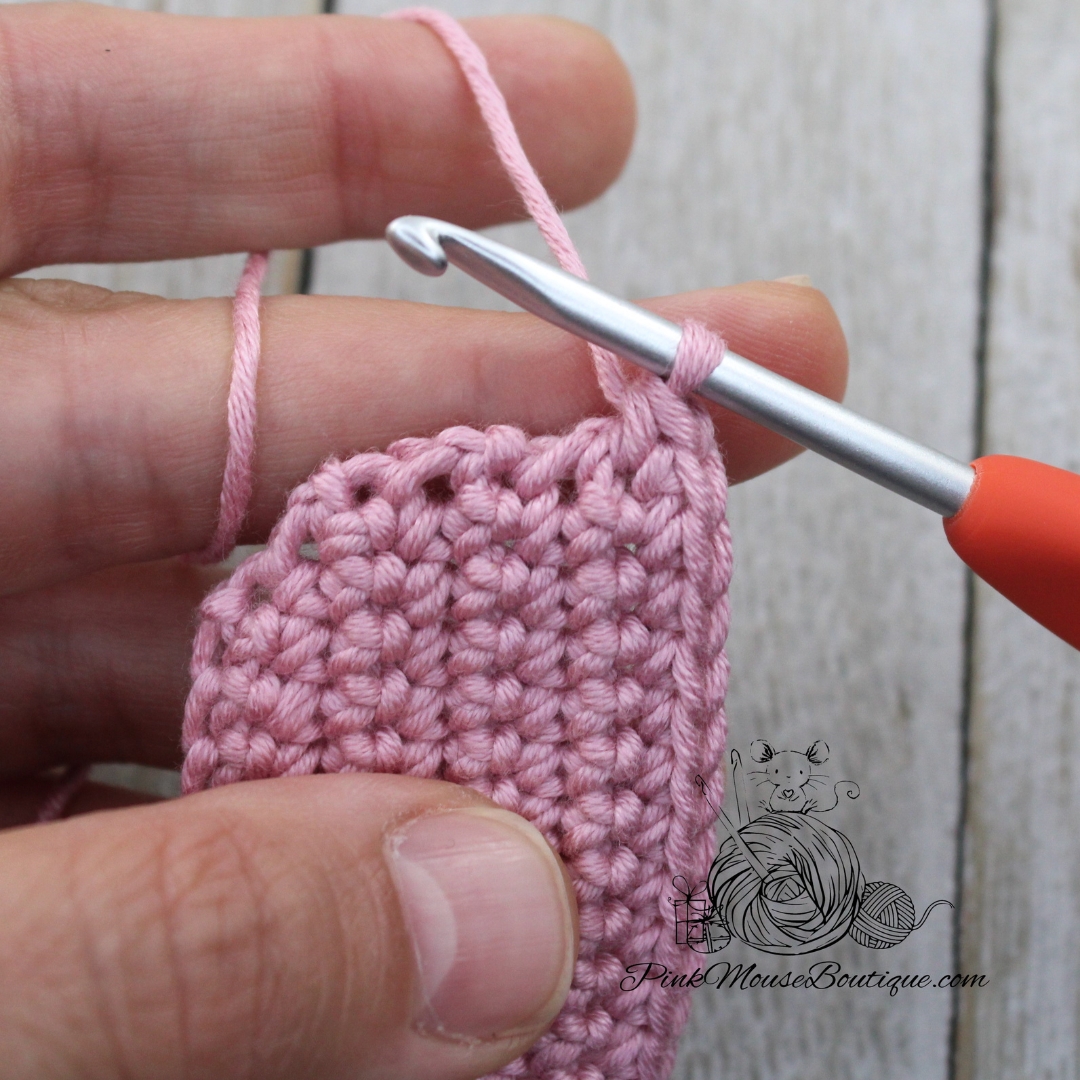
Row 1: 1 sc in 2nd ch from hook, 1 sc in 4 ch, 4 sc in last ch; working on the opposite side of chain 1 sc in 5 ch; ch 1 and turn – 14 sts
Change Color – Light Pink
Row 2: 1 sc in 5 sts, 4 hdc inc, 1 sc in 5 sts; turn – 18 sts
Change Color – Light Yellow
Row 3: sl st in each st – 18 sts
Fasten off leaving a long tail for sewing. Set aside.
SMALL WINGS (x 2)
Suggested Color – Purple, Light Pink, and Light Yellow
With Purple, ch 5
Change Color – Light Pink
Ch one more
Row 1: 1 sc in 2nd ch from hook, 1 sc in 3 chains; 4 sc in last ch; working on the opposite side of chain 1 sc in 4 ch; turn – 12 sts
Change Color – Light Yellow
Row 2: sl st in each st – 12 sts
Leave a long purple tail for sewing. Leave a long pink tail for sewing. Fasten off.
ANTENNAE (x 2)
Suggested Color – Taupe
Ch 4
Row 1: 2 dc in 2nd ch from hook, sc in last 2 chains – 4 sts
Fasten off leaving a tail for sewing.
ARMS (x 2)
Suggested color – Taupe
Ch 4
Row 1: in back bump of ch only sc in 2nd ch from hook, sc in next, hdc in last ch
Fasten off leaving a tail for sewing.
BODY (x 2)
Suggested Colors – Taupe
With Dark Yellow, ch 7
Row 1: in back bump of ch only, 2 sc in 2nd ch from hook, 1 sc in 4 ch, 2 sc in last ch; ch 1 and turn – 8 sts
Row 2: inc, 1 sc in 6 sts, inc; ch 1 and turn – 10 sts
Rows 3 – 12: sc in each st; ch 1 and turn – 10 sts (10 rows)
Row 13: sc, in BLO dec, 1 sc in 4 sts, in BLO dec, sc; ch 1 and turn – 8 sts
Row 14: sc in each st
Continue sc around the entire body, in every st and row.
Sl st to the 1st st of Row 14.
Fasten off the 1st piece and weave in the ends. Do not break the yarn from the 2nd piece.
ASSEMBLY
The facial features will be sewn to the piece that has not been fastened off.
With Black yarn, sew the eyes on Row 4 or 5, 5 stitches apart.
With Black yarn, sew a line between the eyes. The line should be 3 stitches long.
Insert the needle a row below the mouth and in the middle. Pull and go around the mouth to form a curve. Insert the needle again through the same stitch and pull. Tie a knot to secure the ends.
With Dark Pink, sew a couple of times a row below the eyes to make the cheeks.
Sew the arms a row below the cheeks.
Place the two pieces of the body together with the RS facing out. Slip stitch all around going through both pieces. Stuff lightly before you finish closing the body. Finish closing the body, fasten off, and secure the stitches (I tie knots and stuff inside the body).
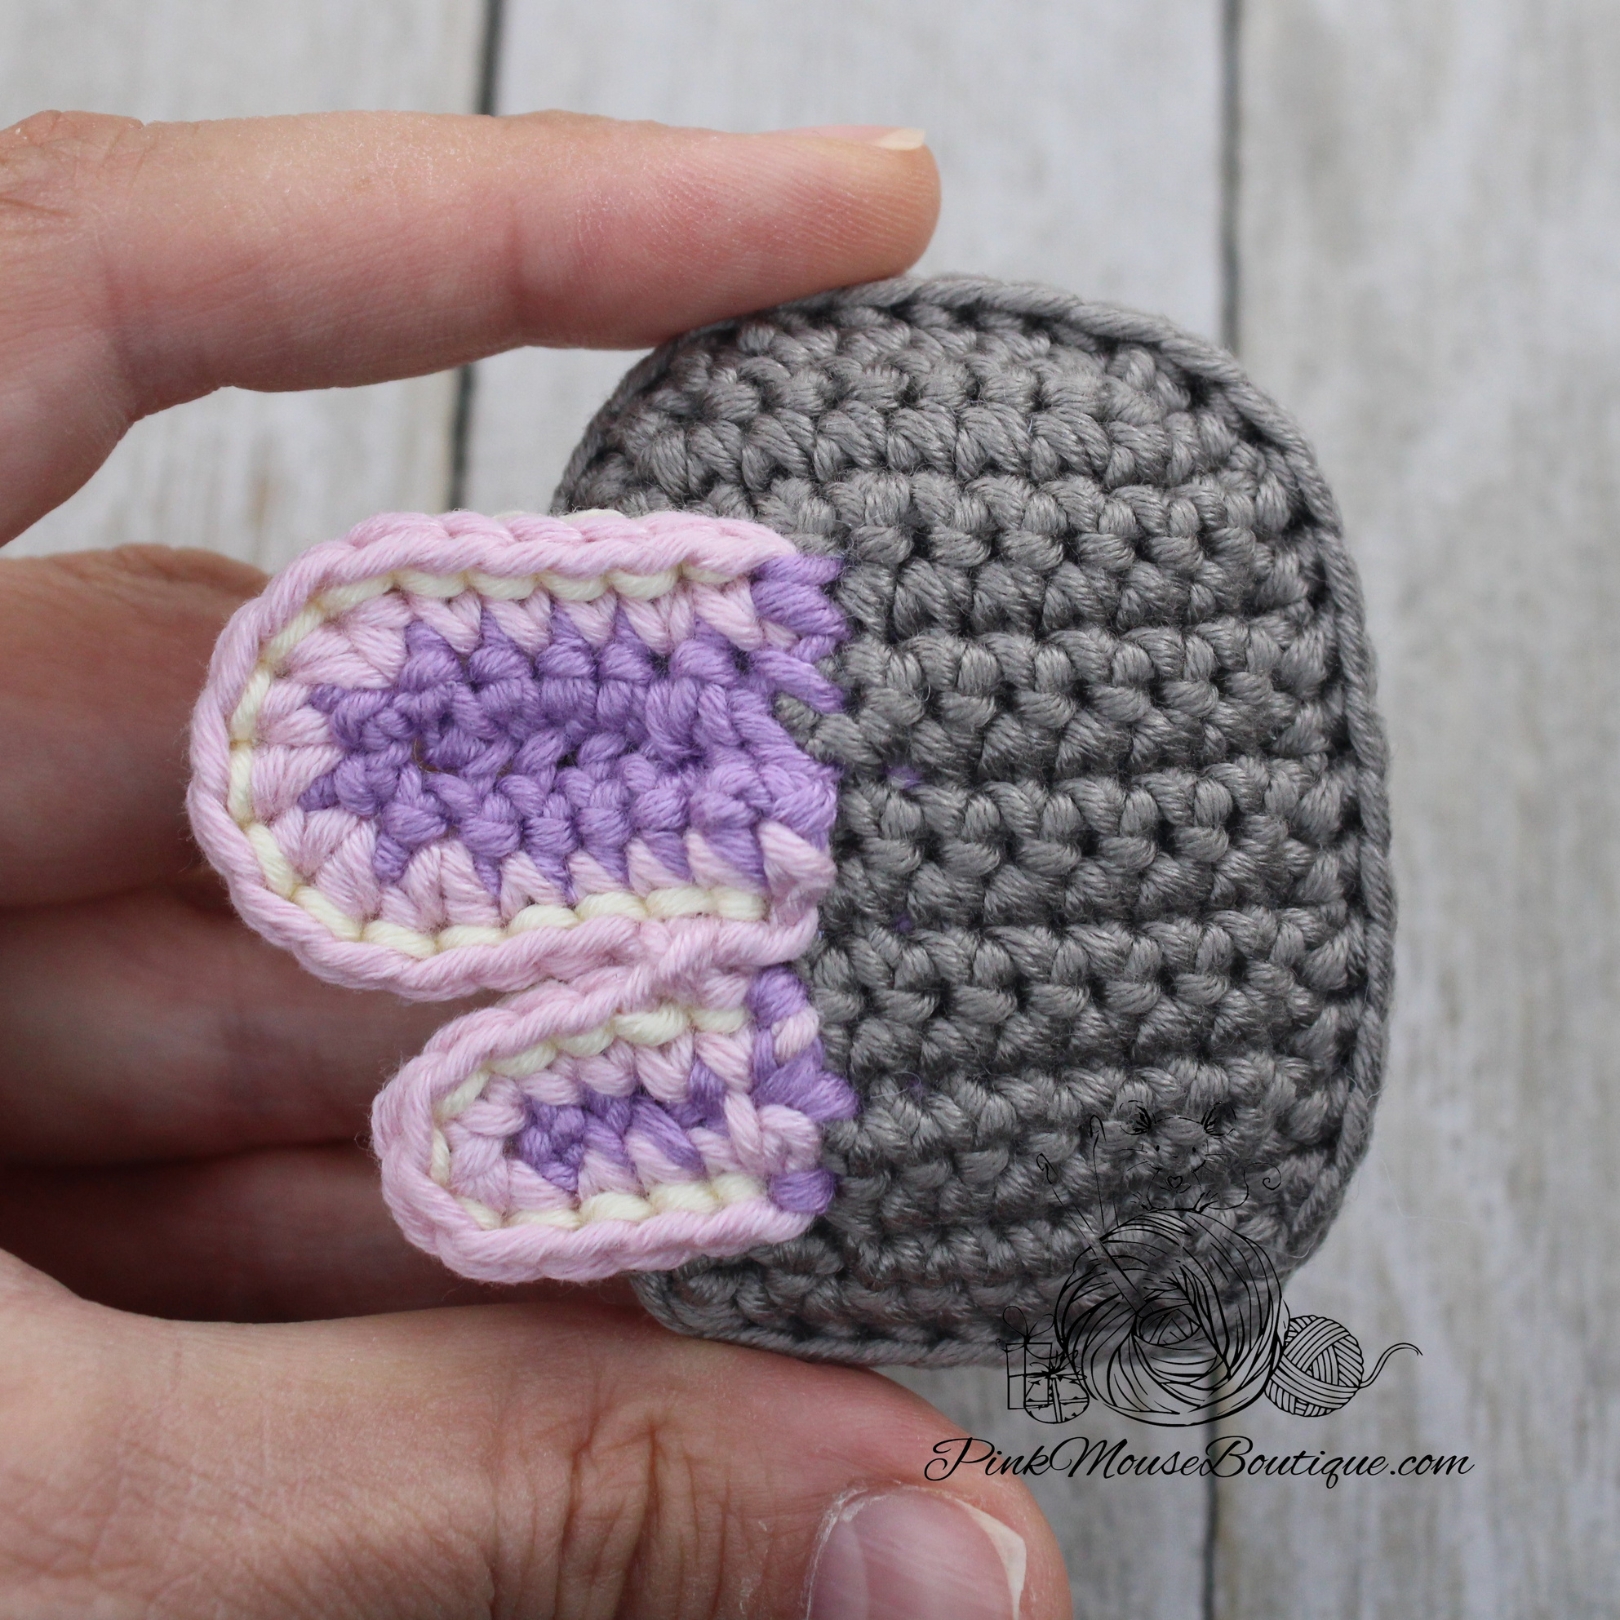
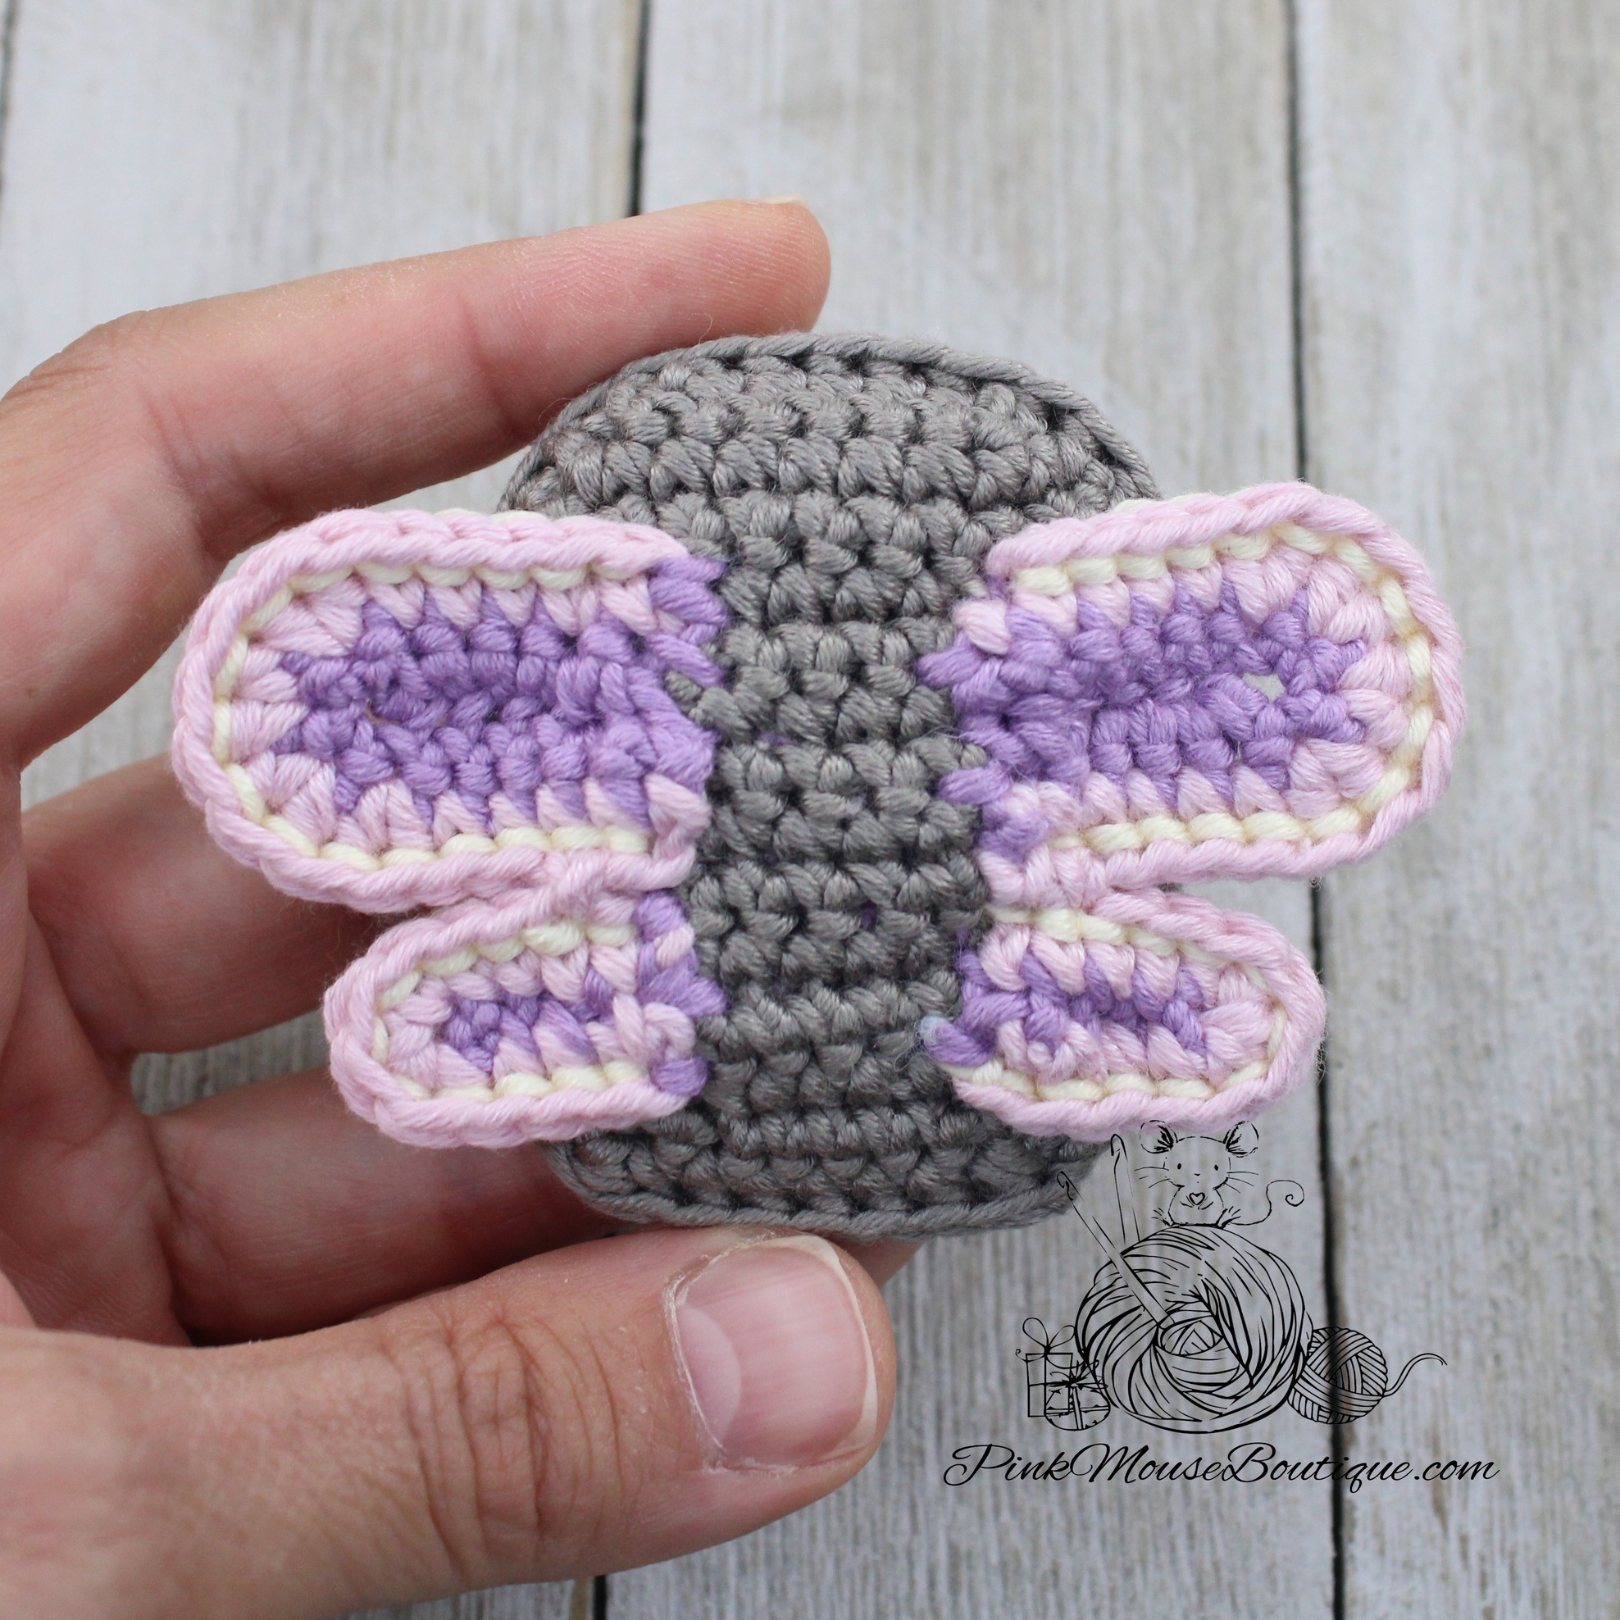
Position the wings, so that the larger one is higher than the smaller and so that they are 4 stitches apart at the back. Secure in place with pins.
Using the purple yarn and the whip stitch, sew the wings in place.
Using the light pink yarn, sew a couple of stitches from the large and small wings together.
Insert tails in same stitch place, tie knots, and stuff inside.
Sew the antennae in place using the BLO of the front piece and the FLO of the back piece. Tie knots and stuff the tails inside.
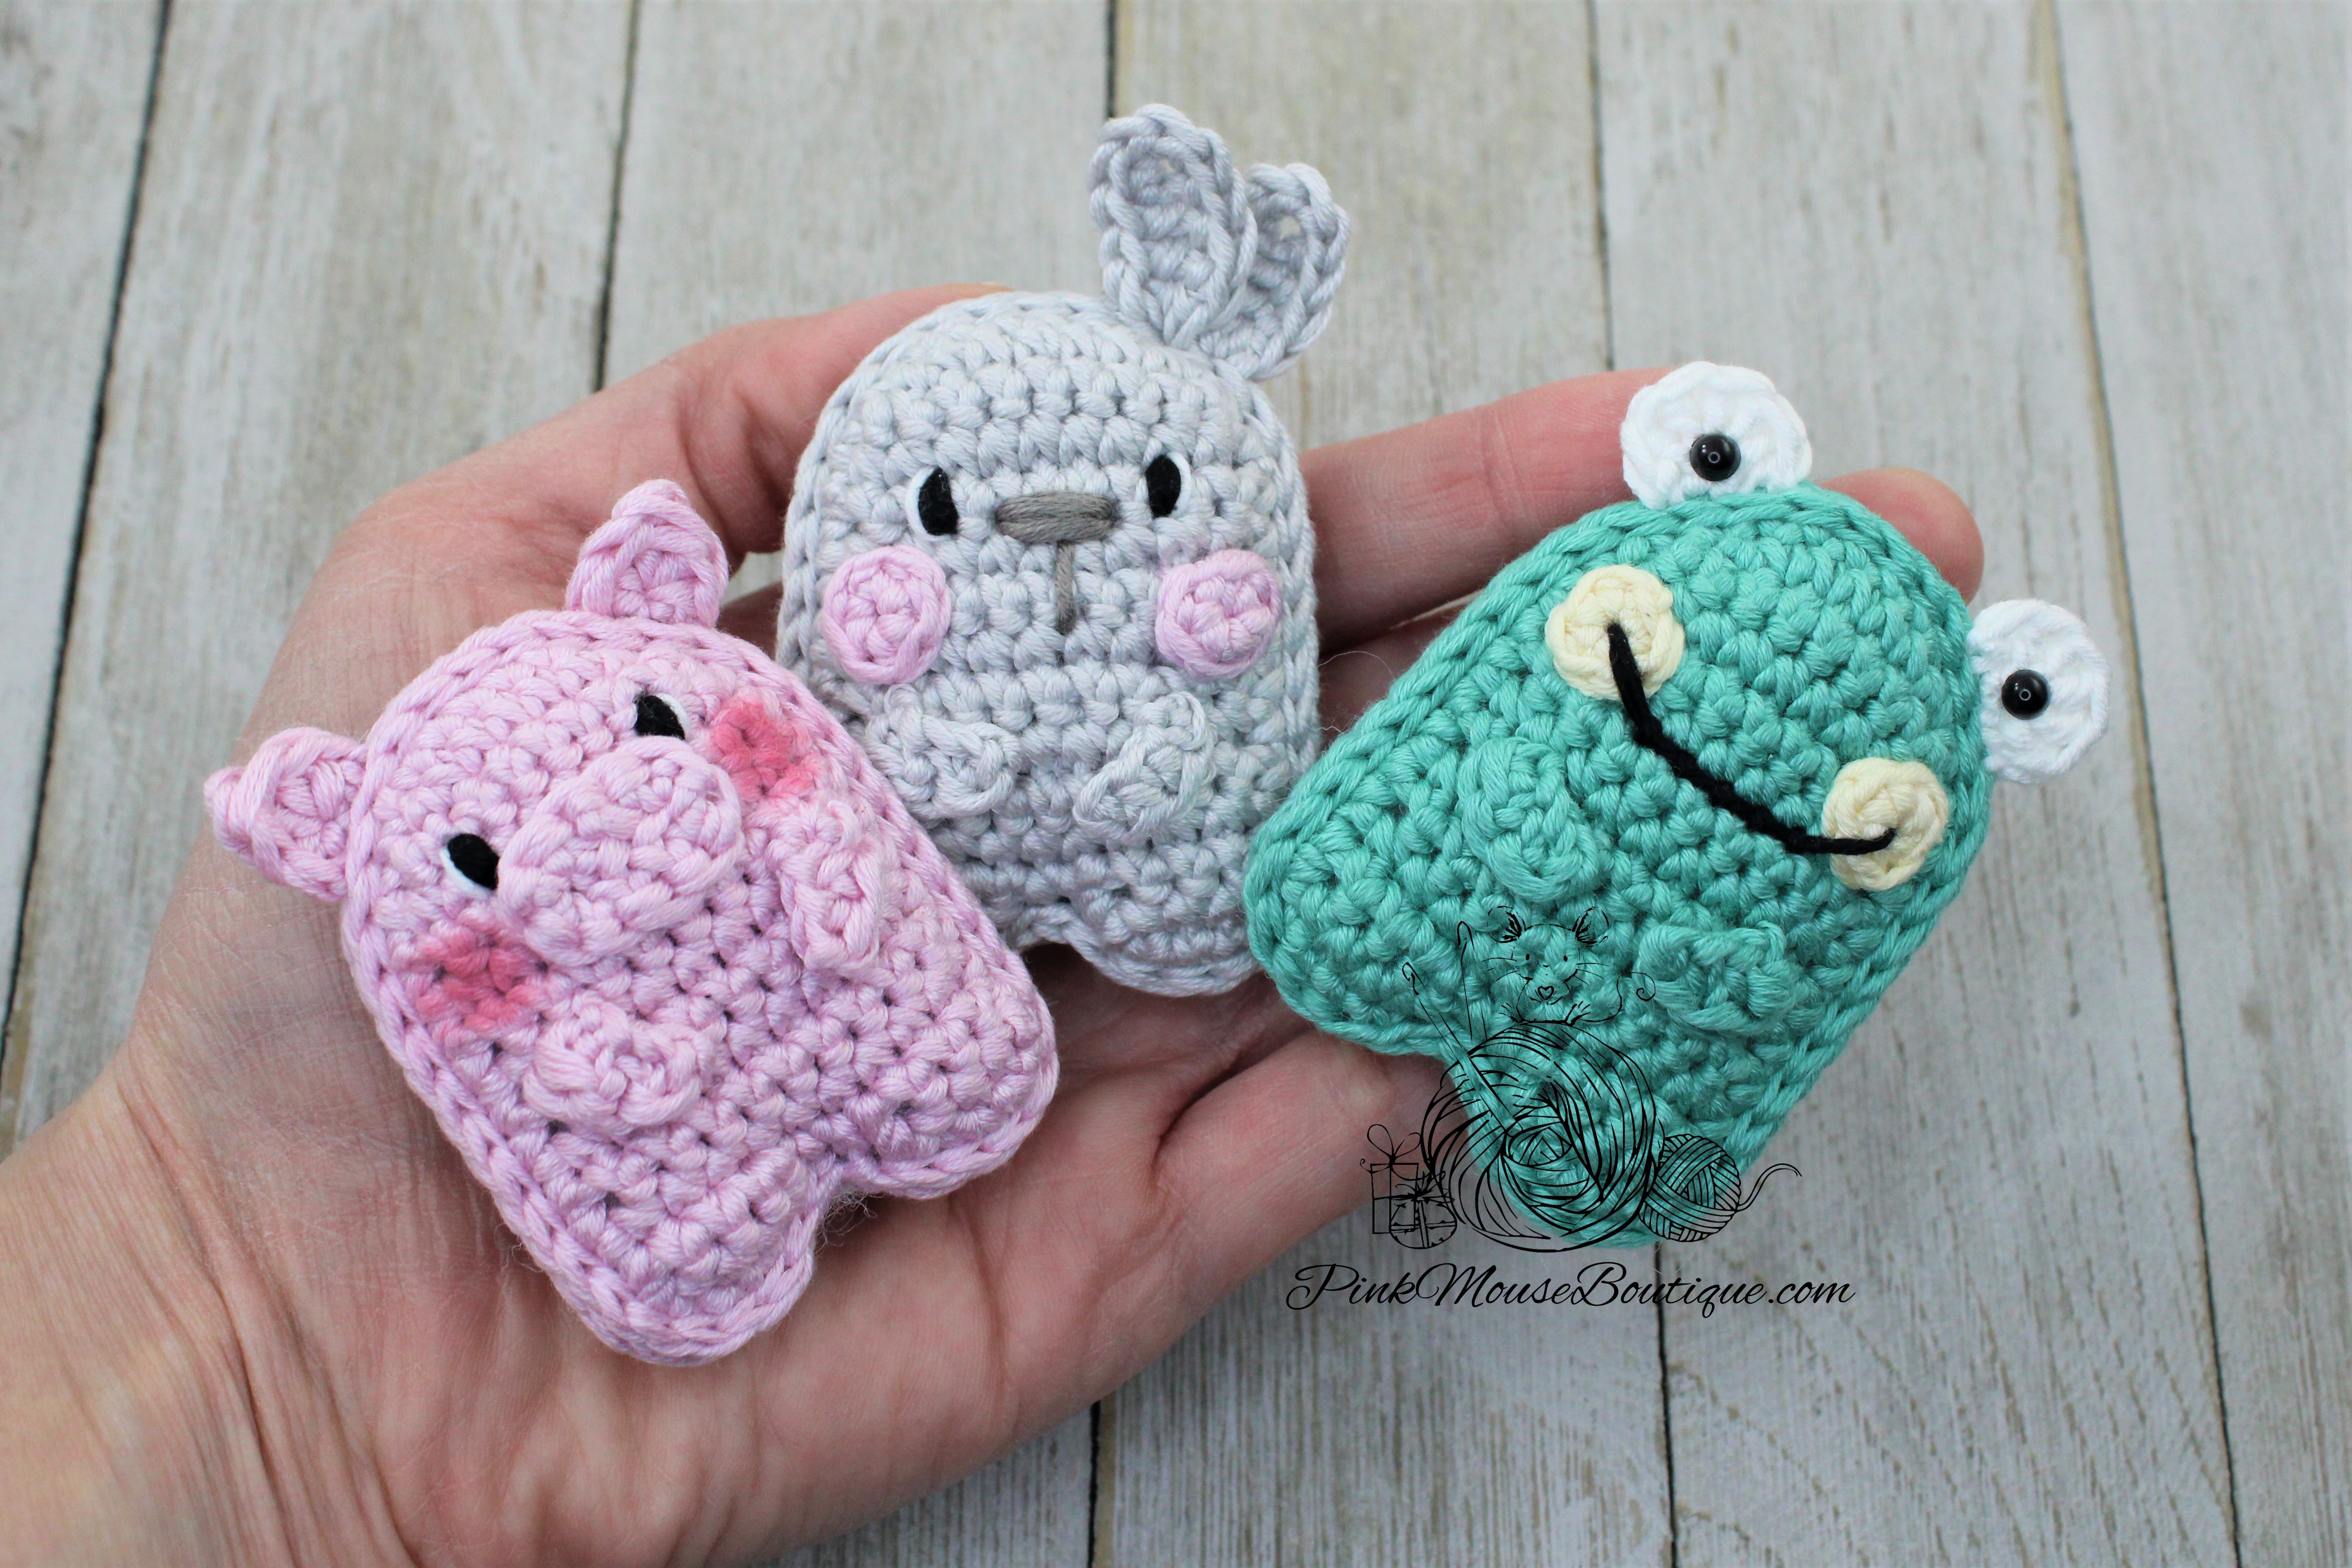
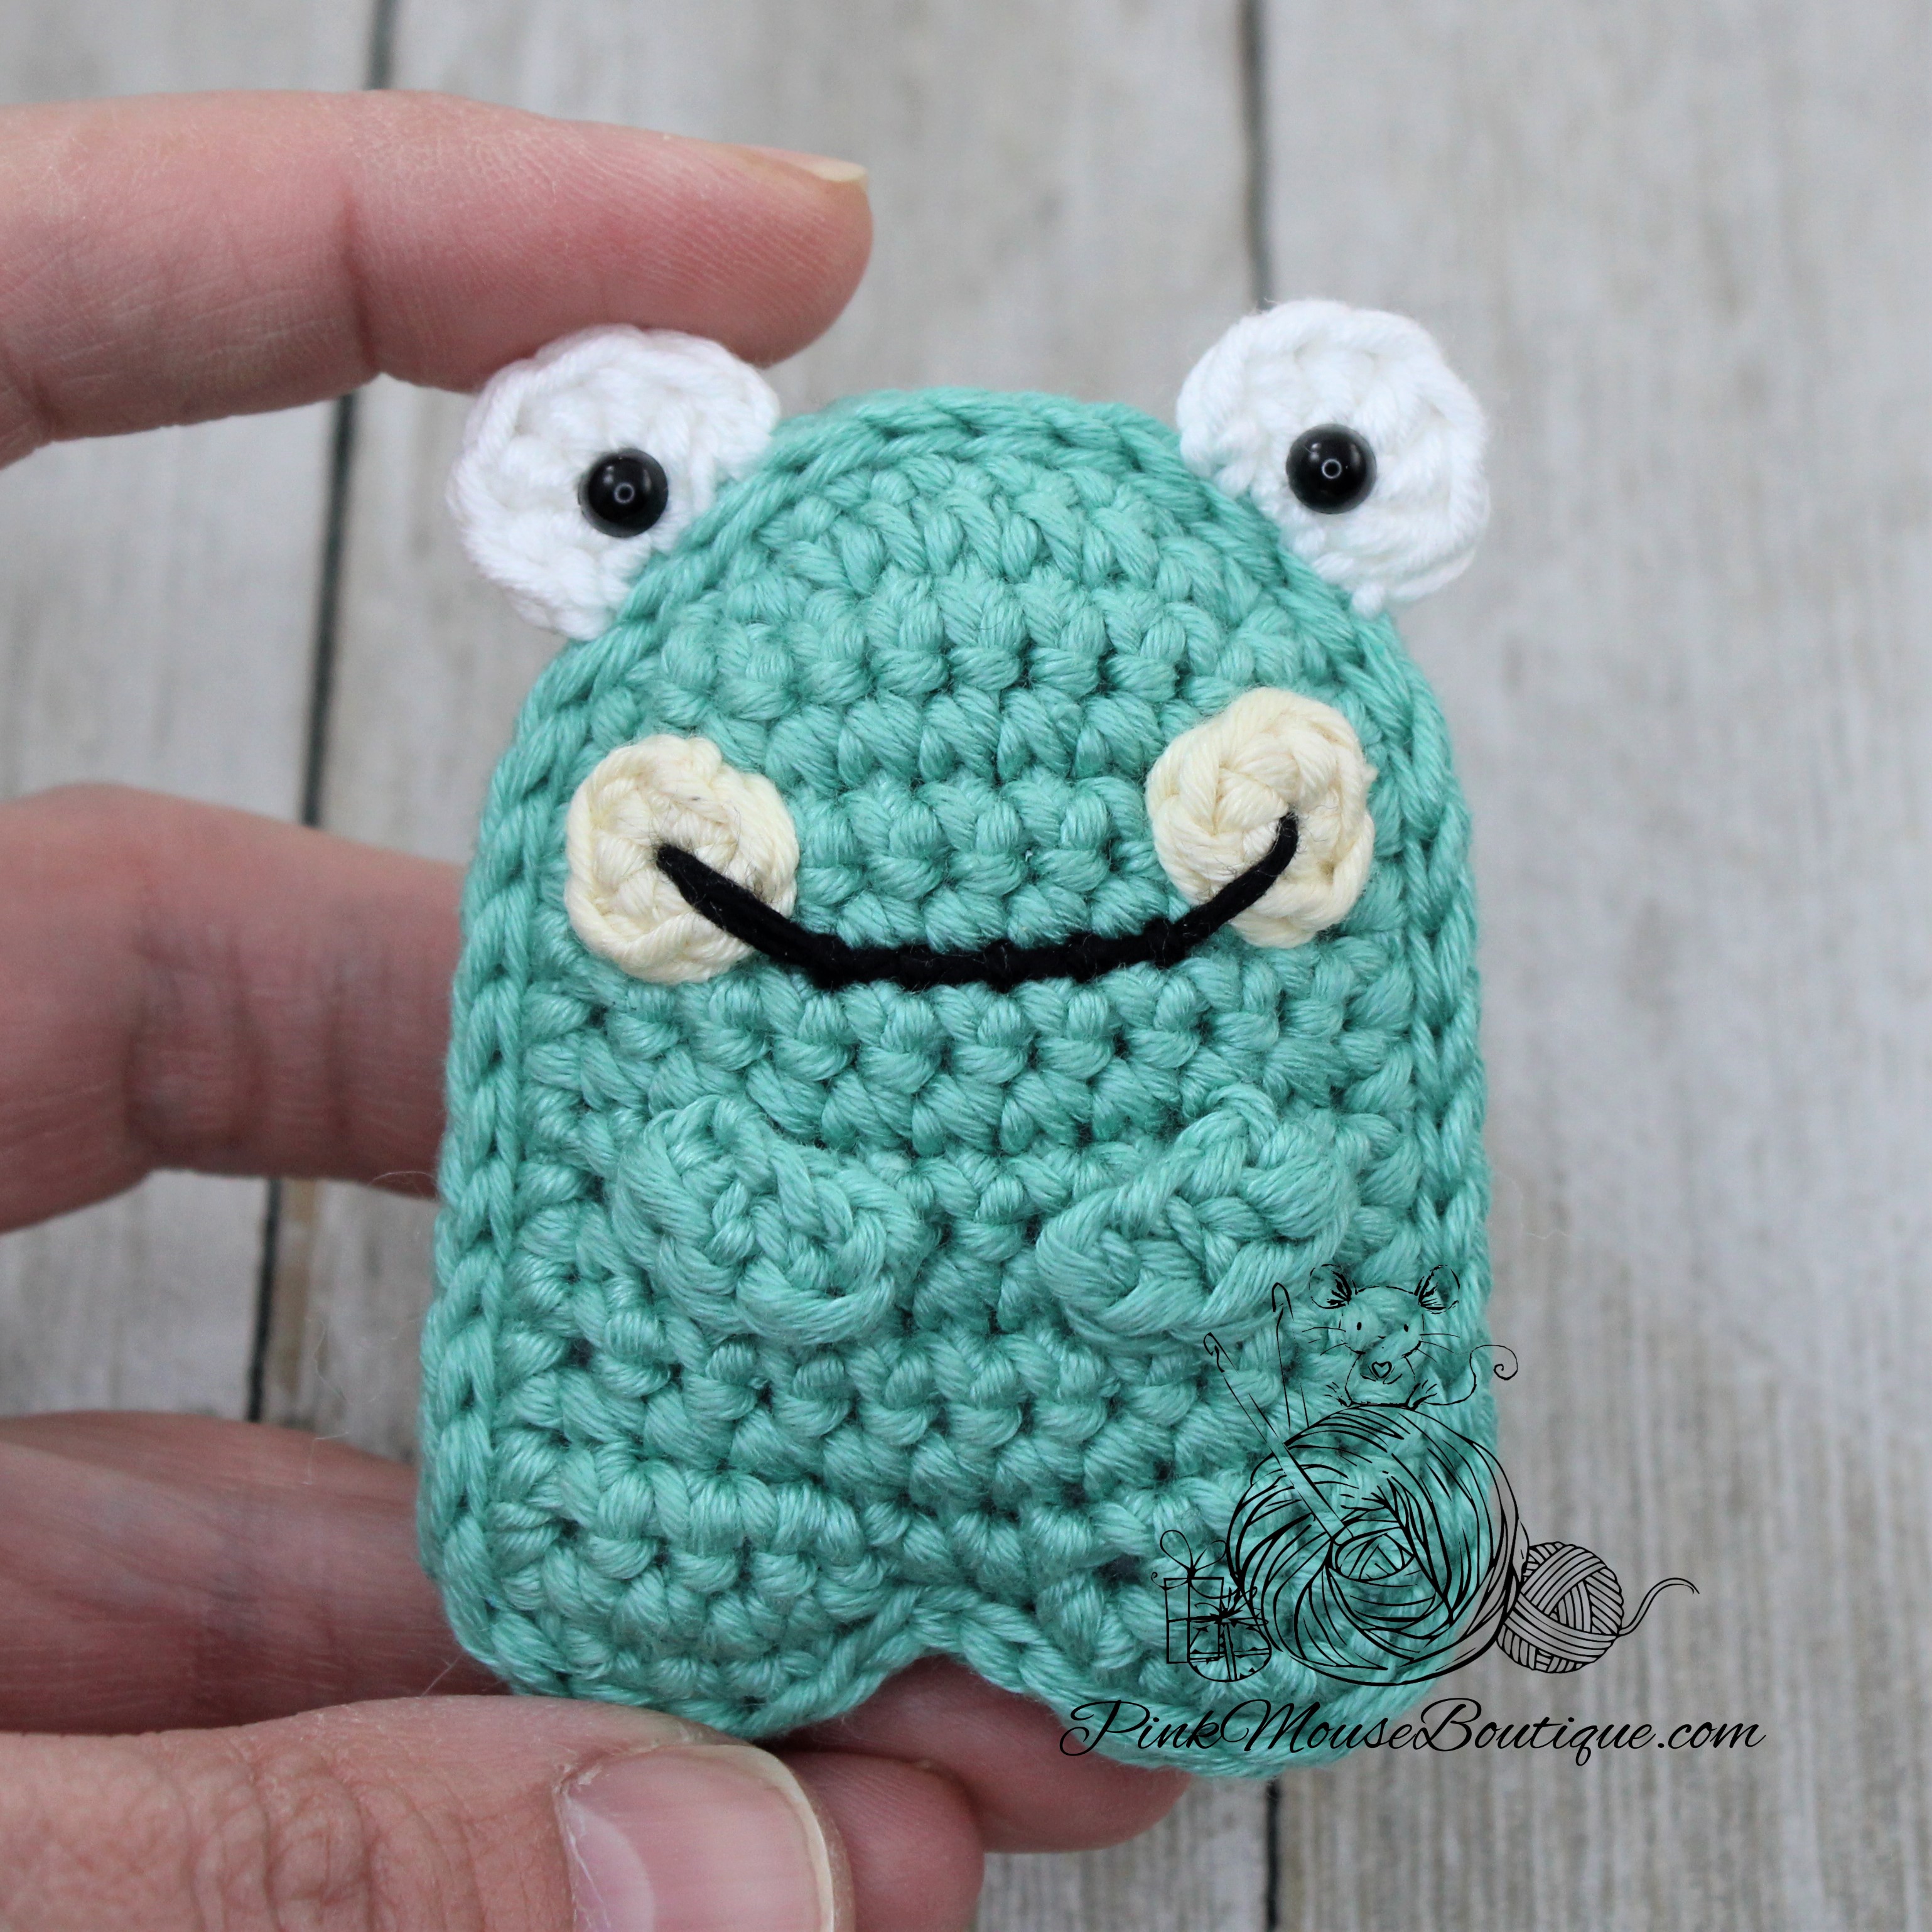
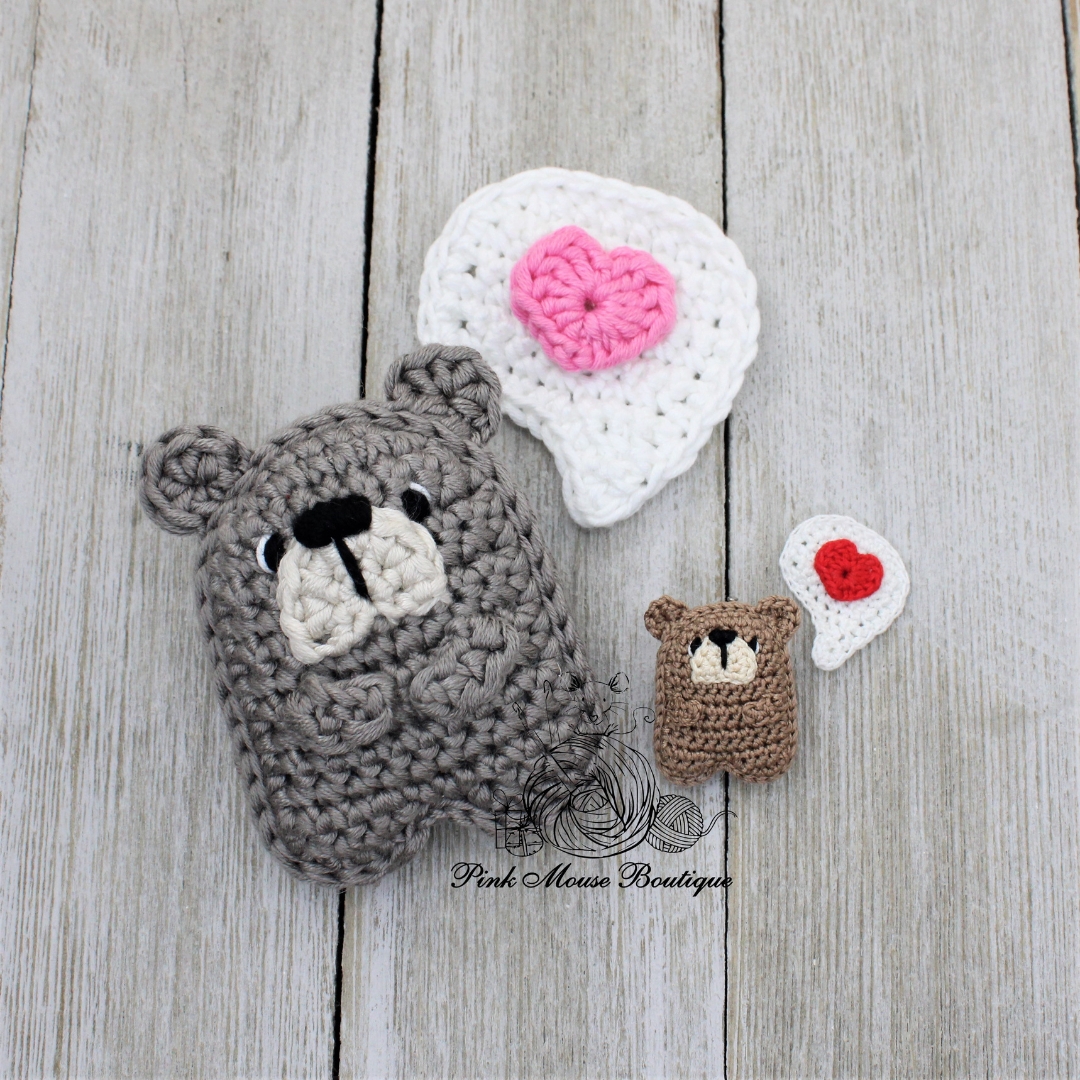
Originally, I only planned for five Pocket Valentines – Bear, Frog, Bee, Narwhal, and Bunny. But the more critters I made, the more I wanted to make. And here we are, at Part 8.
Follow the instructions below to make the cute jellyfish in the picture. More Pocket Valentines are coming soon.
Please note that the instructions for all Pocket Valentines will be available on my blog free of charge. If you’d like the PDF version which includes all patterns in a convenient downloadable document, you can visit my shops below.
Drops Muskat Worsted Weight: Pomegranate and Black
Crochet Hook, 3.25 mm
Stuffing
Others: sewing needle, scissors
Abbreviations
ch – chain
st – stitch
sl st – slip stitch
sc – single crochet
hdc – half double crochet
dc – double crochet
inc – increase
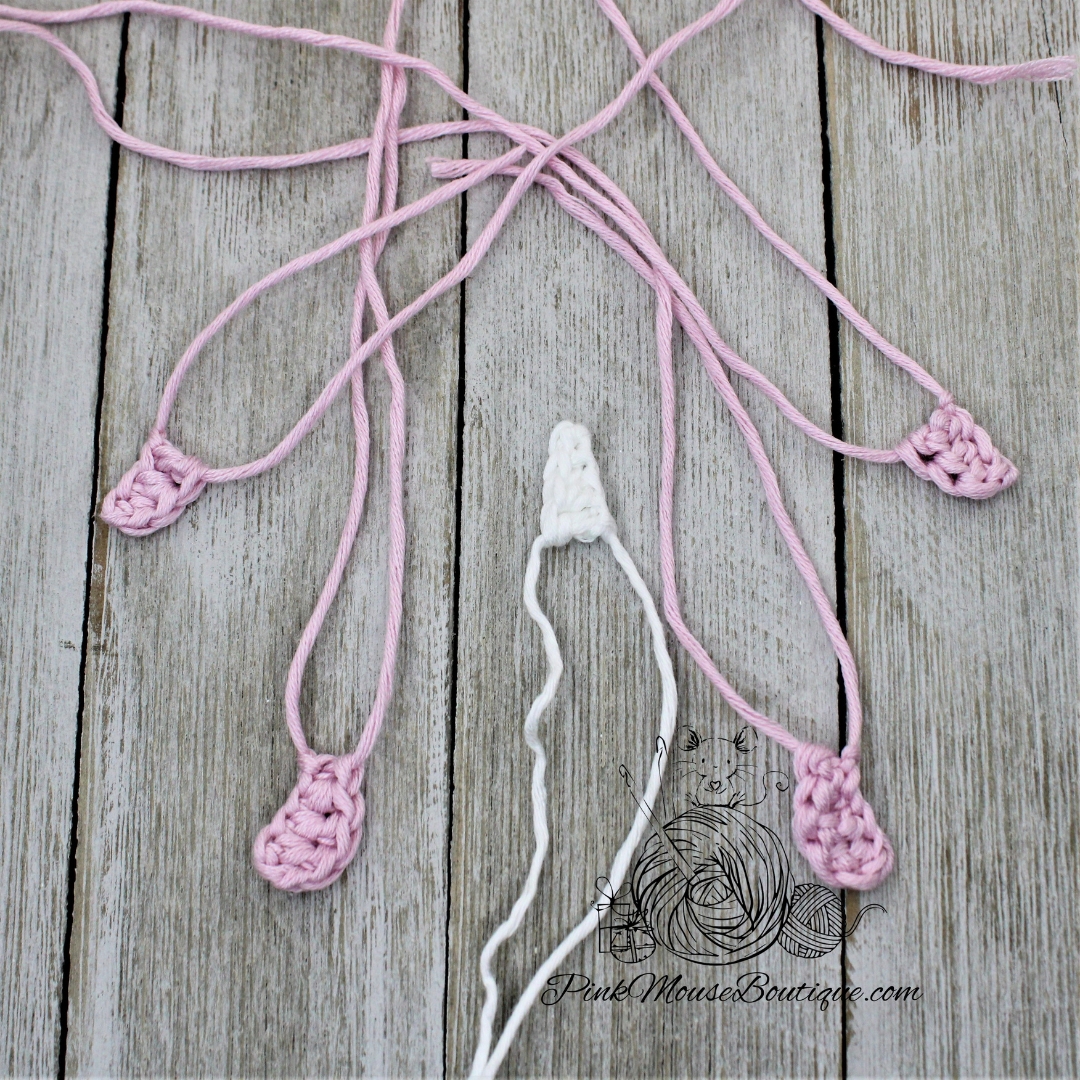
TENTACLES (x 6)
Suggested Color – Pomegranate
Ch 16
Row 1: in back bump of ch only, 1 sc in 2nd ch from hook, sc until the end – 15 sts
Fasten off leaving a tail for sewing. Set aside.
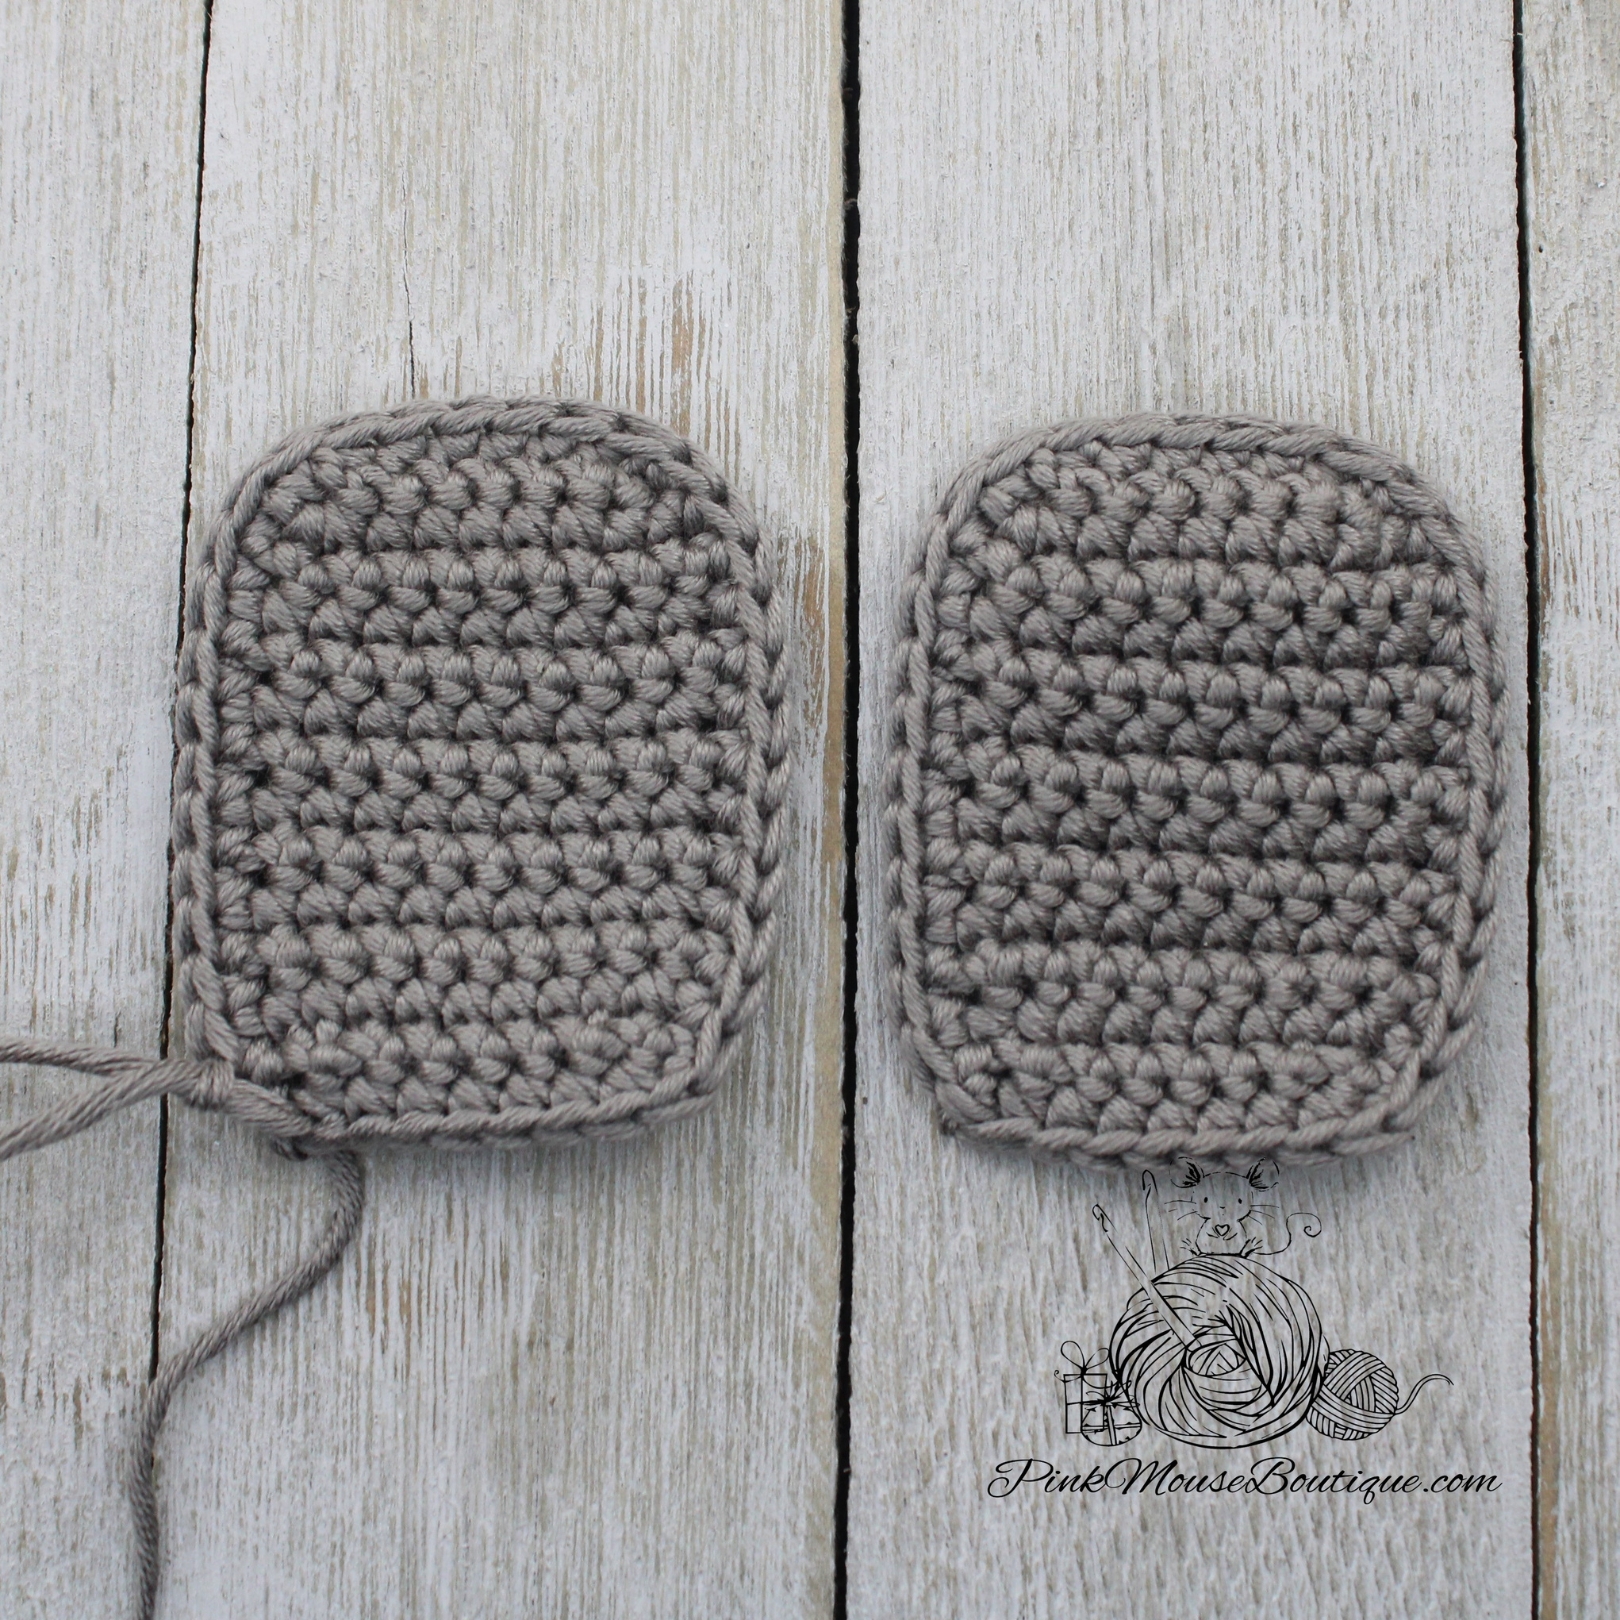
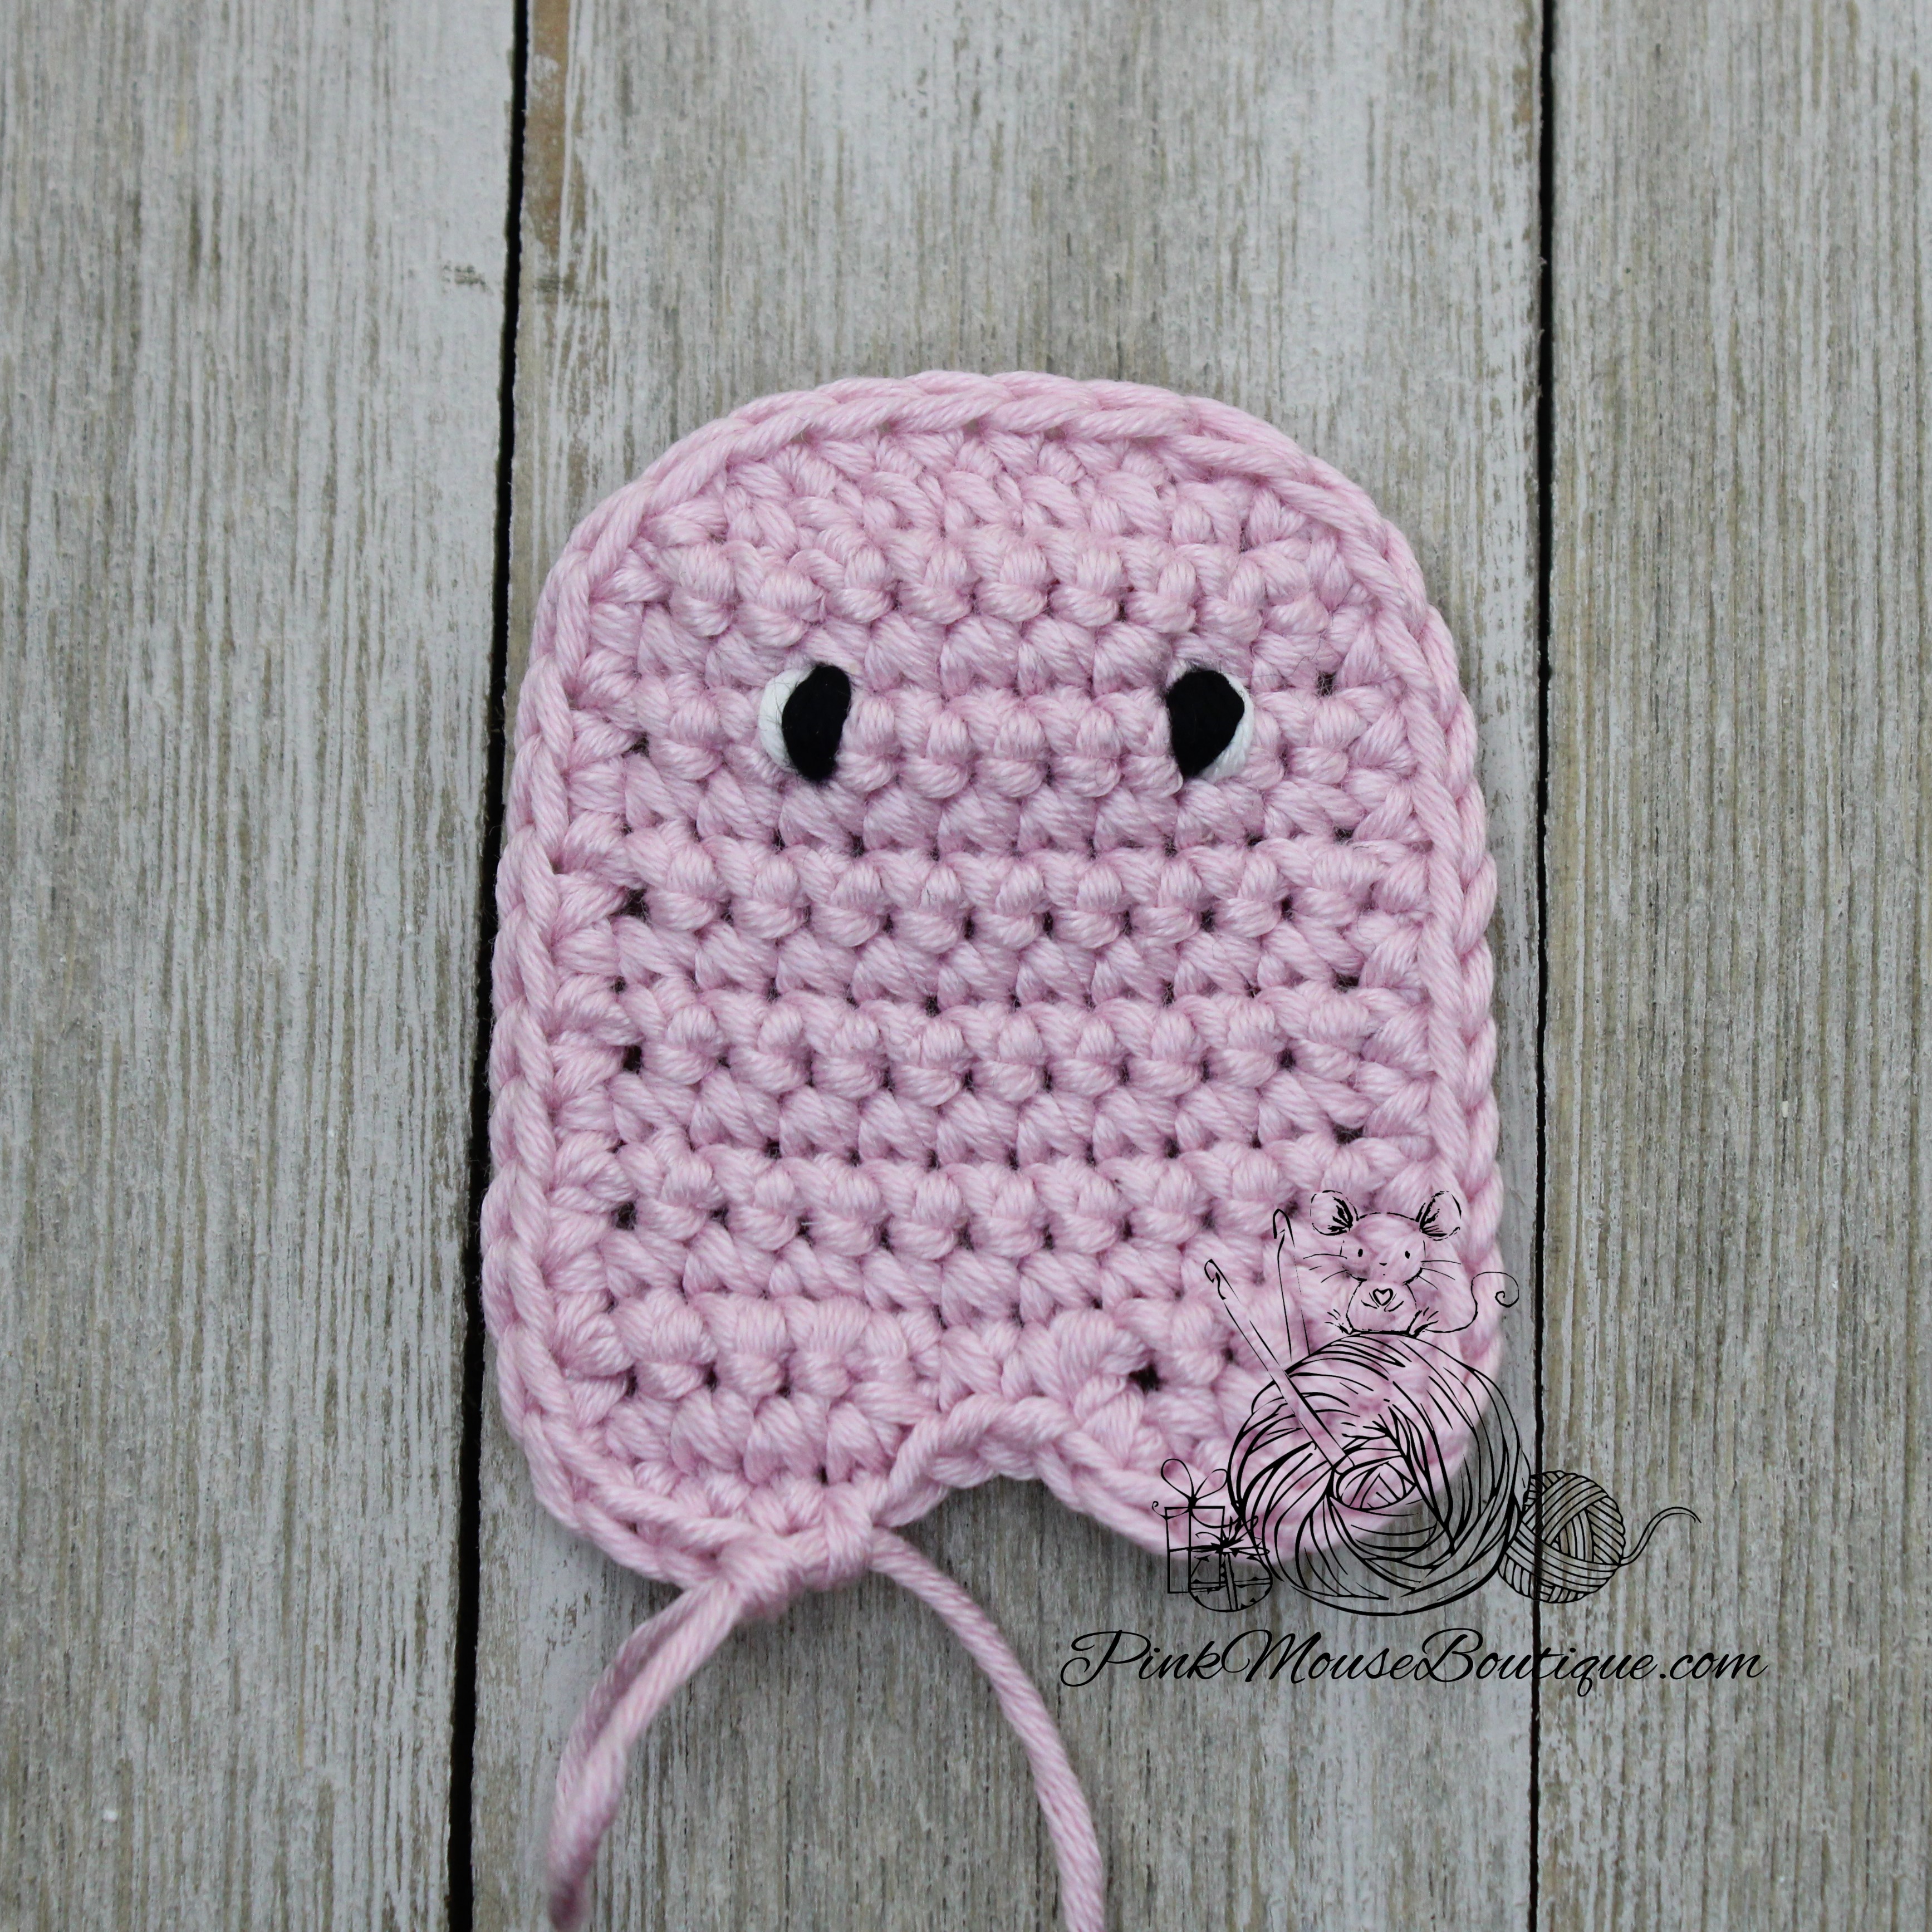
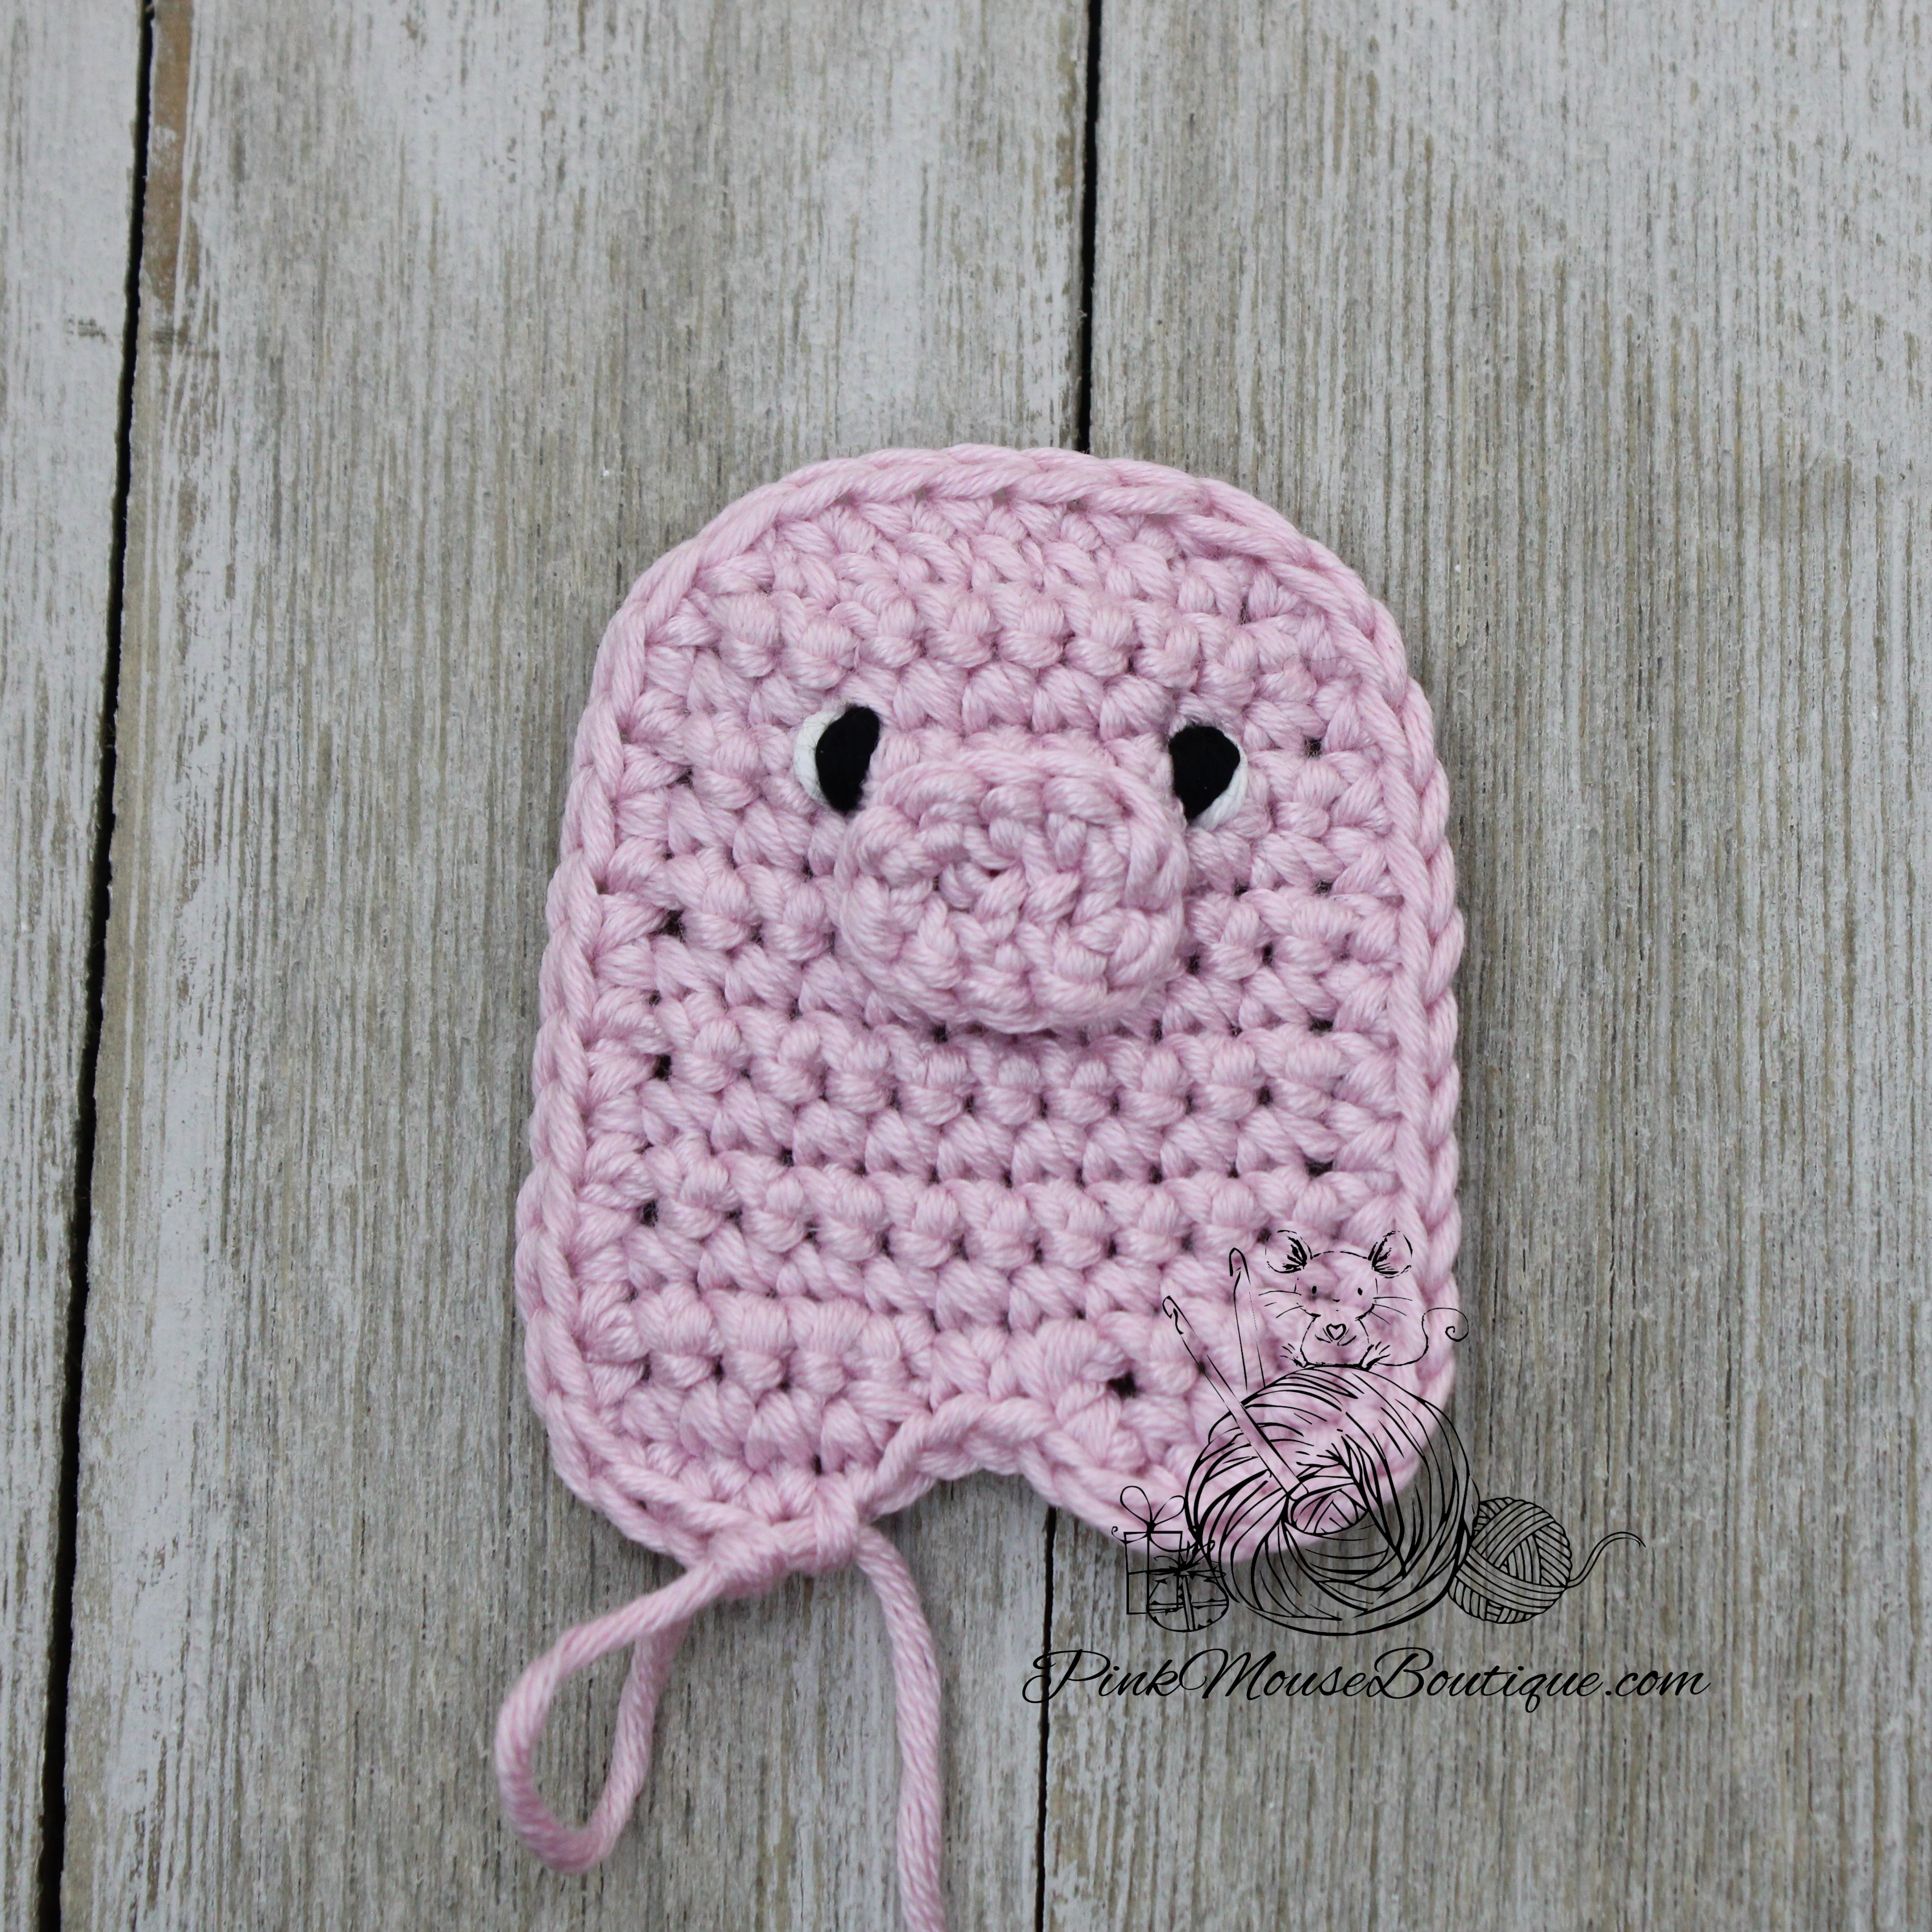
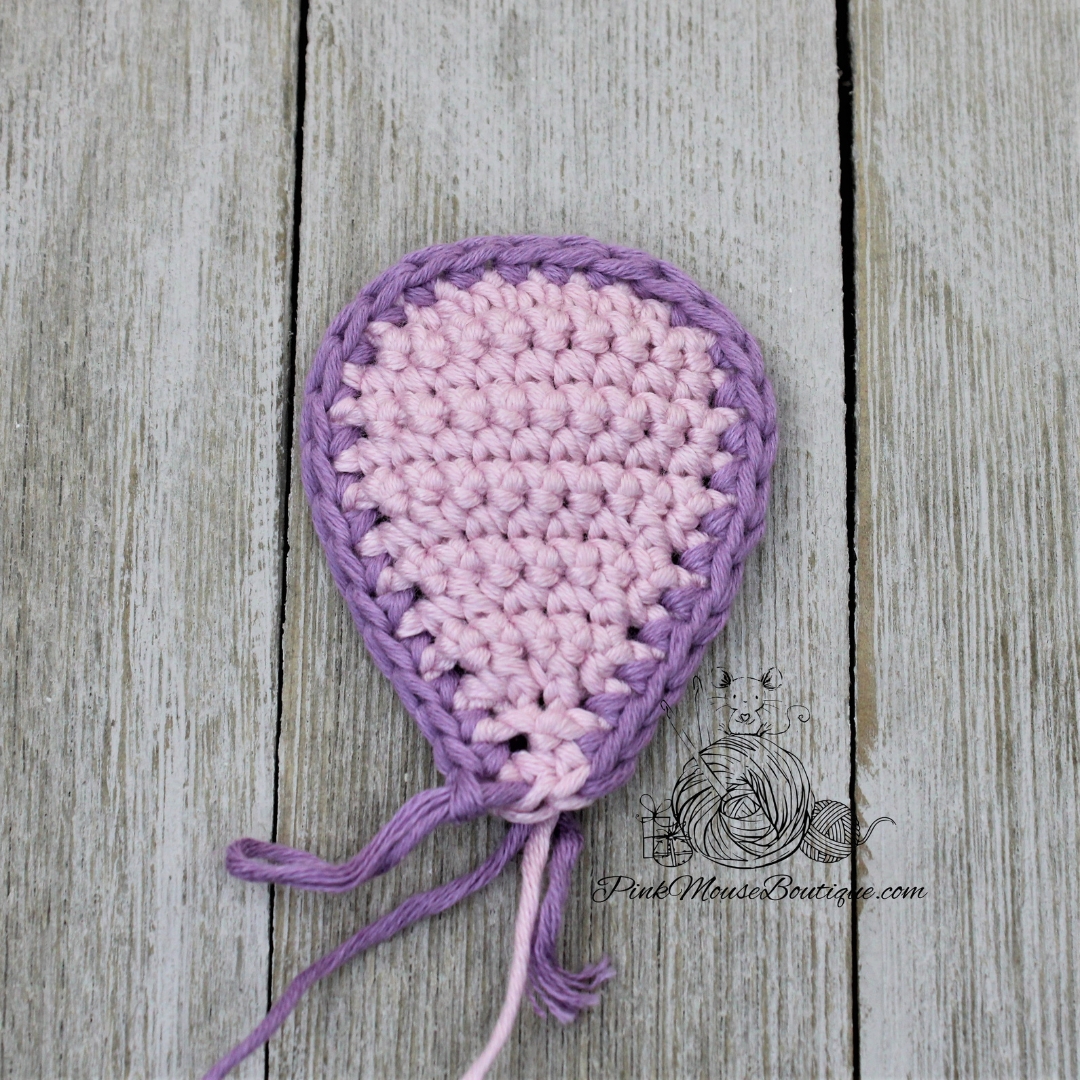
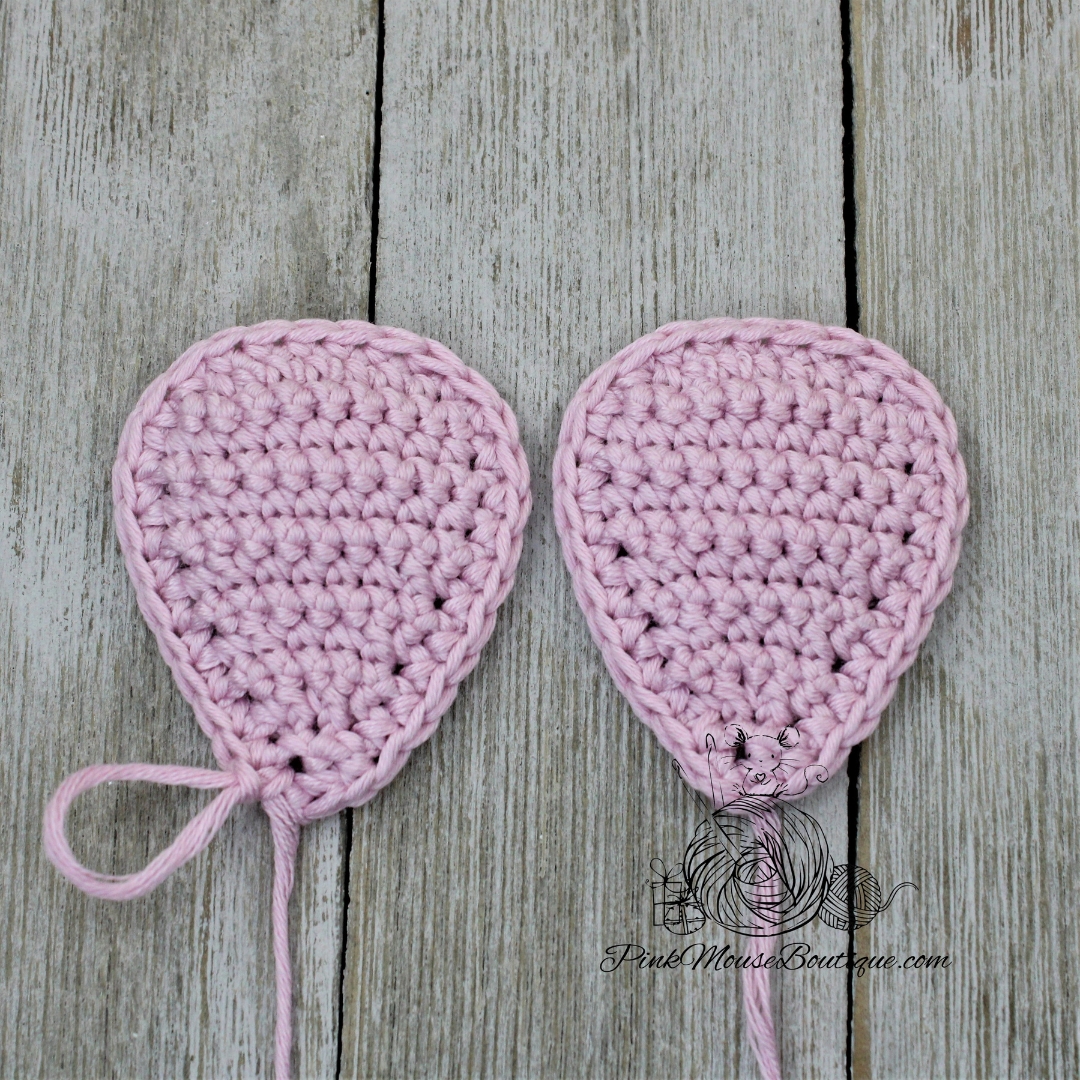
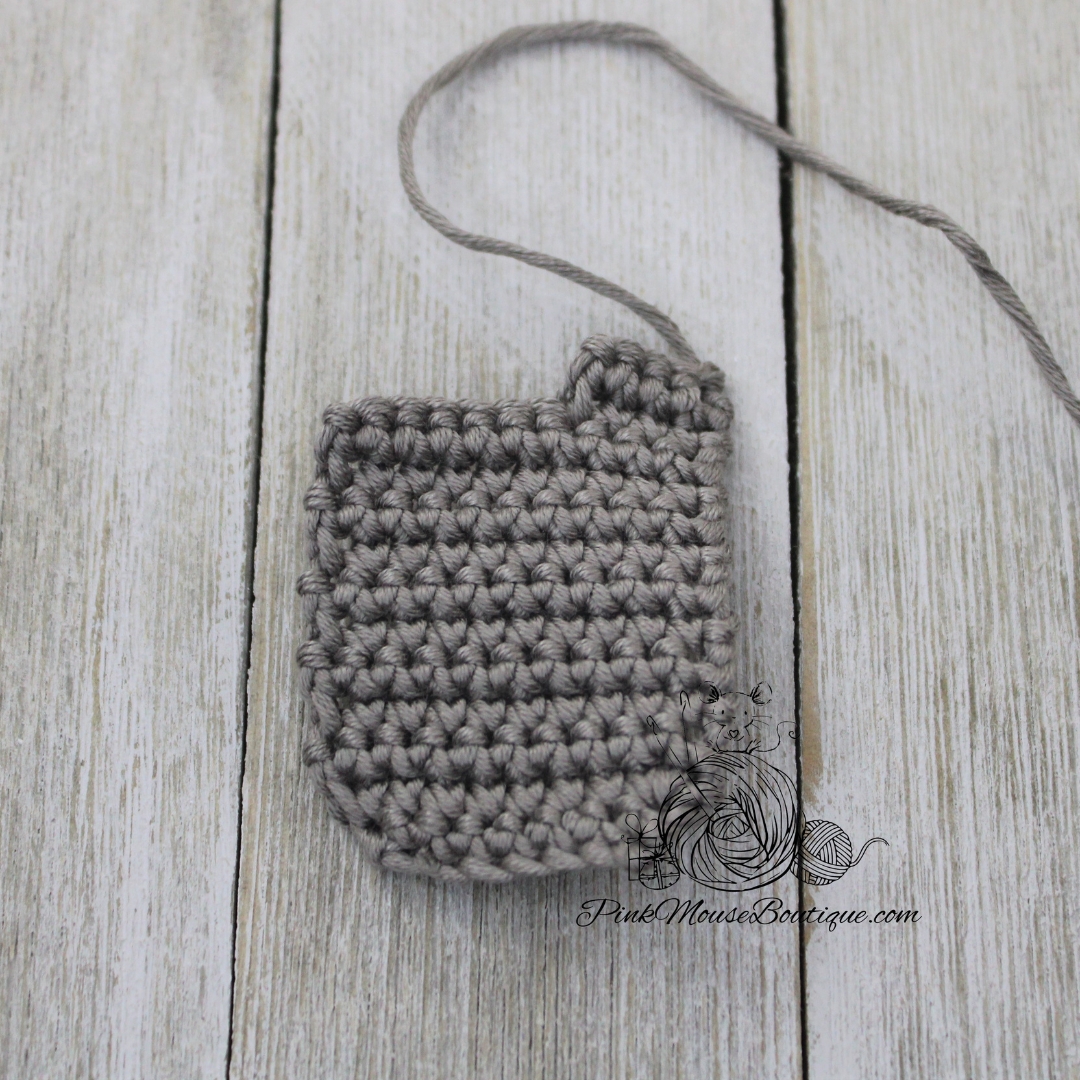
BODY (x 2)
Suggested Colors – Pomegranate
ch 7
Row 1: in back bump of ch only, 2 sc in 2nd ch from hook, 1 sc in 4 ch, 2 sc in last ch; ch 1 and turn – 8 sts
Row 2: inc, 1 sc in 6 sts, inc; ch 1 and turn – 10 sts
Row 3: inc, 1 sc in 8 sts, inc; ch 1 and turn – 12 sts
Row 4: 1 sc in 5 sts, inc, 1 sc in 6 sts; ch 1 and turn – 13 sts
Rows 5 – 7: sc in each st; ch 1 and turn – 13 sts (3 rows)
Row 8: sc in each st
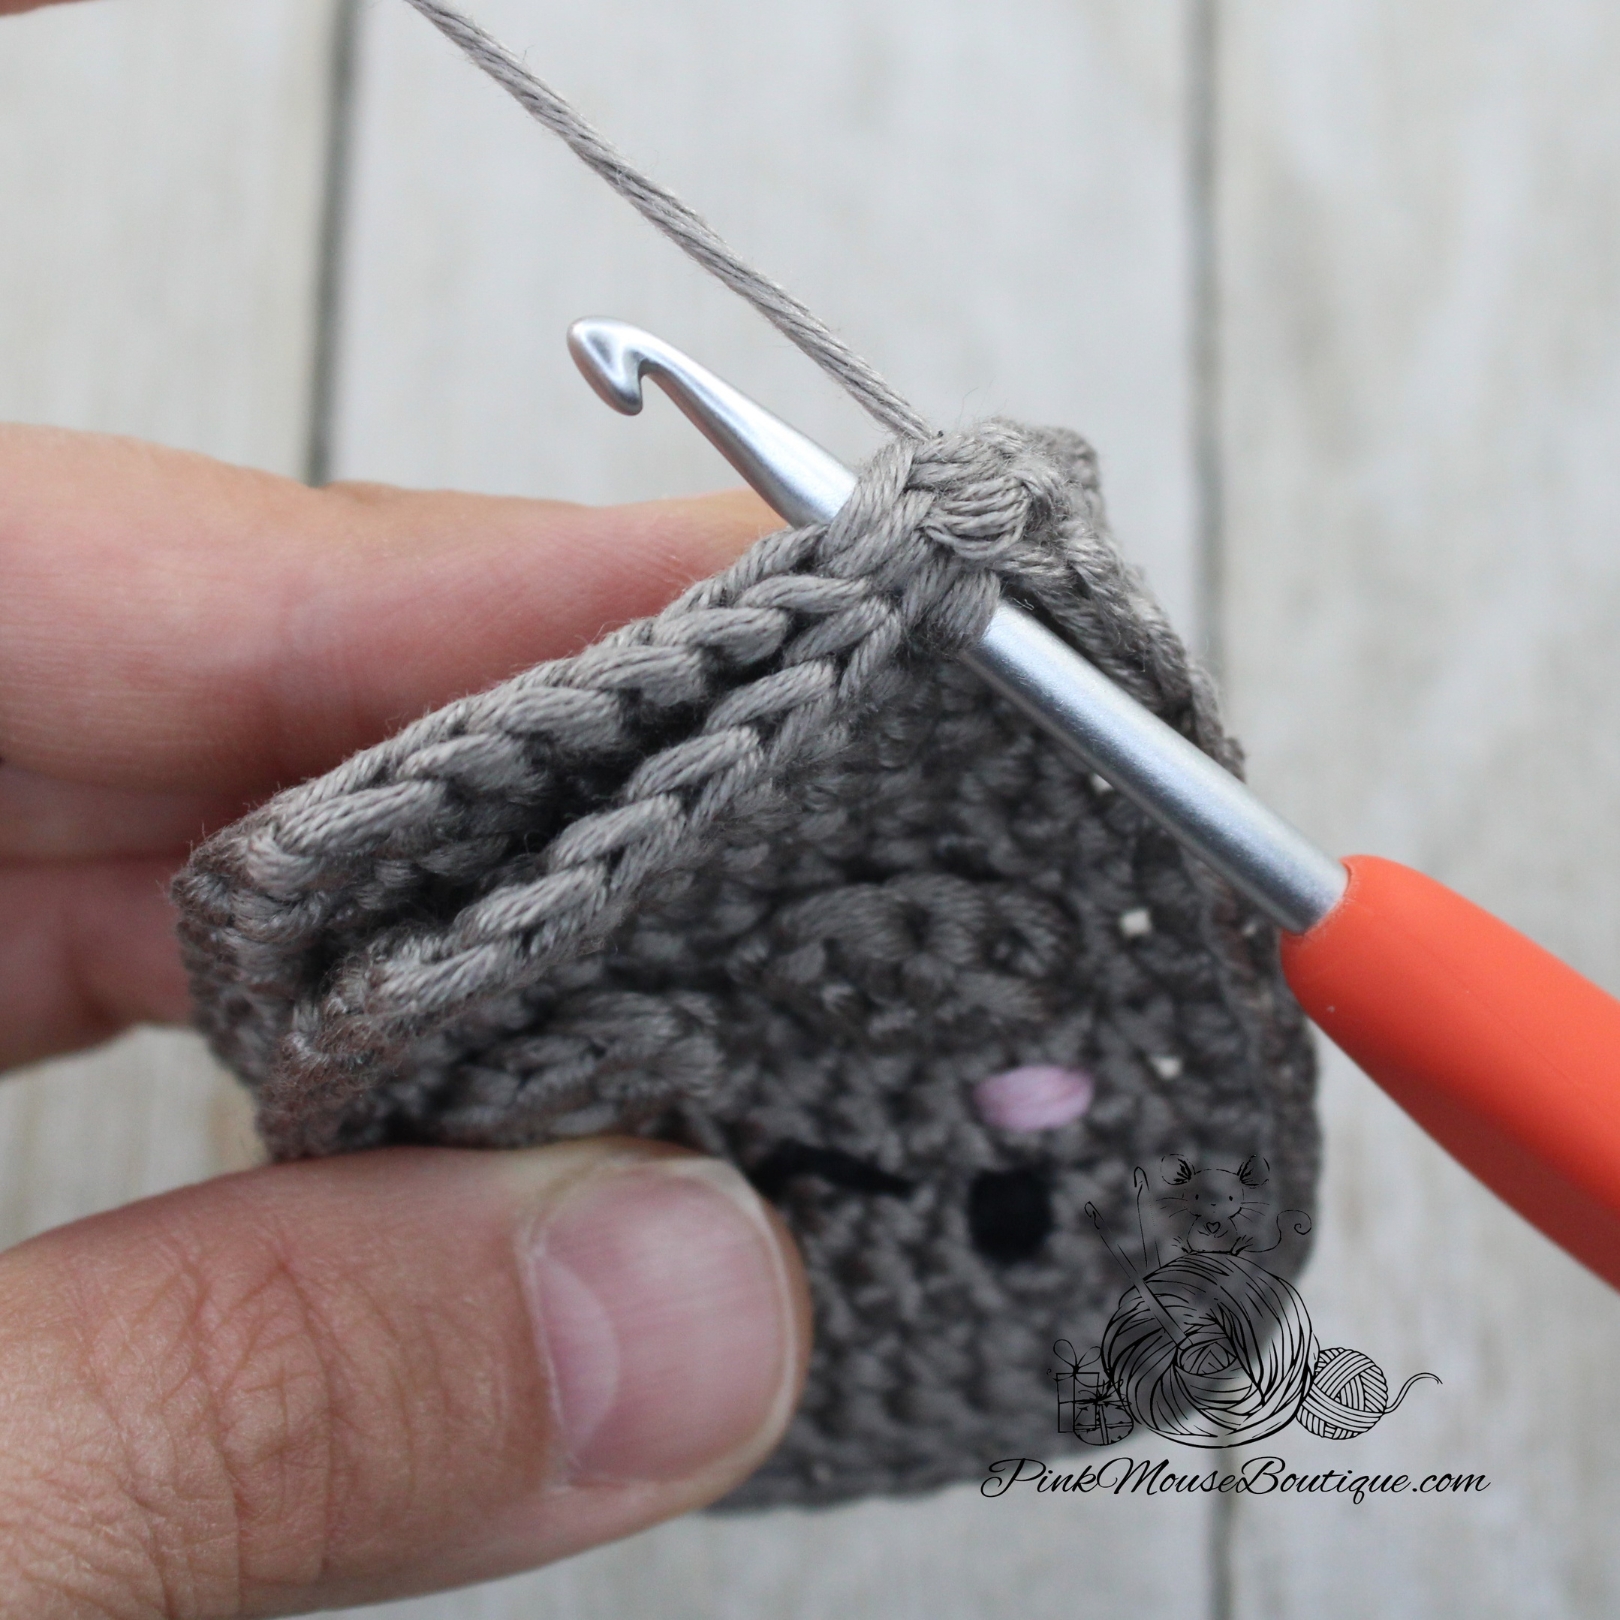
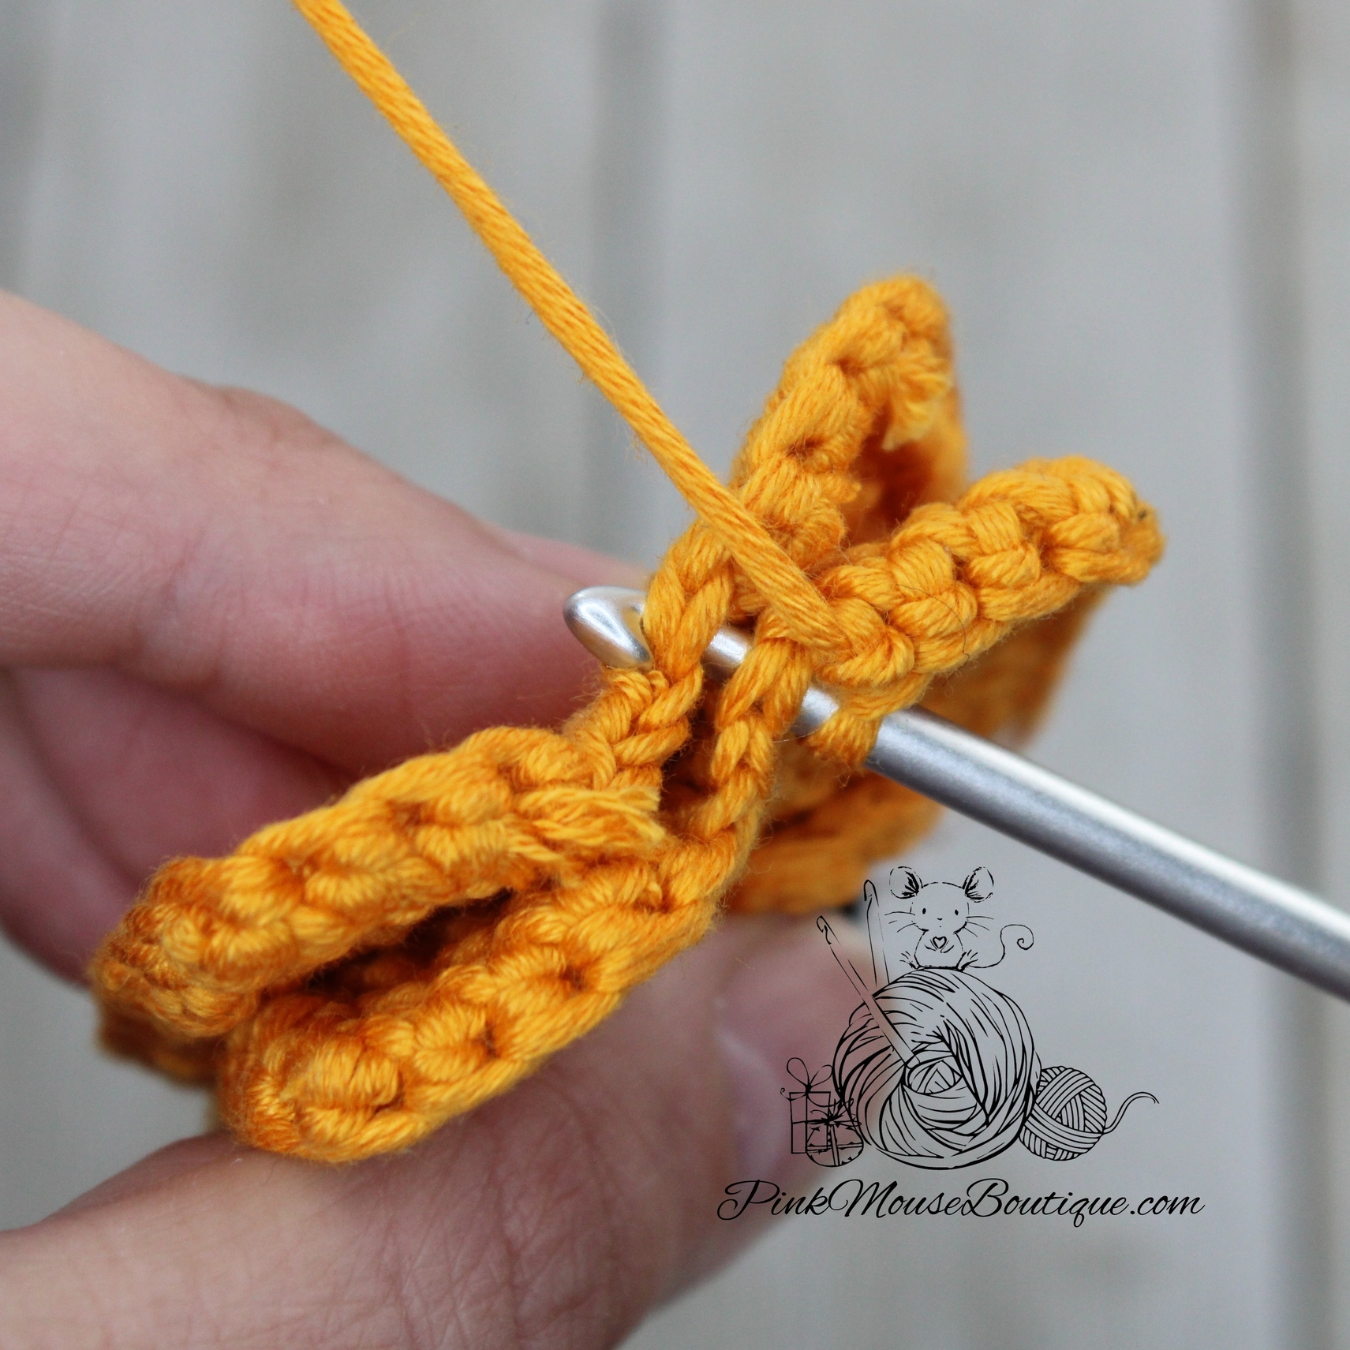
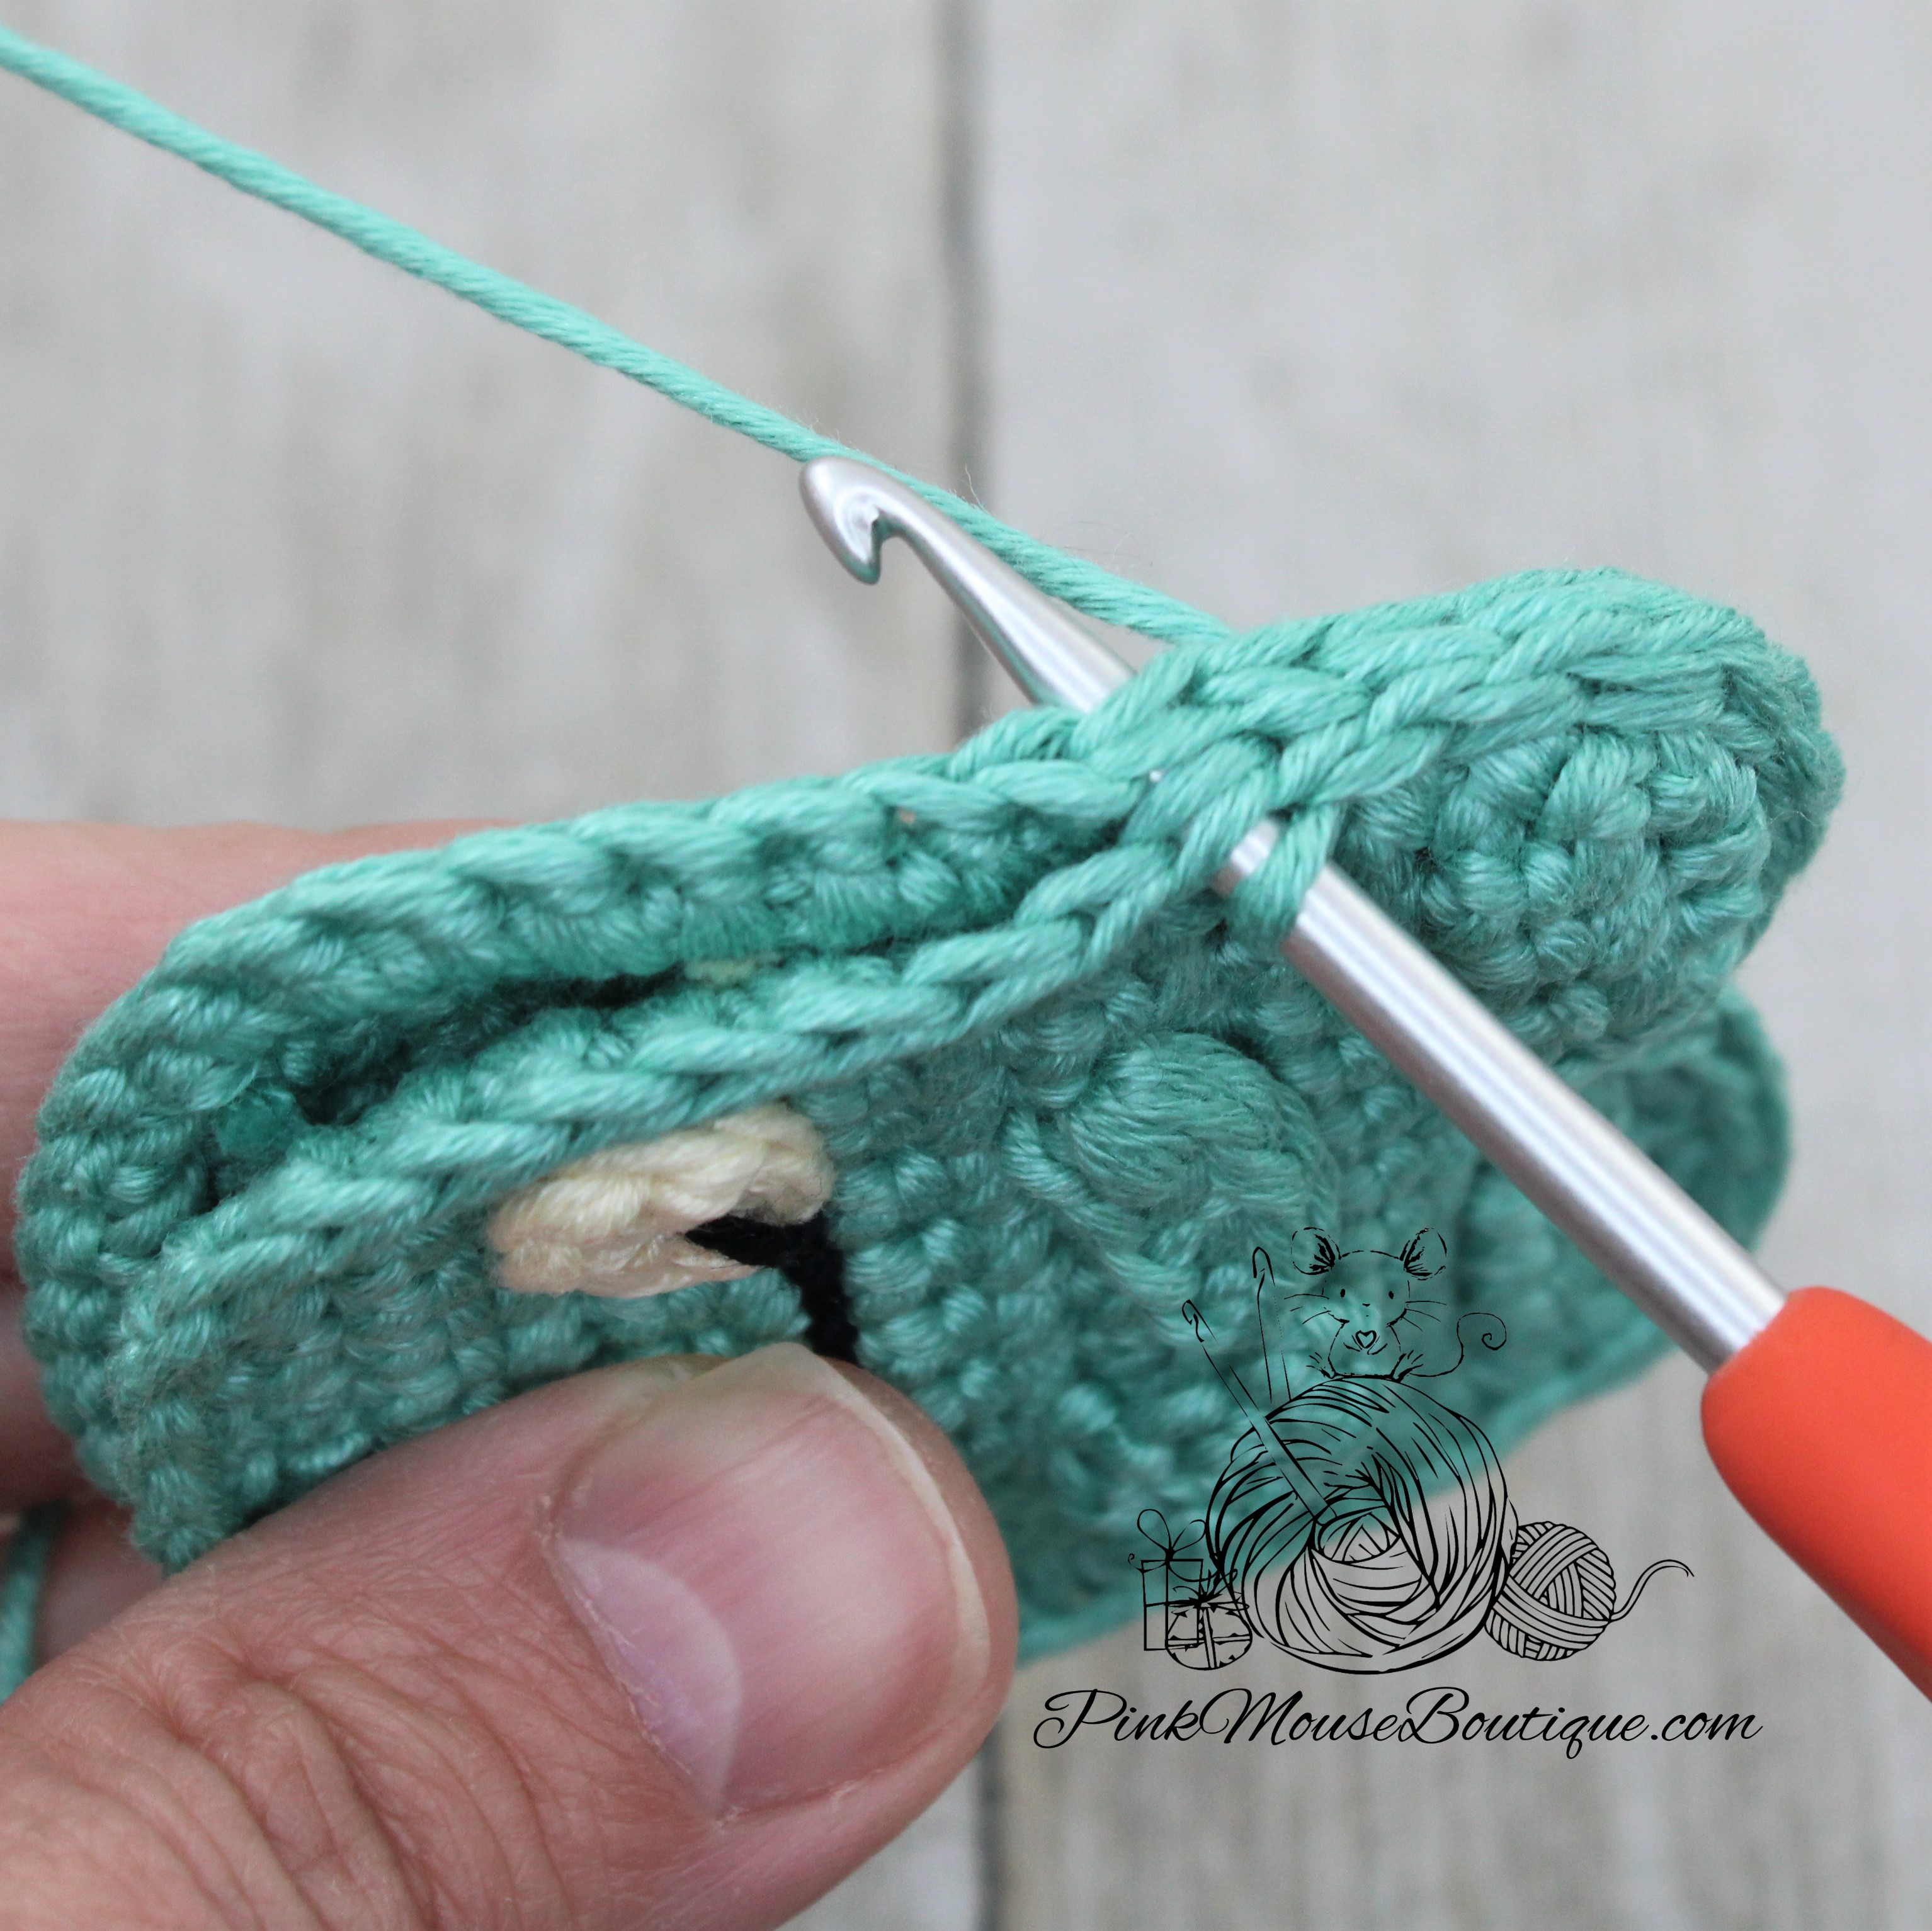
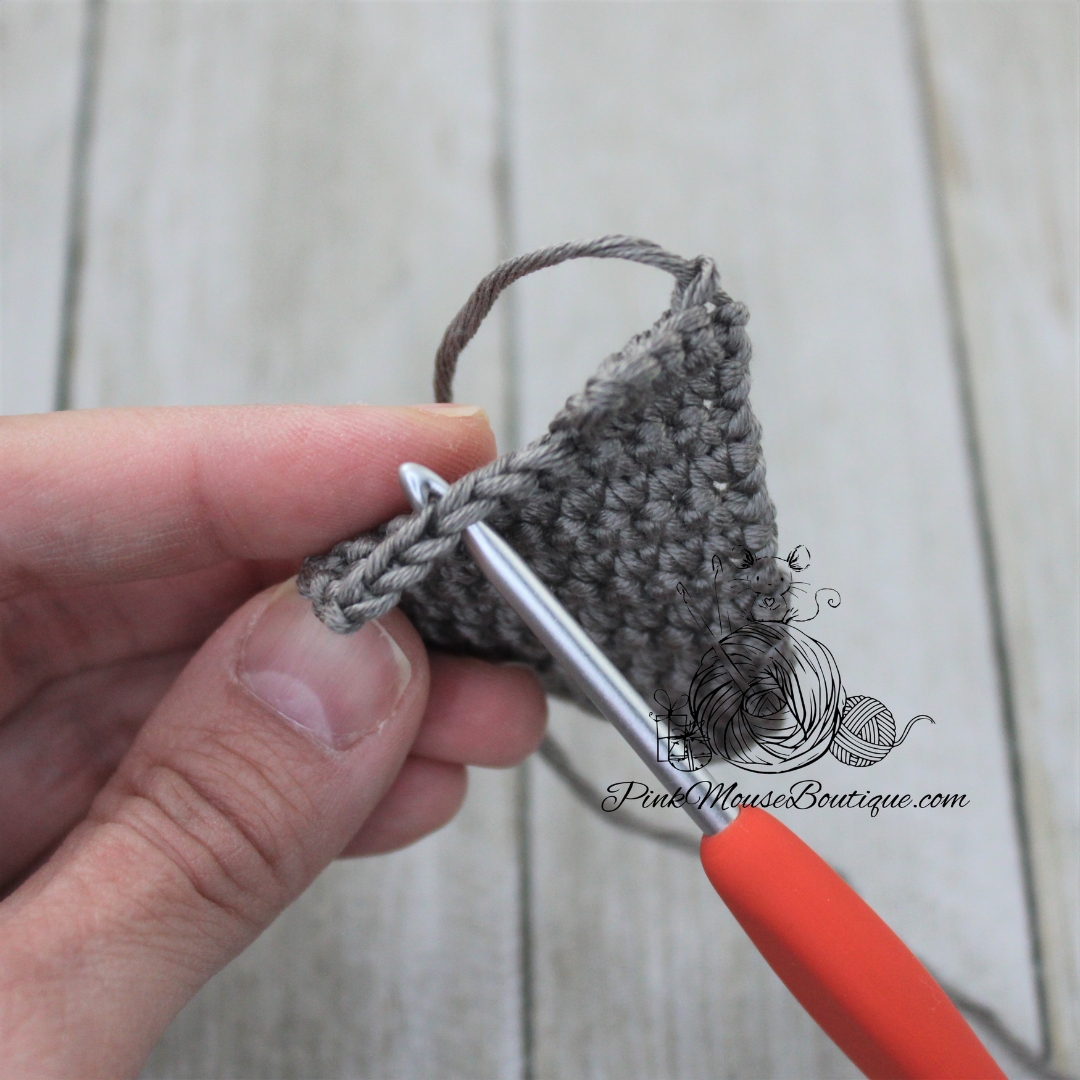
Sc crochet going around the sides and top of the body. When you reach the Row 8, sl st into the FLO of the 1st st of that row. Ch 2
We will work in the front loops of Row 8.
3 dc in 1st st, sk 1 and sl st in next
Repeat 2 more times.
To make the last shell (the 4th one), sk 1 after the sl st and 3 dc in the last st; ch 2 and sl st in the same st as last dc.
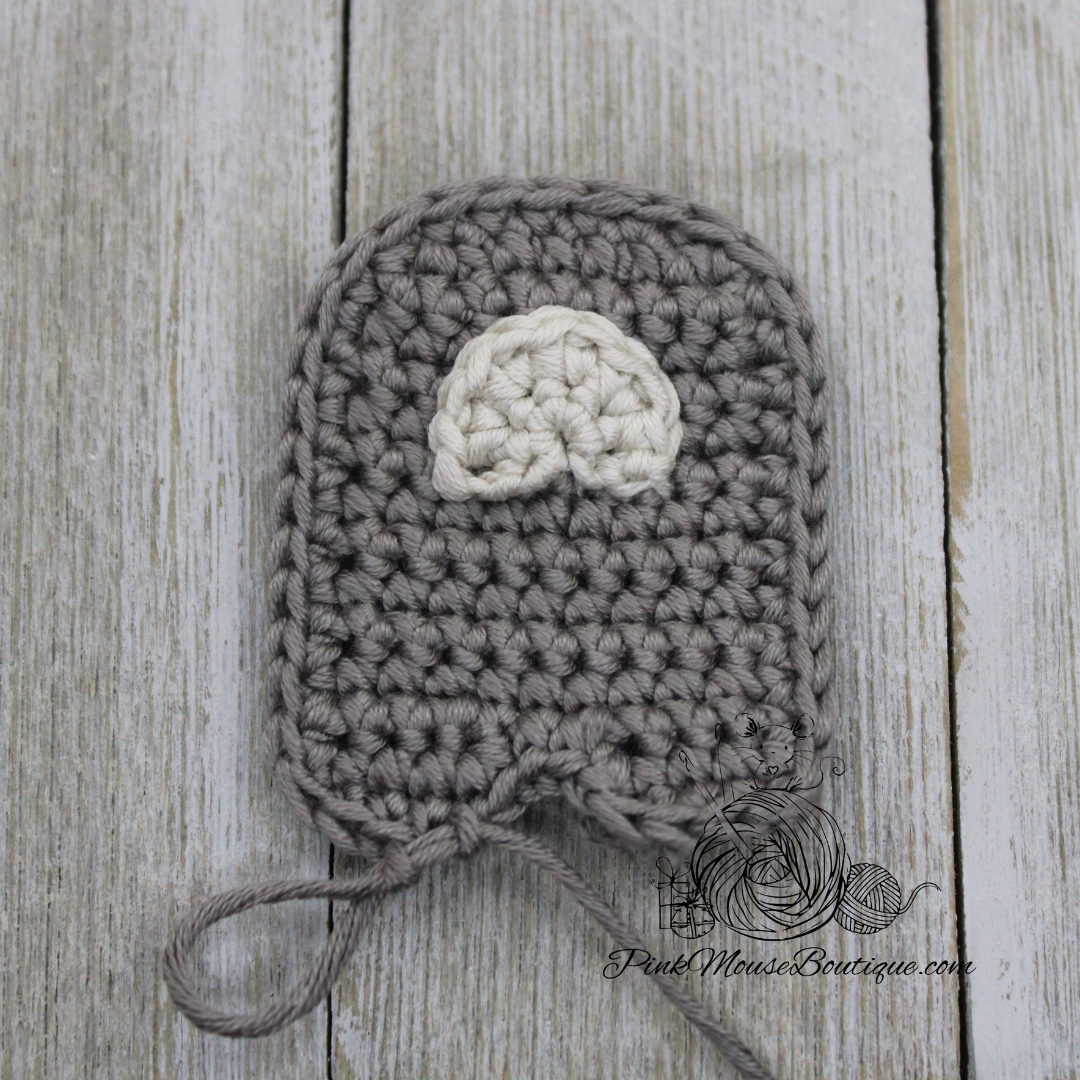
Fasten off and weave in the ends of the first piece (back of body). DO NOT fasten off the 2nd piece (front of the body).
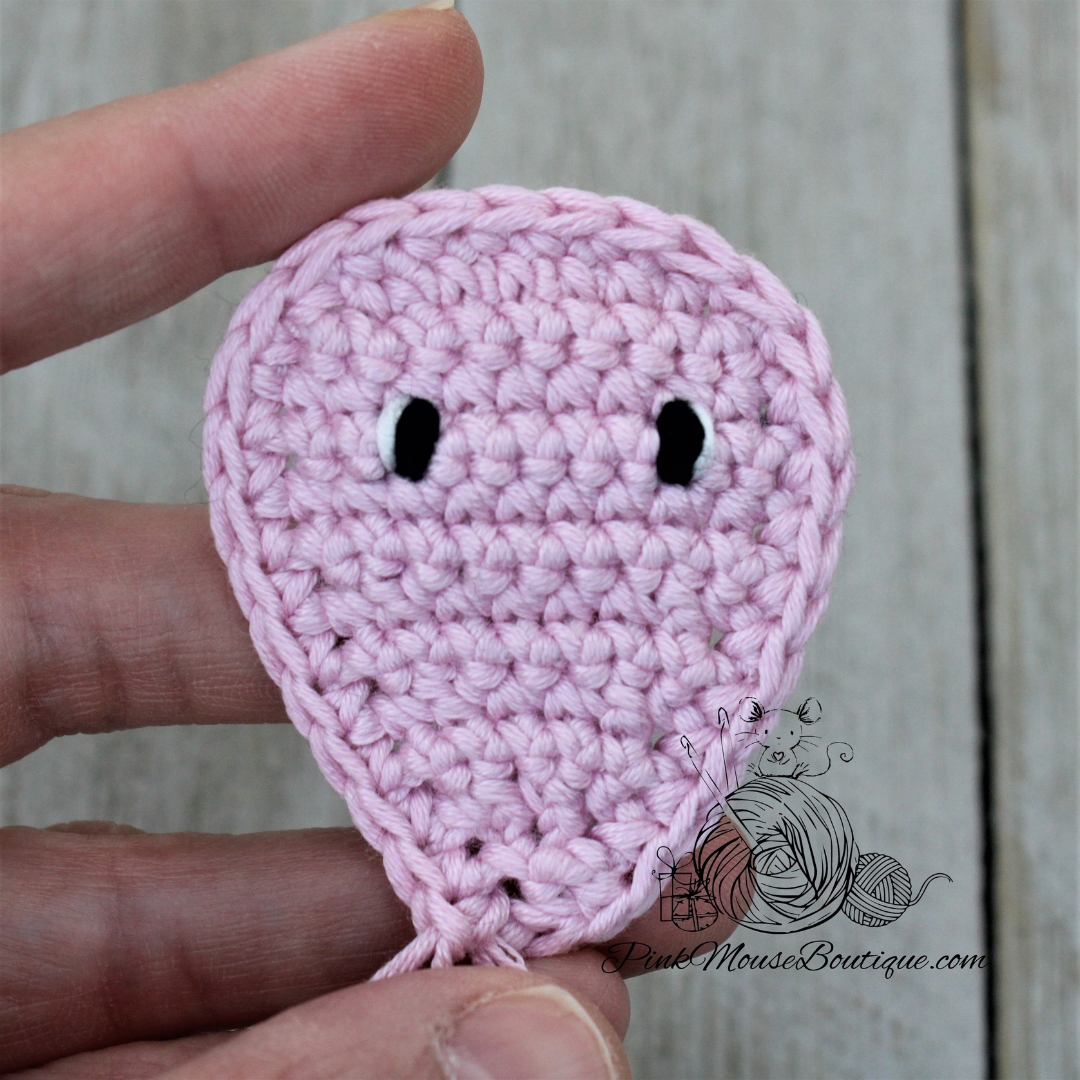
ASSEMBLY
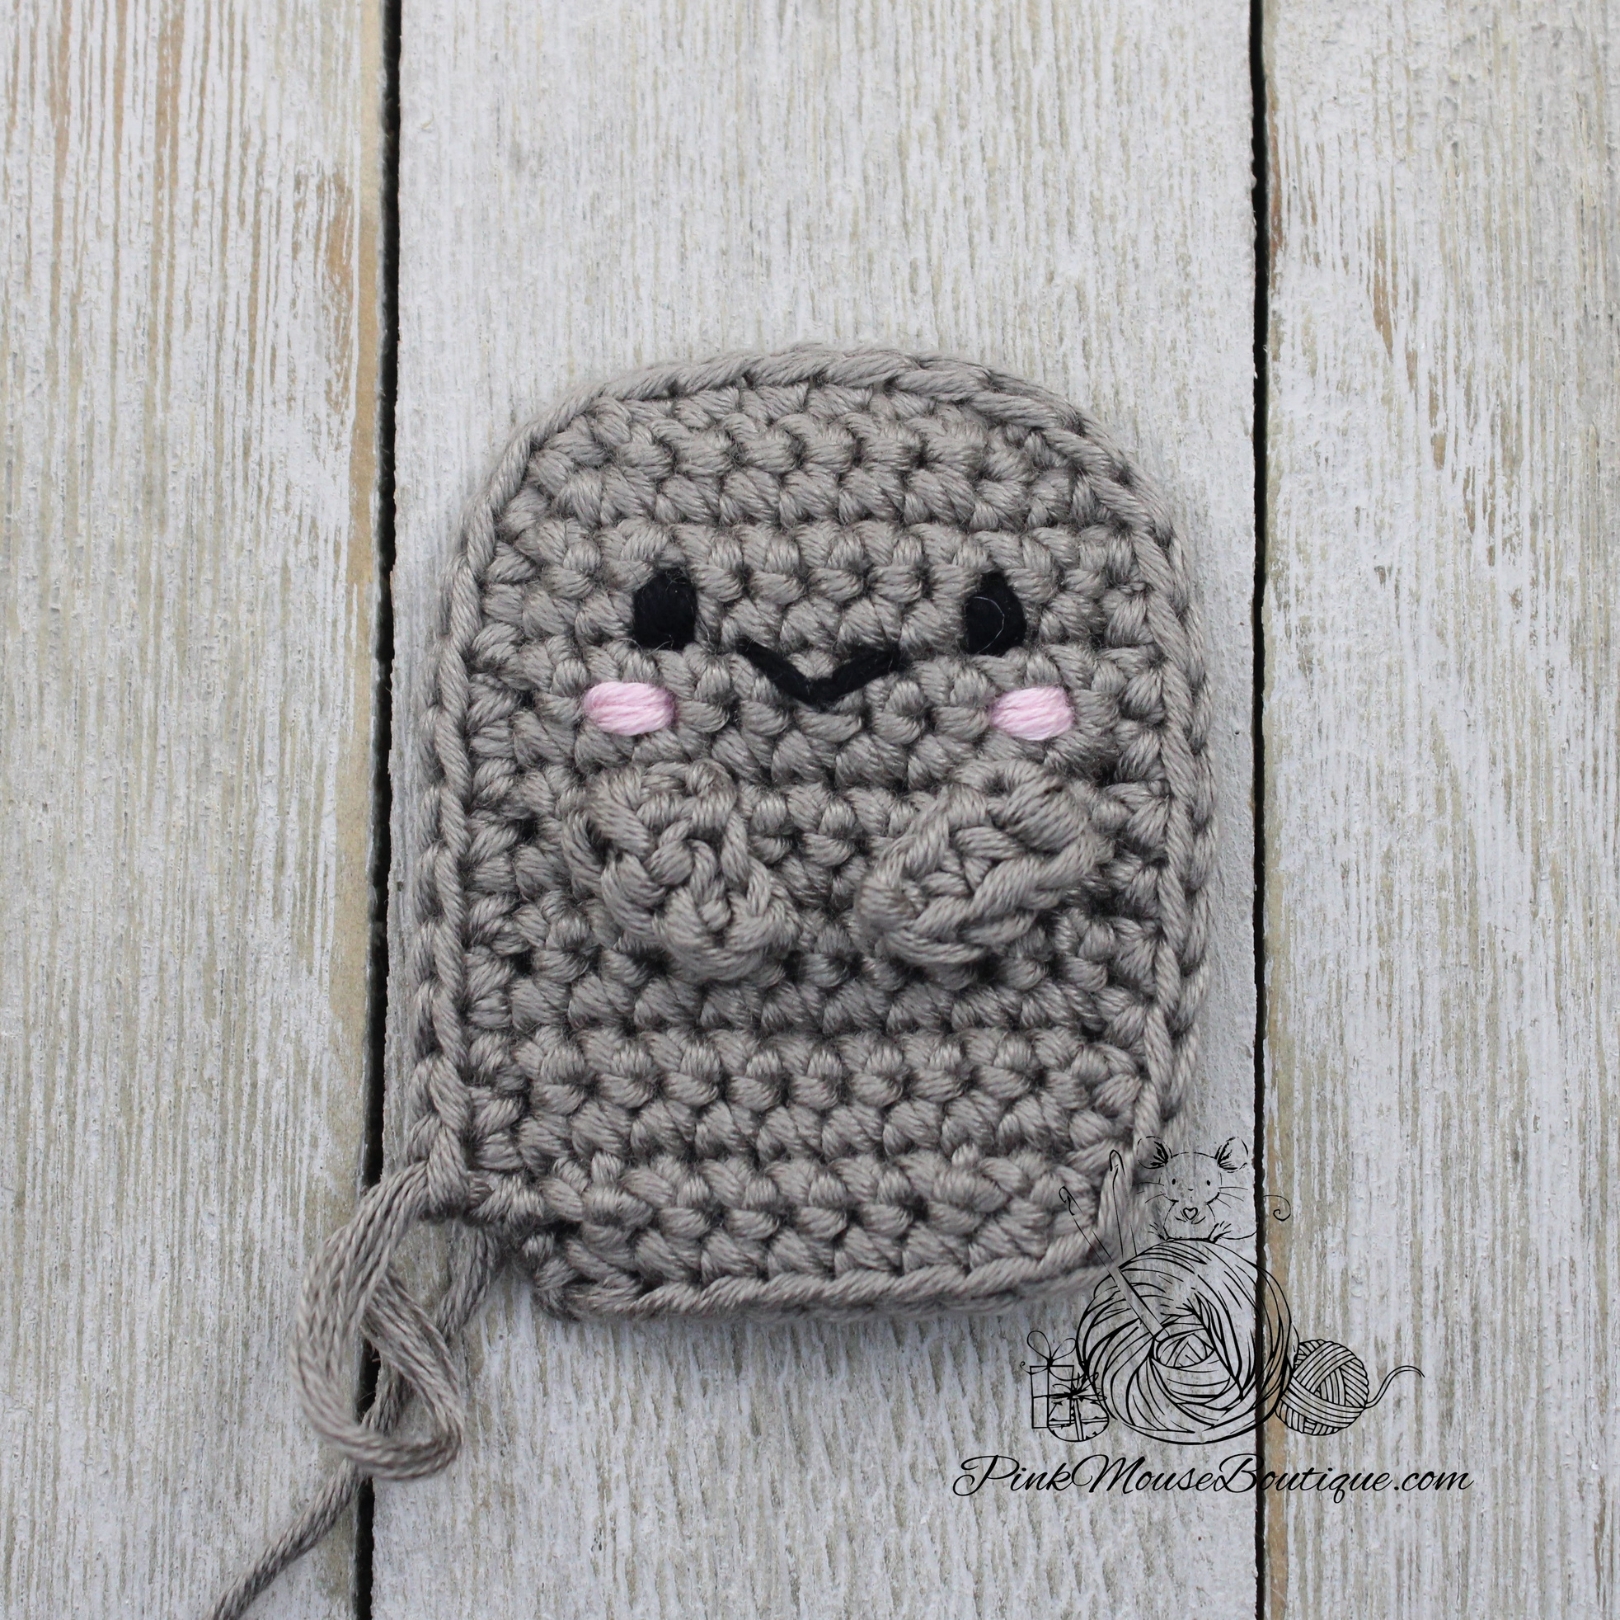
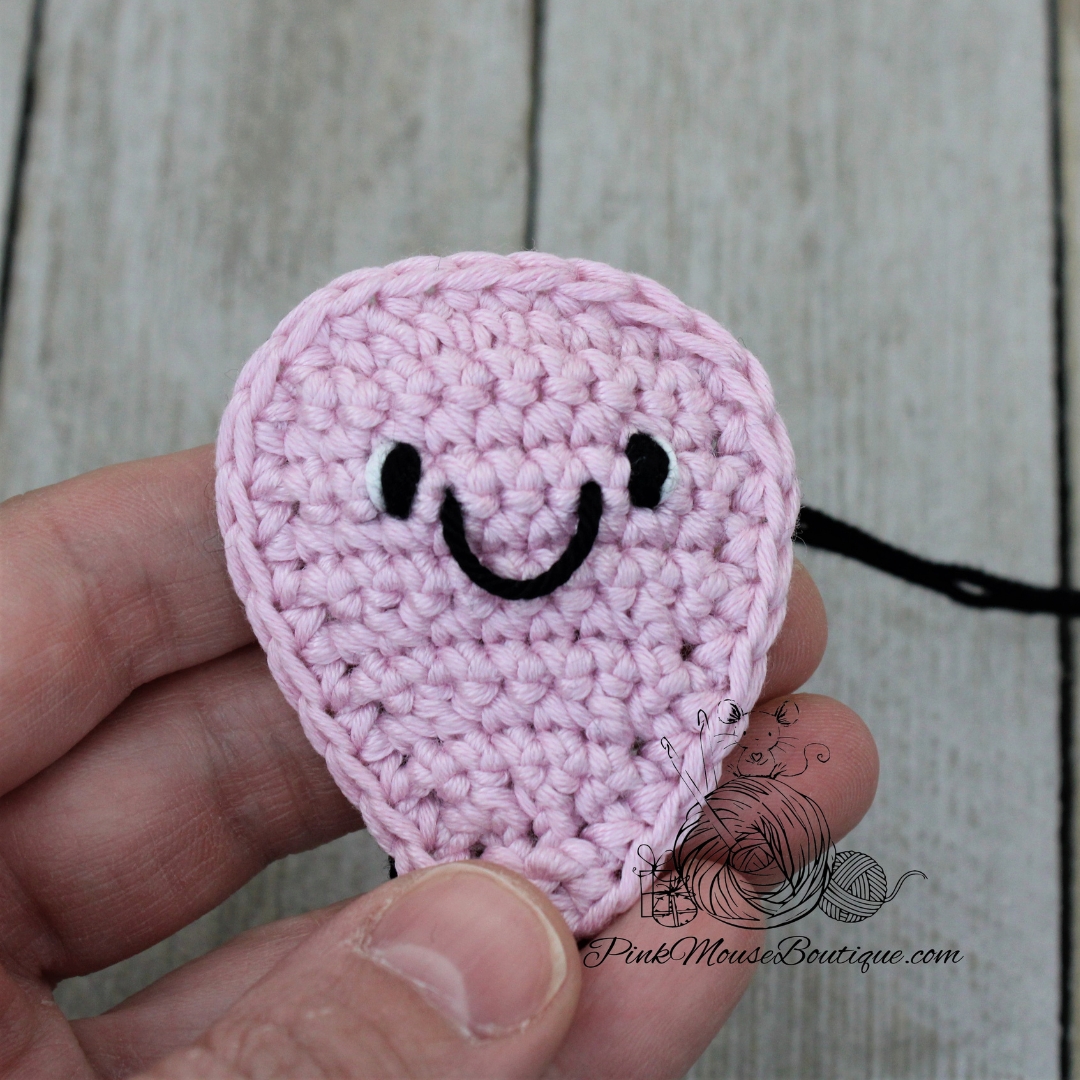
The face is sewn to the front piece (the one that has not been fastened off yet).
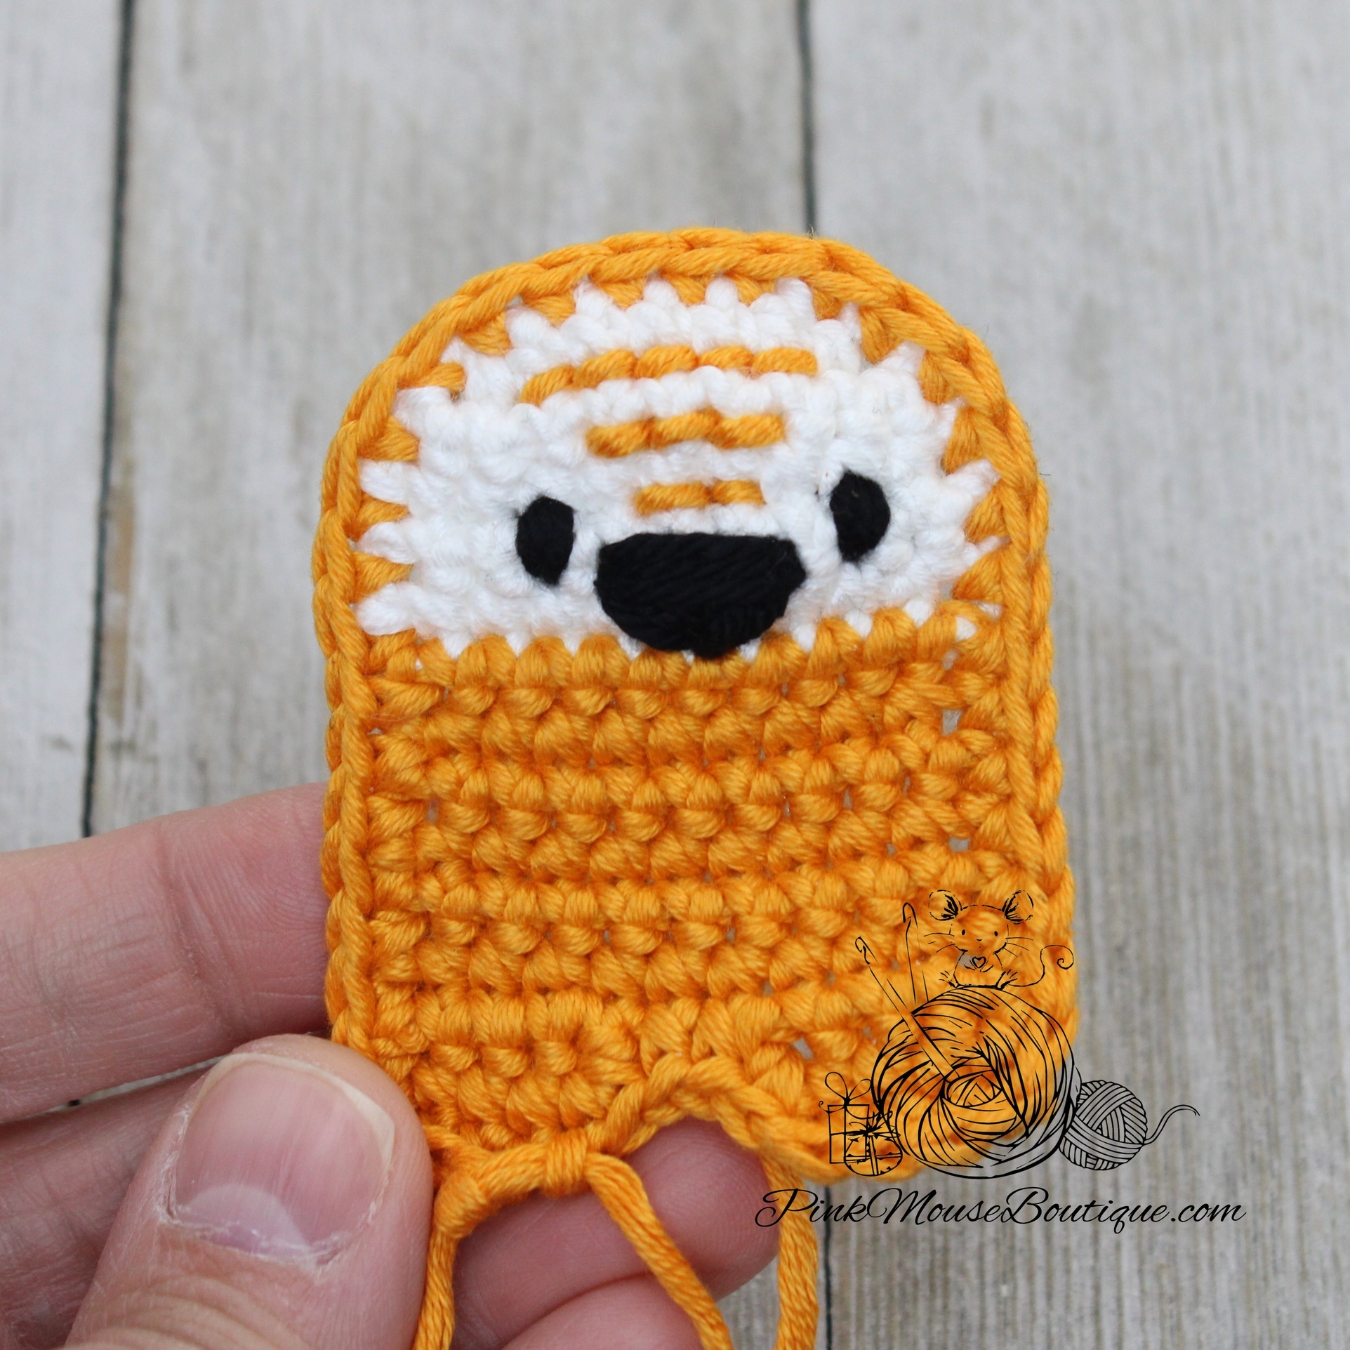
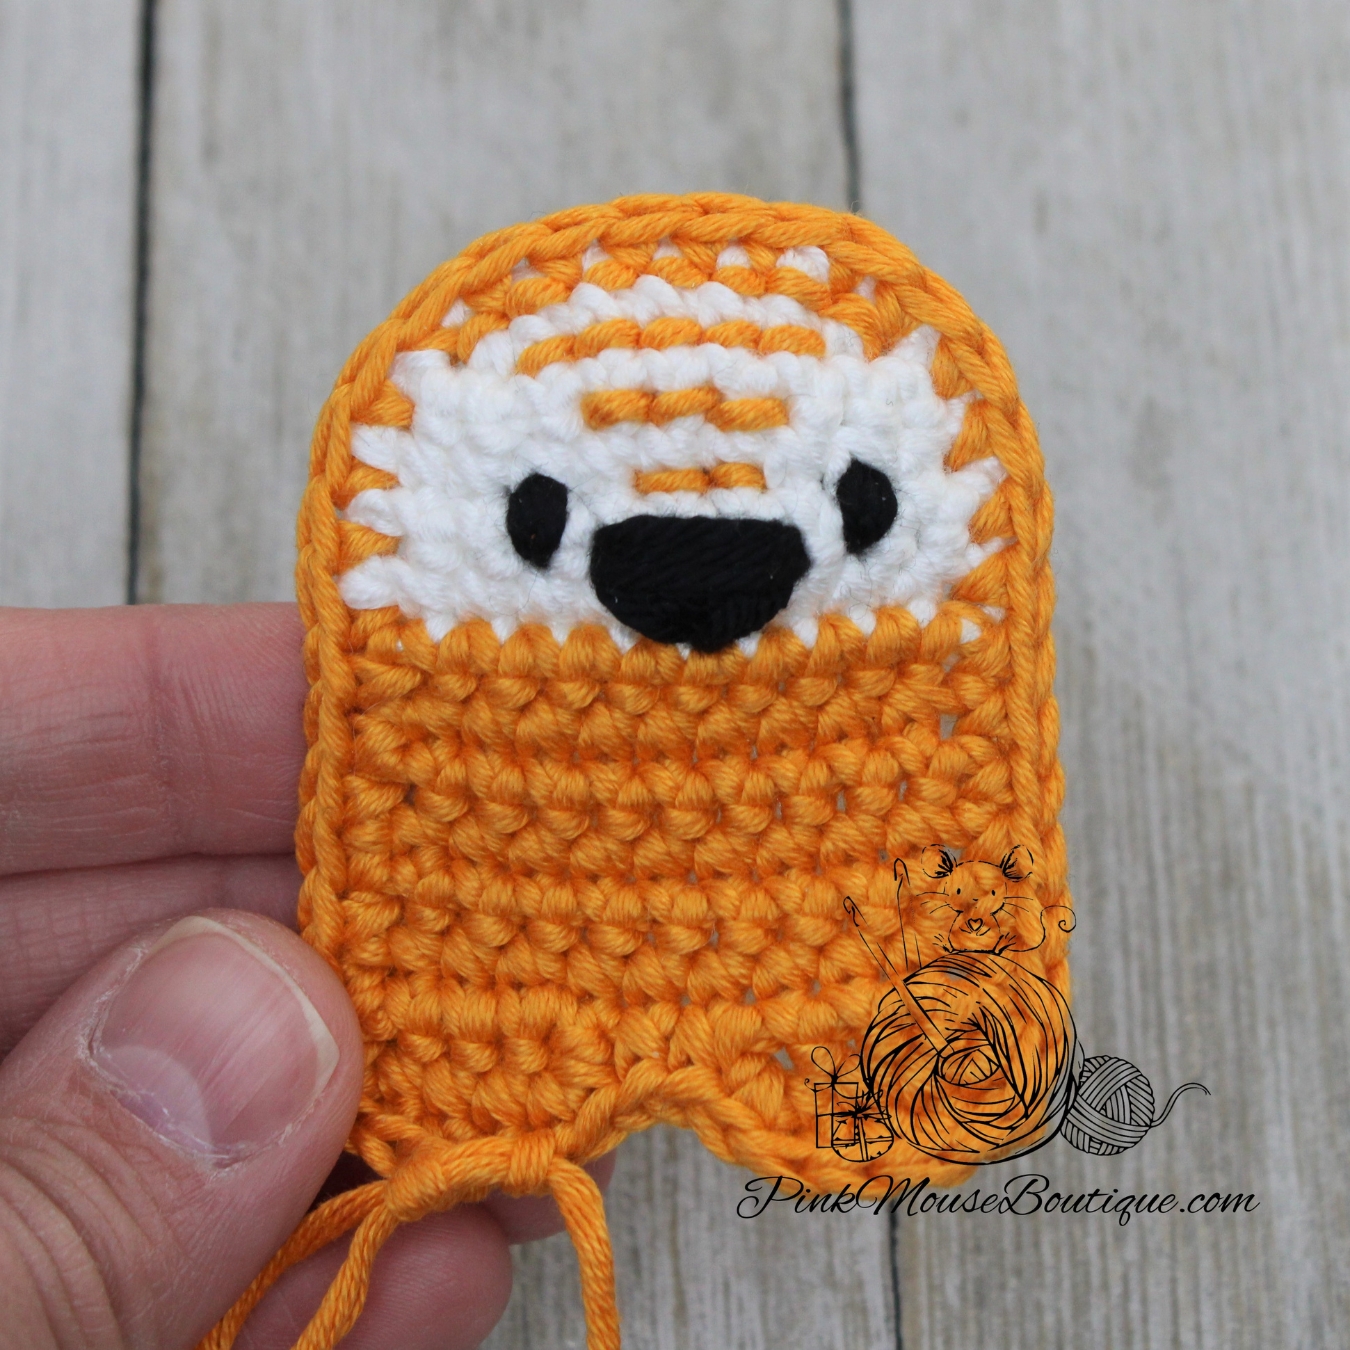
2. Using black yarn, sew the eyes on Row 6, 6 stitches apart.
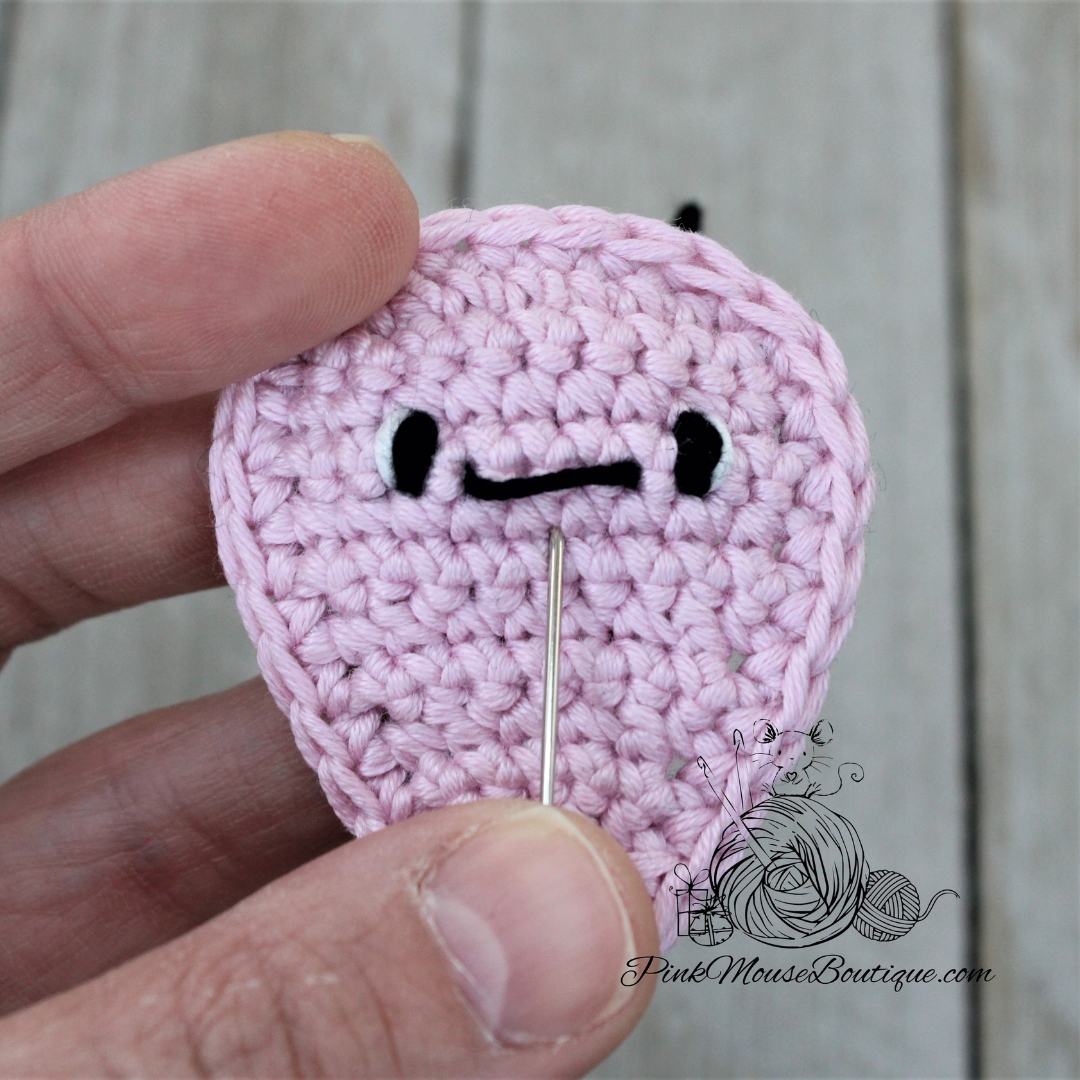
3. Sew a line in the same space as the bottom of the eyes. The line is sewn between the eyes, a stitch apart from each eye.
4. Starting a row below the line we sewed, insert the needle in the closest space to the left and then go over the line and insert the needle in the same space again. Repeat until you get to the space next to the right cheek. This will make the mouth smiley.
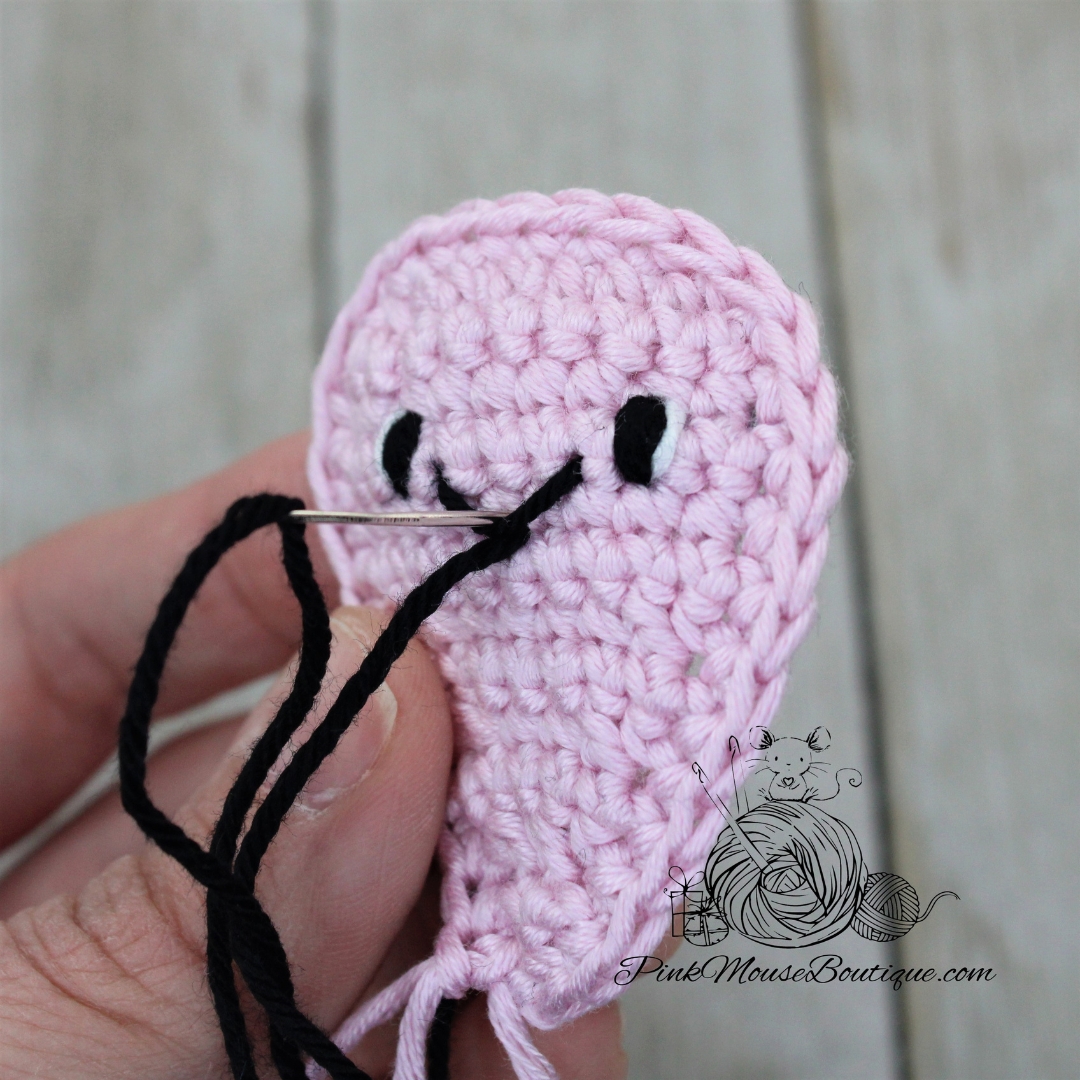
5. Hold the front and back pieces together with the right side facing out and the wrong side facing in. The face of the jellyfish should be turned toward you.
6. Slip stitch through both pieces going up the right side first, then the top, and ending with the left side. Stop when you reach the shells. Fasten off leaving a tail for sewing.
7. Stuff the jellyfish lightly.
8. Insert the end tail, so that it is in between the front and back pieces.
9. Close the body using the back loops. Fasten off and weave in the tail at the back.
10. Open the shells. We will sew the tentacles in between the front and back shells. Begin at one of the ends (left or right). Sew the first tentacle between the 1st and 2nd or the 3rd and 4th shell. Then sew the second tentacle at the opposite end. After you sew in those two tentacles, sew the sides of the shells.I used a tail from the tentacles.
11. Sew the rest of the tentacles between the two end tentacles.
12. To secure all the tails, insert through the same stitch, tie a knot, and stuff inside the body.
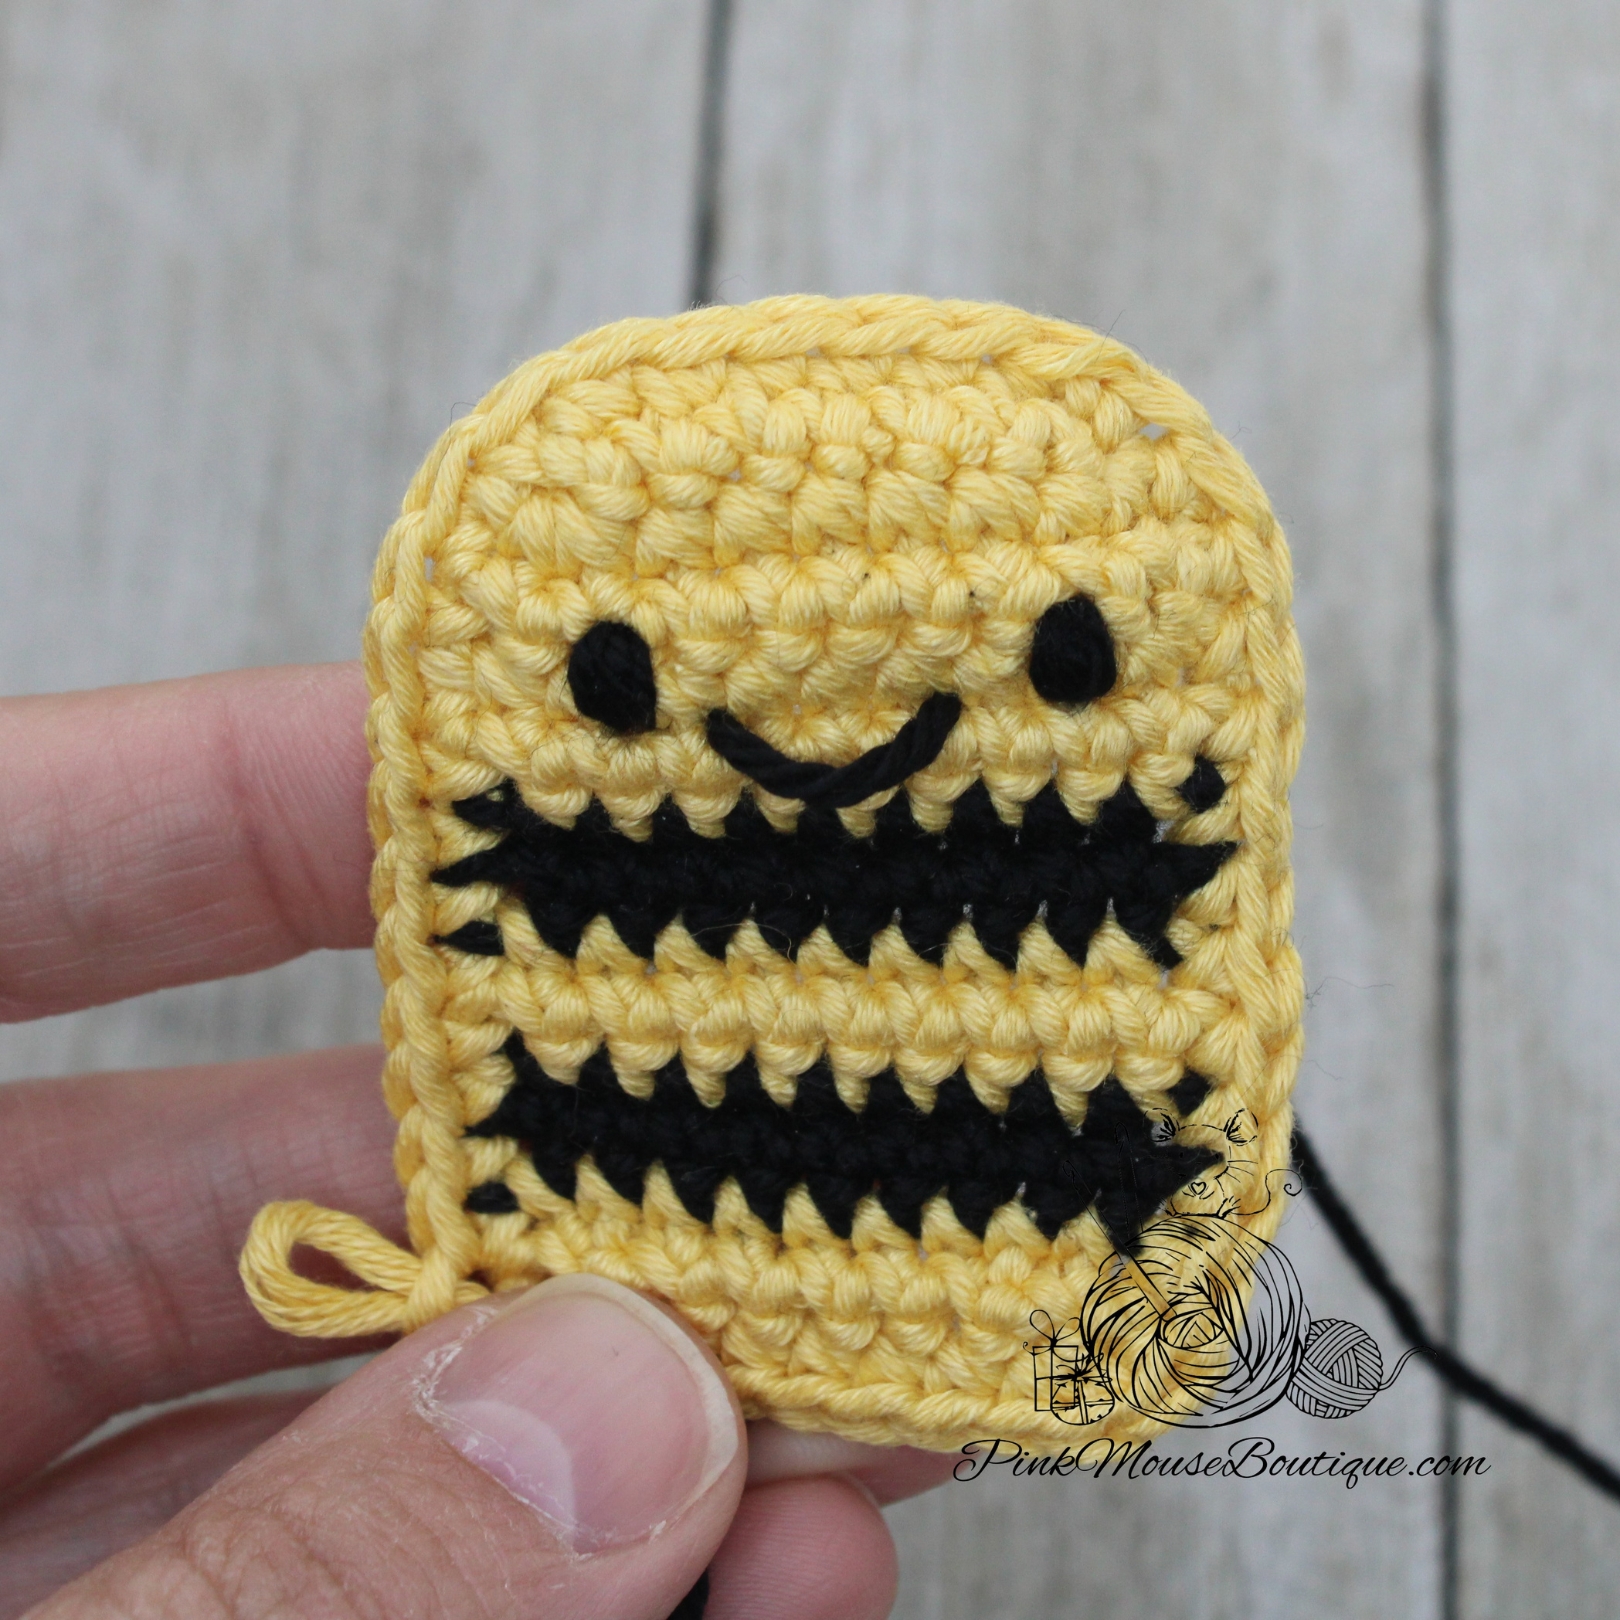
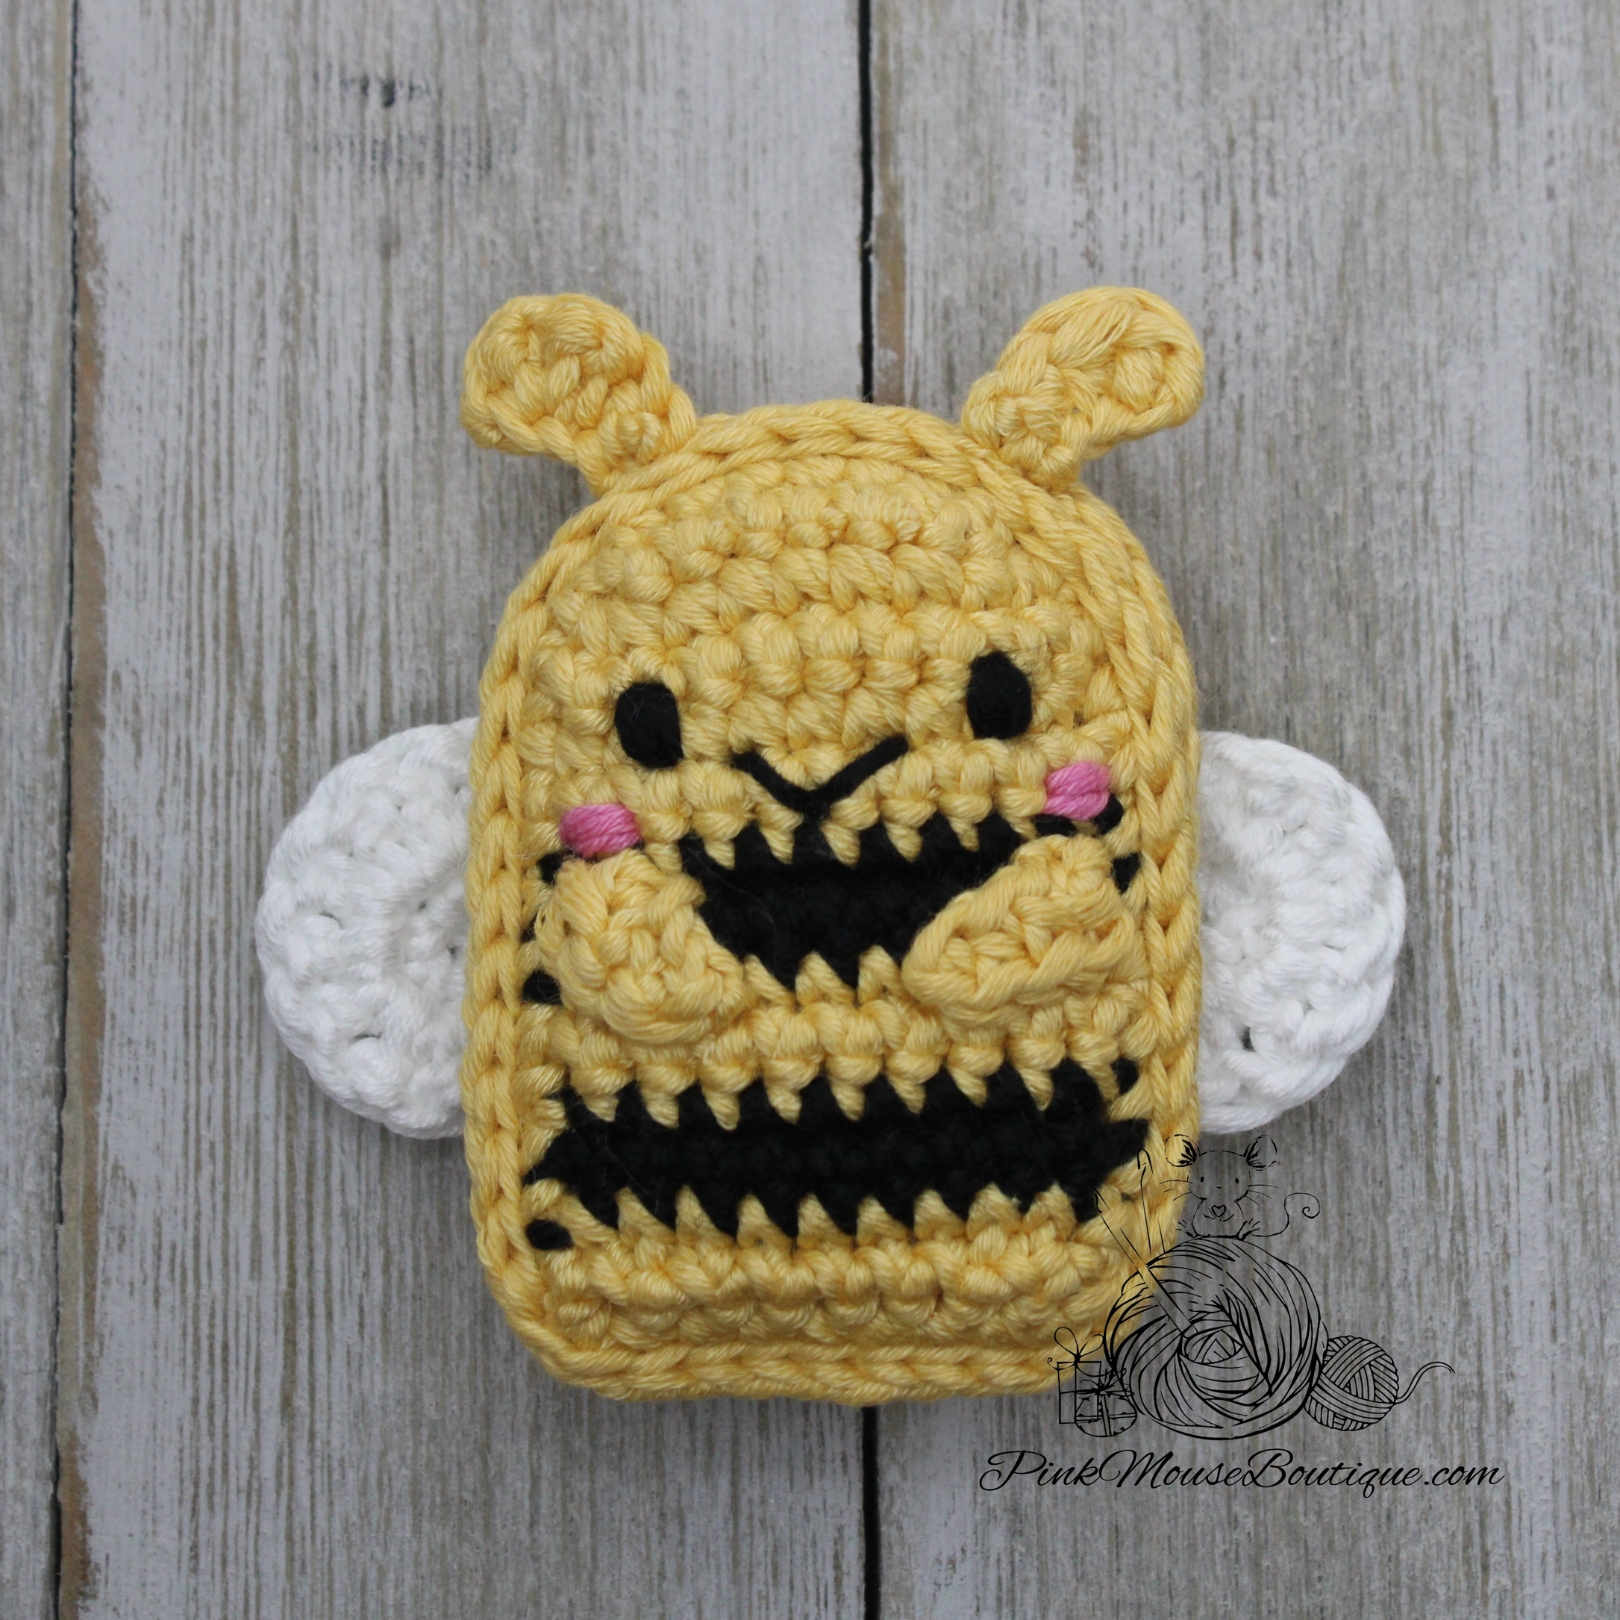
Well, I am excited to have finally published Part 5 of the Pocket Valentines, the Bee. I hope you like this little one as much as the other parts in the series.
Note: Make sure to read through the whole pattern and look at all the step-by-step pictures before crocheting the bee.
WINGS (x 2)
Suggested Color – White
Ch 5
Row 1: 1 sc in 2nd ch from hook, 1 sc in 2 ch, 4 sc in last ch; working on the opposite side of chain 1 sc in 3 ch; ch 1 and turn – 10 sts
Row 2: 1 sc in 2 sts, hdc, 4 dc inc, hdc, 1 sc in 2 sts – 14 sts
Fasten off leaving a long tail for sewing. Set aside.
ANTENNAE (x 2)
Suggested Color – Dark Yellow
Ch 4
Row 1: 2 dc in 2nd ch from hook, sc in last 2 chains – 4 sts
Fasten off leaving a tail for sewing.
ARMS (x 2)
Suggested color – Dark Yellow
Ch 4
Row 1: in back bump of ch only sc in 2nd ch from hook, sc in next, hdc in last ch – 3 sts
Fasten off leaving a tail for sewing.
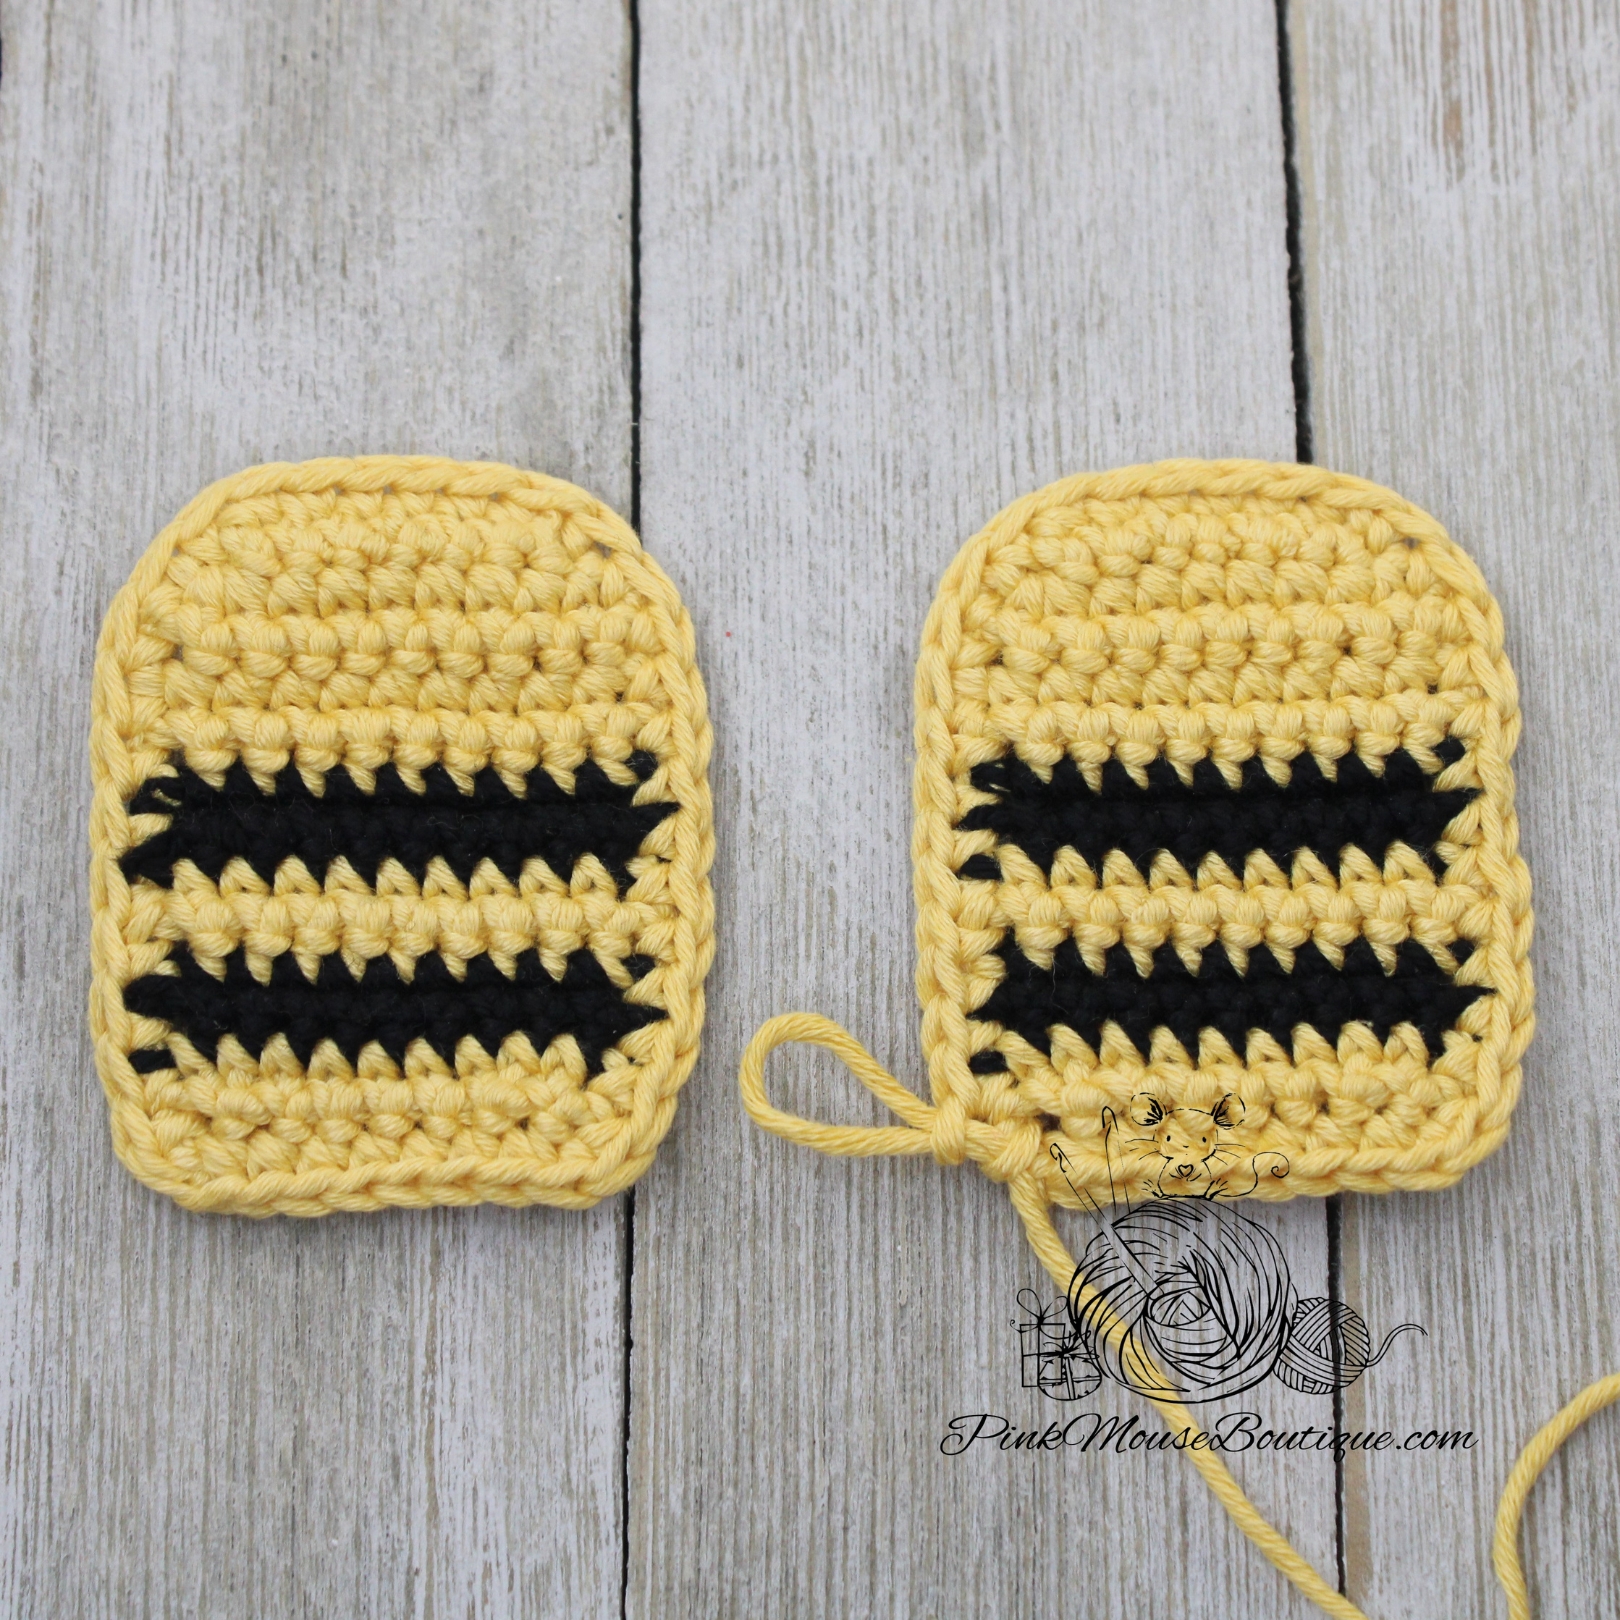
BODY (x 2)
Suggested Colors – Dark Yellow and Black
NOTE: I do not weave in the ends. I tie knots and hide them inside since we will make two pieces for the body and then crochet them together to join.
With Dark Yellow, ch 7
Row 1: in back bump of ch only 2 sc in 2nd ch from hook, 1 sc in 4 ch, 2 sc in last ch; ch 1 and turn – 8 sts
Row 2: inc, 1 sc in 6 sts, inc; ch 1 and turn – 10 sts
Rows 3 – 5: sc in each st; ch 1 and turn – 10 sts (2 rows)
Change color – Black
Rows 6 – 7: sc in each st; ch 1 and turn – 10 sts (2 rows)
Change color – Dark Yellow
Rows 8 – 9: sc in each st; ch 1 and turn – 10 sts (2 rows)
Change color – Black
Rows 10 – 11: sc in each st; ch 1 and turn – 10 sts (2 rows)
Change color – Dark Yellow
Row 11: sc in each st; ch 1 and turn – 10 sts
Row 12: sc, in BLO dec, 1 sc in 4 sts, in BLO dec, sc; ch 1 and turn – 8 sts
Row 14: sc in each st
Continue sc around the entire body, in every st and row.
Sl st to the 1st st of Row 14.
Fasten off the 1st piece. Do not break the yarn from the 2nd piece.
ASSEMBLY
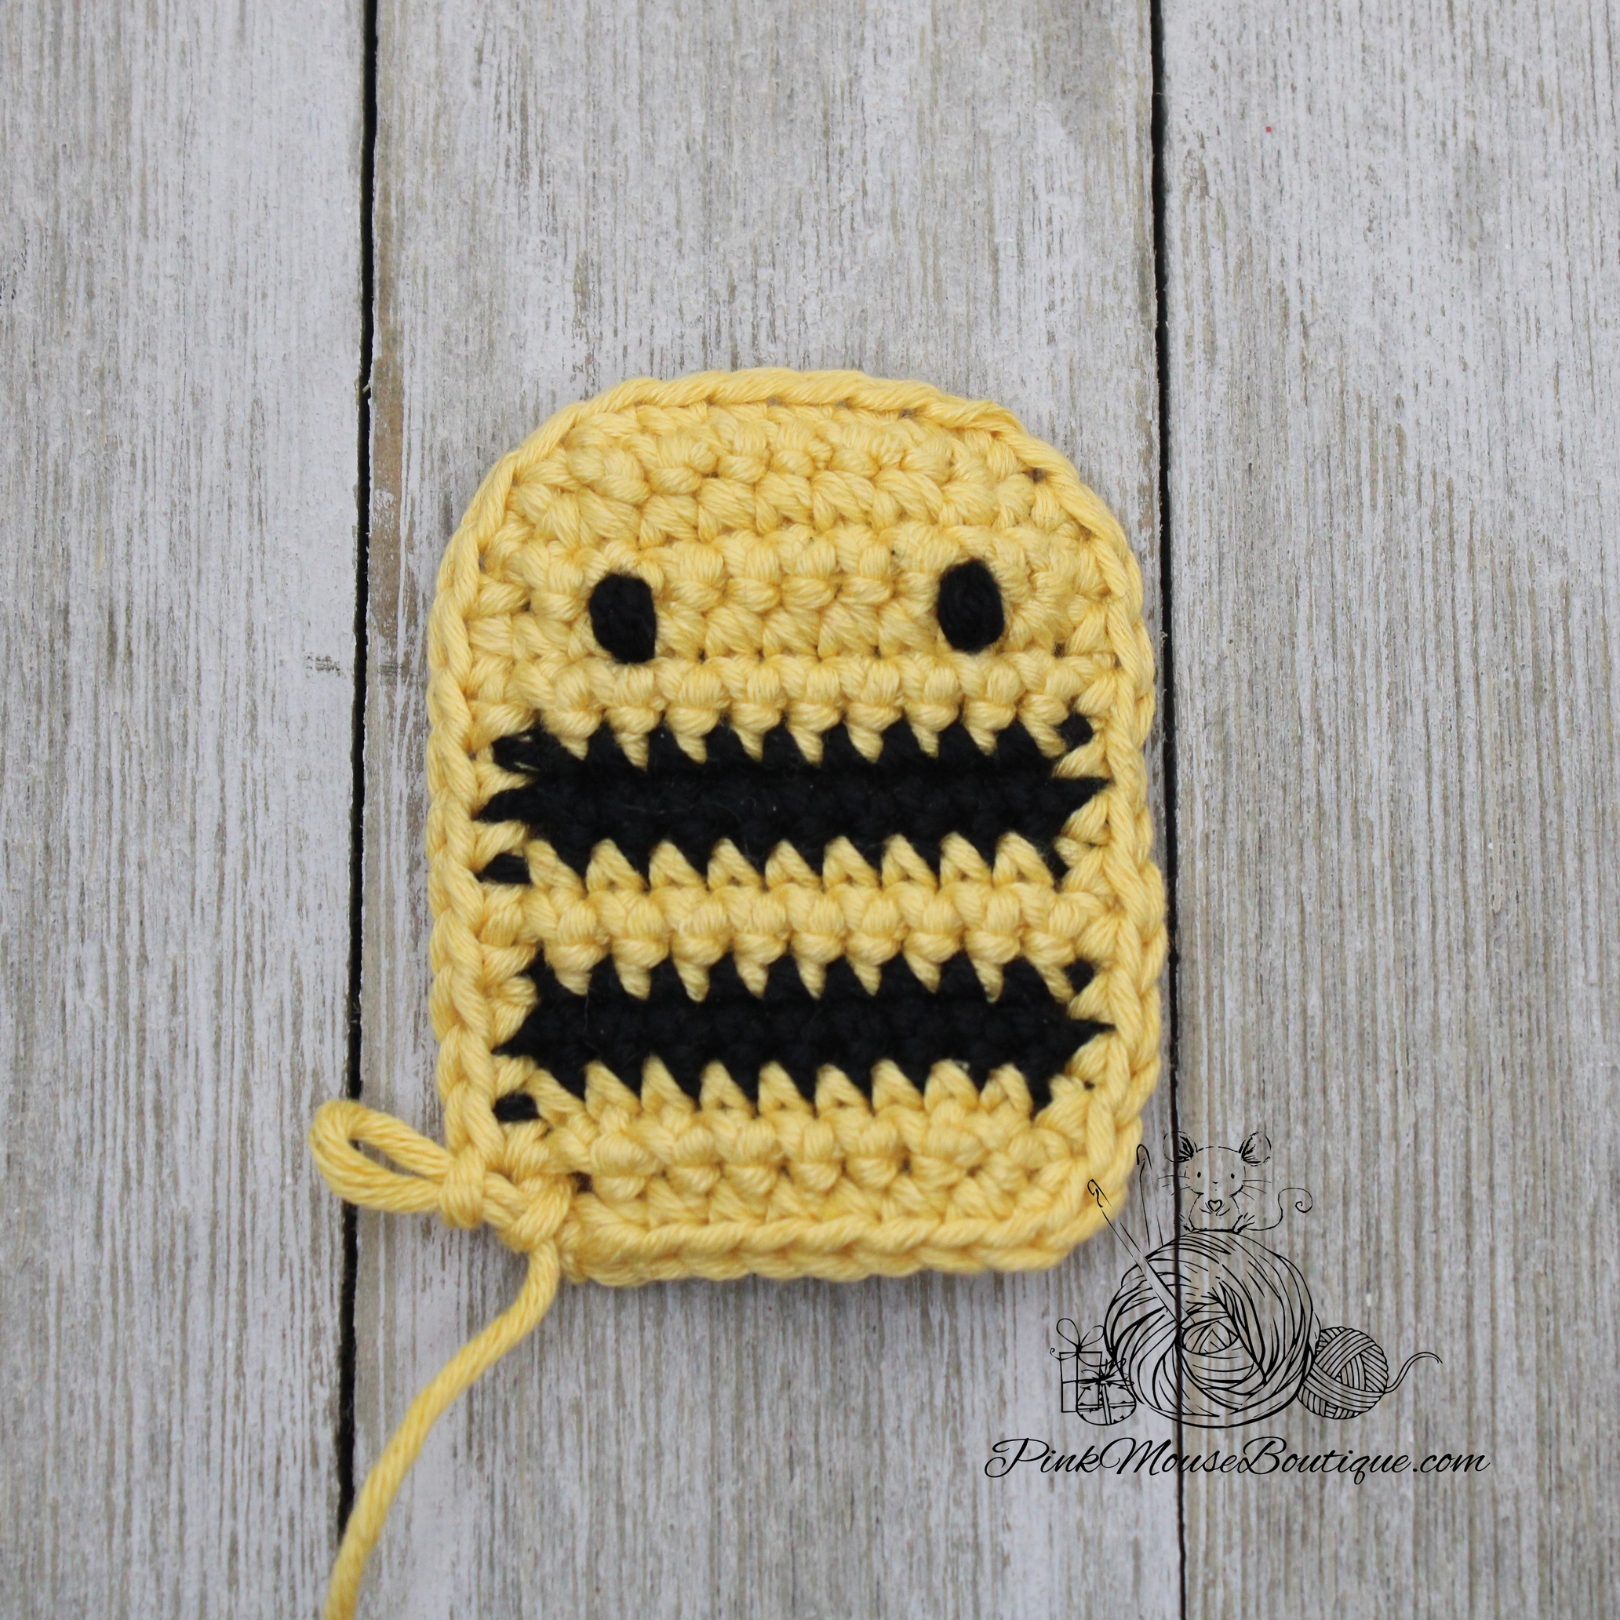
The facial features will be sewn to the piece that has not been fasten off.
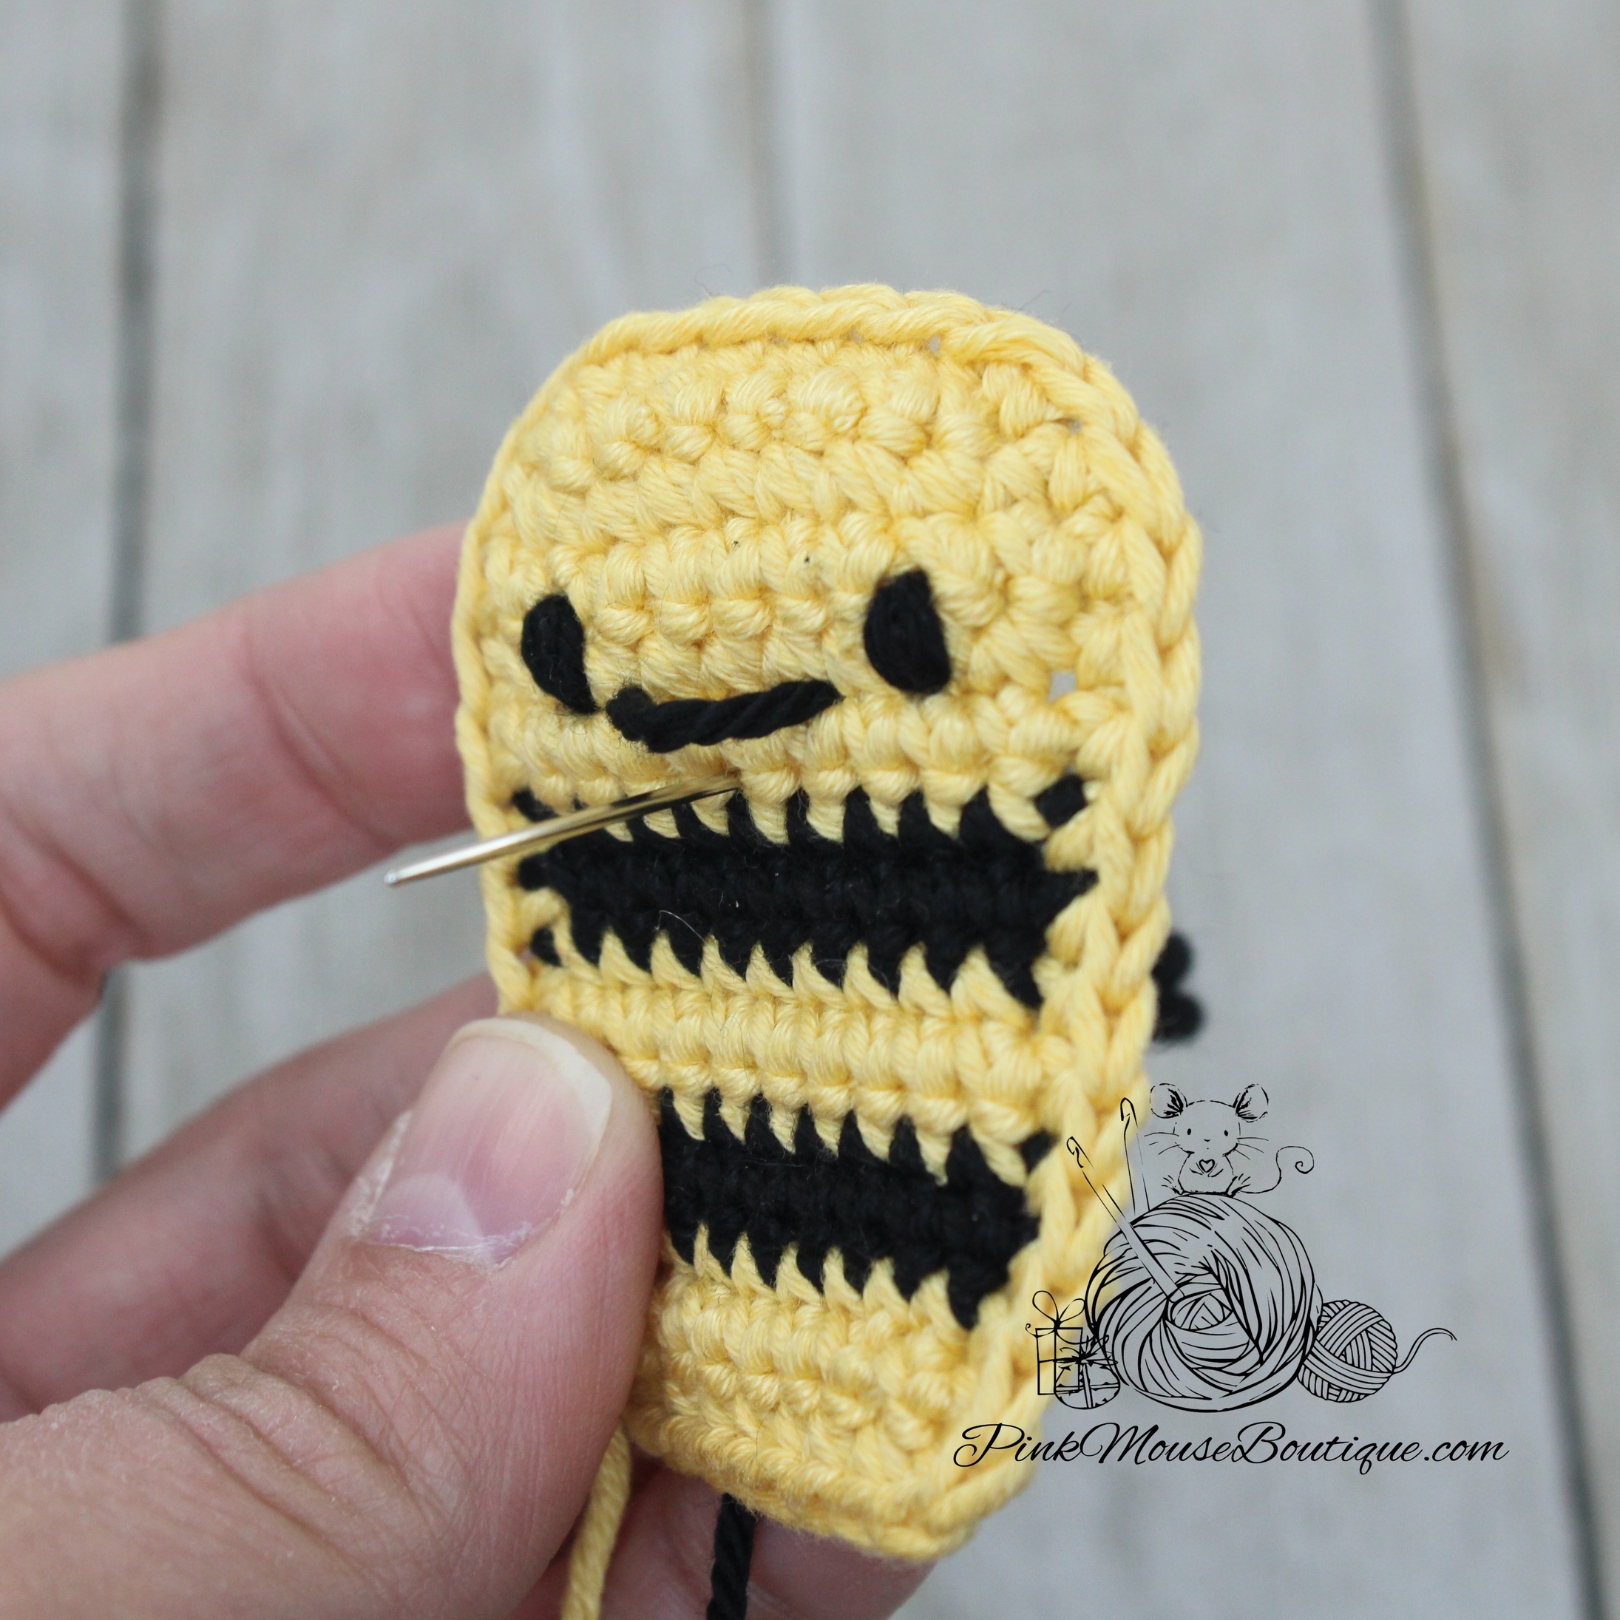
With Black yarn, sew the eyes on Row 4 or 5, 5 stitches apart.
With Black yarn, sew a line between the eyes. The line should be 3 stitches long.
Insert the needle a row below the mouth and in the middle. Pull and go around the mouth to form a curve. Insert the needle again through the same stitch and pull. Tie a knot to secure the ends.
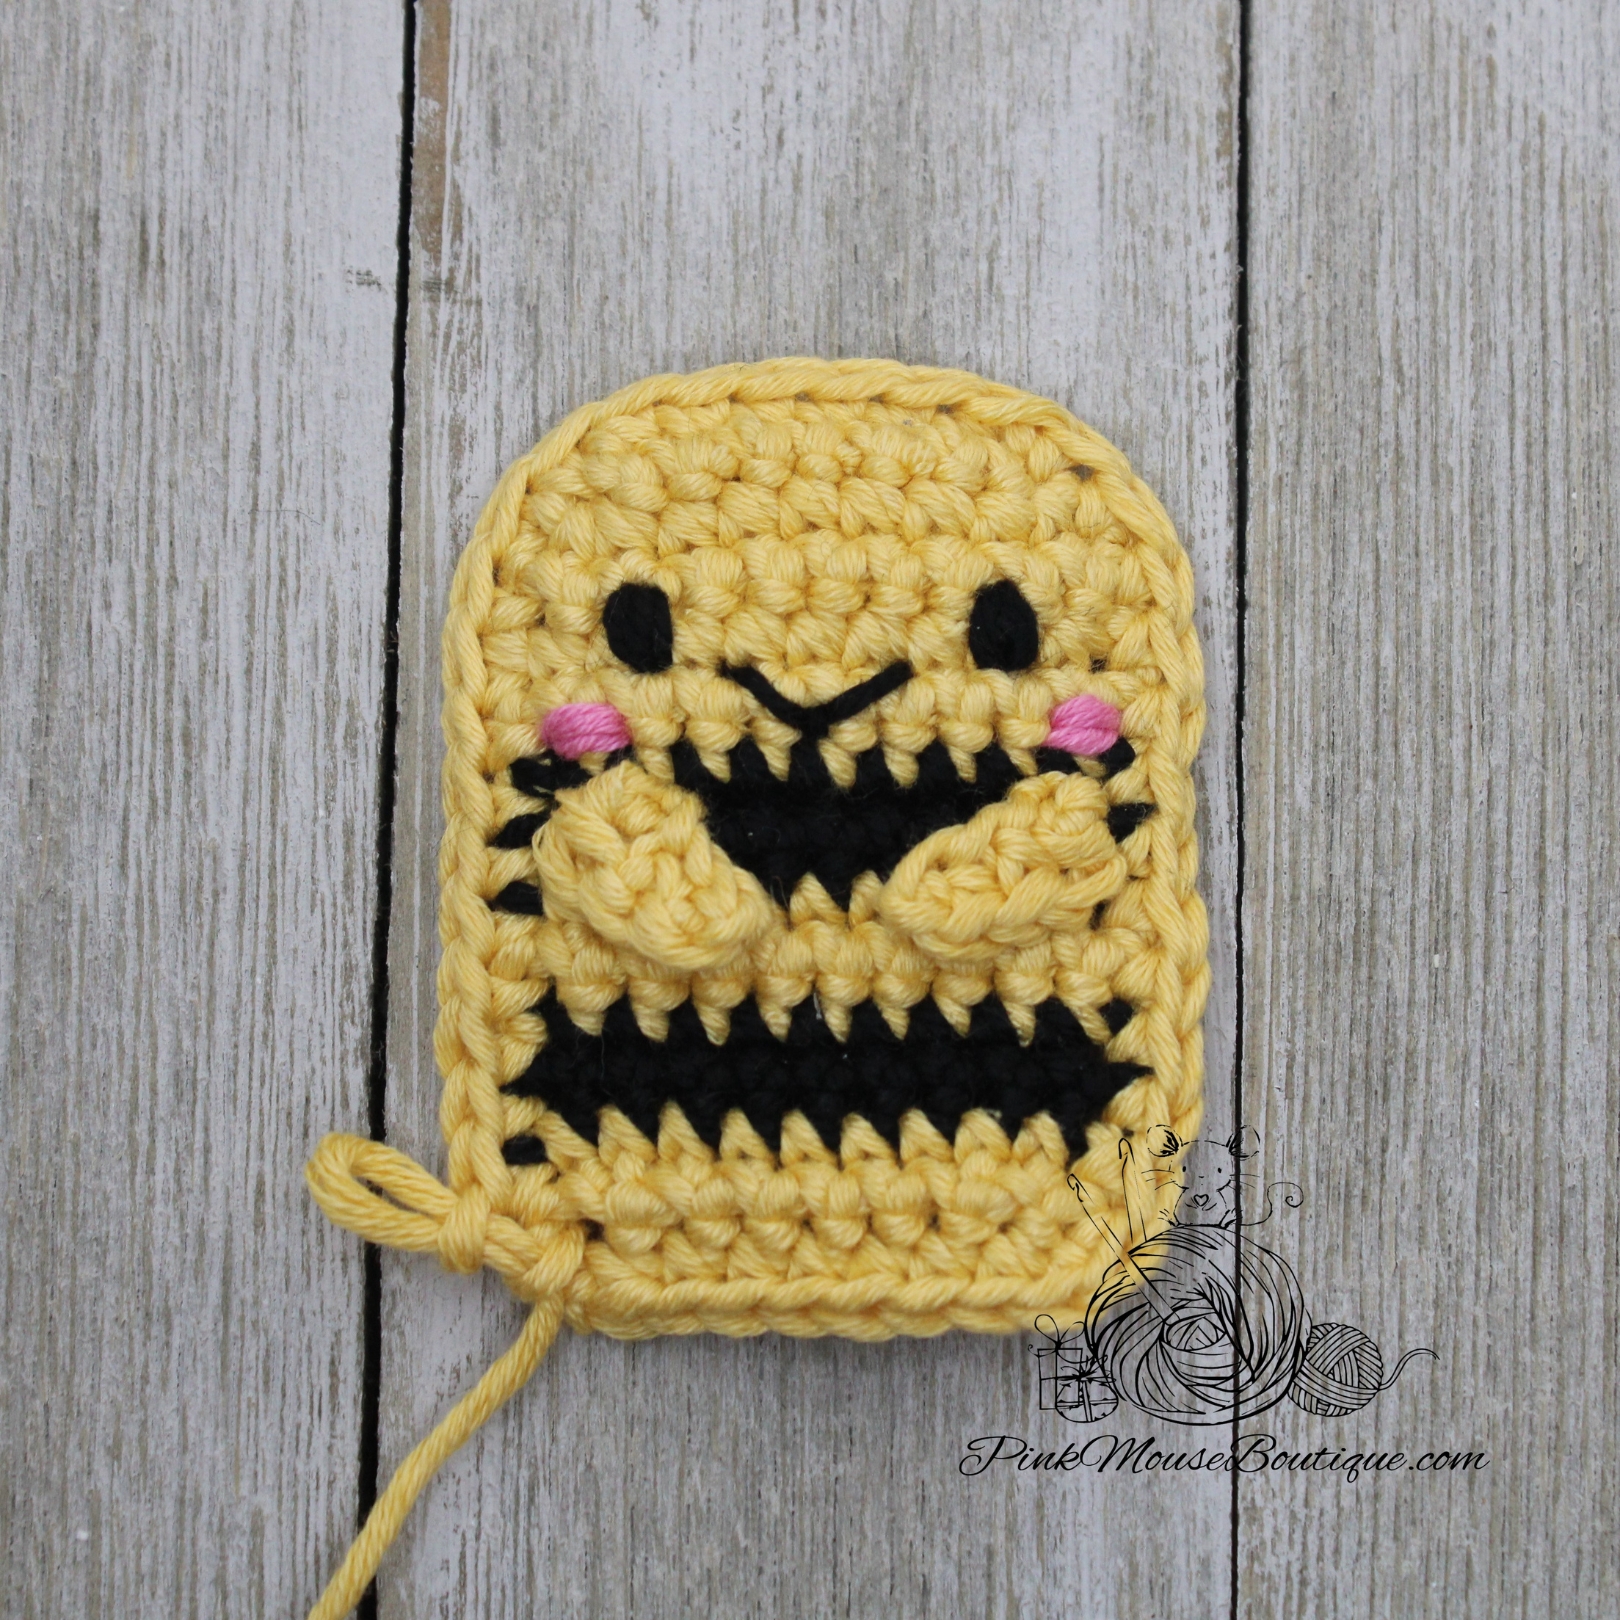
With Dark Pink, sew a couple of times a row below the eyes to make the cheeks.
Sew the arms a row below the cheeks.
7. Place the two pieces of the body together with the right side facing out. Slip stitch all around going through both pieces. Stuff lightly before you finish closing the body. Finish closing the body, fasten off, and secure the stitches (I tie knots and stuff inside the body).
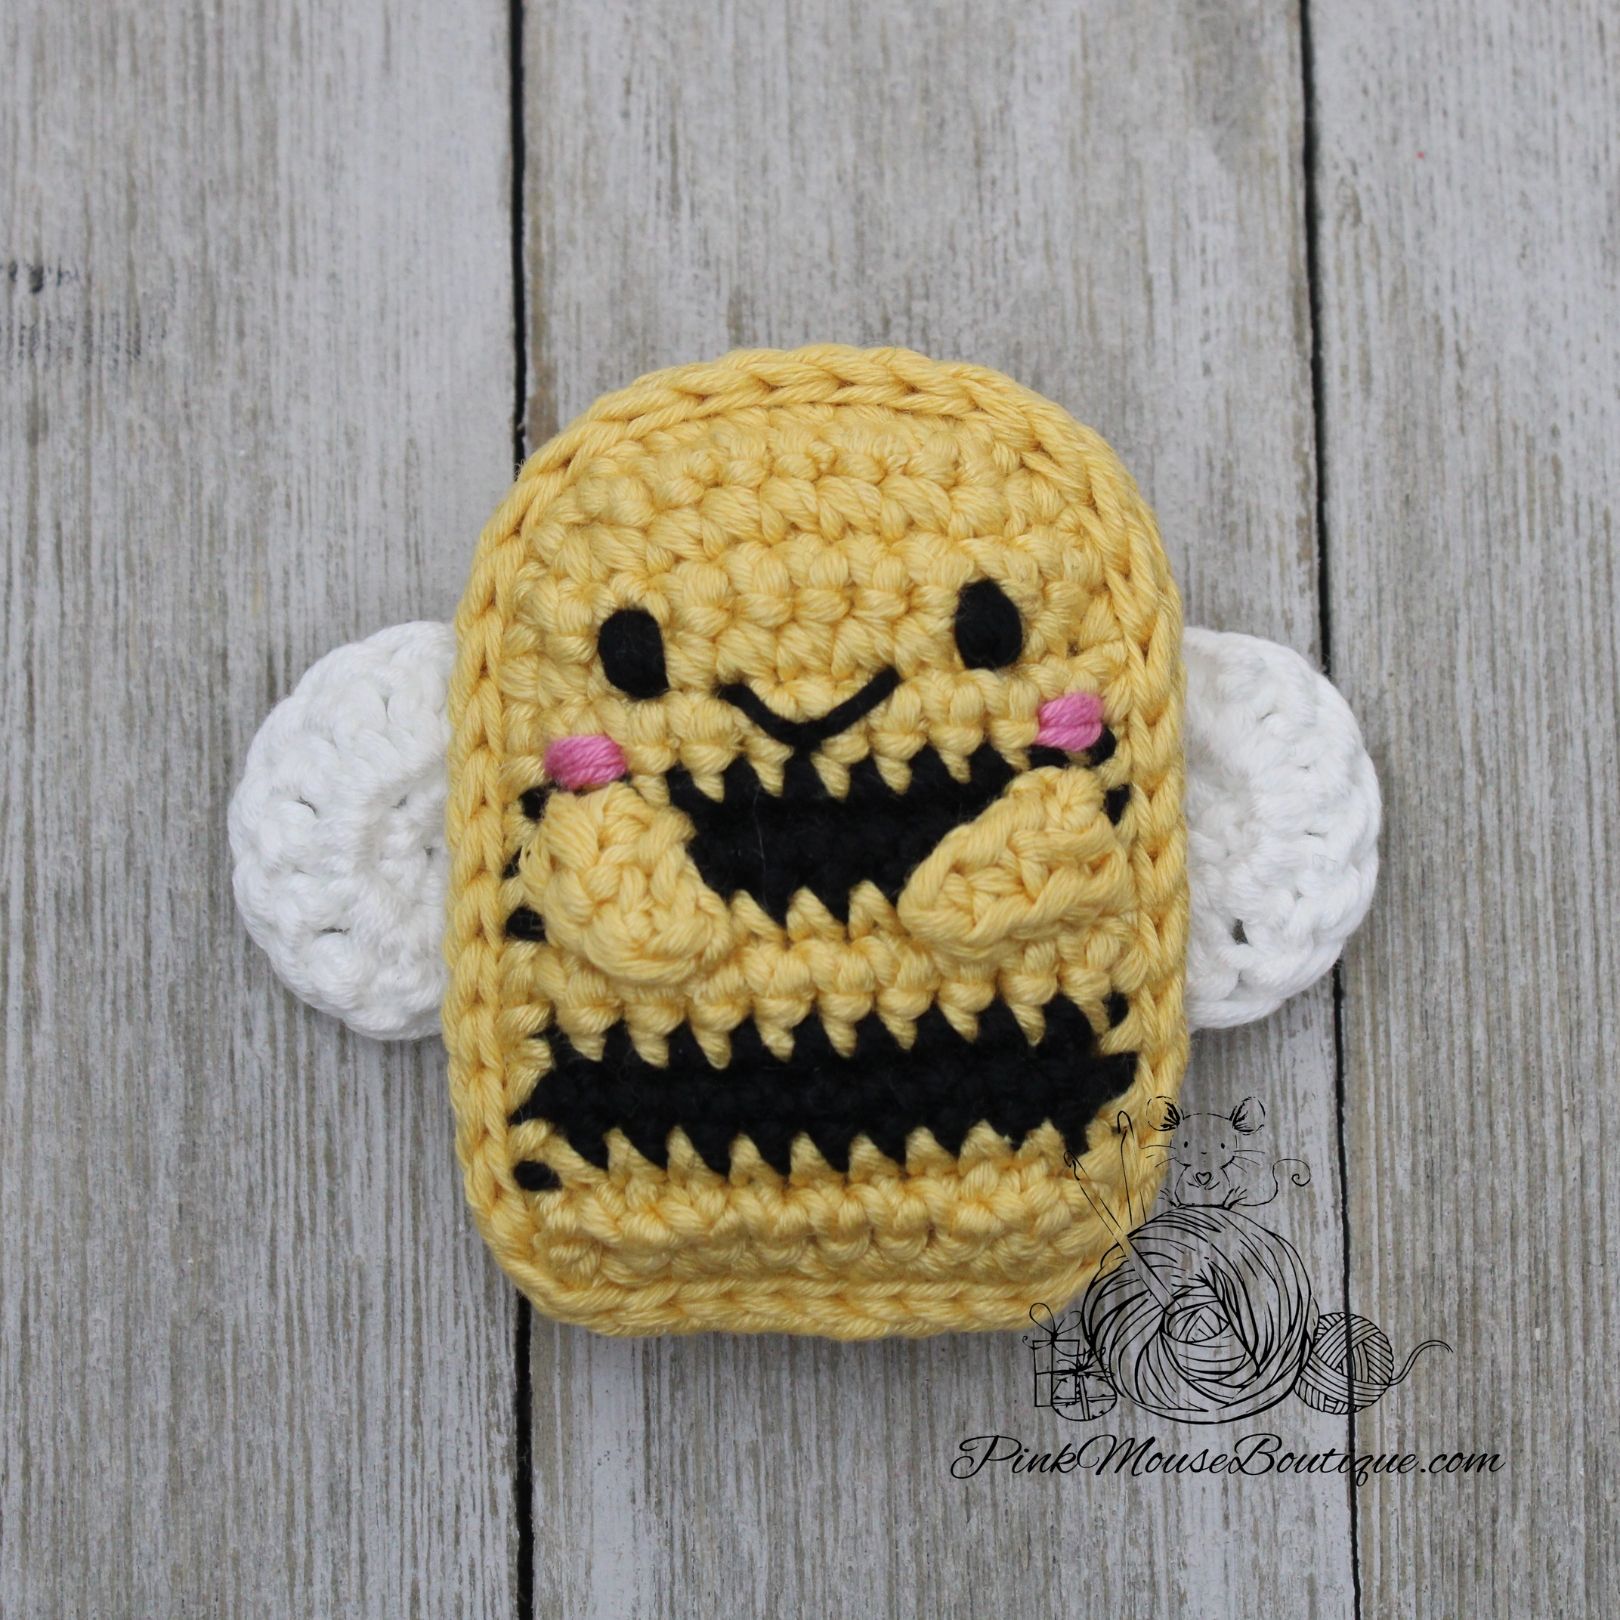
8. Sew the wings at the back of the body.
9. Sew the antennae in place using the BLO of the front piece and the FLO of the back piece.
And your little bee is finished!
I hope you enjoyed making this critter. Please let me know in the comments.
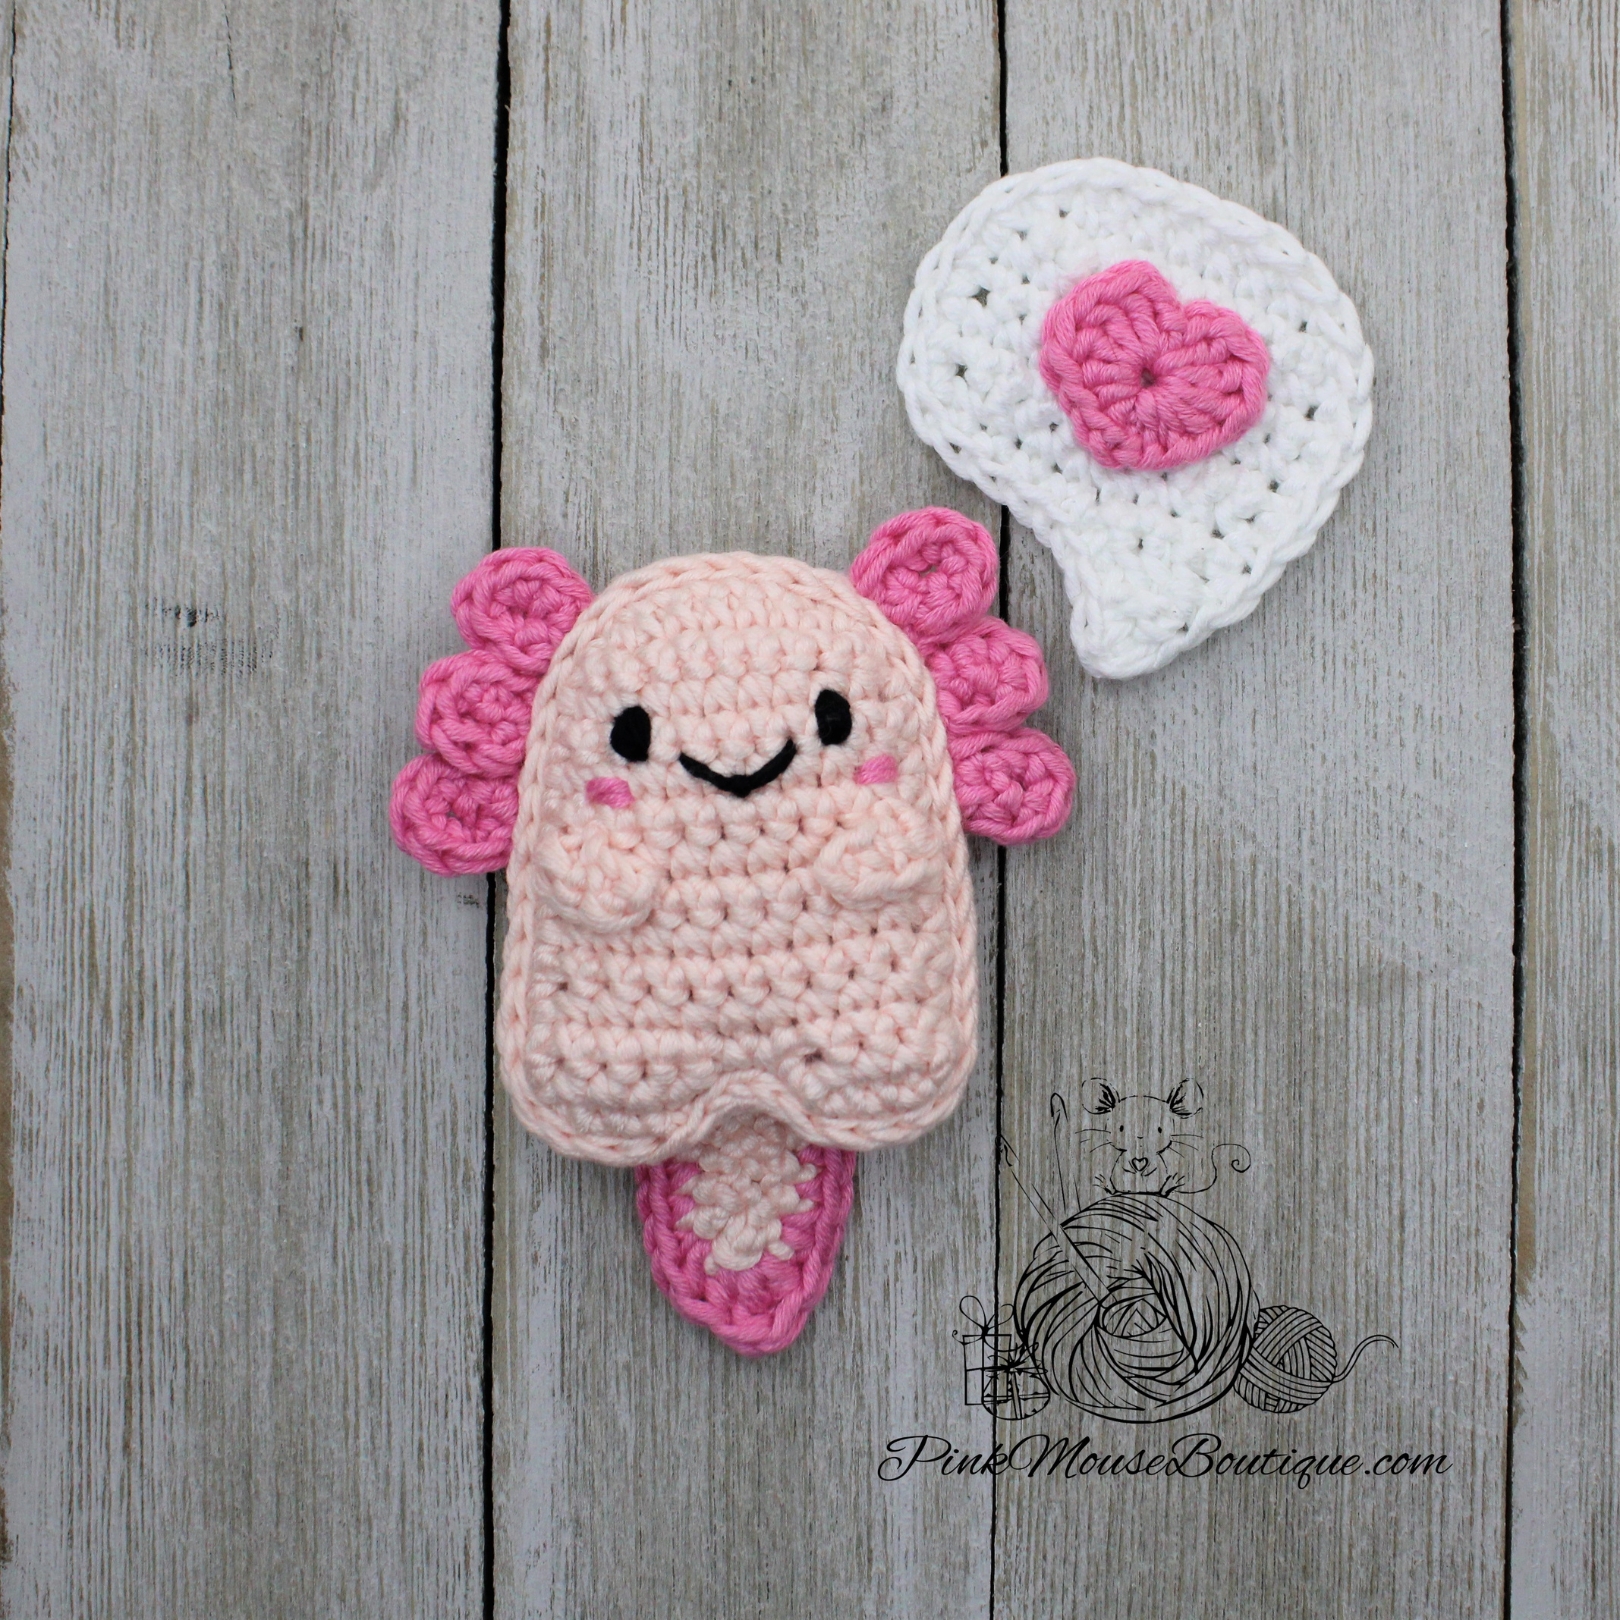
Another Pocket Valentine that was not planned. But this little axolotl would not leave me alone until I made it. 🙂 I hope you like this new addition to the Pocket Valentines series. Don’t forget to let me know in the comments below.
Make sure to read through the whole pattern and look at all the step-by-step pictures before crocheting the axolotl.
You will notice that the pattern for the body and arms is the same as the other critters.
Arms (x 2)
Suggested color – Peach
Ch 4
Row 1: in back bump of ch only sc in 2nd ch from hook, sc in next, hdc in last ch – 3 sts
Fasten off leaving a tail for sewing.
External Gills (x 6)
Suggested Color – Dark Pink
Ch 3
Round 1: 1 sc in 2nd ch from hook, 4 sc in last ch; going around the other side of the ch 1 sc – 6 sts
Fasten off leaving a tail for sewing.
Tail
Suggested Colors – Peach and Dark Pink
With Peach, ch 8
Row 1: 1 sc in 2nd ch from hook, sc in 5 chains; 1 sc, 1 hdc, 1 sc in last ch; going around the other side of the ch 1 sc in 6 chains; ch 1 and turn – 15 sts
Change Color – Dark Pink
Row 2: sc in 6 sts; (sc and hdc) in next st, (hdc, trbl, hdc) in next st, (hdc, sc) in next; sc in last 6 sts – 19 sts
Fasten off both Peach and Dark Pink leaving a long Peach tail for sewing.
BODY (x 2)
Suggested Color – Pink
Ch 7
Row 1: in back bump of ch only 2 sc in 2nd ch from hook, 4 sc, 2 sc in last ch; ch 1 and turn – 8 sts
Row 2: inc, 6 sc, inc; ch 1 and turn – 10 sts
Rows 3 – 11: sc in each st; ch 1 and turn – 10 sts (9 rows)
LEG 1
Row 12: sc in 4 sts; ch 1 and turn – 4 sts
Row 13: sc in each st – 4 sts
Fasten off.
LEG 2
Join thread to 7th st of Row 11.
Row 1: sc in 4 sts; ch 1 and turn – 4 sts
Row 2: sc in each st – 4 sts
Sc in each st and row all around the body.
Fasten off the 1st piece. Do not break the thread from the 2nd piece.
Assembly
The facial features will be sewn to the piece that has not been fasten off.
With Black yarn, sew the eyes on Row 4 or 5, 5 stitches apart.
With Black yarn, sew a line between the eyes. The line should be 3 stitches long.
Insert the needle a row below the mouth and in the middle. Pull and go around the mouth to form a curve. Insert the needle again through the same stitch and pull. Tie a knot to secure the ends.
With Dark Pink, sew a couple of times a row below the eyes to make the cheeks.
Sew the arms a row below the cheeks.
7. Place the two pieces of the body together with the right side facing out. Slip stitch all around going through both pieces. Stuff lightly before you finish closing the body. Finish closing the body, fasten off, and secure the stitches (I tie knots and stuff inside the body).
8. Use pins to position the External Gills in place – 3 on each side of the head. Then sew in place using the BLO of the front piece and the FLO of the back piece.
9. Sew the tail on Row 10, at the back middle of the body.
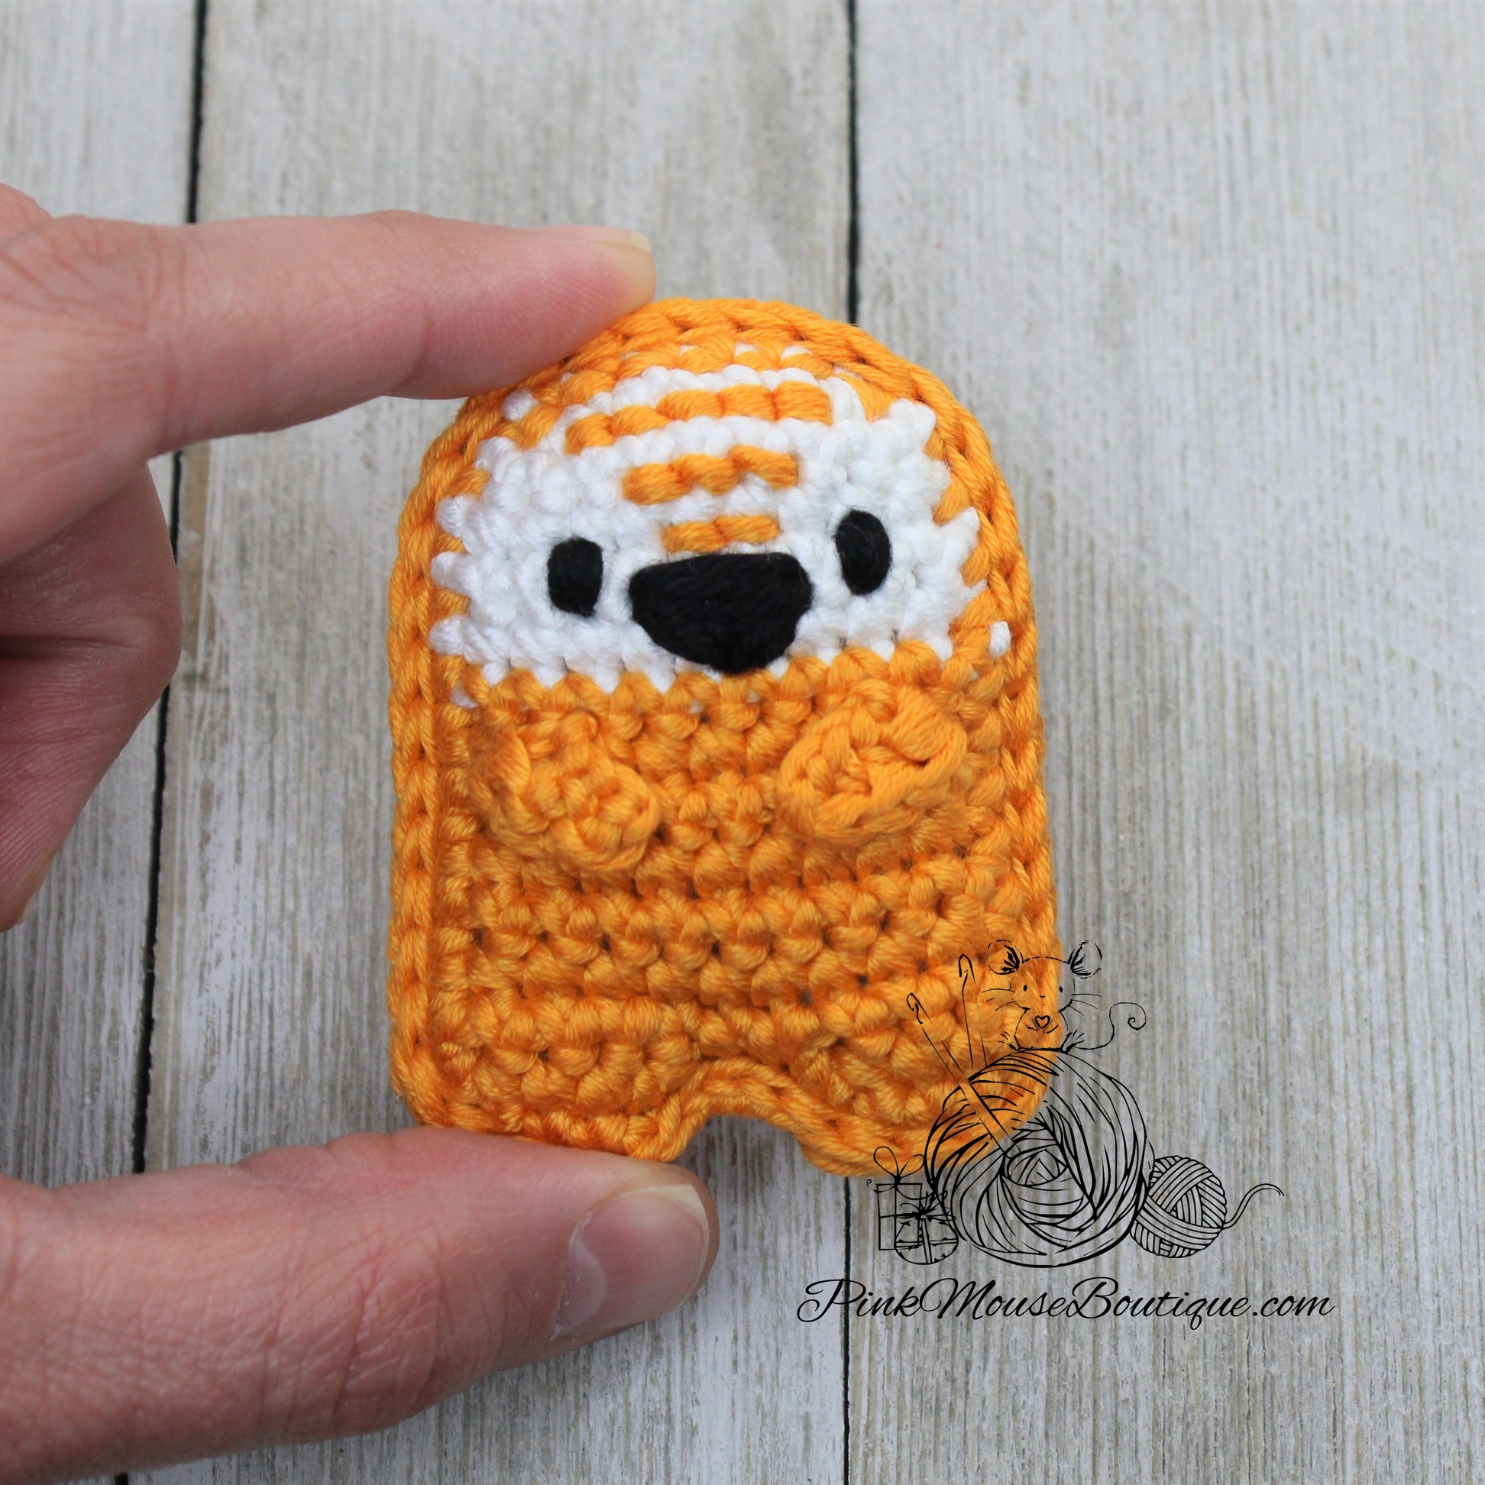
This little fox was not planned. But once the idea popped into my head, I had to make it.
If you have made the other Valentine critters, you will notice that most of the instructions are the same as for the other animals. Only the tail and some of the facial details are different.
Notes: Make sure to read through the whole pattern and look at all the step-by-step pictures before crocheting the fox.
Arms (x 2)
Suggested color – Orange
Ch 4
Row 1: in back bump of ch only sc in 2nd ch from hook, sc in next, hdc in last ch
Fasten off leaving a tail for sewing.
Ears (x 2)
Suggested Color – Orange
Round 1: in a mr 1 sc, 1 hdc, 1 trbl, 1 hdc, 1 sc; do not sl st to join – 5 sts
Fasten off leaving a tail for sewing.
Tail
Suggested Colors – Orange and White
With Orange, ch 3
Row 1: in back bump of ch only 1 sc in 2nd ch from hook, sc in last; ch 1 and turn – 2 sts
Row 2: 2 inc; ch 1 and turn – 4 sts
Row 3: sc in each st; ch 1 and turn – 4 sts (do not cut the orange yarn just yet)
Change Color – White (leave a long beginning tail)
Row 4: sc in each st; ch 1 and turn – 4 sts
Row 5: in BLO 2 dec; ch 1 and turn – 2 sts
Row 6: in FLO dec – 1 st
Fasten off.
Cut the orange yarn leaving a long enough tail to crochet around the orange part. With a needle carry it to the left side of the tail and begin sc around the orange part with the orange yarn. When you get to the white part, change color and use the white beginning tail. Sc around with white. Fasten off when you get to the orange. I did not slip stitch to join to the orange. I sewed the first orange and last white stitches together. Weave in all ends, except for the one you will use to sew the tail in place.
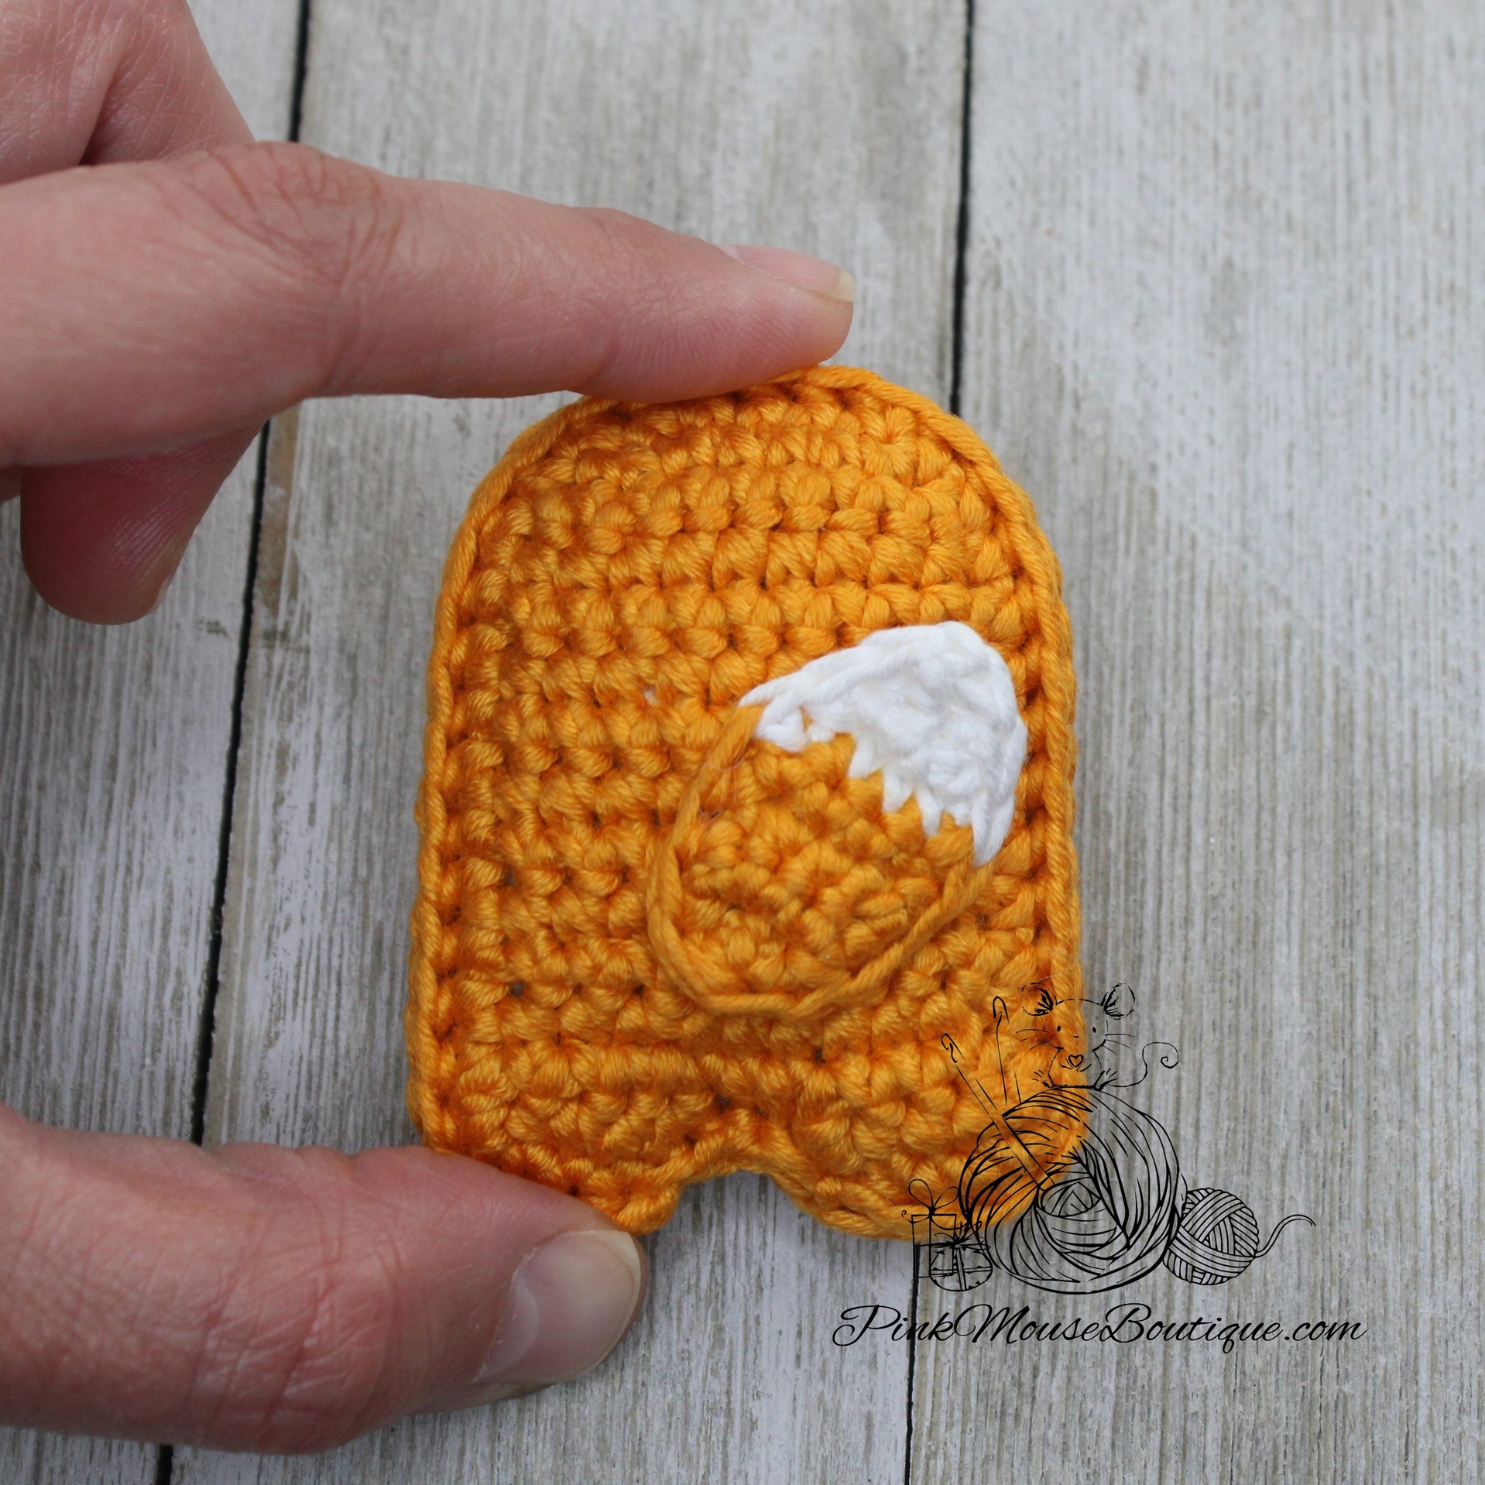
BODY – Back Piece
Suggested Colors – Orange
Ch 7
Row 1: in back bump of ch only 2 sc in 2nd ch from hook, 4 sc, 2 sc in last ch; ch 1 and turn – 8 sts
Row 2: inc, 6 sc, inc; ch 1 and turn – 10 sts
Rows 3 – 11: sc in each st; ch 1 and turn – 10 sts (9 rows)
LEG 1
Row 12: sc in 4 sts; ch 1 and turn – 4 sts
Row 13: sc in each st – 4 sts
Fasten off.
LEG 2
Join thread to 7th st of Row 11.
Row 1: sc in 4 sts; ch 1 and turn – 4 sts
Row 2: sc in each st – 4 sts
Sc in each st and row all around the body.
Fasten off and weave in the ends.
BODY – Front Piece
Suggested Colors – White and Orange
With White, ch 7
Row 1: in back bump of ch only 2 sc in 2nd ch from hook, 4 sc, 2 sc in last ch; ch 1 and turn – 8 sts
Row 2: inc, 6 sc, inc; ch 1 and turn – 10 sts
Rows 3 – 5: sc in each st; ch 1 and turn – 10 sts (3 rows)
Change Color – Orange
Rows 6 – 11: sc in each st; ch 1 and turn – 10 sts (6 rows)
LEG 1
Row 12: sc in 4 sts; ch 1 and turn – 4 sts
Row 13: sc in each st – 4 sts
Fasten off.
LEG 2
Join thread to 7th st of Row 11.
Row 1: sc in 4 sts; ch 1 and turn – 4 sts
Row 2: sc in each st – 4 sts
Sc in each st and row all around the body.
Do not fasten off just yet.
ASSEMBLY
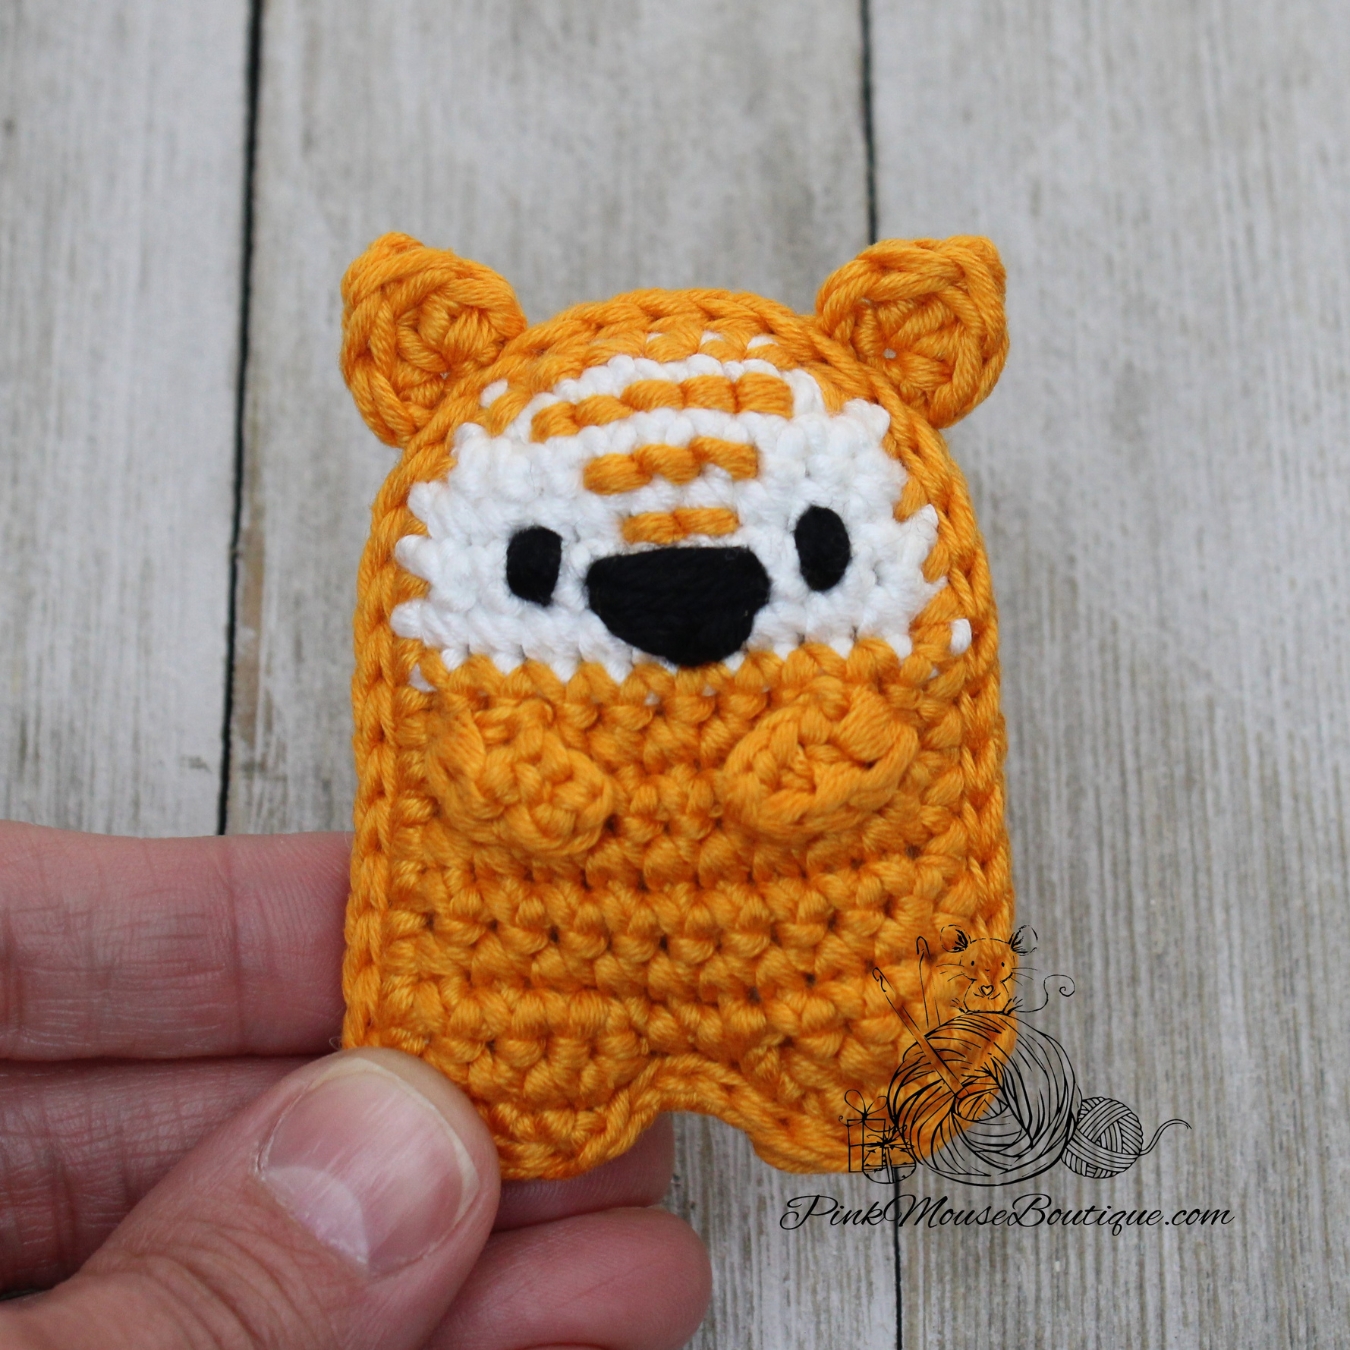
With black, sew the nose. The nose is sewn between Rows 4 and 6. Refer to the first five pictures below. Count 4 spaces in start sewing the nose at the 4th space going down one row. I sewed once in each at first and then went back, and sewed one more time (the 4th picture). Once the bottom of the nose is filled, sew three lines at the top.
With black, sew the eyes a stitch away from the nose on Row 4. Sew several times. Tie knots to secure the yarn.
With orange, sew lines starting with the two stitches above the nose and going up increasing the lines: 2 above the nose, 3 lines in next row, 5 lines in following row, and 7 lines in last row. Secure the yarn by tying both ends with a knot.
Sew the arms at an angle between Rows 7 and 8.
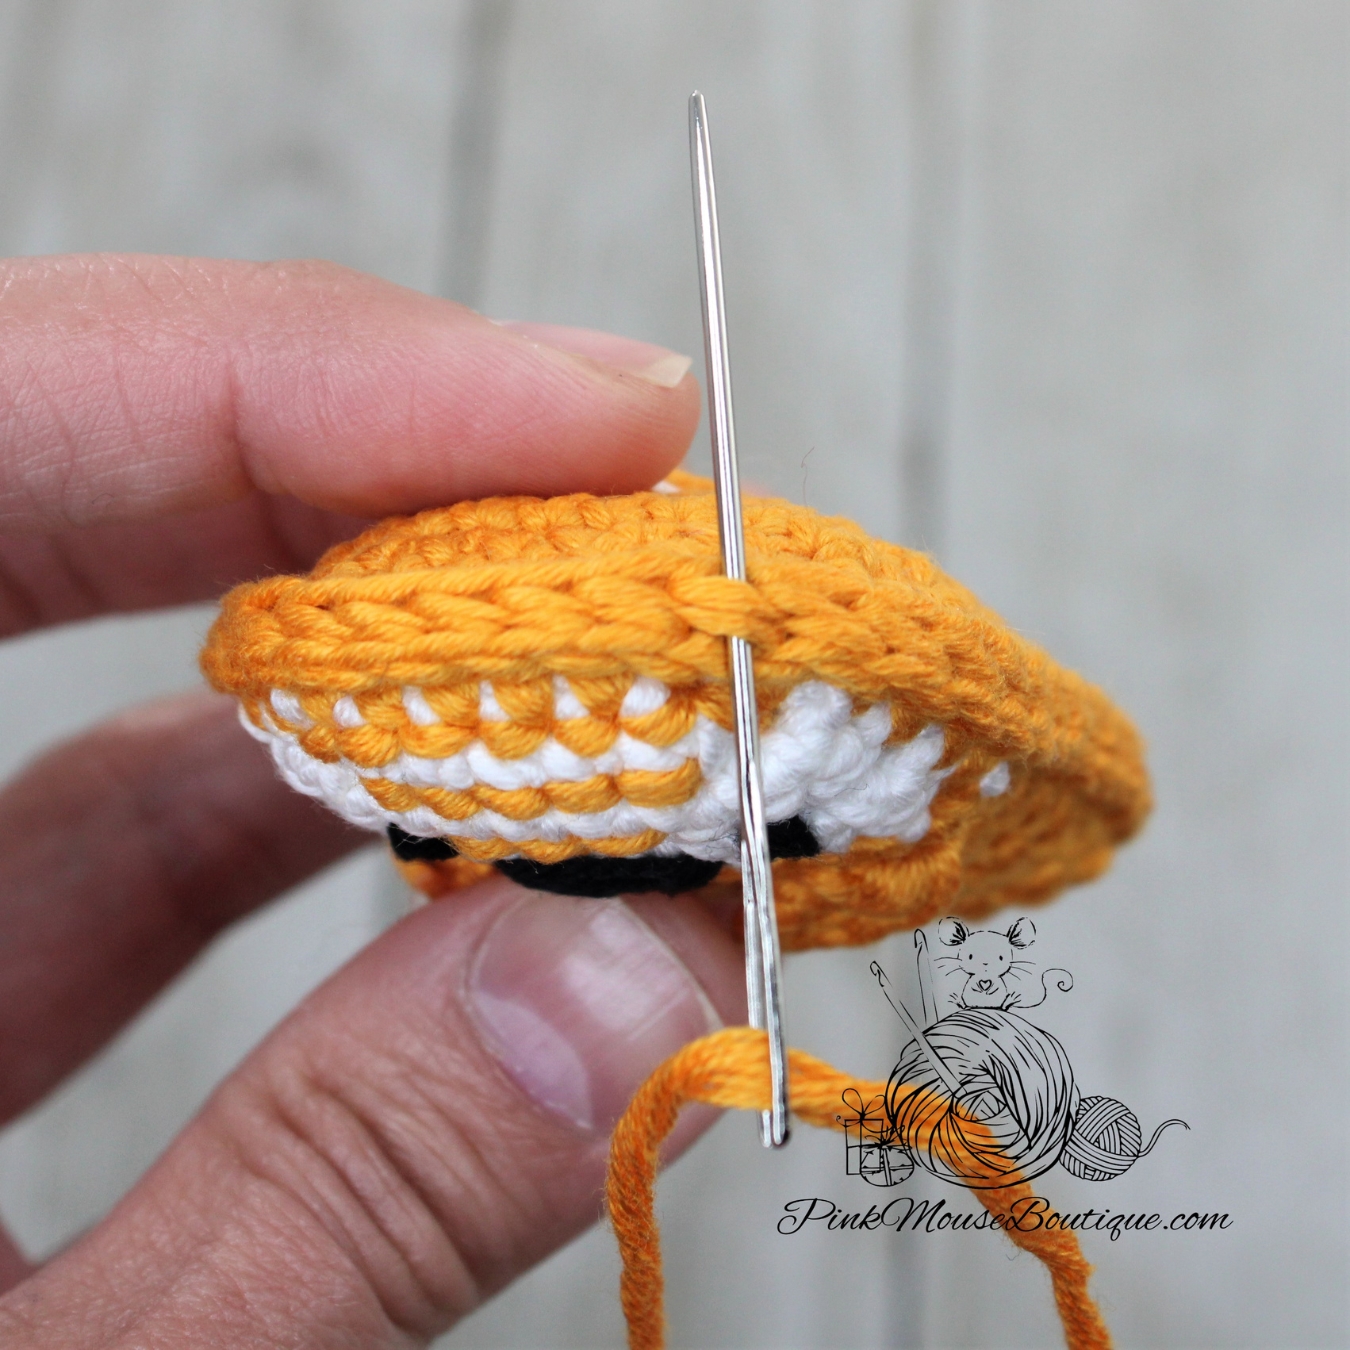
5. Put the front and back pieces together with the wrong side touching and the right side facing out. Slip stitch through both inserting the hook through the front piece first. Stuff lightly before completely closing the piece. Slip stitch until the end. Weave in the tail.
6. Sew the tail in place. I sewed the orange part in place and left the white part free. I sewed the tail at an angle.
7. Using only the BLO of the front piece and the FLO of the back piece, sew the ears in place. Use black fabric marker, to color the tip of the ears.
8. OPTIONAL: With the cotton swab and blush, add color to the cheeks.
Our little fox is finished!
I hope you enjoyed this part of the pattern. Let me know in the comments below.
Make sure to read through the whole pattern and look at all the step-by-step pictures before crocheting the animals.
You will notice that the body pattern is the same one we used to make the bear from Part 2. You will also notice that some of the details are repeated throughout.
FROG DETAILS
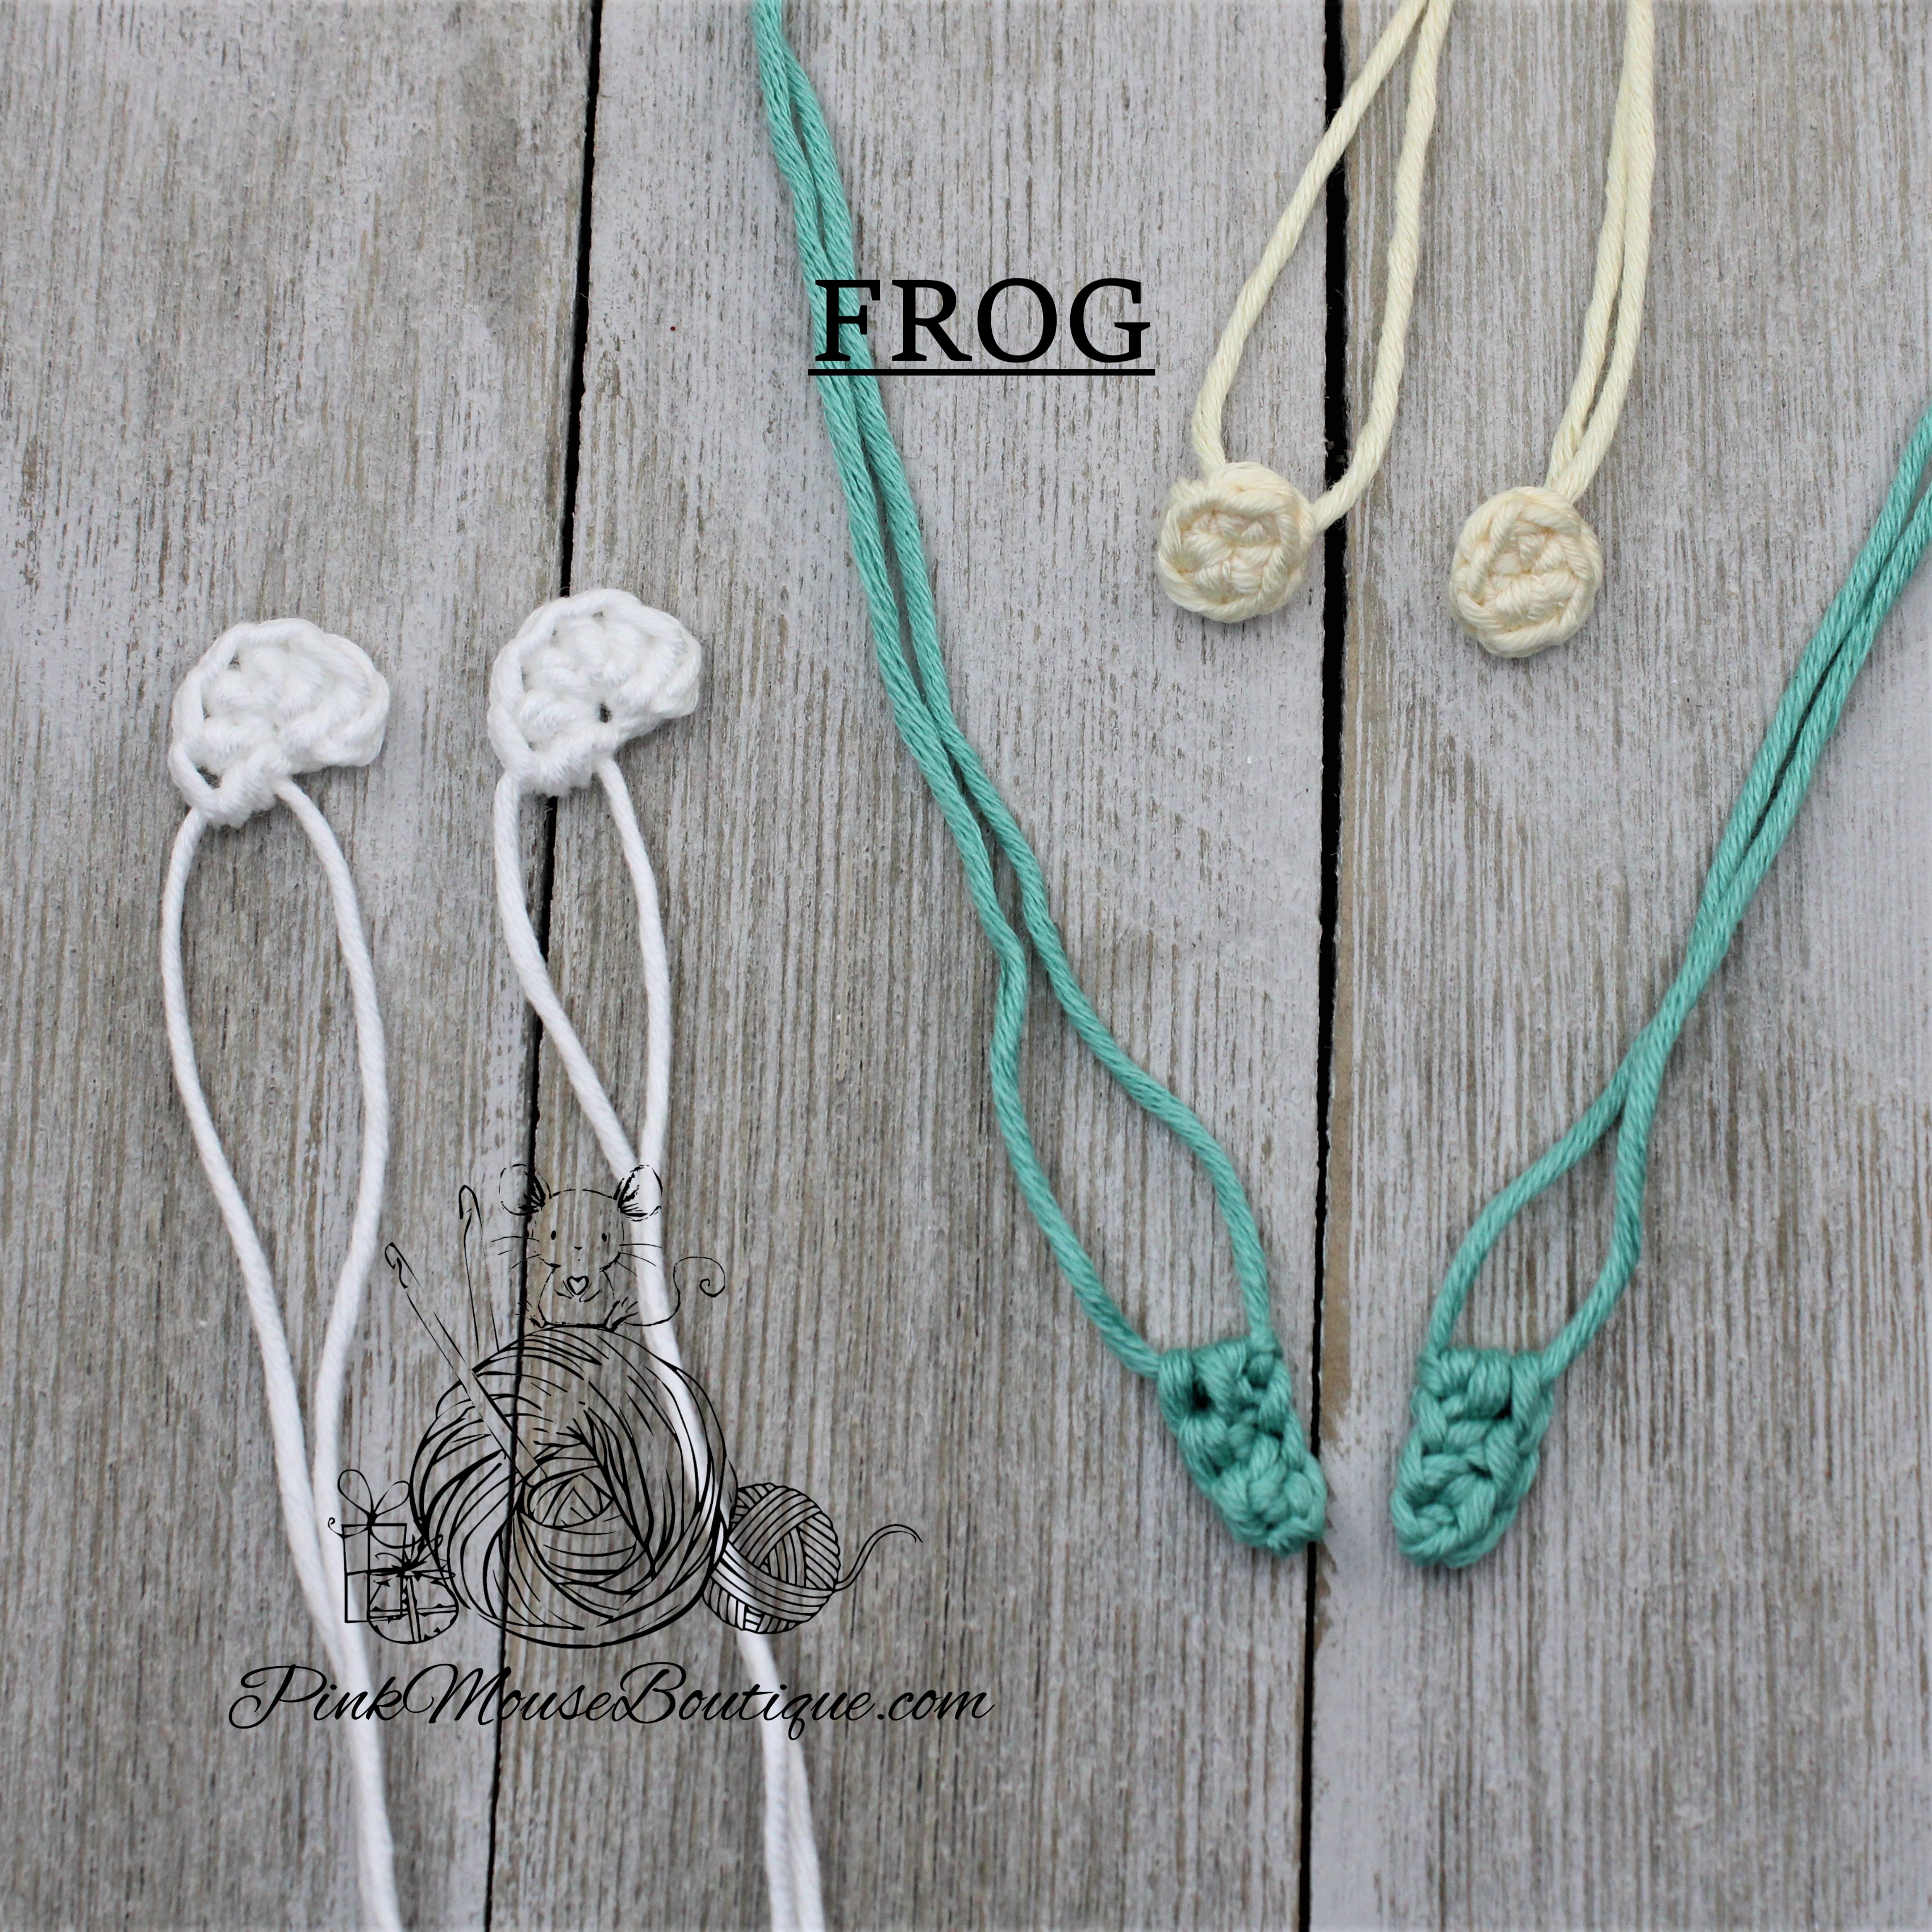
Eyes (x 2)
Suggested Color – White
Round 1: 6 hdc in a mr; do not join with a sl st – 6 sts
Fasten off leaving a tail for sewing.
Cheeks (x 2)
Suggested Color – Light Yellow
Round 1: 6 sc in a mr; sl st to join – 6 sts
Fasten off leaving a tail for sewing.
Arms (x 2) – Same for Bunny and Pig
Suggested color – Green
Ch 4
Row 1: in back bump of ch only sc in 2nd ch from hook, sc in next, hdc in last ch
Fasten off leaving a tail for sewing.
BUNNY DETAILS
Ears (x 2)
Suggested Color – Light Grey
Ch 5
Row 1: 1 sc in 2nd ch from hook, sc in 2 chains, 4 sc in last ch, on other side of ch 1 sc in 3 chains
Fasten off leaving a tail for sewing.
Cheeks (x 2)
Suggested Color – Light Pink
Round 1: 6 sc in a mr; sl st to join – 6 sts
Fasten off leaving a tail for sewing.
Tail
Suggested color – Light Grey
Round 1: 8 hdc in a mr; sl st to join
Fasten off leaving a tail for sewing.
PIG DETAILS
Ears (x 2)
Suggested Color – Light Pink
Round 1: in a mr 1 sc, 1 hdc, 1 trbl, 1 hdc, 1 sc; do not sl st to join – 5 sts
Fasten off leaving a tail for sewing.
Muzzle
Suggested Color – Light Pink
Ch 4
Round 1: 2 sc in 2nd ch from hook, 1 sc in next; 4 sc in last ch; continue on other side of chain 1 sc in next, 2 sc in last ch; sl st to join – 10 sts
Fasten off leaving a tail for sewing.
Tail
Suggested Color – Light Pink
Ch 5
Row 1: 3 sc in 2nd ch from hook, 3 sc in next 3 chains – 12 sts
Fasten off leaving a tail for sewing.
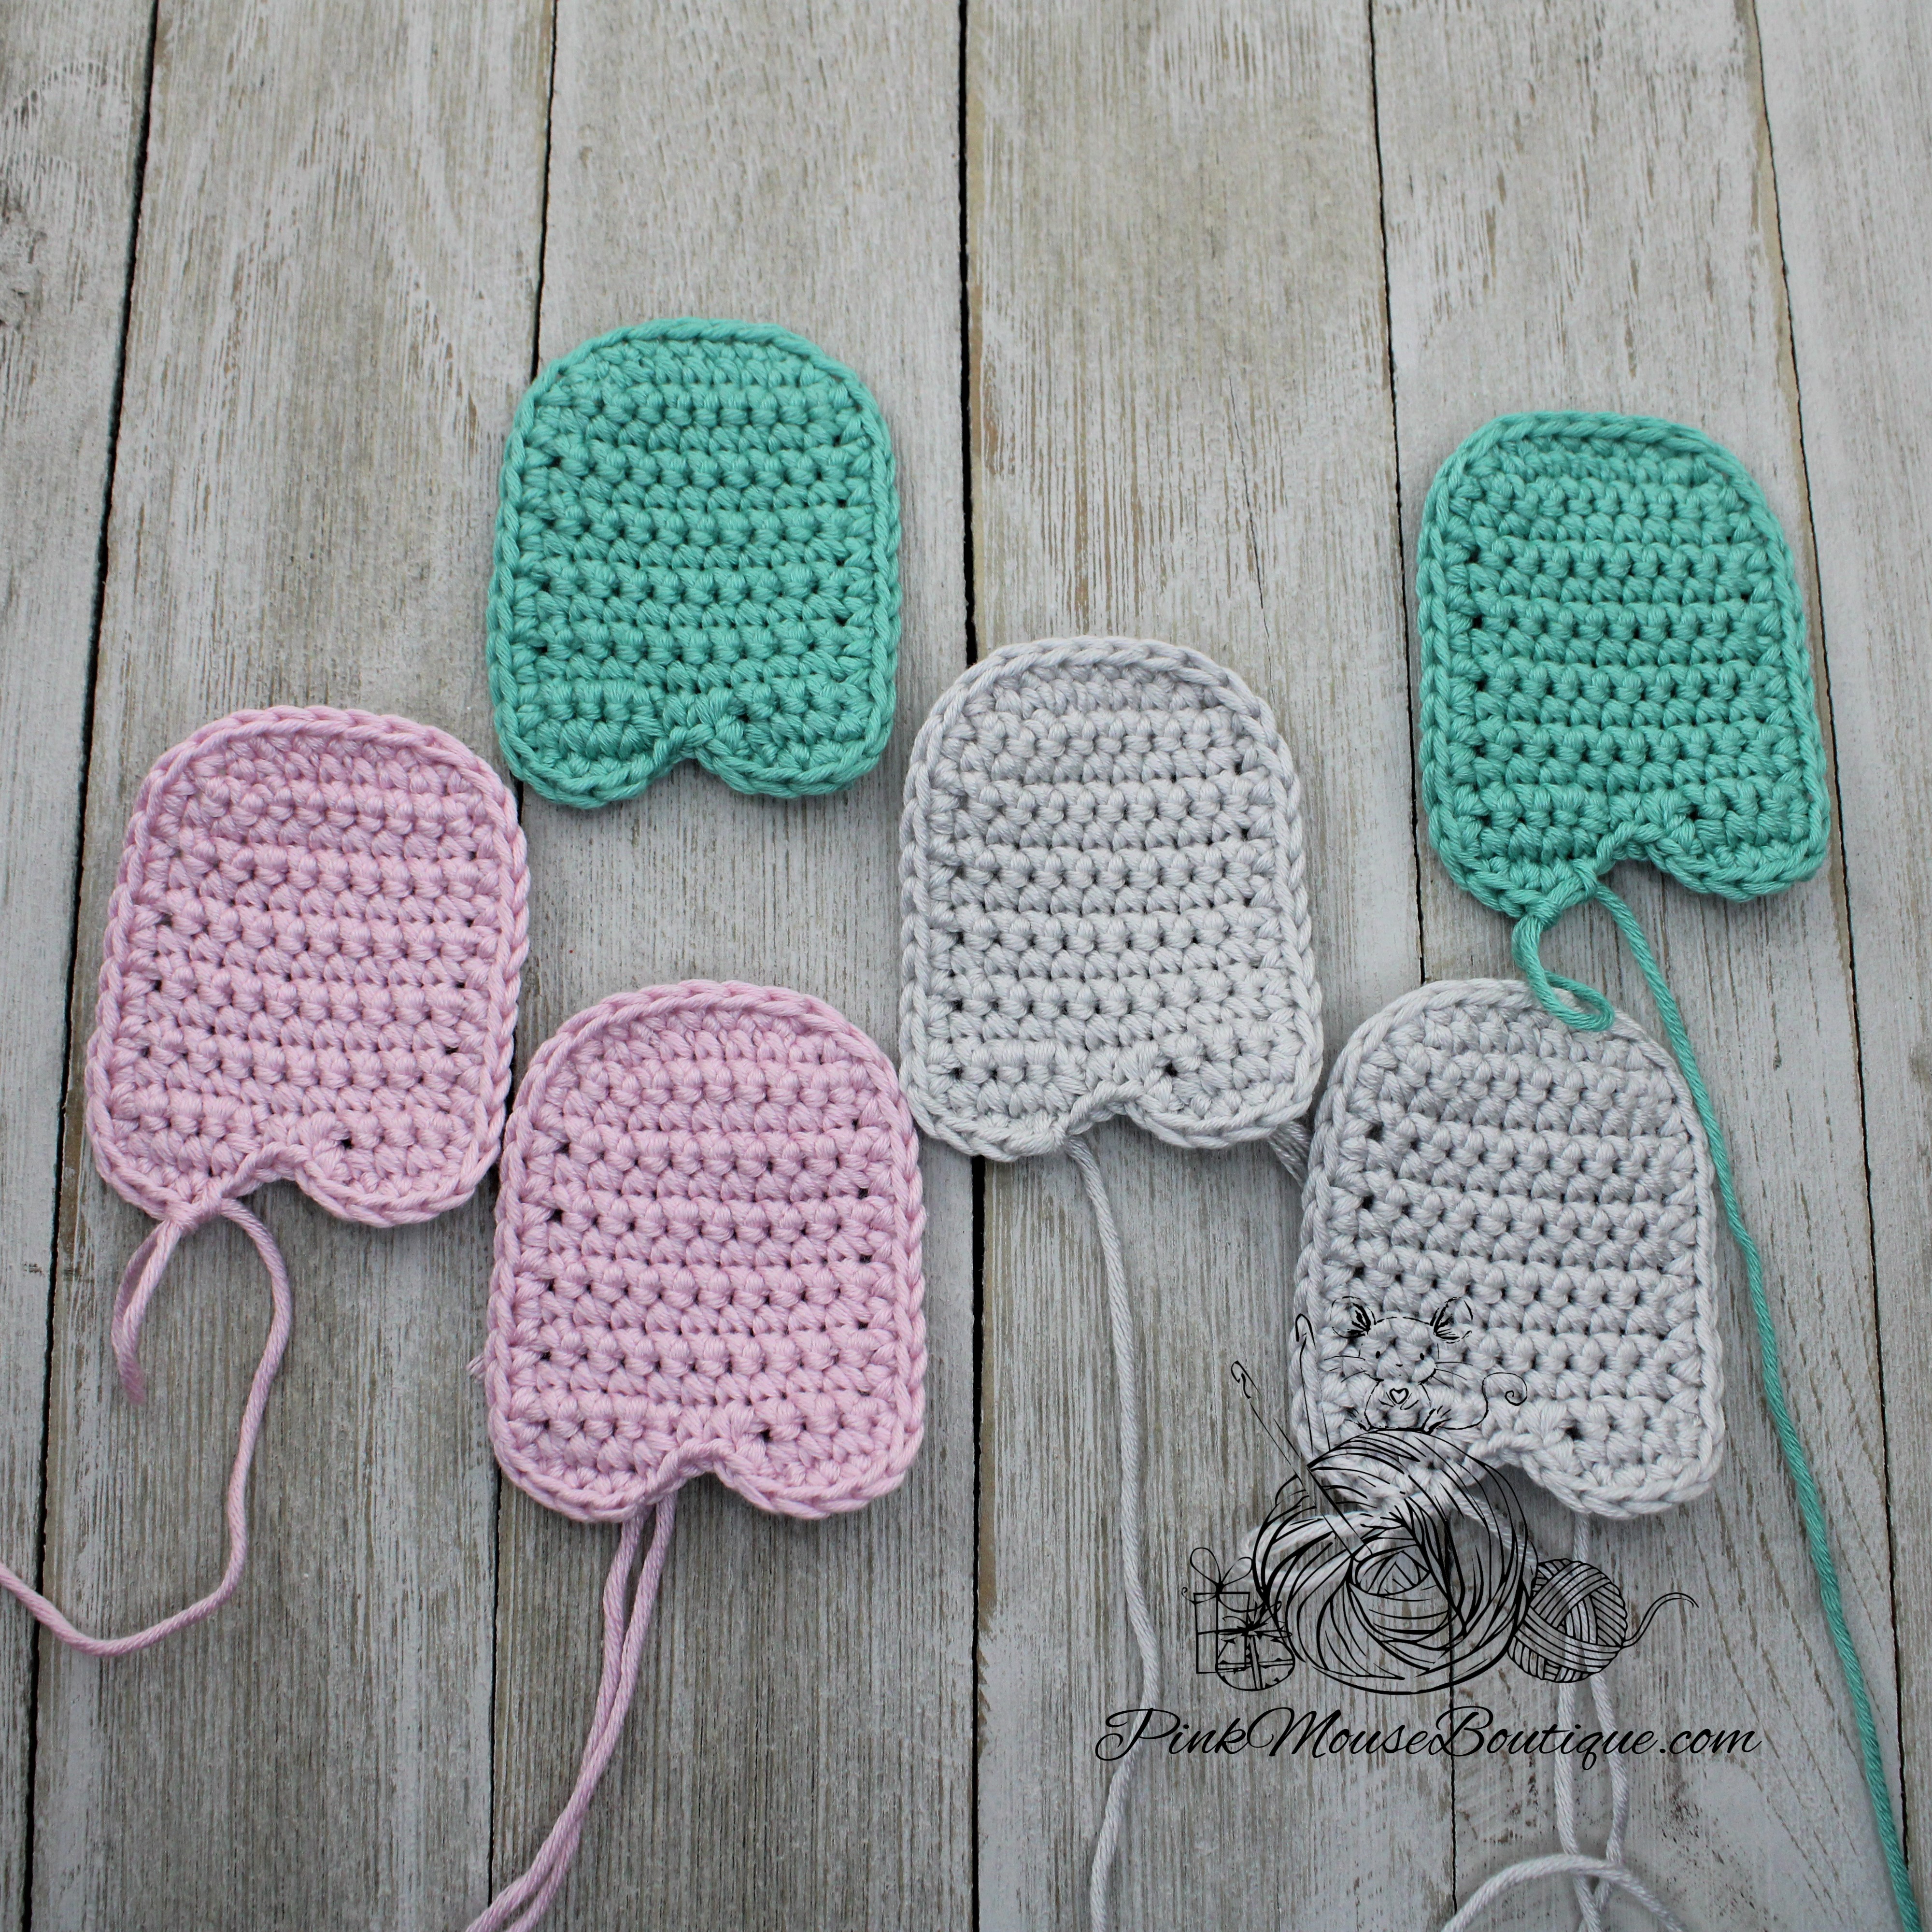
BODY (x 2)
Suggested Colors – Green (Frog), Grey (Bunny), or Light Pink (Pig)
Ch 7
Row 1: in back bump of ch only 2 sc in 2nd ch from hook, 4 sc, 2 sc in last ch; ch 1 and turn – 8 sts
Row 2: inc, 6 sc, inc; ch 1 and turn – 10 sts
Rows 3 – 11: sc in each st; ch 1 and turn – 10 sts (9 rows)
LEG 1
Row 12: sc in 4 sts; ch 1 and turn – 4 sts
Row 13: sc in each st – 4 sts
Fasten off.
LEG 2
Join thread to 7th st of Row 11.
Row 1: sc in 4 sts; ch 1 and turn – 4 sts
Row 2: sc in each st – 4 sts
Sc in each st and row all around the body.
Fasten off the 1st piece. Do not break the thread from the 2nd piece.
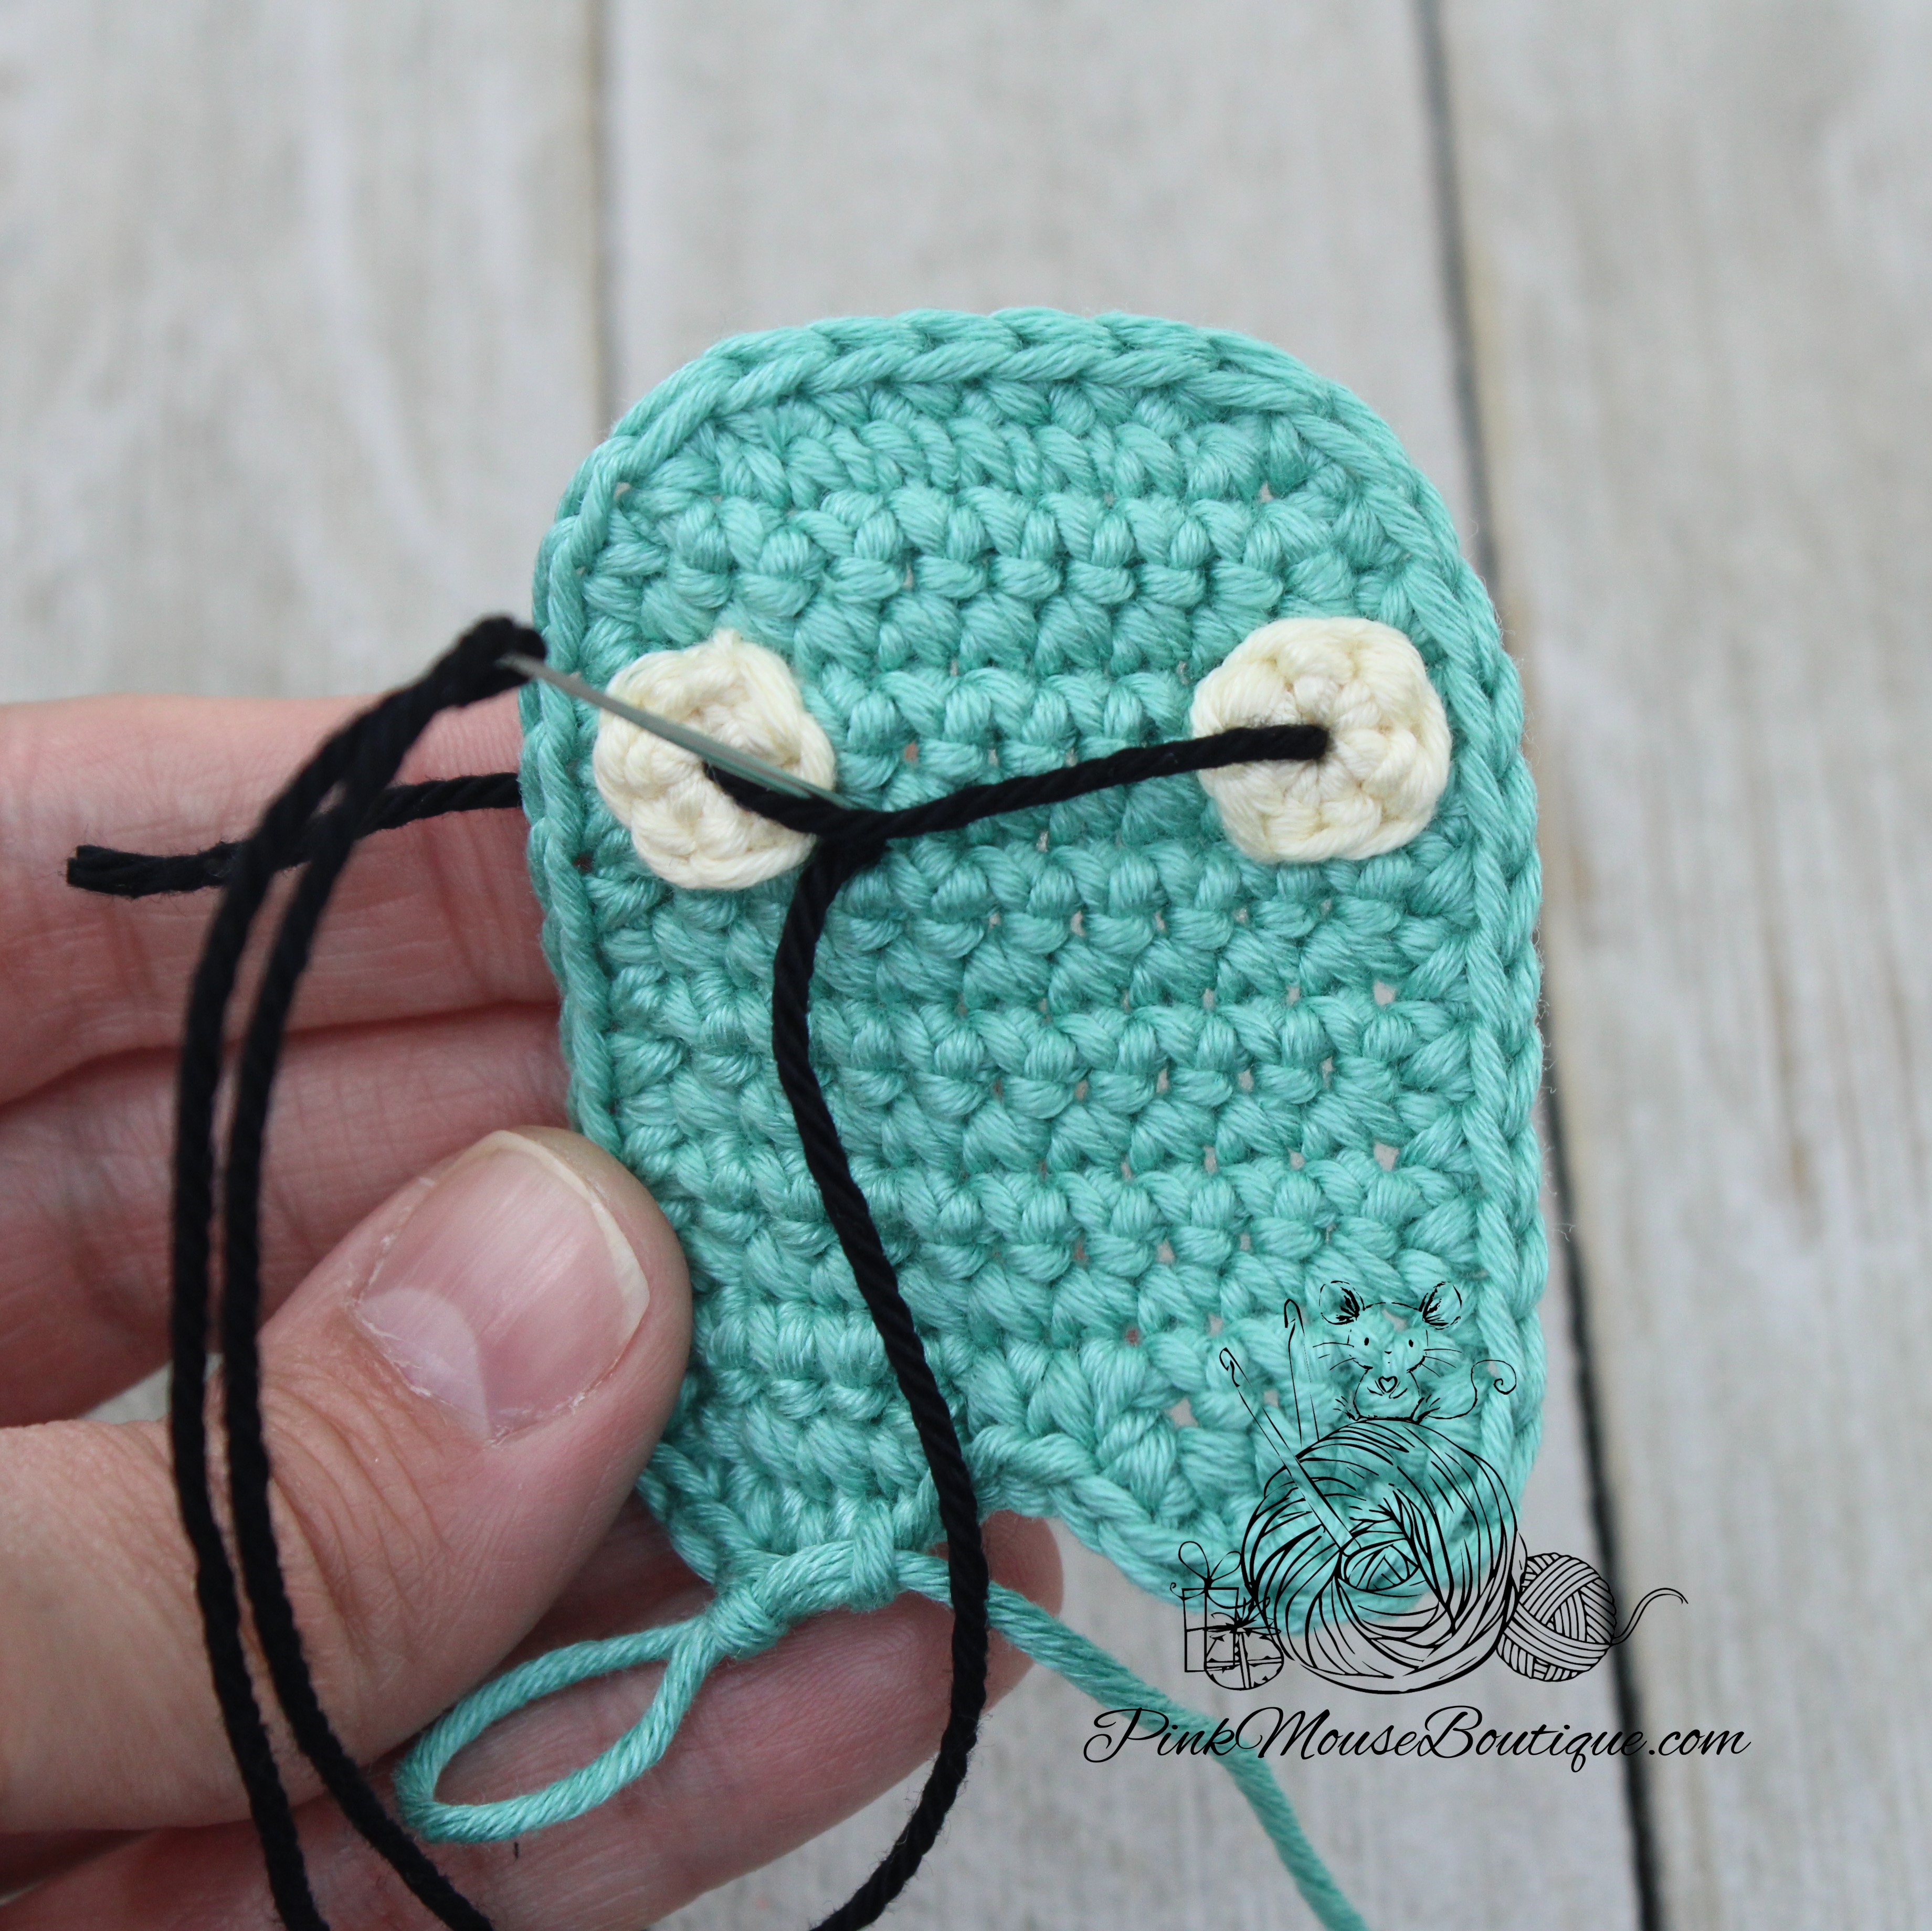
FROG ASSEMBLY
Sew the cheeks between Rows 3 and 6 (we are not counting the sc we did all around the body).
With black yarn, sew a line going from the mr of the left cheek to the mr of the right cheek.
Starting a row below the line we sewed, insert the needle in the closest space to the left cheek and then go over the line and insert it in the same space again. Repeat until you get to the space next to the right cheek. This will make the mouth smiley.
4. Sew the arms 1-2 rows below the cheeks.
5. Put the back and front pieces of the body together with the right side facing out. Slip stitch through both. Stuff lightly before closing the body completely.
6. Using only the BLO of the front piece and the FLO of the back piece, sew the eyes on either side of the body. Once the white part is in place, sew the shank buttons using white thread.
BUNNY ASSEMBLY
With black yarn, sew the eyes on Row 4 (not counting the sc going around the body), 5 sts apart.
Sew the eye detail with white yarn.
With Taupe, sew the nose in the 3 middle stitches. The horizontal line is sewn in the same spaces as the bottom of the eyes. Once the horizontal line is sewn, sew a line going down 2 rows.
Sew the cheeks below the eyes.
Sew the arms below the cheeks.
Sew the tail to the back piece.
Just like we did with the frog, put the back and front pieces of the body together with the right side facing out. Slip stitch through both. Stuff lightly before closing the body completely.
8. Sew both ears on the right side using only the BLO of the front piece and the FLO of the back piece.
PIG ASSEMBLY
With black yarn, sew the eyes on Row 4 (not counting the sc going around the body), 5 sts apart.
Sew the eye detail with white.
Sew the muzzle between the eyes. The top of the muzzle should be sewn to the same spaces as the bottom of the eyes.
Sew the arms a row below the muzzle.
Sew the tail to the back piece.
Just like we did with the frog, put the back and front pieces of the body together with the right side facing out. Slip stitch through both. Stuff lightly before closing the body completely.
Using only the BLO of the front piece and the FLO of the back piece, sew the ears in place.
OPTIONAL: Add color to the cheeks with blush and a cotton swab.
Three more friends have been added to your collection.
Make sure to subscribe to my email list, so you don’t miss my next post. More Valentine’s Day friends will be joining the critters.
And let me know what you think of the pattern in the comments below.
After finishing Part 1 and Part 2, we are now ready to continue with Part 3 and make a tiny narwhal.
Remember that this pattern consists of several parts. You can click on the links below to jump to any of the other parts. Some have not been posted yet but will be added soon.
Note: Make sure to read through the whole pattern and look at all the step-by-step pictures before crocheting the narwhal.
TOOTH/TUSK PATTERN
Suggested Color – White
Ch 5
Row 1: in back bump of ch only 1 sl st in 2nd ch from hook, sc in next, hdc in next, dc in last ch – 4 sts
Fasten off leaving a tail for sewing.
TAIL PATTERN (x 2)
Suggested Color – Light Blue (or Light Pink)
Ch 6
Row 1: in back bump of ch only 1 dc in 3rd ch from hook, dc in next, hdc in next, sl st in last ch – 4 sts
Fasten off leaving a tail for sewing.
FINS PATTERN (x 2)
Suggested Color – Light Blue (or Light Pink)
Ch 4
Row 1: in back bump of ch only 1 sc in 2nd ch from hook, hdc in next, dc in last ch – 3 sts
Fasten off leaving a tail for sewing.
BODY PATTERN (x 2)
Suggested Color – Light Blue (or Light Pink)
Ch 7
Row 1: in back bump of ch only 2 sc in 2nd ch from hook, 1 sc in 4 chains, 2 sc in last ch; ch 1 and turn – 8 sts
Row 2: inc, 6 sc, inc; ch 1 and turn – 10 sts
Rows 3 – 6: sc in each st; ch 1 and turn – 10 sts (4 rows)
Row 7: sc, in FLO dec, 1 sc in 4 sts, in FLO dec, sc; ch 1 and tun – 8 sts
Row 8: sc in each st; ch 1 and turn – 8 sts
Row 9: sc, in FLO dec, 1 sc in 2 sts, in FLO dec, sc; ch 1 and turn – 6 sts
Row 10: sc in each st; ch 1 and turn – 6 sts
Row 11: sc, in FLO 2 dec, sc; ch 1 and turn – 4 sts
Row 12: in BLO 2 dec; ch 1 and turn – 2 sts
Row 13: sc in each st – 2 sts
Continue sc all around the body, every st and row. Sl st to join to 1st st of Row 13.
Fasten off 1st piece. Do not break the yarn from the 2nd piece.
ASSEMBLY
The facial features will be sewn to the piece that has not been fasten off.
With Black yarn, sew the eyes on Row 4 or 5, 5 stitches apart. Sew the white eye detail on the side of each eye.
With Black yarn, sew a line between the eyes. The line should be 3 stitches long.
Insert the needle a row below the mouth and in the middle. Pull and go around the mouth to form a curve. Insert the needle again through the same stitch and pull. Tie a knot to secure the ends.
5. Place the two pieces of the body together with the right side facing out. Slip stitch all around going through both pieces. Stuff lightly before you finish closing the body. Finish closing the body, fasten off, and secure the stitches (I tie knots and stuff inside the body).
6. Using the whip stitch, sew the tooth in place using the BLO of the front piece and the FLO of the back piece (see picture below). Make sure the tooth is centered.
7. We will continue sewing the tail and then the fins. We will again sew only to the BLO of the front piece and the FLO of the back piece.
8. Before sewing the fins in place, take the end tail and insert it through the beginning chain (see picture below), then pull. The fins are sewn a row below the mouth. So that they are not sticking too much to the side, I sewed 2 stitches of the fins to the body.
9. Once finished, tie knots and stuff the ends inside the body.
And now, you have completed Part 3 of the Tiny Valentines pattern. I hope you enjoyed making these sweet little narwhals. Let me know what you think in the comments below.
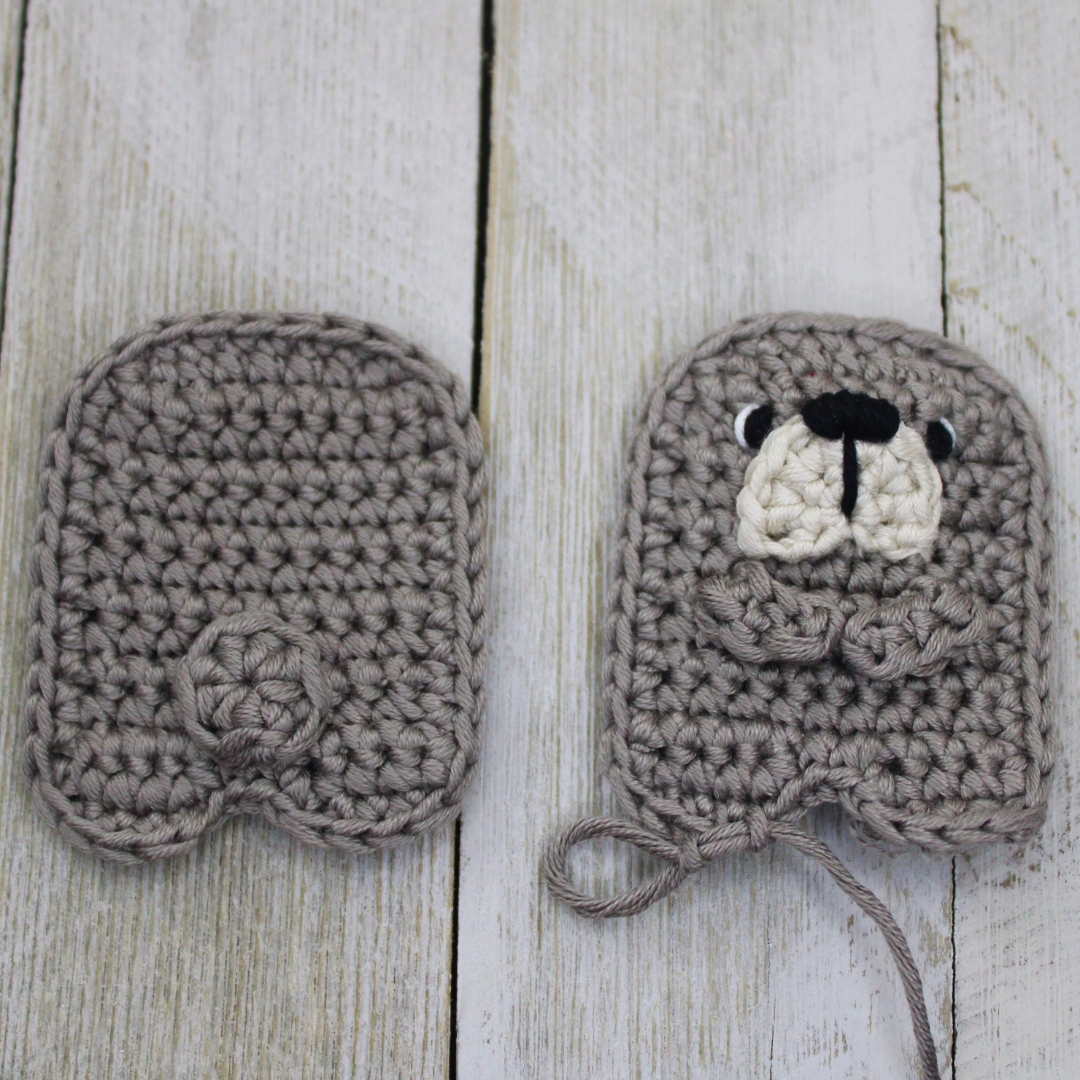
After finishing Part 1 of the Tiny Valentines (the envelope and speech bubble), we are ready to make Bear. I use the same size hook and yarn (or thread, in the case of the smaller version above) throughout the entire pattern and all its parts.
This pattern consists of several parts. You can click on the links below to jump to any of the other parts. Some have not been posted yet but will be added soon.
Note: Make sure to read through the whole pattern and look at all the step-by-step pictures before crocheting the bear.
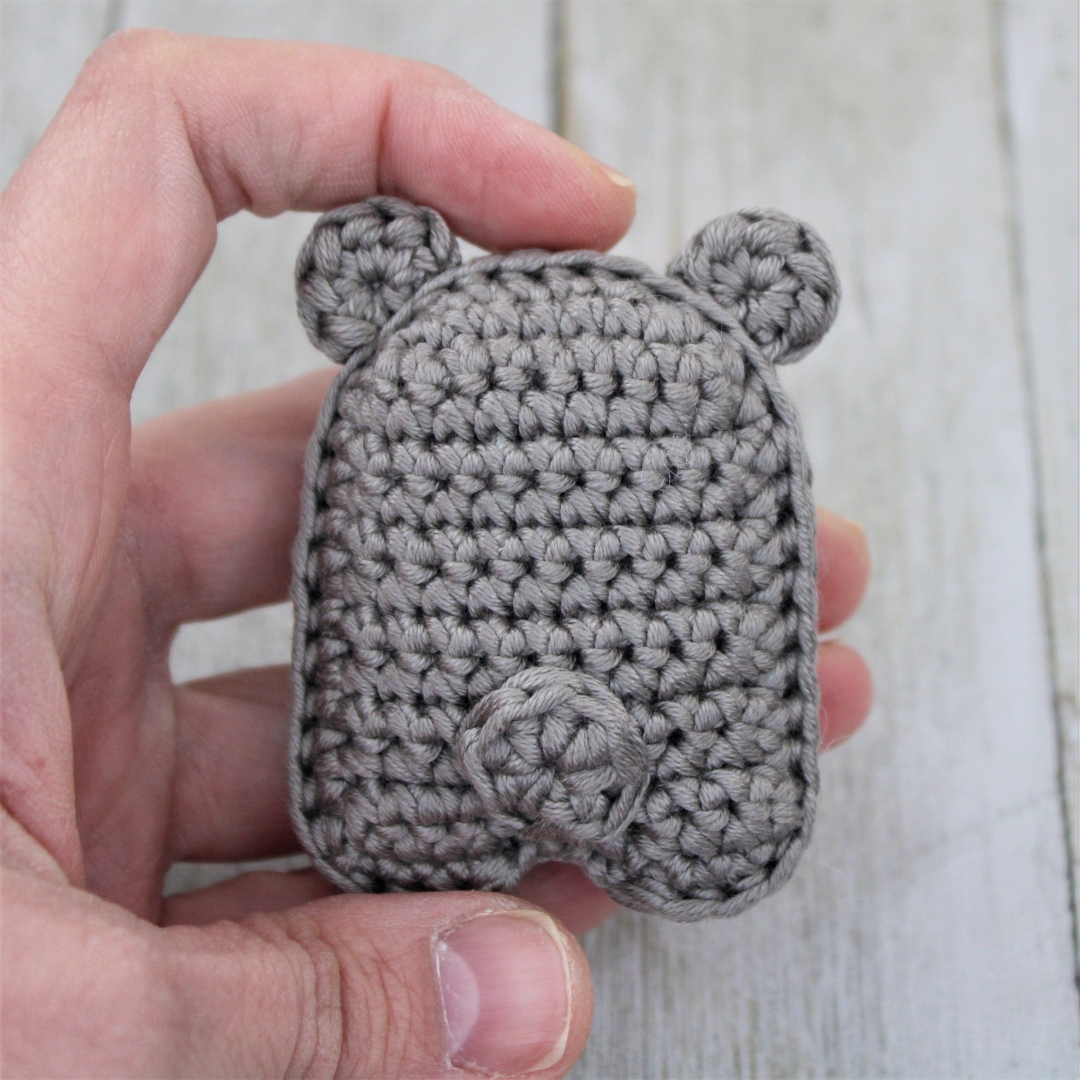
EARS (x 2)
Suggested color – Taupe
Round 1: 6 hdc in a mr
Fasten off leaving a tail for sewing.
MUZZLE
Suggested color – Pearl
Row 1: 6 sc in a mr; ch 1 and turn – 6 sts
Row 2: sc, 4 inc, sc – 10 sts
Fasten off leaving a tail for sewing.
TAIL
Suggested color – Taupe
Round 1: 8 hdc in a mr; sl st to join
Fasten off leaving a tail for sewing.
ARMS (x 2)
Suggested color – Taupe
Ch 4
Row 1: in back bump of ch only sc in 2nd ch from hook, sc in next, hdc in last ch
Fasten off leaving a tail for sewing.
NOTE: I do not weave in the ends. I tie knots and hide them inside since we will make two pieces for the body and then crochet them together to join.
BODY (x 2)
Suggested Color – Taupe
Ch 7
Row 1: in back bump of ch only 2 sc in 2nd ch from hook, 4 sc, 2 sc in last ch; ch 1 and turn – 8 sts
Row 2: inc, 6 sc, inc; ch 1 and turn – 10 sts
Rows 3 – 11: sc in each st; ch 1 and turn – 10 sts (9 rows)
LEG 1
Row 12: sc in 4 sts; ch 1 and turn – 4 sts
Row 13: sc in each st – 4 sts
Fasten off.
LEG 2
Join thread to 7th st of Row 11.
Row 1: sc in 4 sts; ch 1 and turn – 4 sts
Row 2: sc in each st – 4 sts
Sc in each st and row all around the body.
Fasten off the 1st piece. Do not break the thread from the 2nd piece.
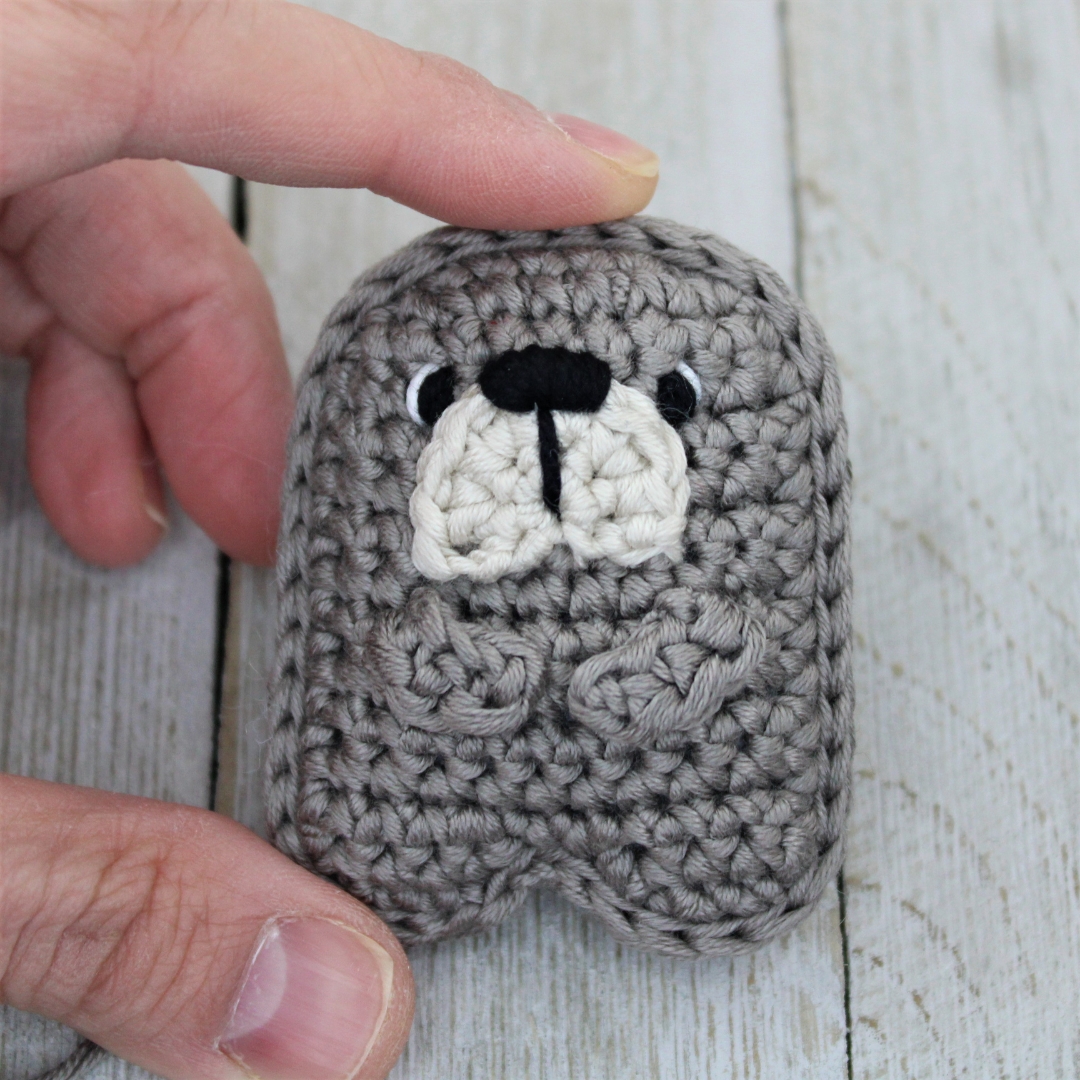
ASSEMBLY
The facial features will be sewn to the piece that has not been fasten off.
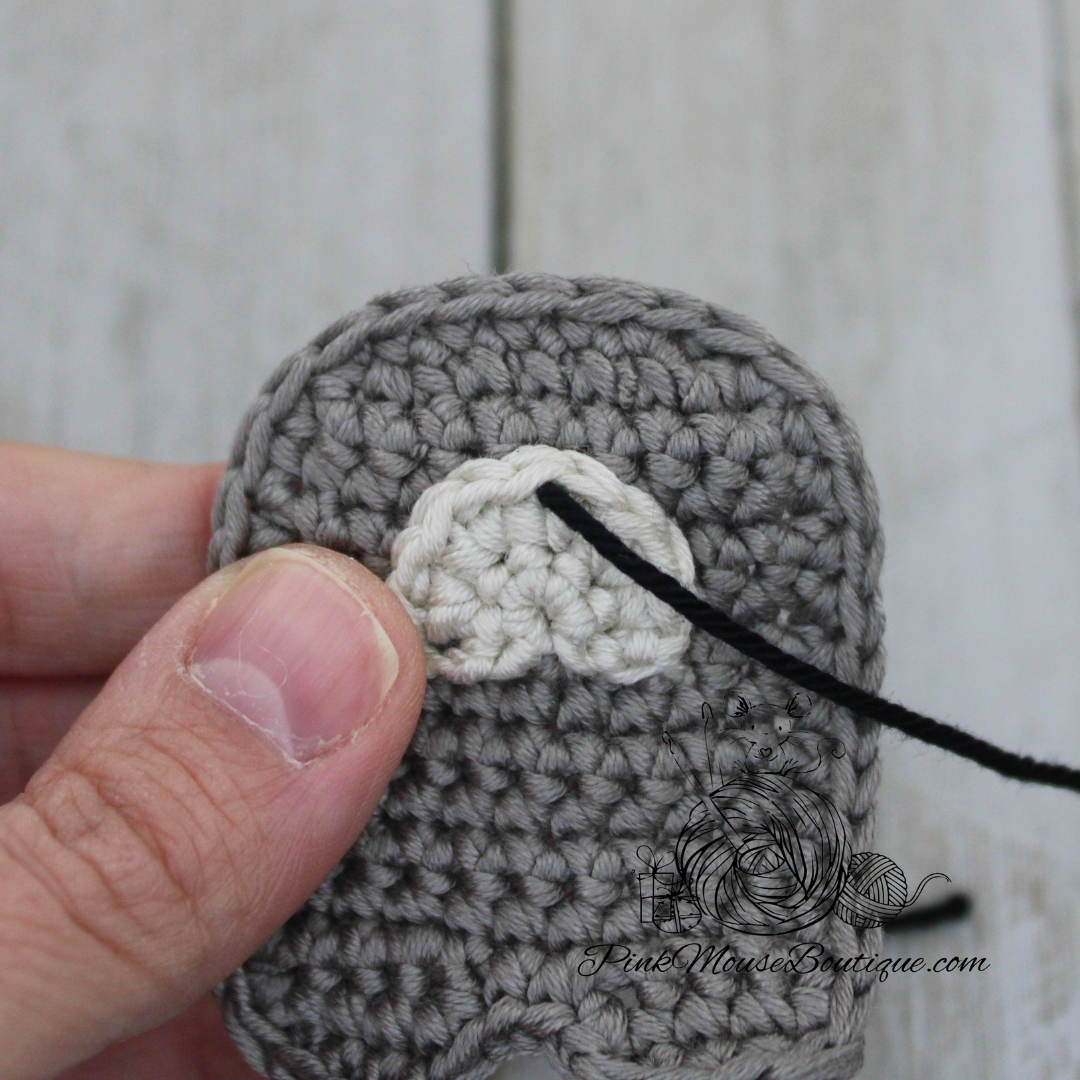
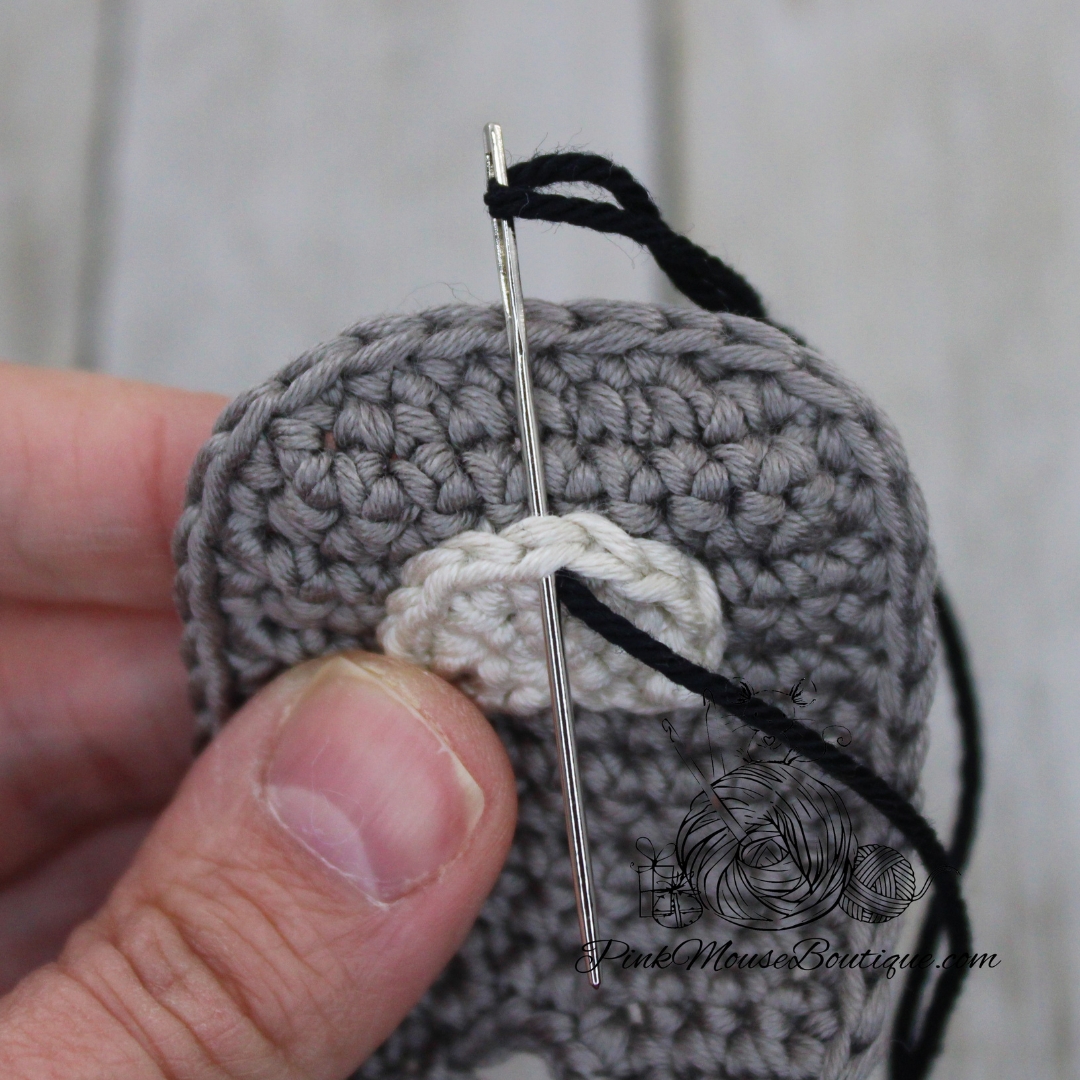
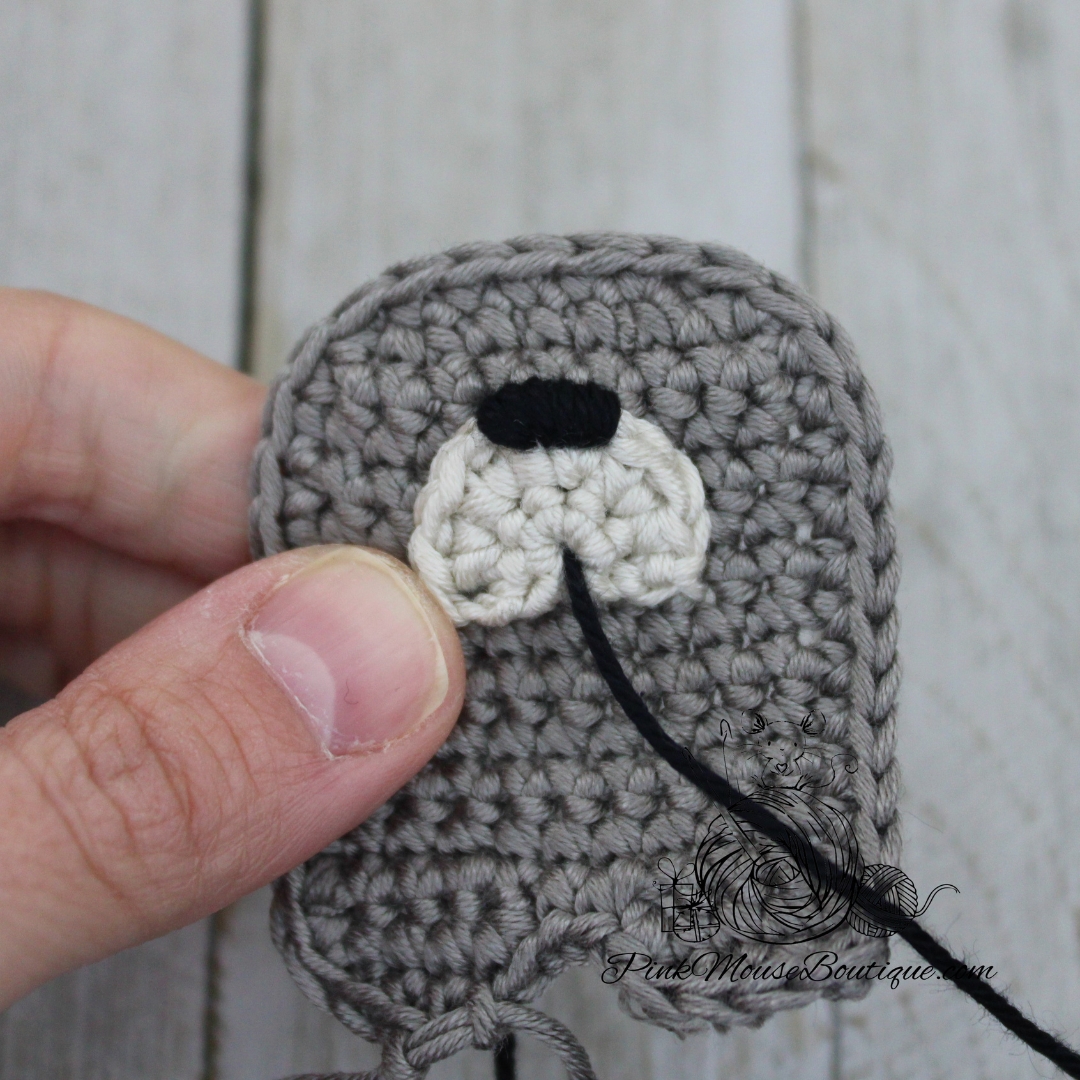
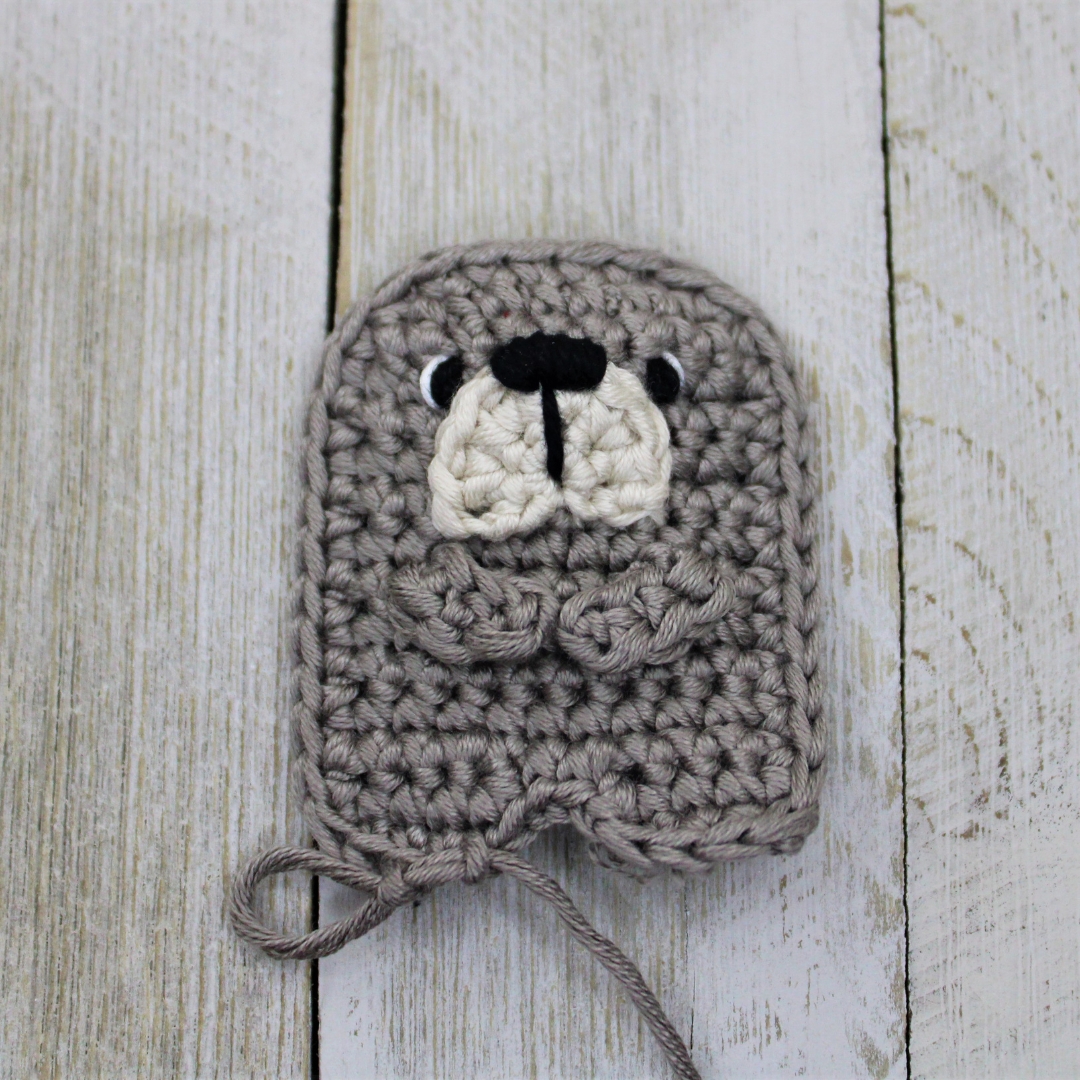
Sew the muzzle on Rows 4 through 7.
Sew the nose using Black yarn. Insert the needle only through the two middle stitches of the muzzle that will be used for the nose. Sew several times.
Once finished with the nose, use the same yarn, and sew a line through the middle of the muzzle. I began the line at the magic ring hole.
With Black yarn, sew several times on Row 4 on either side of the muzzle to make the eyes. Once finished, use White yarn to sew an eye detail.
Sew the arms at an angle a row below the muzzle.
Sew the tail to the back piece.
Put both pieces, back and front, together making sure they align. Sl st through both pieces.
When you are almost finished closing the piece, insert stuffing. Do not stuff too much. You only need to stuff a little to make sure the bear is not completely flat. Finish closing the piece. Weave in the ends or secure the ends by tying knots and hiding them inside the body.
10. Using the whip stitch, sew the ears in place using the BLO of the front piece and the FLO of the back piece.
If you have used Drops Muskat wosrted weight, your bear will be about 2.5 inches tall. If you have used Lizbeth 20 with a 1.25 mm hook (for the smaller bear in the pictures at the beginning of the post), your bear will be about an inch tall. Please note that the finished size depends not only on the materials used, but also on your tension.
The idea to create a Unicorn Zombie was given to me by one of my followers on Instagram last year. It took me a while, but finally I was able to make this cute little guy. And I am so happy with the final look! The bone is a challenge though. 🙂
This version of the pattern is FREE. You can also find a PREMIUM version that includes a drawing of the unicorn that you can use to create fun Halloween cards. The premium version is a PDF file that you can conveniently download and print.
We will end Round 16 there. Fasten off, finish off, and secure the stitches.
BODY
Turn the head upside down with the back of the head facing you.
You will notice that there are 2 sets of unworked stitches – 4 that are closest to you (this is where the back of the body will be once you make it) and 4 are further away from you (where the front of the body will be once you make it). Insert the hook in the 2nd to last st beginning with the back (closest to you) and with a sc join Clarity.
Round 1: sc again in same st where you joined thread and inc in next st
Insert hook through the same st as last inc and through the stitch at the front
Inc (but the second sc should be made only in the 1st st at the front; do not grab the last st from the back)
Inc in next 3 sts
Insert hook through the same st as last inc and through the stitch at the front
Inc (but the second sc should be made only in the 1st st at the back; do not grab the last st from the front)
Inc in last st
After you finish Round 1, you should have 16 sts.
Round 2: (3 sc, inc) x 4 – 20 sts
Rounds 3 – 4: sc around – 20 sts (2 rounds)
Round 5: (4 sc, inc) x 4 – 24 sts
Round 6: (5 sc, inc) x 4 – 28 sts
Rounds 7 – 8: sc around – 28 sts (2 rounds)
Round 9: (5 sc, dec) x 4 – 24 sts
Fasten off leaving a long tail for sewing.
Stuff the body well. Leave 8 stitches on each side of the body for legs. Mark the middle 8 stitches (4 at the front and 4 at the back) with thread. Make sure the spaces you are leaving for legs are aligned with the head.
LEGS (x 2)
Turn the body upside down (back side facing you) and with a sc join Clarity thread in one of the stitches you left for the 1st leg.
Round 1: sc in each st until you get to the thread marking the middle sts. Insert hook in same st as last sc and in the st at the other side of the body. 1 sc ; sc until the end of round – 8 sts
Round 2: sc around – 8 sts
Stuff well.
Round 3: 4 dec – 4 sts
Fasten off.
Repeat for the second leg.
Once finished, sew the middle 8 stitches to close.
Secure the stitches.
ARM
Crochet in spiral.
Round 1: 8 sc in a mr – 8 sts
Rounds 2 – 7: sc around – 8 sts (6 rounds)
Round 8: 4 dec – 4 sts
Fasten off leaving a tail for sewing.
BONE
Crochet tight.
Because I used thread, I didn’t need to stuff the bone. If you are using yarn, you may need to stuff a little.
Suggested color – DMC cotton perle 12 with a 1 mm hook (NOTE: I used yarn for the step-by-step pictures)
Ch 4
Round 1: 1 puff stitch in 2nd ch from hook (Please follow the steps below and refer to the pictures)
YO and insert hook through 2nd chain from hook, YO and pull (three loops on hook)
YO and pull through 2 loops (two loops left on hook)
YO and insert hook in same ch, YO and pull (four loops on hook)
YO and pull through 2 loops (3 loops left on hook)
YO and insert hook in same ch, YO and pull (five loops on hook)
YO and pull through all loops (puff stitch created)
1 sc in next chain
2 puff stitches in last ch
Now we will crochet on the other side of the chain
1 sc in next ch
1 puff stitch in last ch
At the end of Round 1, you should have 6 stitches.
Fasten off, finish off, and secure the stitches. Leave one of the tails for sewing later.
EAR 1
Round 1: with light blue 2 sc, hdc, 2 sc in a mr; sl st to join and ch 1 – 5 sts
Round 2: 1 sc in 1st st, inc in next, (hdc, dc, hdc) in third st, inc in next, 1 sc in last st; sl st to join – 9 sts
Fasten off leaving a tail for sewing.
EAR 2
Round 1: with light blue 2 sc, hdc, 2 sc in a mr; sl st to join and ch 1 – 5 sts
Round 2: 1 sc in 1st st, inc in next, (1 hdc, ch 2 and sl st in 3rd st), inc in next, 1 sc in last st; sl st to join – 8 sts
Fasten off leaving a tail for sewing.
EYE
Suggested color: DMC cotton perle 12, black with a 1 mm hook
Round 1: 6 sc in a mr; sl st to join and ch 1 – 6 sts
Round 2: (1 sc in 2 sts, 3 sc in next st) x 2; sl st to join – 10 sts
Fasten off leaving a tail for sewing.
Use DMC cotton perle 12, color white thread to sew a few times in a stitch in the eye to make a large sparkle. Then sew a couple of times in another st to make a second sparkle (a bit smaller than the first one).
HORN
Suggested color – DMC metallic thread (2 or 3 strands)
Round 1: 8 sc in a mr; sl st to join and ch 1 – 8 sts
Round 2: in BLO sc around; sl st to join and ch 1 – 8 sts
Round 3: in BLO (2 sc, dec) x 2; sl st to join and ch 1 – 6 sts
Round 4: in BLO sc around; sl st to join and ch 1 – 6 sts
Round 5: in BLO (sc, dec) x 2; sl st to join – 4 sts
Fasten off leaving a tail for sewing.
TAIL (x 6)
Suggested colors – Curio size 10, Hollyberry and Eggplant
Ch 6
Row 1: in back bump only 1 sc in 2nd ch from hook, 1 sc until the end – 5 sts
Fasten off leaving a tail for sewing.
MANE (5 or 6)
Suggested colors – Curio size 10, Hollyberry and Eggplant
Ch 15
Row 1: in back bump only 1 sc in 2nd ch from hook, 1 sc until the end – 14 sts
Fasten off leaving a tail for sewing.
ASSEMBLY
Sew the eye to the head, right above the muzzle. I sewed the eye on the left part of the face.
Using Curio size 10, black thread and a needle, sew a line going up 4 rounds at an angle on the right side of the head. The bottom of the line should be 7 stitches from the eye and the top – about 4 or 5 stitches from the top of the eye. Once the line is sewn (I sewed twice to make it thicker), sew 3 smaller lines crossing the longer one. Secure the thread.
Sew the horn 4 rounds above the eyes.
Sew the ears about 2 stitches behind the horn, about 3 stitches apart.
Sew the arm one round below the head and the bone – two rounds below the head making sure both align with the legs.
Sew the pieces you made for the tail at the back of the body, one or two rounds above the legs.
Sew the pieces you made for the mane at the back of the head, between the ears.
With black thread, sew a line going down the arm about four rounds. Then sew two smaller lines crossing the longer one.
With the Conch color (also light or salmon pink), cross stitch in 5 stitches below the right ear (about 2 rounds above the eye).
Using a small brush or cotton swab, apply your choice of color of the hard pastel around the scarred eye and arm patch. I also applied some on the broken ear, the bottom of the legs, and a little around the left eye (the round one).