

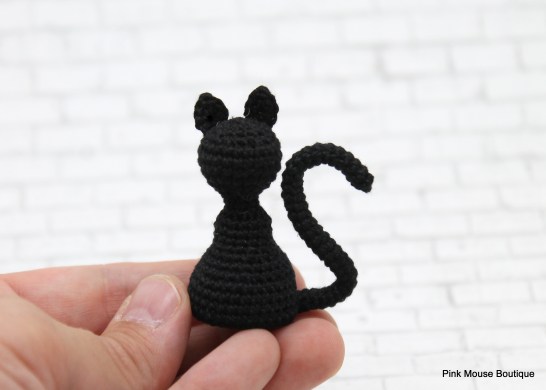
This is one of the very first patterns I wrote. It took me four years to finally take the pictures and actually write it properly so others can make the little kitty too.
This is a very quick and easy pattern. It is perfect if you are new to crochet or miniatures.
Materials:
- Aunt Lydia’s crochet thread – size 10 (black)
- Clover Amour crochet hook – 1.5 mm
- Old gift card (or cardboard)
- Stuffing
- Sewing needle
- Scissors
Abbreviations:
- mr – magic ring
- ch – chain
- st – stitch
- sc – single crochet
- hdc – half double crochet
- tr cr – treble crochet
- sl st – slip stitch
- BLO – black loop only
- inc – increase
- dec – decrease
Pattern:
Crochet in spiral. Do not join rounds. We will make the kitty from the bottom up.
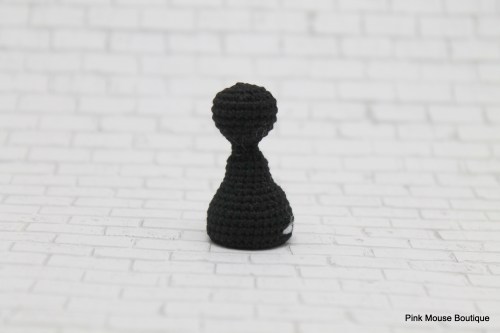
Body and Head
Round 1: mr, ch 1, 8 sc in the ring
Pull tight to close the ring.
Round 2: 8 inc – 16 sts
Round 3: (sc, inc) x 8 – 24 sts
Round 4: (2 sc, inc) x 8 – 32 sts
Trace the circle on cardboard or thicker piece of plastic. I used an old gift card. We will put the circle inside the cat’s body before we start decreasing. This will help the cat be able to stand on its own.
Round 5: 10 sc, sk 3 and ch 3, 19 sc – 32 sts (counting the 3 chains you made)
Round 6: 10 sc, 3 sc in the BLO of the chains, 19 sc – 32 sts
Rounds 7 – 9: 32 sc
Insert the plastic circle in the cat’s body.

Round 10: (2 sc, dec) x 8 – 24 sts
Round 11: 24 sc
Round 12: (sc, dec) x 8 – 16 sts
Start stuffing as you are working on the doll. Stuff well.
Rounds 13 – 16: 16 sc
Round 17: 8 dec – 8 sts
Rounds 18 – 19: 8 sc
Round 20: 8 inc – 16 sts
Round 21: 16 sc
Round 22: (sc, inc) x 8 – 24 sts
Rounds 23 – 25: 24 sc
Round 26: (sc, dec) x 8 – 16 sts
Round 27: 16 sc
Stuff the head well but do not over stuff. You should be able to shape the head with your hands.
Round 28: 8 dec – 8 sts
Round 29: 2 dec
Do not crochet in the rest of the sts in this round. Fasten off. Finish off your work and secure the sts by inserting both tails (from the magic ring and from the last round) into the same stitch. Tie a knot. Cut the excess thread and stuff it into the cat’s body.
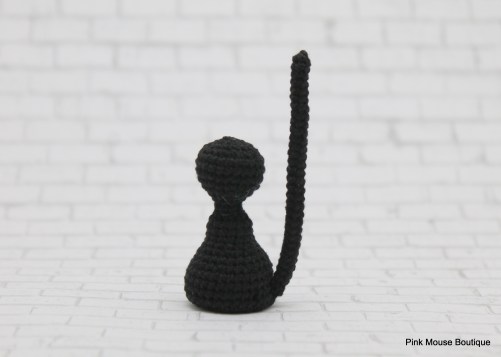
Tail:
The tail should be about 2 1/4 inches long. Cut your wire to be slightly longer than that (maybe 2.5 inches). Use the back of your crochet hook to move the stuffing right above the plastic piece you have at the bottom of the cat. That will make space for the wire to be inserted more easily. Insert the wire in the space you made. You will crochet around the wire.
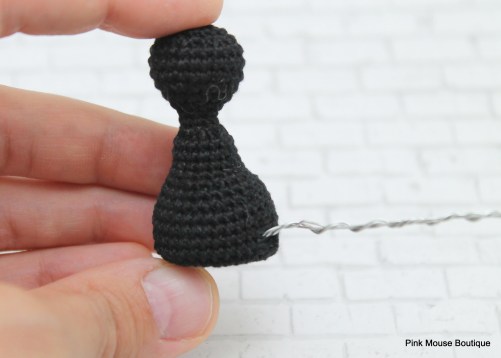
Crochet the tail in the 3 chains and 3 front loops you left after Round 6. Insert the hook in any one stitch, ch 1 and 1 sc in the same st you made the 1 ch. This will count as the first st of the round. Keep your sts tight in this first round so there are no holes.
Round 1: 5 sc – 6 sts
Single crochet around until the tail is about 2 1/4 inches long (a round above the wire).
Fasten off and finish off.
Ears x 2:
Round 1: mr, ch 1, 3 sc, 1 hdc, 1 dc, 1 hdc, 3 sc
Slip stitch into the 1st stitch of the round. Leave a long tail for sewing. Fasten off.
Sew the ears on round 26 or 27 about 3 or 4 sts apart.

And voila! You have made a cute little black kitty that you can add to your Halloween decor.
I hope you enjoyed this pattern. Leave me a comment to let me know what you think.
Happy Crochet!

What a fun little cat! This could be a fun Halloween game….it’s small enough to make a bunch and hide throughout the house (like Easter eggs). Thank you for this pattern!
LikeLiked by 1 person
That’s a really fun idea! I am going to have to do this for Halloween now. My kids will love it 🙂
LikeLike
this is so cute!!!
LikeLiked by 1 person
Your hand makes are so adorable!!! One day soon I will try to make them all. Thank you.
LikeLiked by 1 person
Oh thanks it’s been really a nice pattern . ❤️ I going to make him for going with my Halloween doll 😻
LikeLiked by 1 person
May I ask what kind of wire was used for making the tail? I cannot find anything noted in the instructions or list of materials needed.
LikeLike
I guess I forgot to put it in the list of materials. 🙂
I use florist wire.
LikeLike