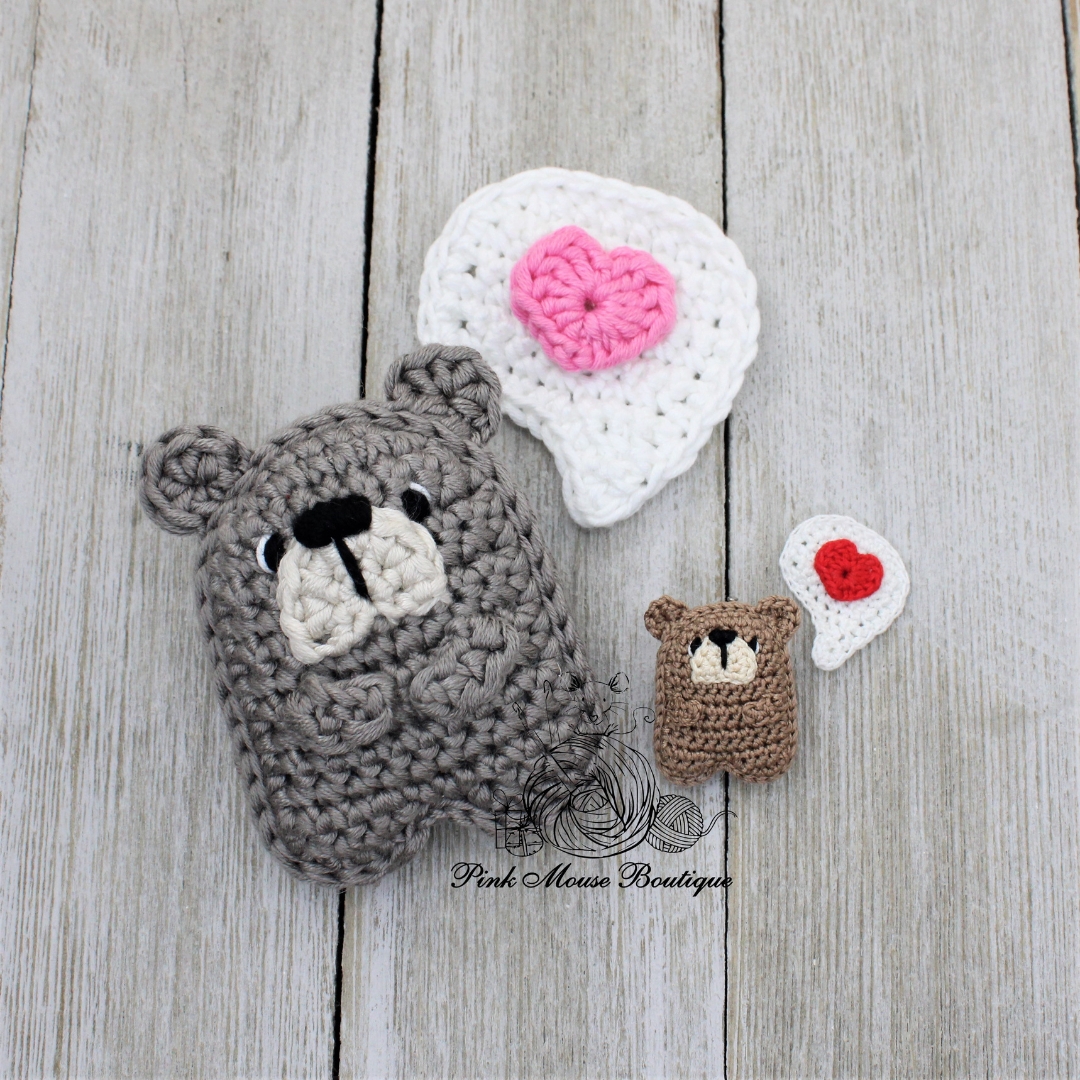
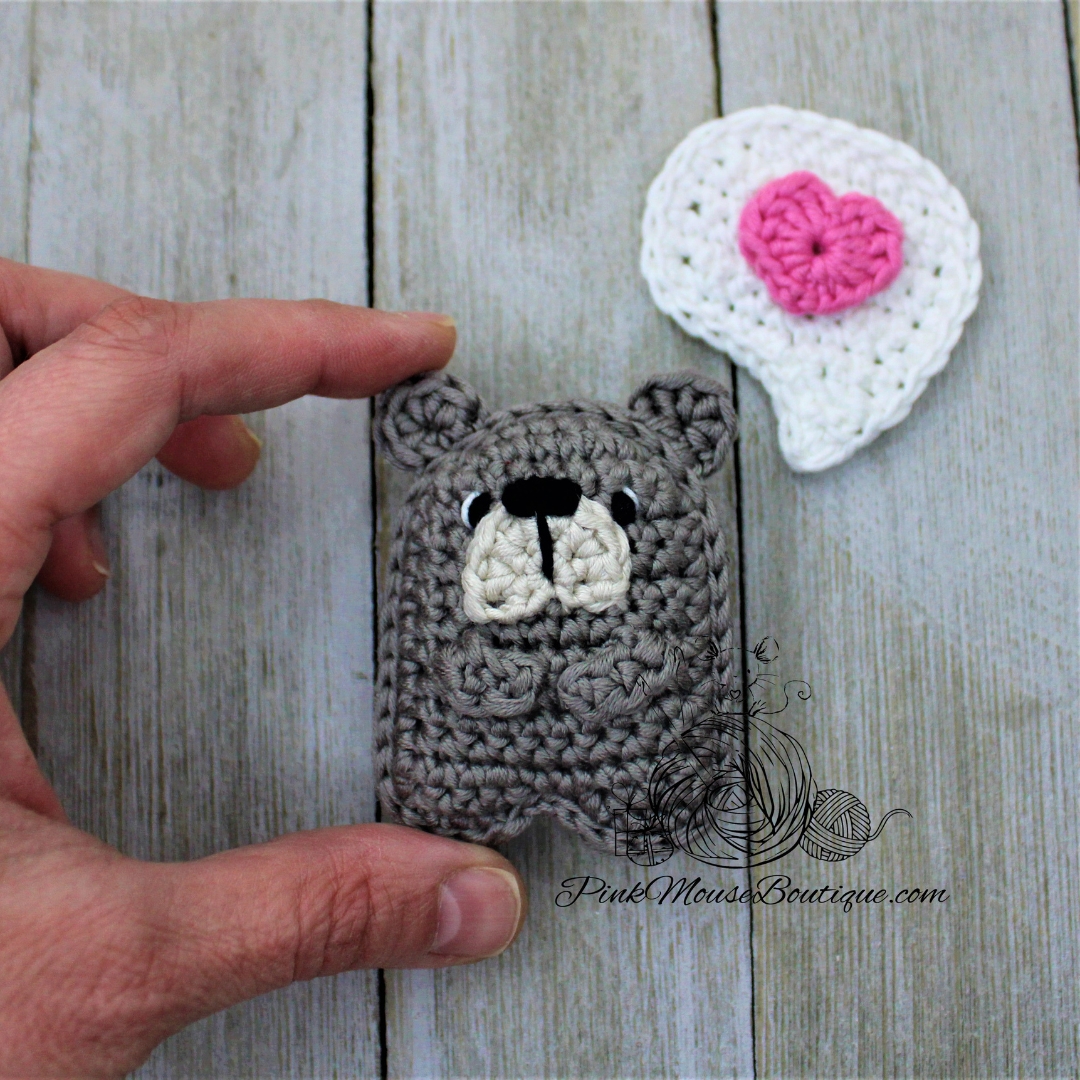
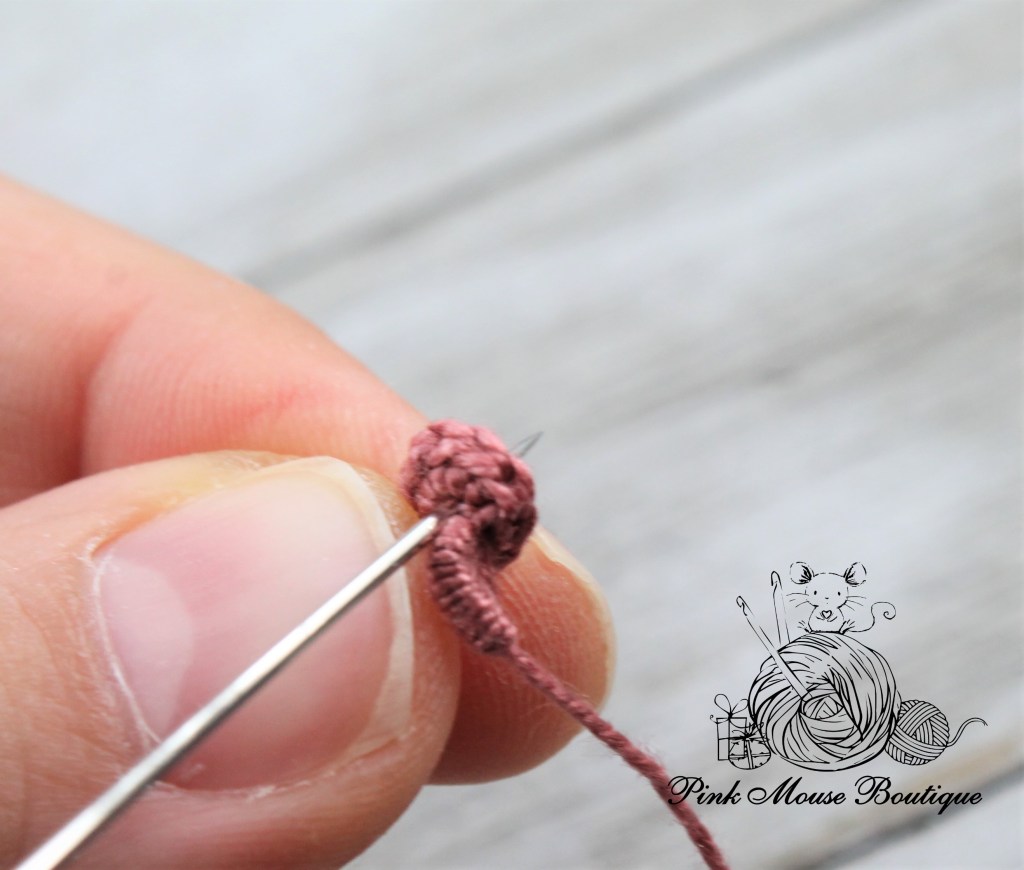
After finishing Part 1 of the Tiny Valentines (the envelope and speech bubble), we are ready to make Bear. I use the same size hook and yarn (or thread, in the case of the smaller version above) throughout the entire pattern and all its parts.
This pattern consists of several parts. You can click on the links below to jump to any of the other parts. Some have not been posted yet but will be added soon.
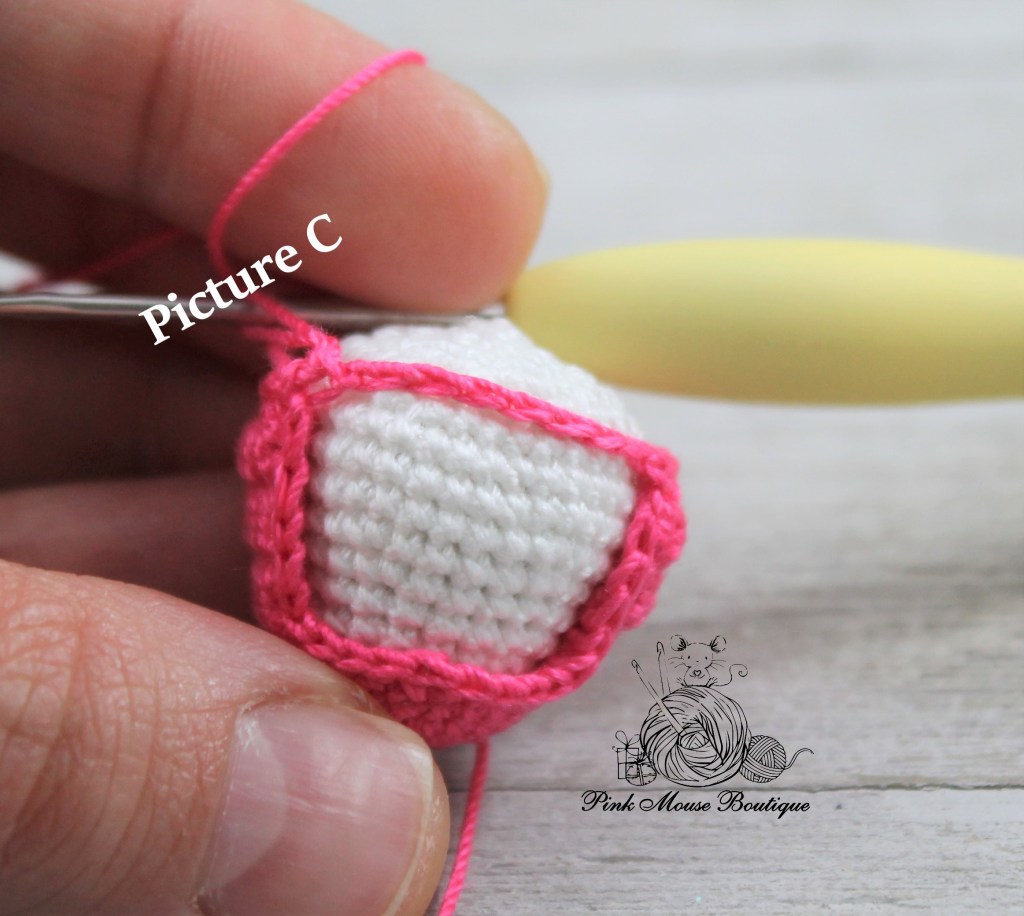
Note: Make sure to read through the whole pattern and look at all the step-by-step pictures before crocheting the bear.
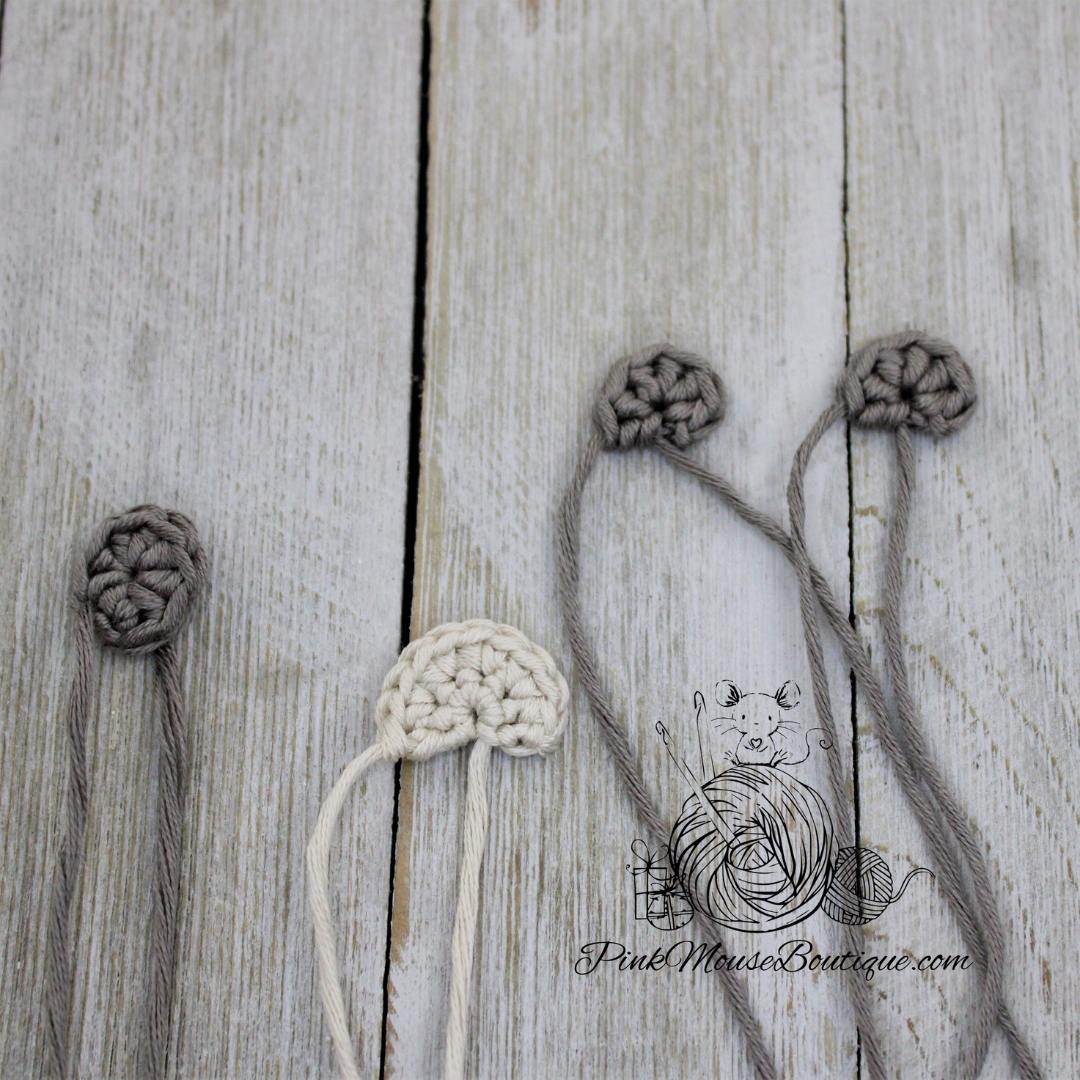
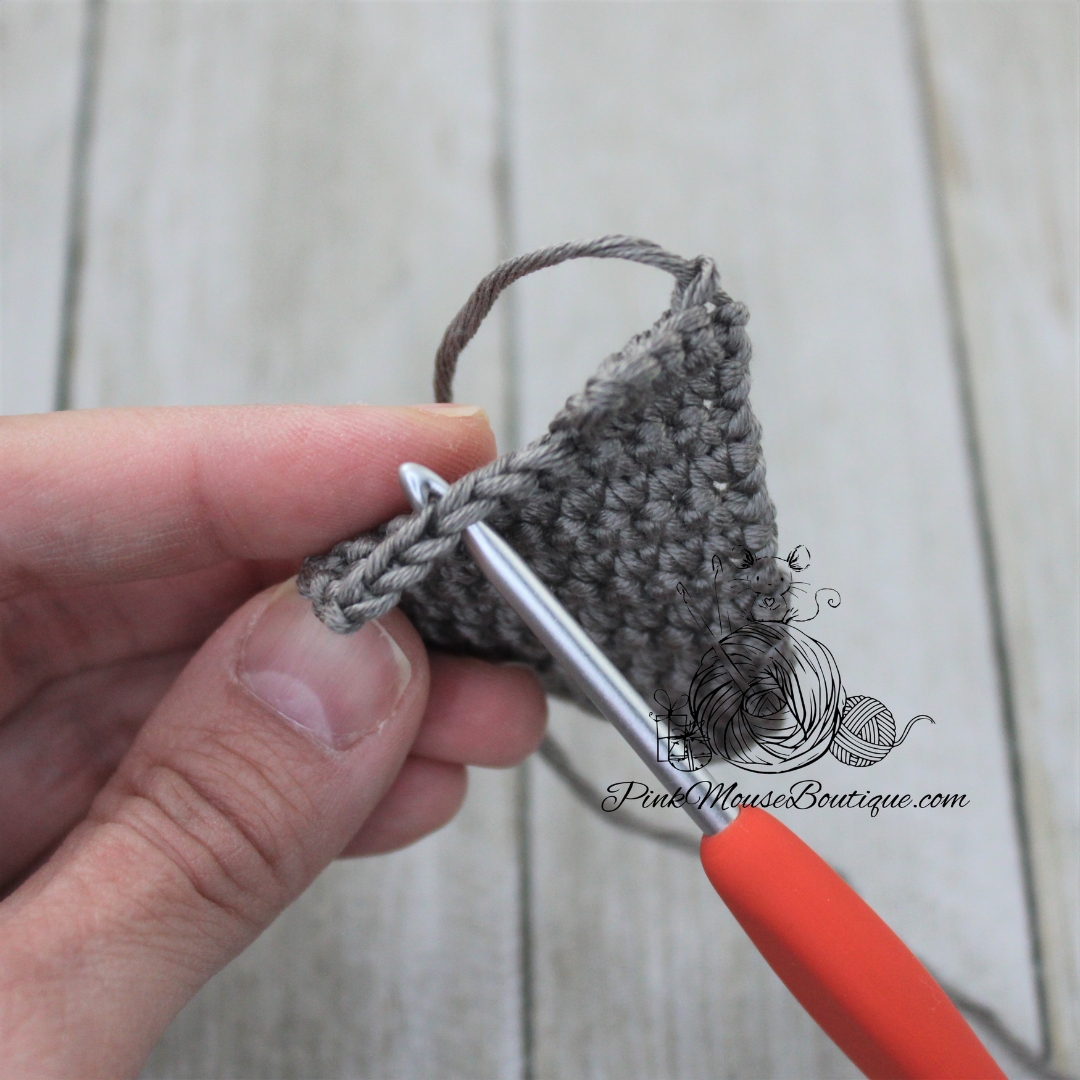
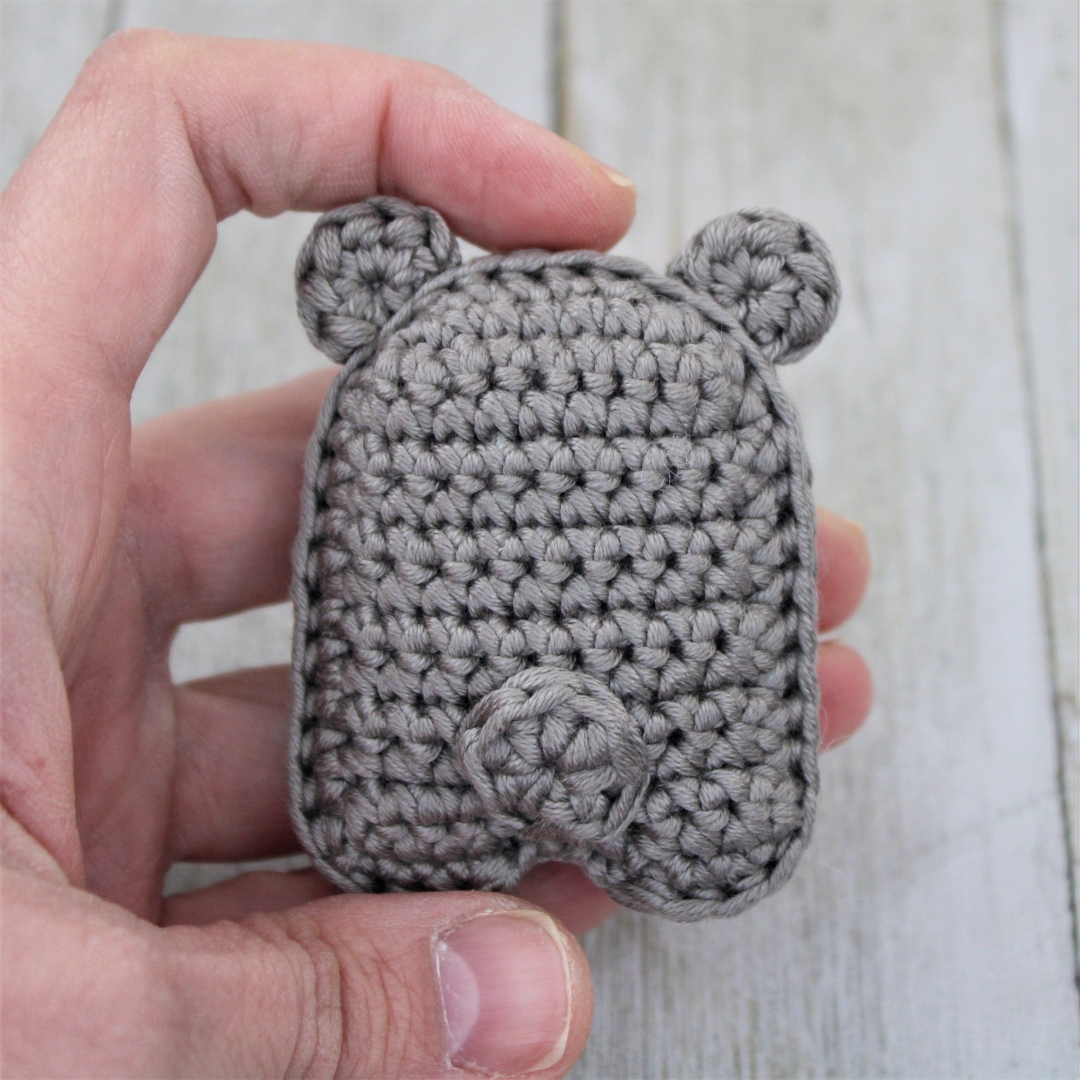
EARS (x 2)
Suggested color – Taupe
Round 1: 6 hdc in a mr
Fasten off leaving a tail for sewing.
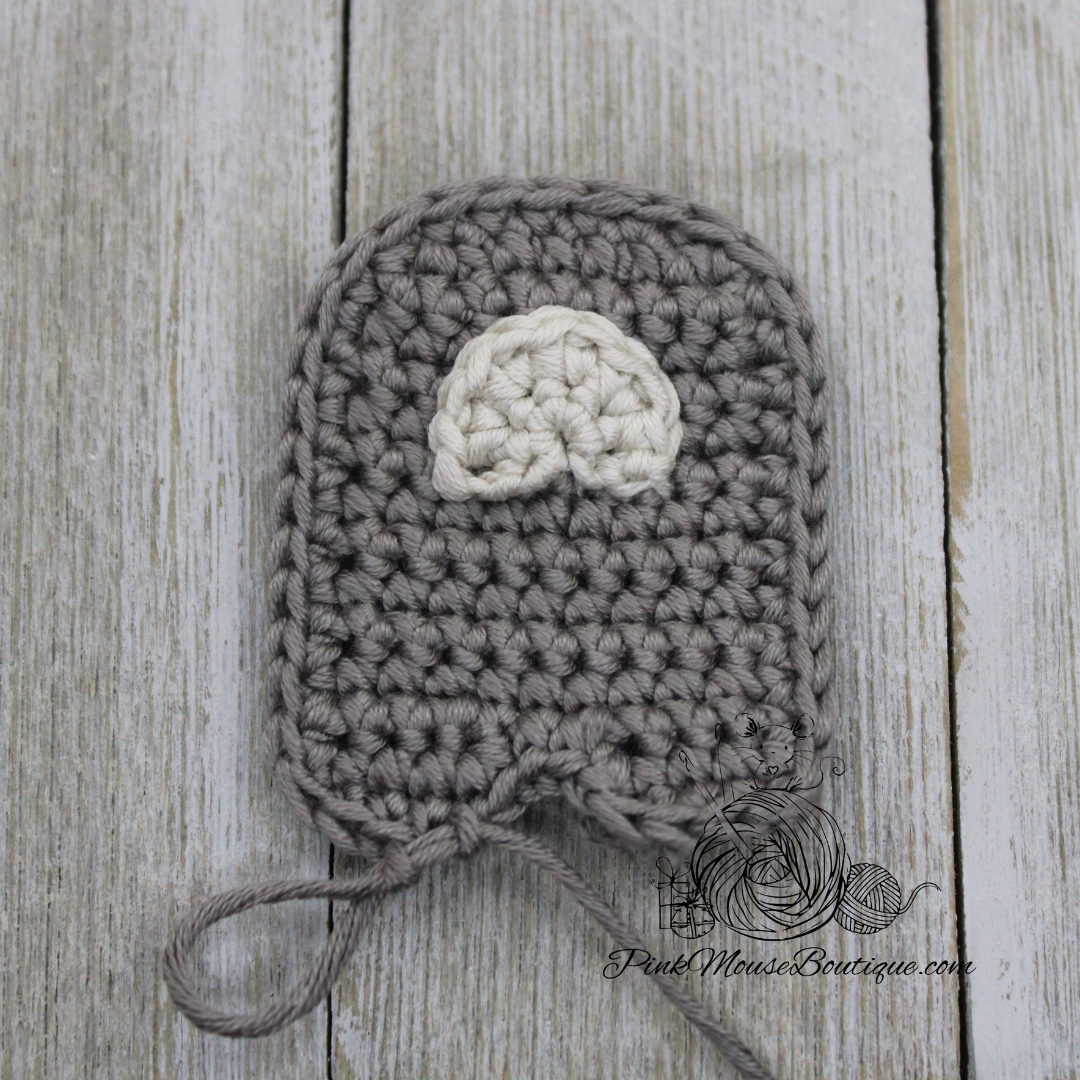
MUZZLE
Suggested color – Pearl
Row 1: 6 sc in a mr; ch 1 and turn – 6 sts
Row 2: sc, 4 inc, sc – 10 sts
Fasten off leaving a tail for sewing.
TAIL
Suggested color – Taupe
Round 1: 8 hdc in a mr; sl st to join
Fasten off leaving a tail for sewing.
ARMS (x 2)
Suggested color – Taupe
Ch 4
Row 1: in back bump of ch only sc in 2nd ch from hook, sc in next, hdc in last ch
Fasten off leaving a tail for sewing.
NOTE: I do not weave in the ends. I tie knots and hide them inside since we will make two pieces for the body and then crochet them together to join.
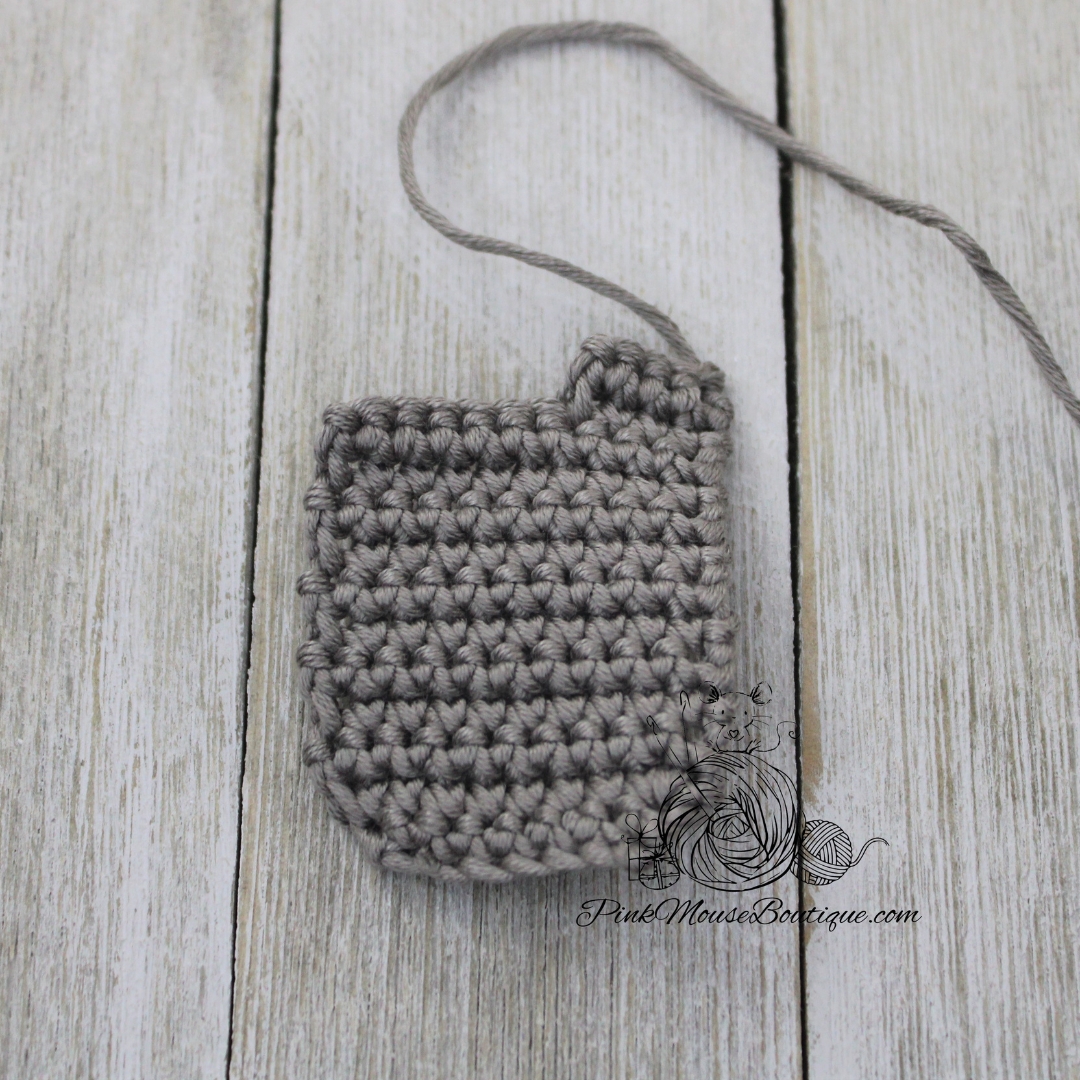
BODY (x 2)
Suggested Color – Taupe
Ch 7
Row 1: in back bump of ch only 2 sc in 2nd ch from hook, 4 sc, 2 sc in last ch; ch 1 and turn – 8 sts
Row 2: inc, 6 sc, inc; ch 1 and turn – 10 sts
Rows 3 – 11: sc in each st; ch 1 and turn – 10 sts (9 rows)
LEG 1
Row 12: sc in 4 sts; ch 1 and turn – 4 sts
Row 13: sc in each st – 4 sts
Fasten off.
LEG 2
Join thread to 7th st of Row 11.
Row 1: sc in 4 sts; ch 1 and turn – 4 sts
Row 2: sc in each st – 4 sts
Sc in each st and row all around the body.
Fasten off the 1st piece. Do not break the thread from the 2nd piece.
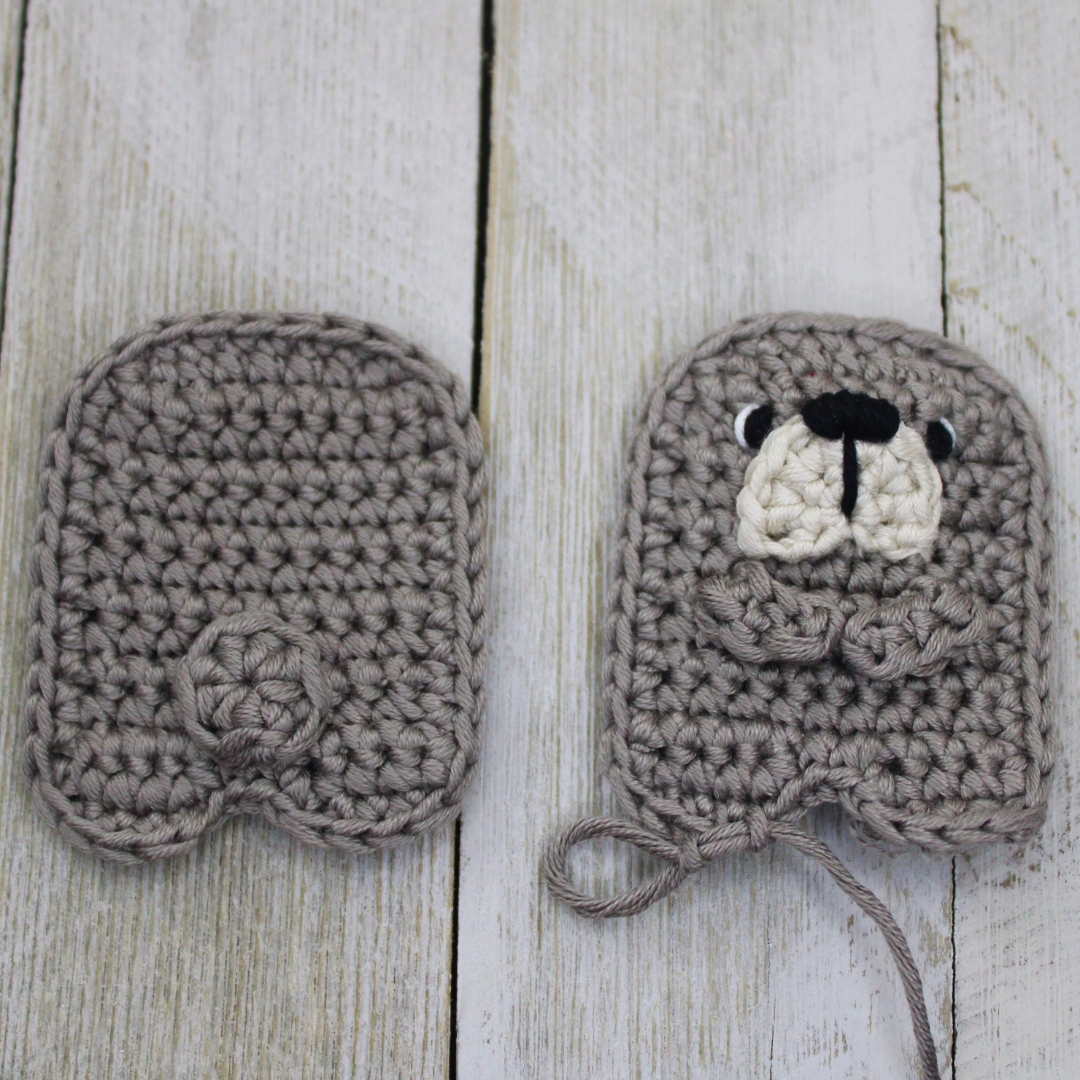
ASSEMBLY
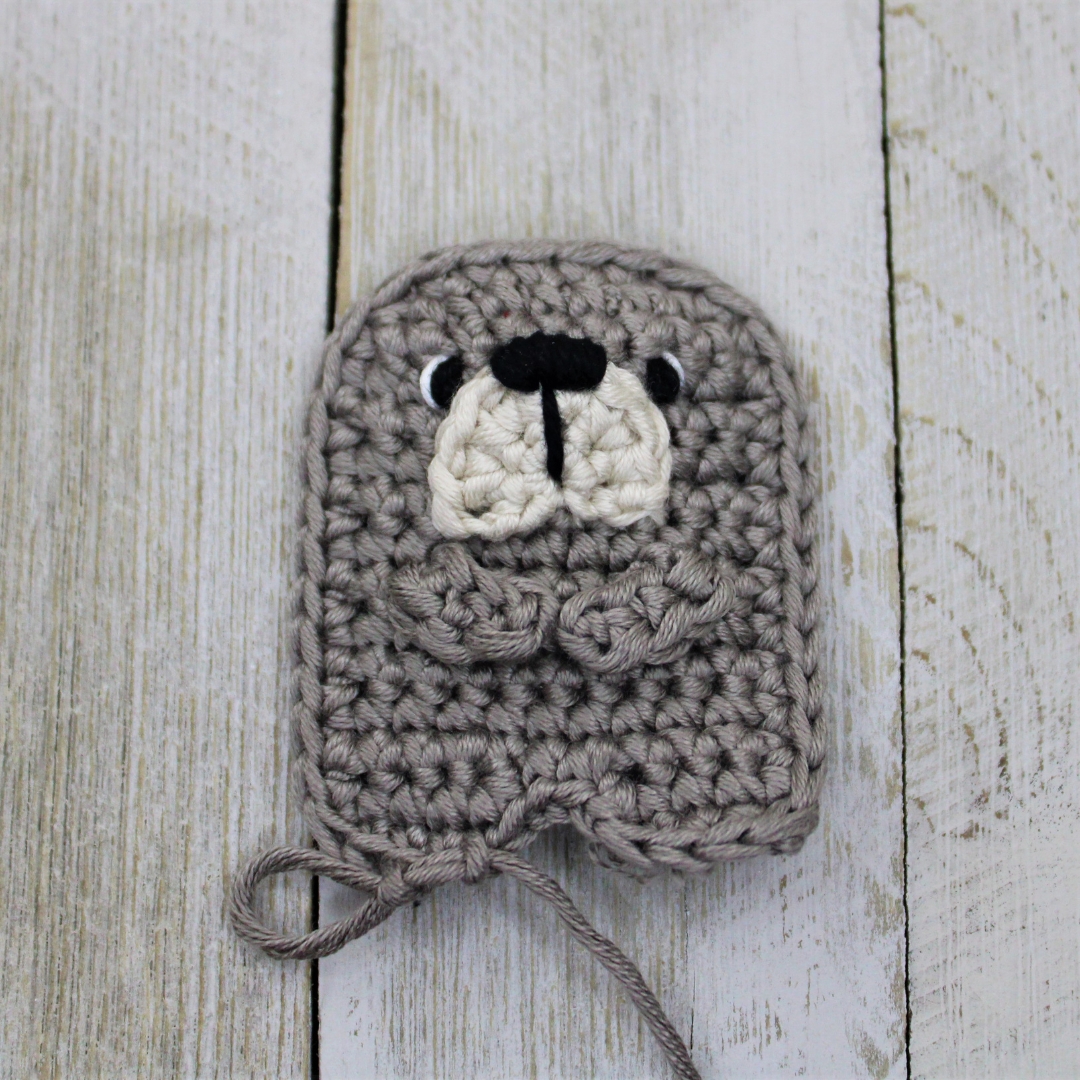
The facial features will be sewn to the piece that has not been fasten off.
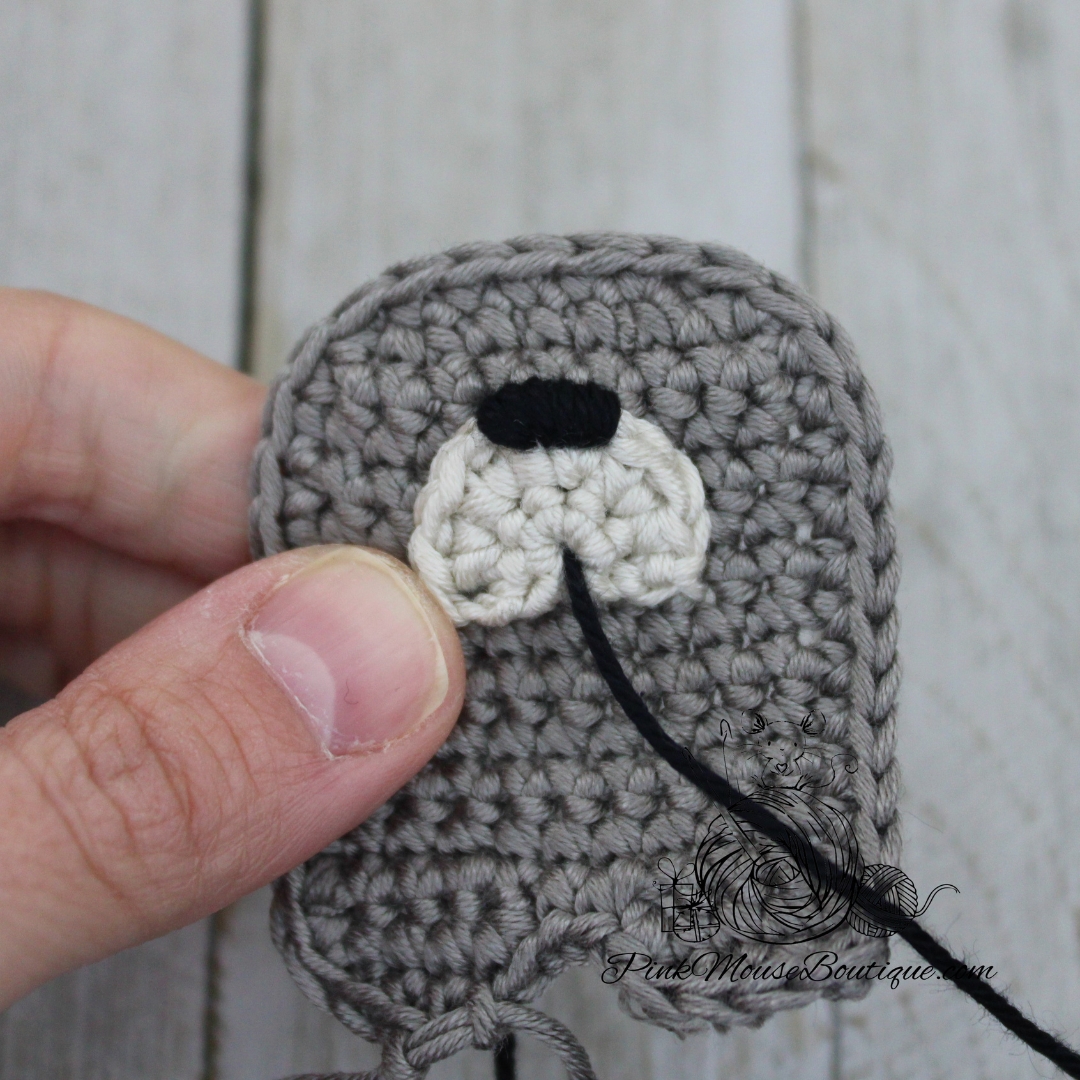
Sew the muzzle on Rows 4 through 7.
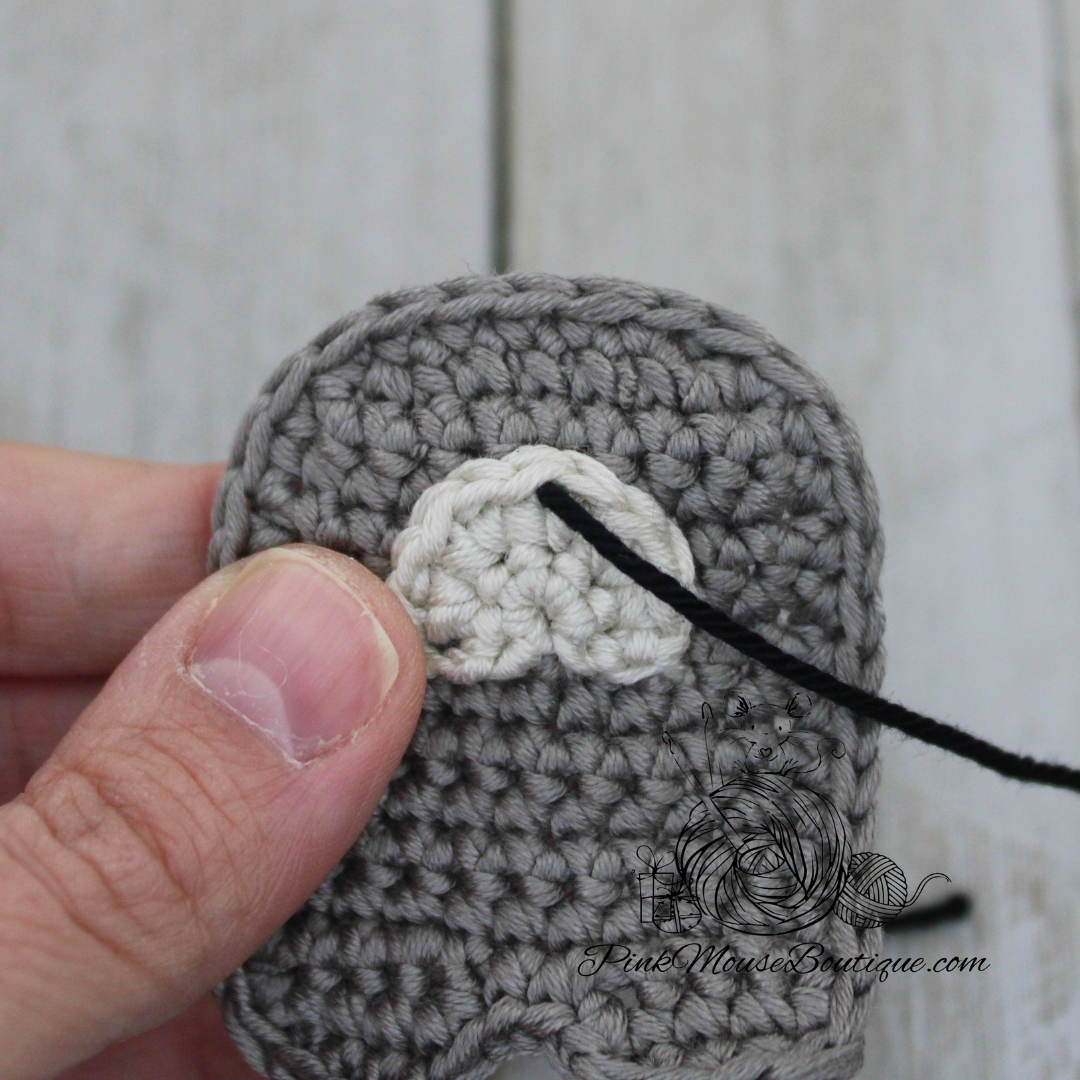
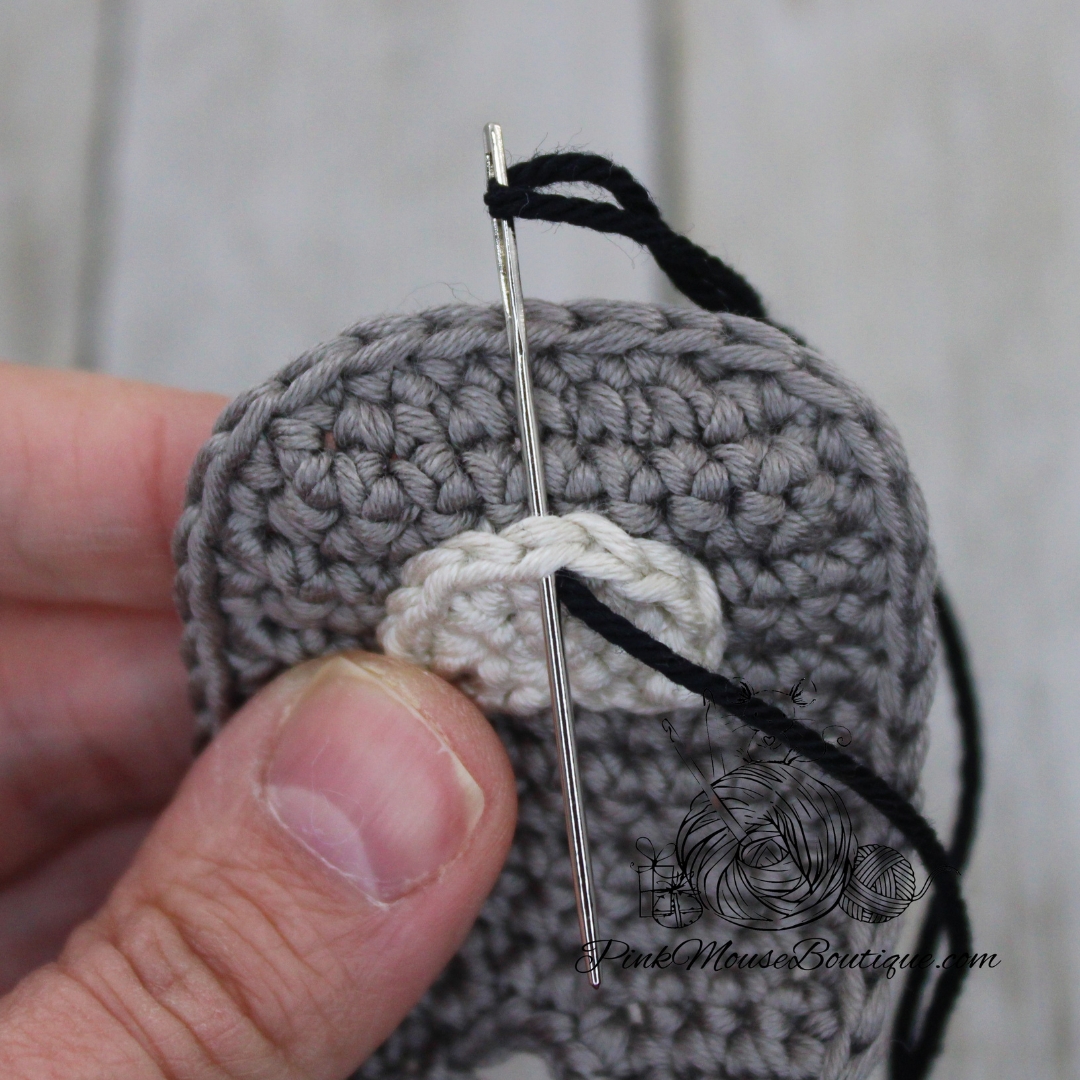
Sew the nose using Black yarn. Insert the needle only through the two middle stitches of the muzzle that will be used for the nose. Sew several times.
Once finished with the nose, use the same yarn, and sew a line through the middle of the muzzle. I began the line at the magic ring hole.
With Black yarn, sew several times on Row 4 on either side of the muzzle to make the eyes. Once finished, use White yarn to sew an eye detail.
Sew the arms at an angle a row below the muzzle.
Sew the tail to the back piece.
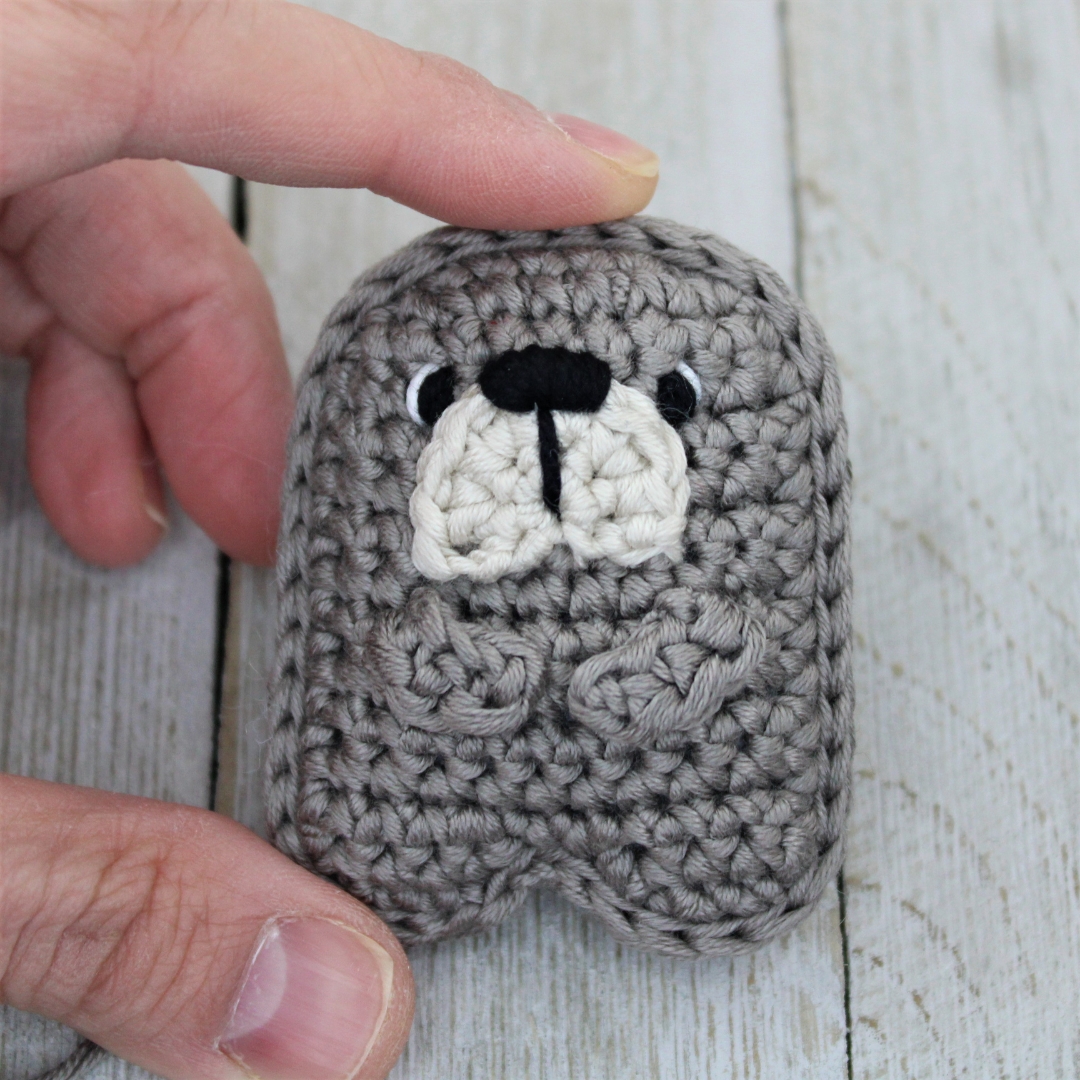
Put both pieces, back and front, together making sure they align. Sl st through both pieces.
When you are almost finished closing the piece, insert stuffing. Do not stuff too much. You only need to stuff a little to make sure the bear is not completely flat. Finish closing the piece. Weave in the ends or secure the ends by tying knots and hiding them inside the body.
10. Using the whip stitch, sew the ears in place using the BLO of the front piece and the FLO of the back piece.
If you have used Drops Muskat wosrted weight, your bear will be about 2.5 inches tall. If you have used Lizbeth 20 with a 1.25 mm hook (for the smaller bear in the pictures at the beginning of the post), your bear will be about an inch tall. Please note that the finished size depends not only on the materials used, but also on your tension.
This year for Valentine’s Day, I wanted to create a design that is adorable, but also easy and quick to make; something that even a beginner can crochet without frustration; something that can be made last minute. My first idea was to put a tiny bear in an envelope. But once I made that, the idea of the speech bubble with the little heart came to me. Then while my testers were testing the pattern, I crocheted several other little animals using the pattern for the bear. And now, we have a pattern with several parts. Best of all, you have choices of what animal to make depending on who you are making this Valentine for.
And because the pattern is growing and because I wanted to make it easy to follow, I decided to split it in small parts.
Please note that the instructions for all Pocket Valentines will be available on my blog free of charge. If you’d like the PDF version which includes all patterns in a convenient downloadable document, you can visit my shops below.
Note: You will notice that when I decrease in the pattern, I either crochet in the BLO or the FLO. I do that because it makes the decrease neater, or invisible. You can do a normal decrease and insert the hook in both loops when decreasing if that is what you prefer.
SPEECH BUBBLE PATTERN
Suggested color – White
Ch 7
Row 1: in back bump of ch only 2 sc in 2nd ch from hook, 1 sc in 4 chains, 2 sc in last ch; ch 1 and turn – 8 sts
Row 2: inc, 1 sc in 6 sts, inc; ch 1 and turn – 10 sts
Rows 3 – 6: sc in each st; ch 1 and turn – 10 sts (4 rows)
Row 7: sc, in FLO dec, 1 sc in 4 sts, in FLO dec, sc; ch 1 and turn – 8 sts
Row 8: 1 sc in 4 sts; ch 1 and turn – 4 sts
Row 9: in FLO 2 dec; ch 1 and turn – 2 sts
Row 10: in BLO dec; ch 1 and turn – 1 st
Row 11: 1 sc
Sc all around the speech bubble, in every st and row. Slip stitch to join to the st of Row 11. You should have 31 sts.
Fasten off and weave in the ends.
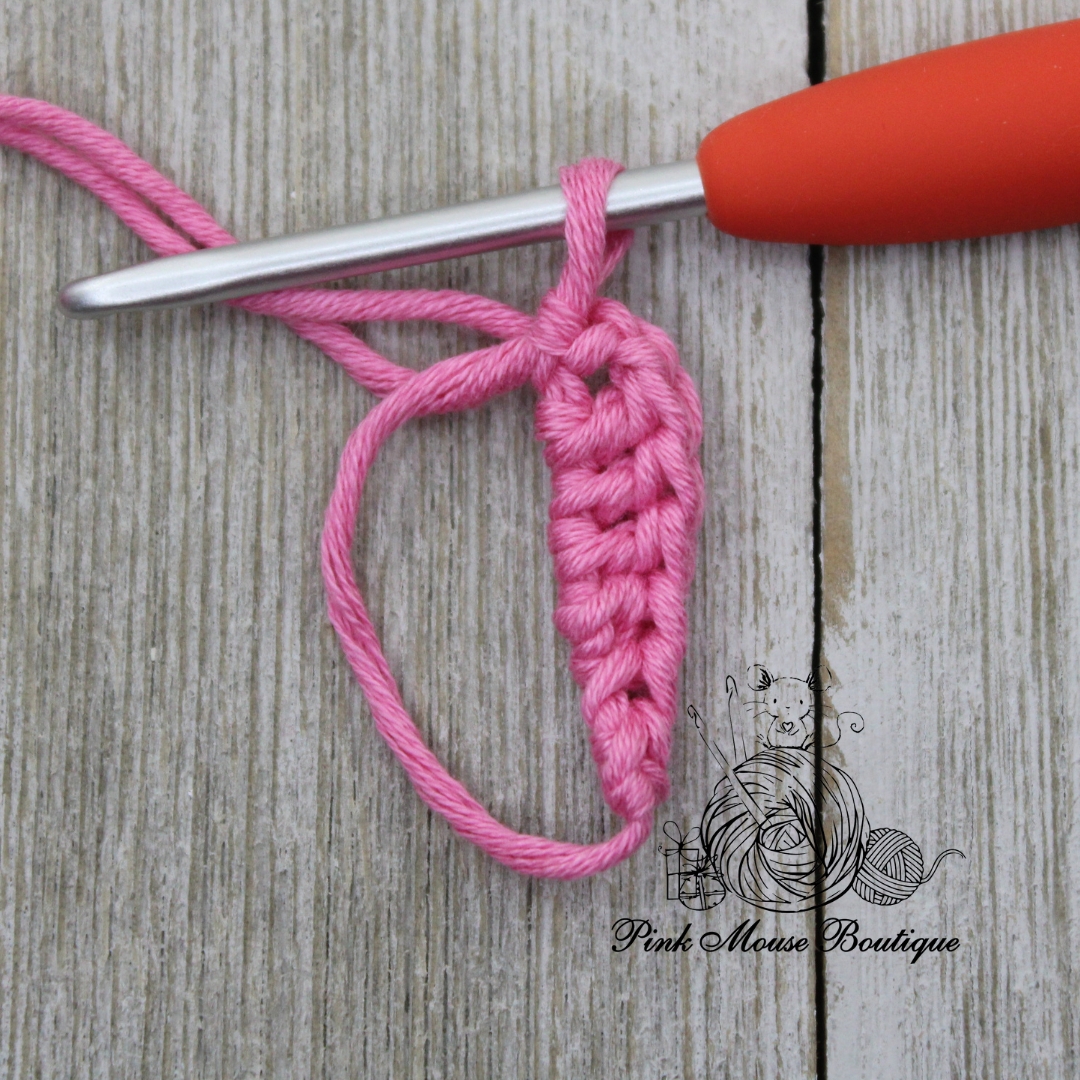
HEART PATTERN
Suggested color – Dark Pink
Round 1: in a mr 2 sc, hdc, 3 dc, ch 2 and sl st, ch 2 and 3 dc, hdc, 2 sc; sl st to join – 13 sts
Fasten off. Pull beginning tail to close the ring.
I used a hot glue gun to attach the heart to the speech bubble.
Set it aside and let’s continue with the Stamp and Envelope.
STAMP
Suggested Color – White
Ch 8
Row 1: in back bump of ch, 1 sc in 2nd ch from hook, 1 sc in every ch; ch 1 and turn – 7 sts
Rows 2 – 7: sc in each st; ch 1 and turn – 7 sts (6 rows)
Row 8: sc in each st – 7 sts
Fasten off leaving a tail for sewing.
STRAP
Suggested Color – Light Grey
Leaving a long beginning tail 23 fsc. Fasten off leaving a tail for sewing. Set aside.
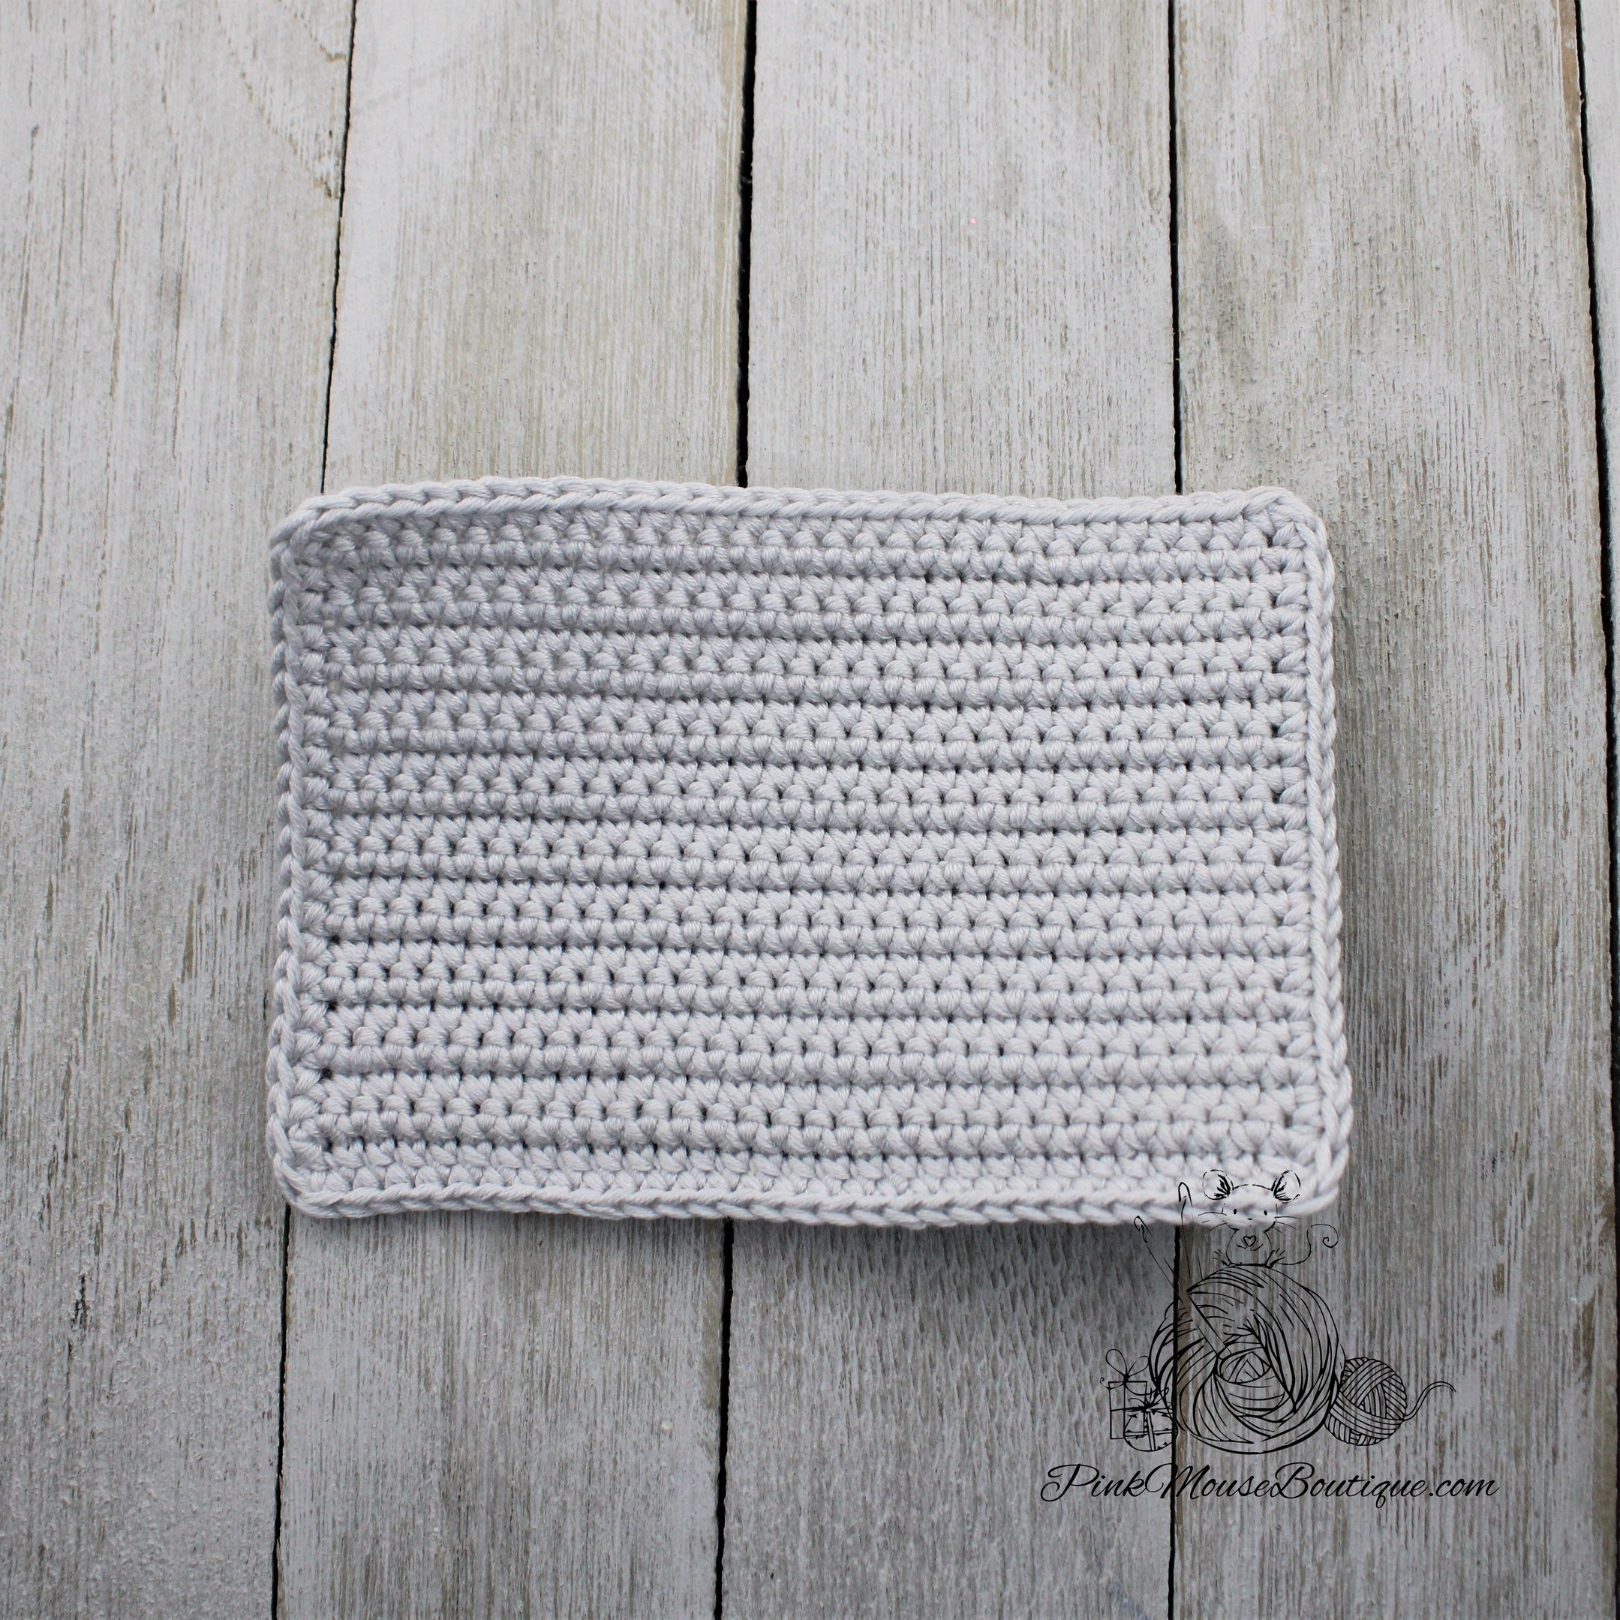
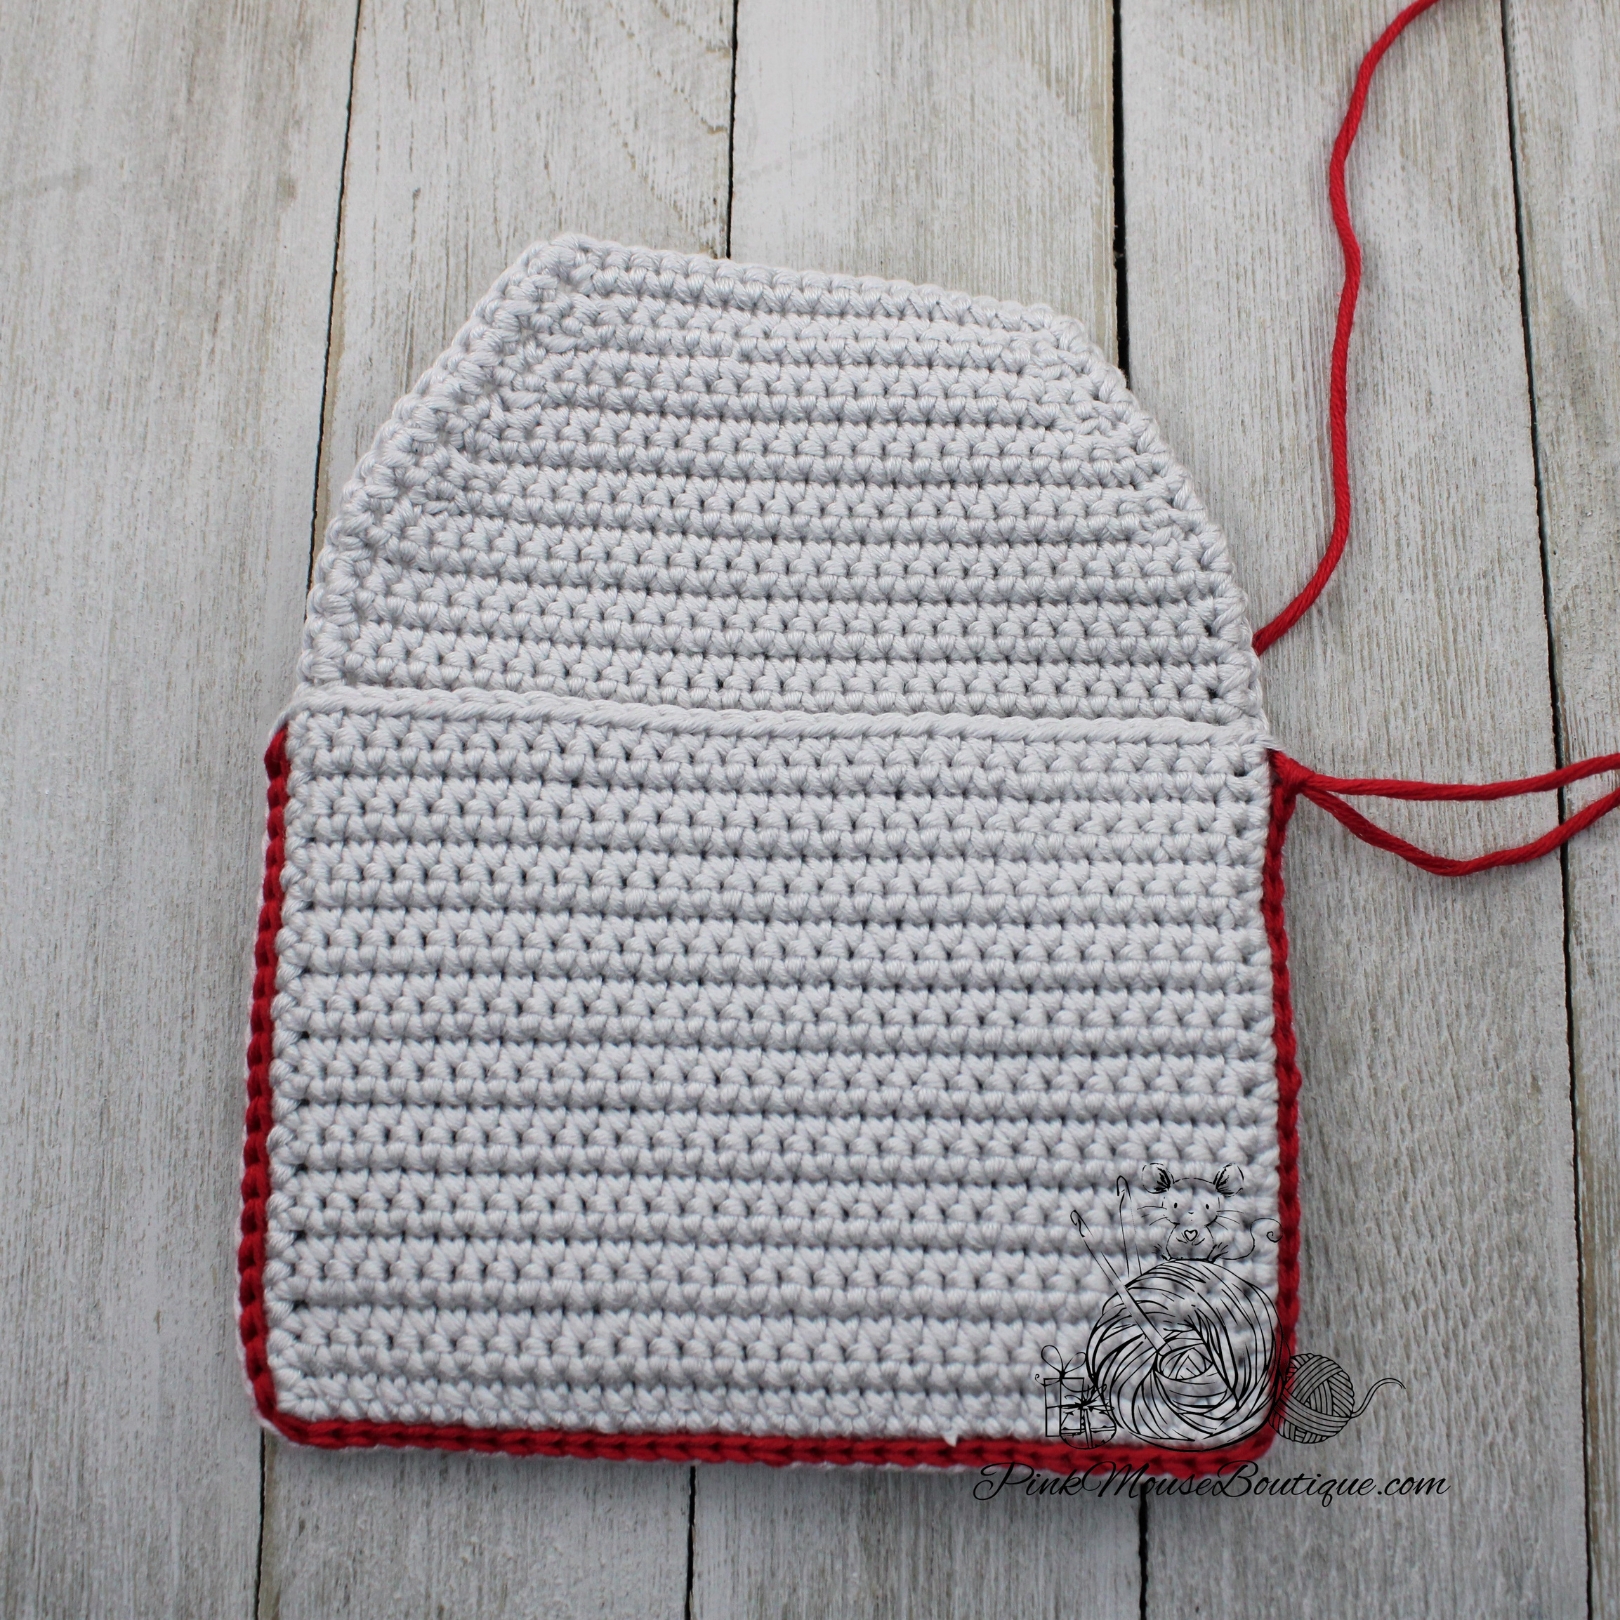
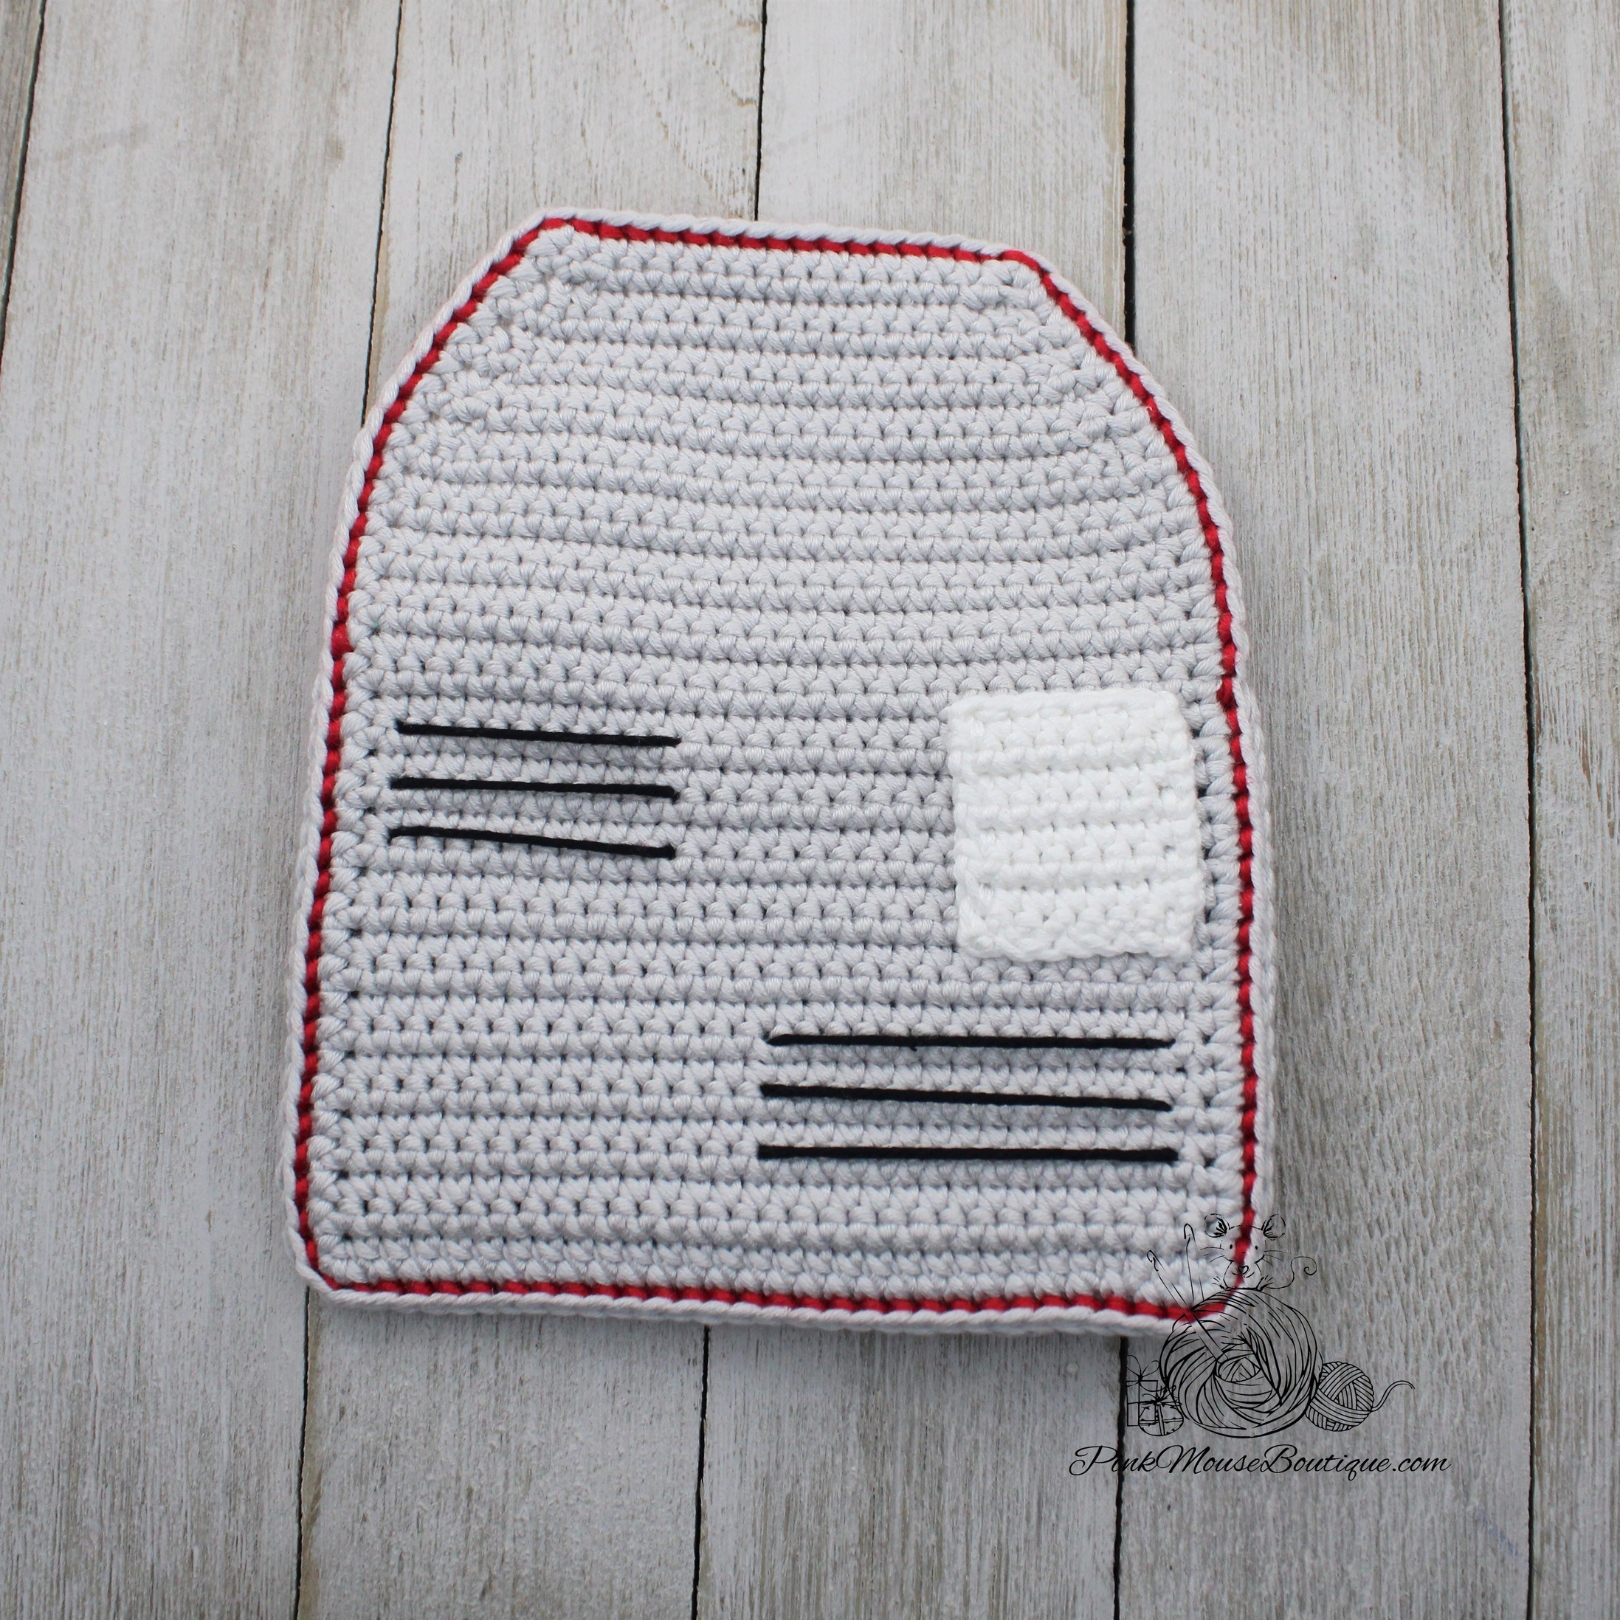
ENVELOPE – FRONT PIECE
Suggested Color – Light Grey
Ch 31
Row 1: in back bump of ch, 1 sc in 2nd ch from hook, 1 sc in every ch; ch 1 and turn – 30 sts
Rows 2 – 20: sc in each st; ch 1 and turn – 30 sts (19 rows)
Row 21: sc in each st – 30 sts
1 sc in each row going down the left side of the piece – 20 sts
2 sc in the corner st
1 sc in each st – 28 sts
2 sc in the corner st
Sc in each row going up – 28 sts
Fasten off and weave in the ends.
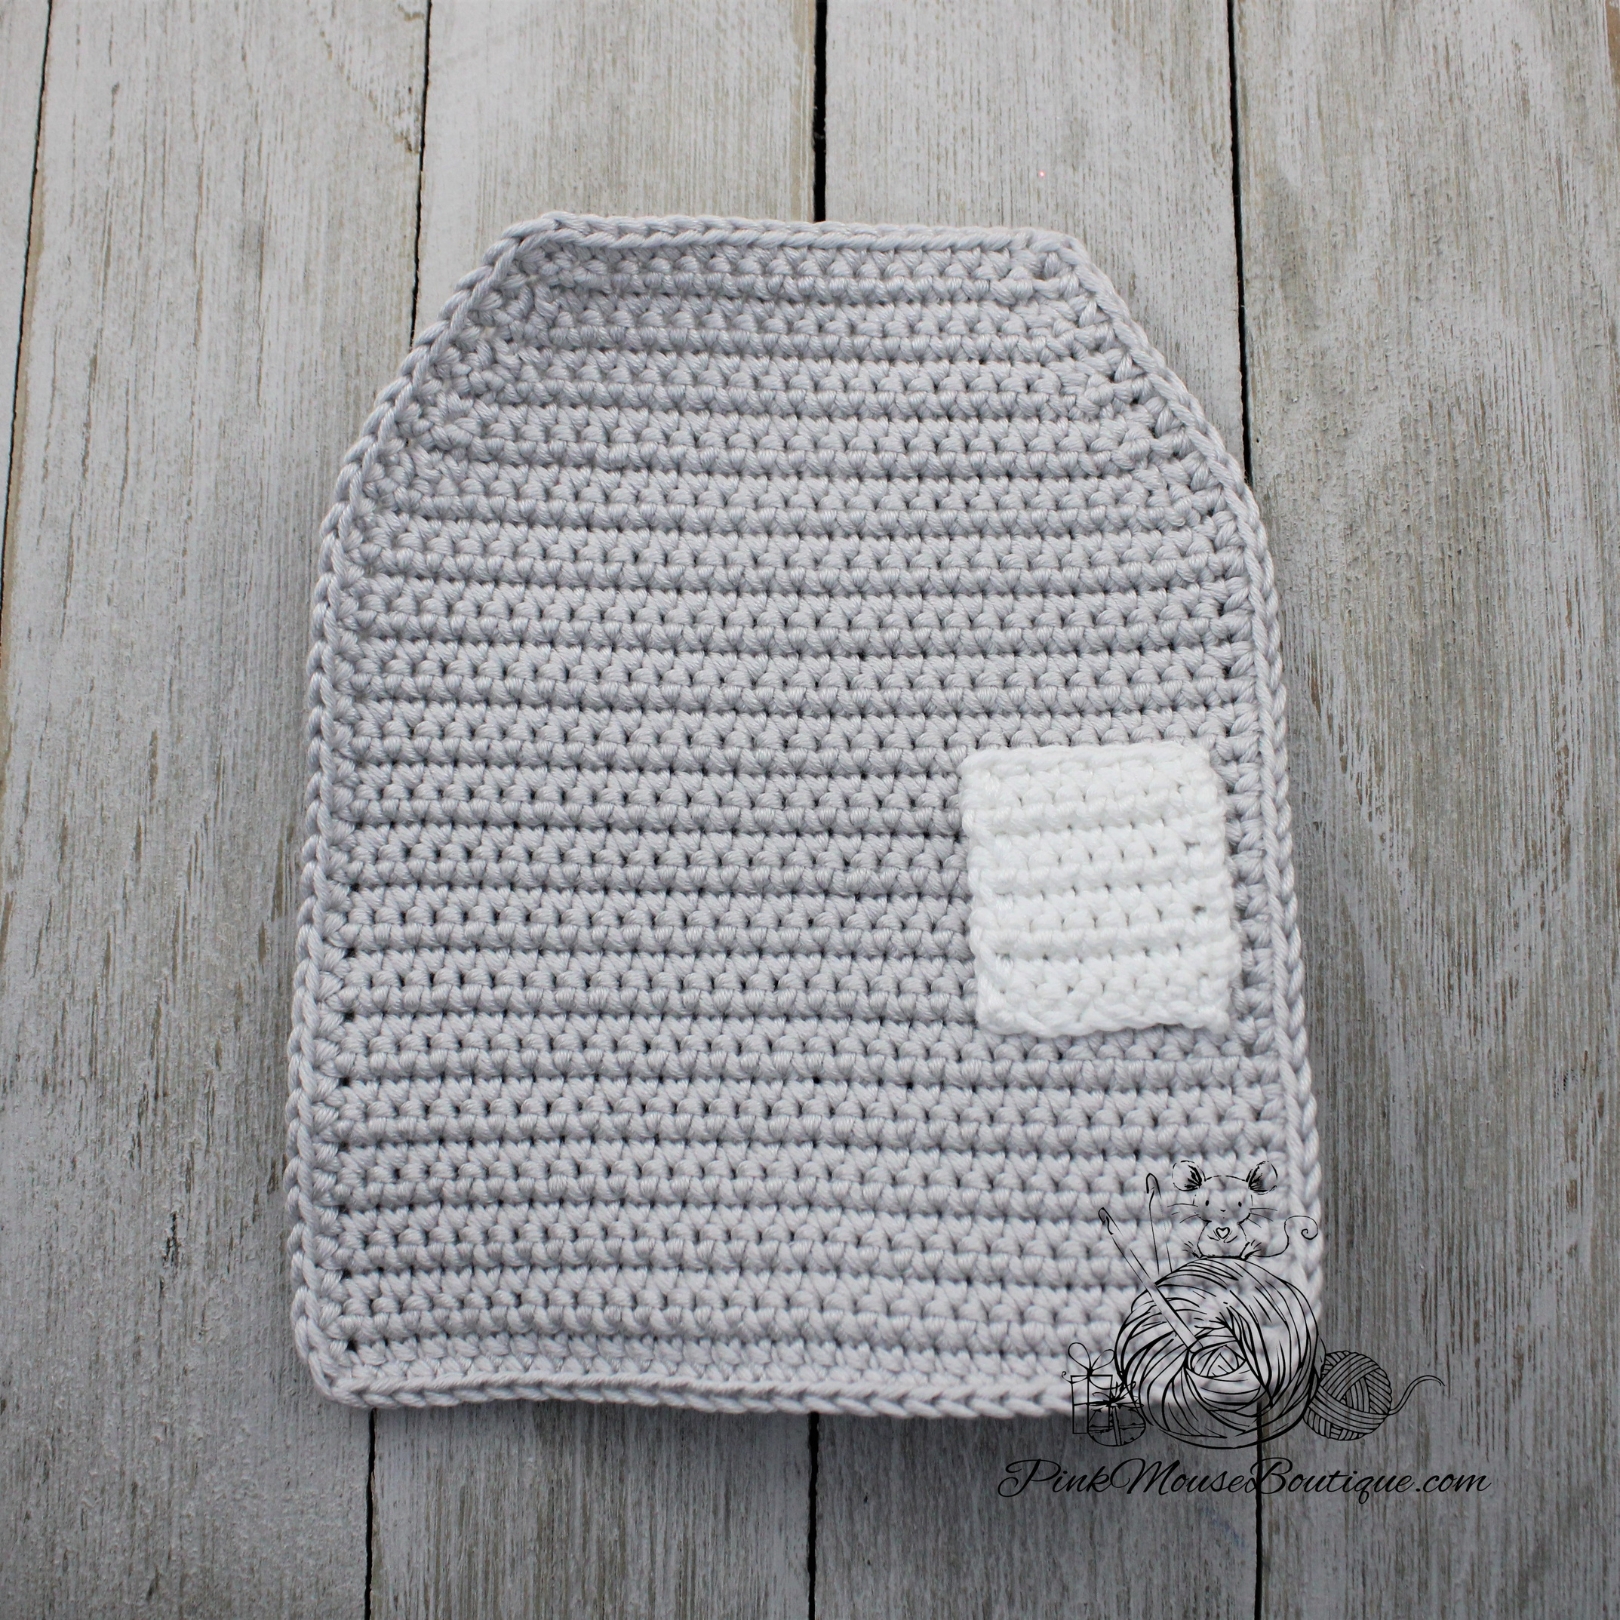
ENVELOPE – BACK PIECE
Suggested Color – Light Grey
Ch 31
Row 1: in back bump of ch, 1 sc in 2nd ch from hook, 1 sc in every ch; ch 1 and turn – 30 sts
Rows 2 – 28: sc in each st; ch 1 and turn – 30 sts (27 rows)
Row 29: sc, in FLO dec, 24 sc, in FLO dec, sc; ch 1 and turn – 28 sts
Row 30: sc, in BLO dec, 22 sc, in BLO dec, sc; ch 1 and turn – 26 sts
Row 31: sc in each st; ch 1 and turn – 26 sts
Row 32: sc, in BLO dec, 20 sc, in BLO dec, sc; ch 1 and turn – 24 sts
Row 33: sc, in FLO dec, 18 sc, in FLO dec, sc; ch 1 and turn – 22 sts
Row 34: sc in each st; ch 1 and turn – 22 sts
Row 35: sc, in FLO dec, 16 sc, in FLO dec, sc; ch 1 and turn – 20 sts
Row 36: sc, in BLO dec, 14 sc, in BLO dec, sc; ch 1 and turn – 18 sts
Row 37: sc in each st – 18 sts
Sc in each row going down – 36 sts
2 sc in the corner st
1 sc in 28 sts
2 sc in the corner st
Sc in each row going up – 36 sts Fasten off and weave in the ends.
ASSEMBLY
Sew the stamp to the BACK PIECE between Rows 11 and 21. Weave in the ends.
Using black yarn, sew 3 black lines starting 2 rows below the stamp. The lines should be 12 to 14 stitches long and sewn two rows apart. Weave in the ends.
Using black yarn, sew three lines to the left of the stamp. The first line should be sewn on Row 15, the second line – on Row 17, and the last line – on Row 19. Weave in the ends.
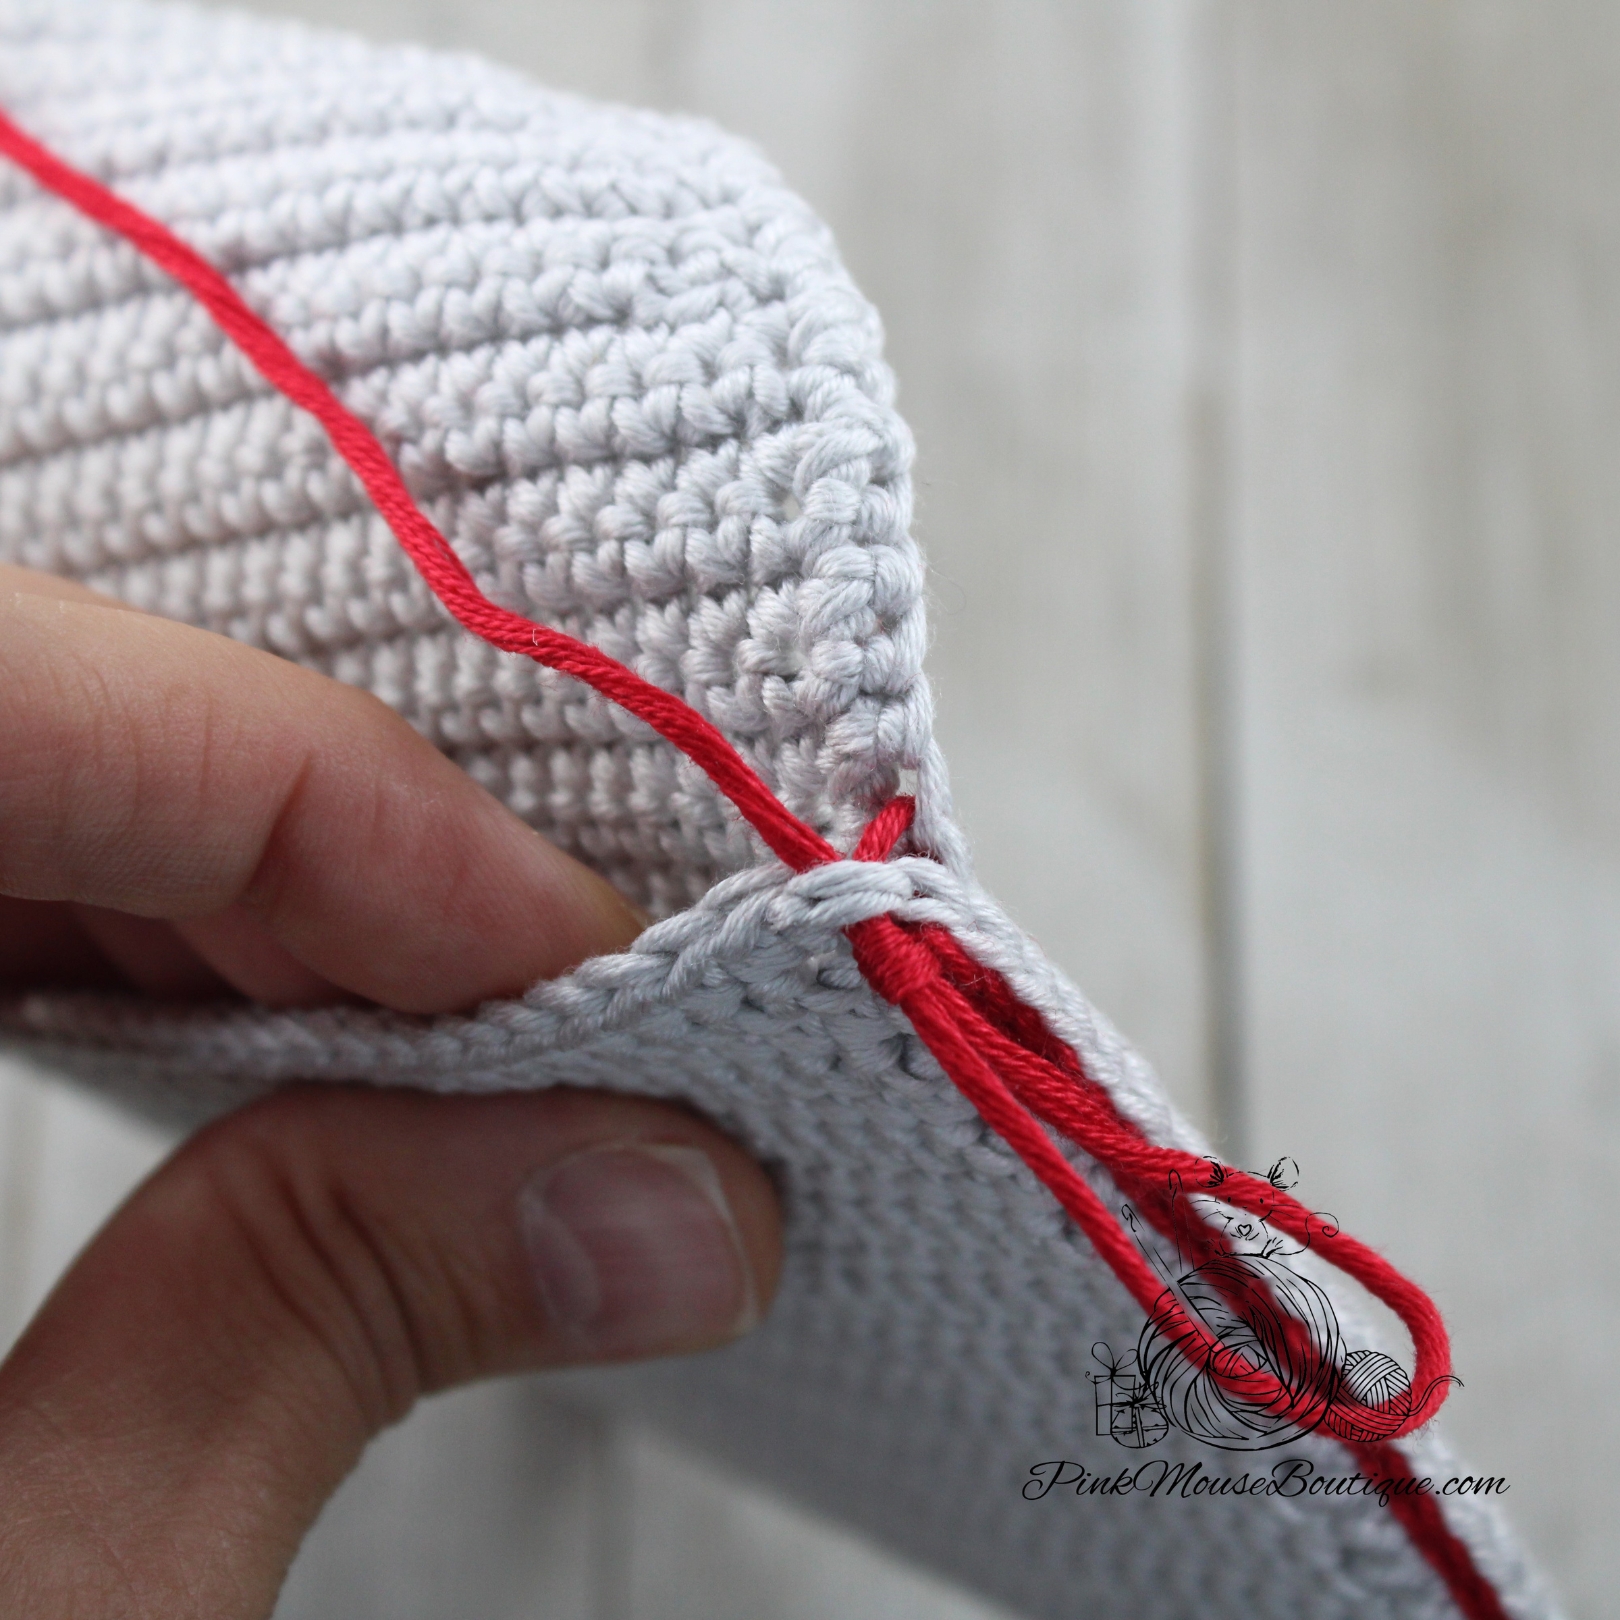
Flip the back of the envelope so that the inside is facing you. Place the FRONT PIECE on top. Align the bottom and sides of the two pieces. Using red yarn, slip stitch through both starting at the top left corner of the FRONT (the rectangular piece). Slip stitch all around the left side, the bottom, and then the right side.
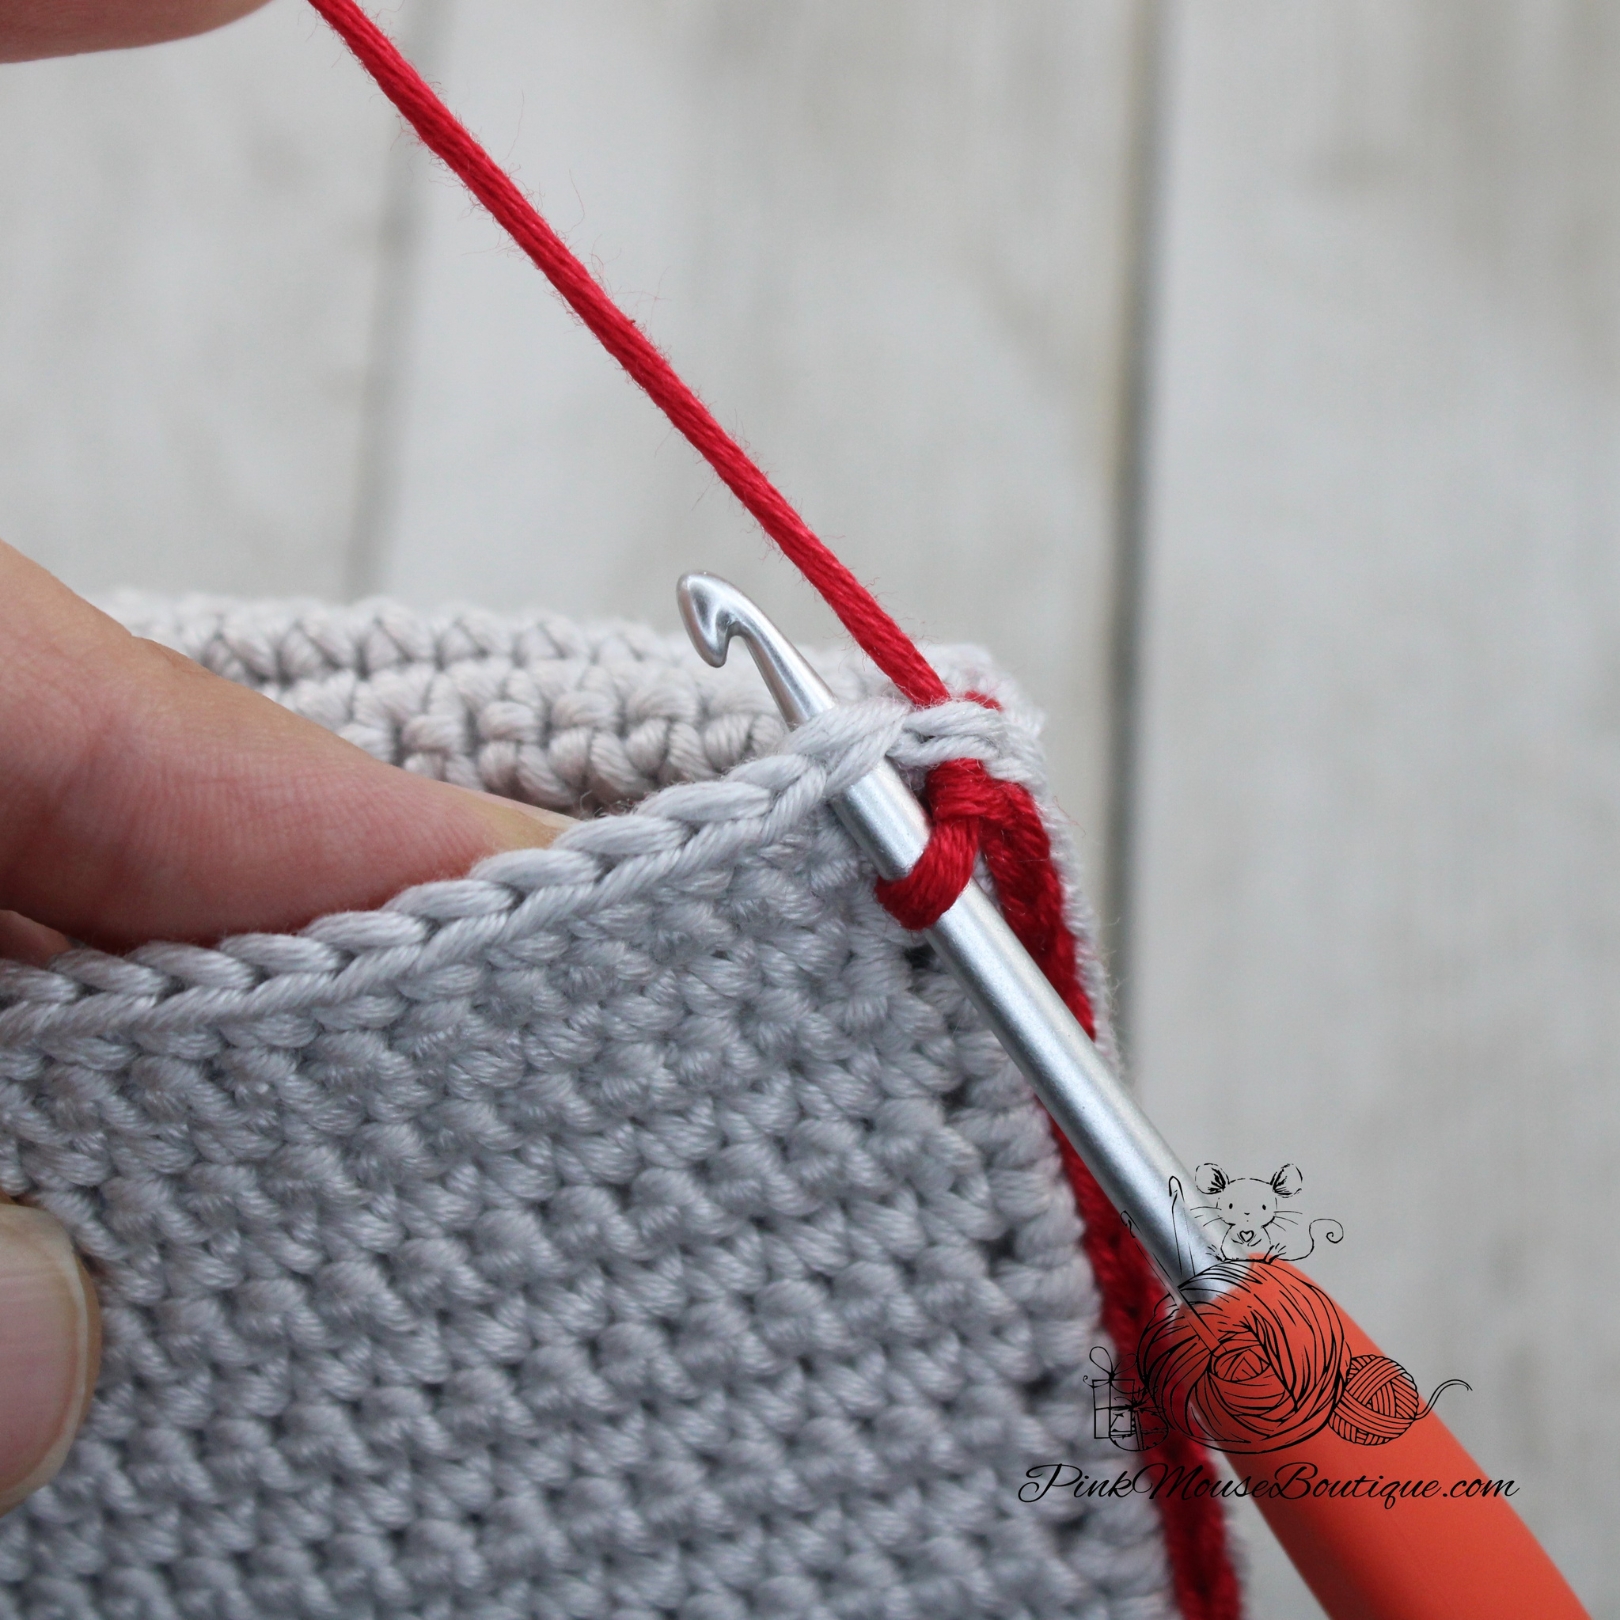
Cut the yarn leaving a long tail and without fastening off pull the end out only of the BACK part of the envelope.
Continue slip stitching only through the top of the rectangle part of the envelope.
Once finished, fasten off and weave in the ends.
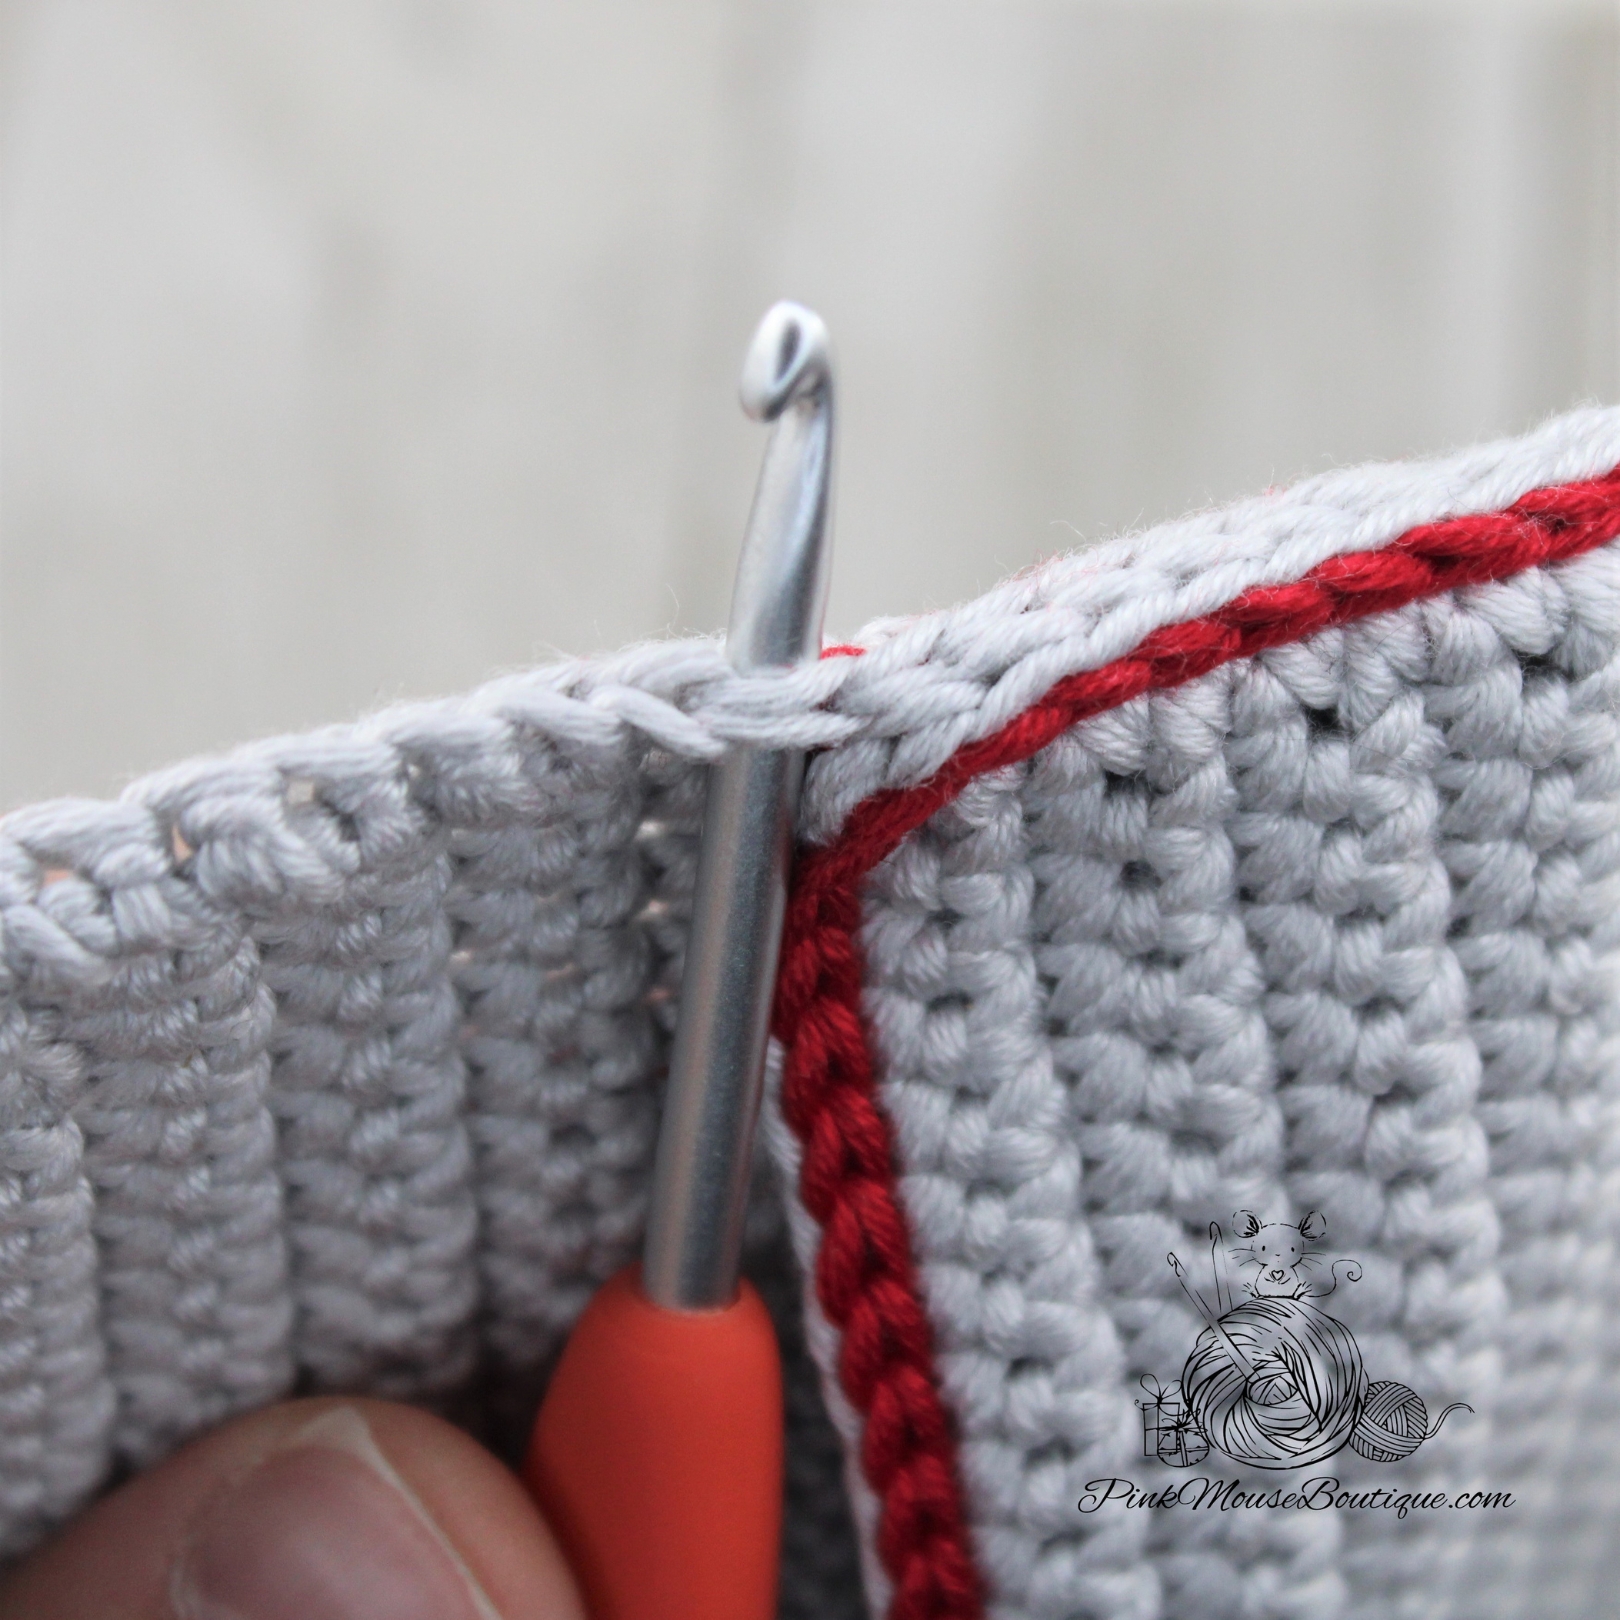
Insert hook in the same stitch where you last crocheted through the FRONT and BACK on the right. With red slip stitch all around the top of the BACK PIECE (the flap). Fasten off and weave in the ends.
Sew the strap on Row 15 or 16 making sure you can close the envelope and that the strap will hold it closed.
The idea to create a Unicorn Zombie was given to me by one of my followers on Instagram last year. It took me a while, but finally I was able to make this cute little guy. And I am so happy with the final look! The bone is a challenge though. 🙂
This version of the pattern is FREE. You can also find a PREMIUM version that includes a drawing of the unicorn that you can use to create fun Halloween cards. The premium version is a PDF file that you can conveniently download and print.
We will end Round 16 there. Fasten off, finish off, and secure the stitches.
BODY
Turn the head upside down with the back of the head facing you.
You will notice that there are 2 sets of unworked stitches – 4 that are closest to you (this is where the back of the body will be once you make it) and 4 are further away from you (where the front of the body will be once you make it). Insert the hook in the 2nd to last st beginning with the back (closest to you) and with a sc join Clarity.
Round 1: sc again in same st where you joined thread and inc in next st
Insert hook through the same st as last inc and through the stitch at the front
Inc (but the second sc should be made only in the 1st st at the front; do not grab the last st from the back)
Inc in next 3 sts
Insert hook through the same st as last inc and through the stitch at the front
Inc (but the second sc should be made only in the 1st st at the back; do not grab the last st from the front)
Inc in last st
After you finish Round 1, you should have 16 sts.
Round 2: (3 sc, inc) x 4 – 20 sts
Rounds 3 – 4: sc around – 20 sts (2 rounds)
Round 5: (4 sc, inc) x 4 – 24 sts
Round 6: (5 sc, inc) x 4 – 28 sts
Rounds 7 – 8: sc around – 28 sts (2 rounds)
Round 9: (5 sc, dec) x 4 – 24 sts
Fasten off leaving a long tail for sewing.
Stuff the body well. Leave 8 stitches on each side of the body for legs. Mark the middle 8 stitches (4 at the front and 4 at the back) with thread. Make sure the spaces you are leaving for legs are aligned with the head.
LEGS (x 2)
Turn the body upside down (back side facing you) and with a sc join Clarity thread in one of the stitches you left for the 1st leg.
Round 1: sc in each st until you get to the thread marking the middle sts. Insert hook in same st as last sc and in the st at the other side of the body. 1 sc ; sc until the end of round – 8 sts
Round 2: sc around – 8 sts
Stuff well.
Round 3: 4 dec – 4 sts
Fasten off.
Repeat for the second leg.
Once finished, sew the middle 8 stitches to close.
Secure the stitches.
ARM
Crochet in spiral.
Round 1: 8 sc in a mr – 8 sts
Rounds 2 – 7: sc around – 8 sts (6 rounds)
Round 8: 4 dec – 4 sts
Fasten off leaving a tail for sewing.
BONE
Crochet tight.
Because I used thread, I didn’t need to stuff the bone. If you are using yarn, you may need to stuff a little.
Suggested color – DMC cotton perle 12 with a 1 mm hook (NOTE: I used yarn for the step-by-step pictures)
Ch 4
Round 1: 1 puff stitch in 2nd ch from hook (Please follow the steps below and refer to the pictures)
YO and insert hook through 2nd chain from hook, YO and pull (three loops on hook)
YO and pull through 2 loops (two loops left on hook)
YO and insert hook in same ch, YO and pull (four loops on hook)
YO and pull through 2 loops (3 loops left on hook)
YO and insert hook in same ch, YO and pull (five loops on hook)
YO and pull through all loops (puff stitch created)
1 sc in next chain
2 puff stitches in last ch
Now we will crochet on the other side of the chain
1 sc in next ch
1 puff stitch in last ch
At the end of Round 1, you should have 6 stitches.
Fasten off, finish off, and secure the stitches. Leave one of the tails for sewing later.
EAR 1
Round 1: with light blue 2 sc, hdc, 2 sc in a mr; sl st to join and ch 1 – 5 sts
Round 2: 1 sc in 1st st, inc in next, (hdc, dc, hdc) in third st, inc in next, 1 sc in last st; sl st to join – 9 sts
Fasten off leaving a tail for sewing.
EAR 2
Round 1: with light blue 2 sc, hdc, 2 sc in a mr; sl st to join and ch 1 – 5 sts
Round 2: 1 sc in 1st st, inc in next, (1 hdc, ch 2 and sl st in 3rd st), inc in next, 1 sc in last st; sl st to join – 8 sts
Fasten off leaving a tail for sewing.
EYE
Suggested color: DMC cotton perle 12, black with a 1 mm hook
Round 1: 6 sc in a mr; sl st to join and ch 1 – 6 sts
Round 2: (1 sc in 2 sts, 3 sc in next st) x 2; sl st to join – 10 sts
Fasten off leaving a tail for sewing.
Use DMC cotton perle 12, color white thread to sew a few times in a stitch in the eye to make a large sparkle. Then sew a couple of times in another st to make a second sparkle (a bit smaller than the first one).
HORN
Suggested color – DMC metallic thread (2 or 3 strands)
Round 1: 8 sc in a mr; sl st to join and ch 1 – 8 sts
Round 2: in BLO sc around; sl st to join and ch 1 – 8 sts
Round 3: in BLO (2 sc, dec) x 2; sl st to join and ch 1 – 6 sts
Round 4: in BLO sc around; sl st to join and ch 1 – 6 sts
Round 5: in BLO (sc, dec) x 2; sl st to join – 4 sts
Fasten off leaving a tail for sewing.
TAIL (x 6)
Suggested colors – Curio size 10, Hollyberry and Eggplant
Ch 6
Row 1: in back bump only 1 sc in 2nd ch from hook, 1 sc until the end – 5 sts
Fasten off leaving a tail for sewing.
MANE (5 or 6)
Suggested colors – Curio size 10, Hollyberry and Eggplant
Ch 15
Row 1: in back bump only 1 sc in 2nd ch from hook, 1 sc until the end – 14 sts
Fasten off leaving a tail for sewing.
ASSEMBLY
Sew the eye to the head, right above the muzzle. I sewed the eye on the left part of the face.
Using Curio size 10, black thread and a needle, sew a line going up 4 rounds at an angle on the right side of the head. The bottom of the line should be 7 stitches from the eye and the top – about 4 or 5 stitches from the top of the eye. Once the line is sewn (I sewed twice to make it thicker), sew 3 smaller lines crossing the longer one. Secure the thread.
Sew the horn 4 rounds above the eyes.
Sew the ears about 2 stitches behind the horn, about 3 stitches apart.
Sew the arm one round below the head and the bone – two rounds below the head making sure both align with the legs.
Sew the pieces you made for the tail at the back of the body, one or two rounds above the legs.
Sew the pieces you made for the mane at the back of the head, between the ears.
With black thread, sew a line going down the arm about four rounds. Then sew two smaller lines crossing the longer one.
With the Conch color (also light or salmon pink), cross stitch in 5 stitches below the right ear (about 2 rounds above the eye).
Using a small brush or cotton swab, apply your choice of color of the hard pastel around the scarred eye and arm patch. I also applied some on the broken ear, the bottom of the legs, and a little around the left eye (the round one).
I love everything about the fall season – the rain, the colors, the falling leaves. Everything…
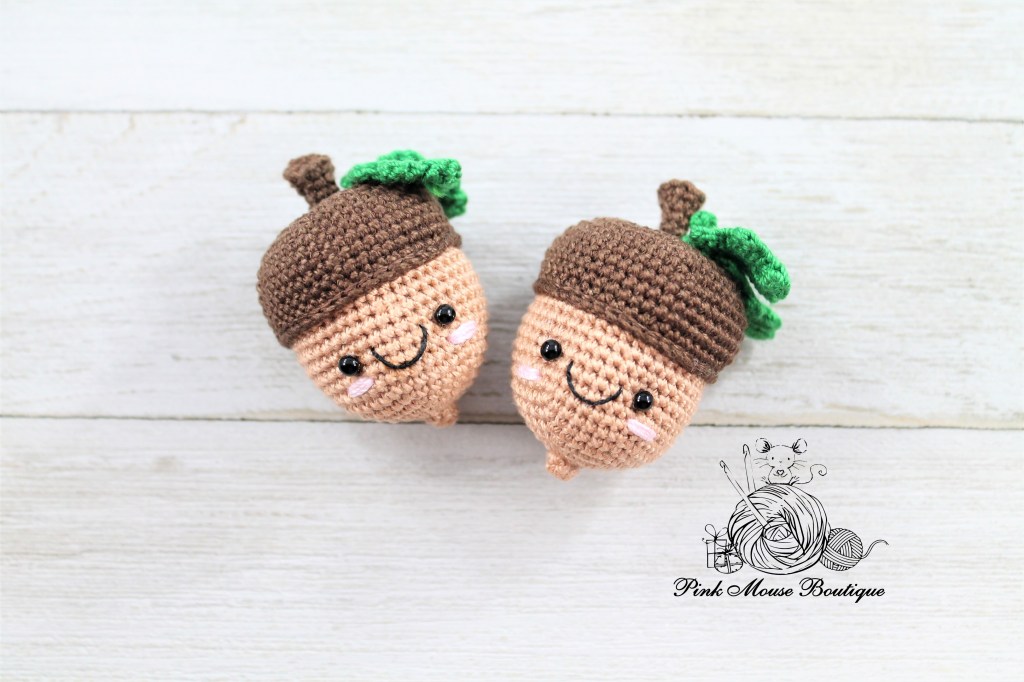
And this year I was inspired to make a sweet little acorn. You can add a cute face or leave it plain for a more stylish fall decor.
The pattern is below.
Or you can download the free PDF by visiting my amigurumi patterns (dot) net store here: PINK MOUSE BOUTIQUE
MATERIALS
Aunt Lydia’s size 10:
Light brown – acorn
Dark brown – acorn top
Light pink – cheeks
DMC cotton perle 12 (or single strand DMC floss)
Black – mouth
Plastic eyes – 3 mm
Clover Amour hook – 1.5 mm
Stuffing
Clear tacky glue
ABBREVIATIONS:
MR – magic ring
St(es) – stitch(es)
Sl st – slip stitch
Sc – single crochet
Inc – increase
Dec – decrease (invisible decrease)
RS – right side
PATTERN
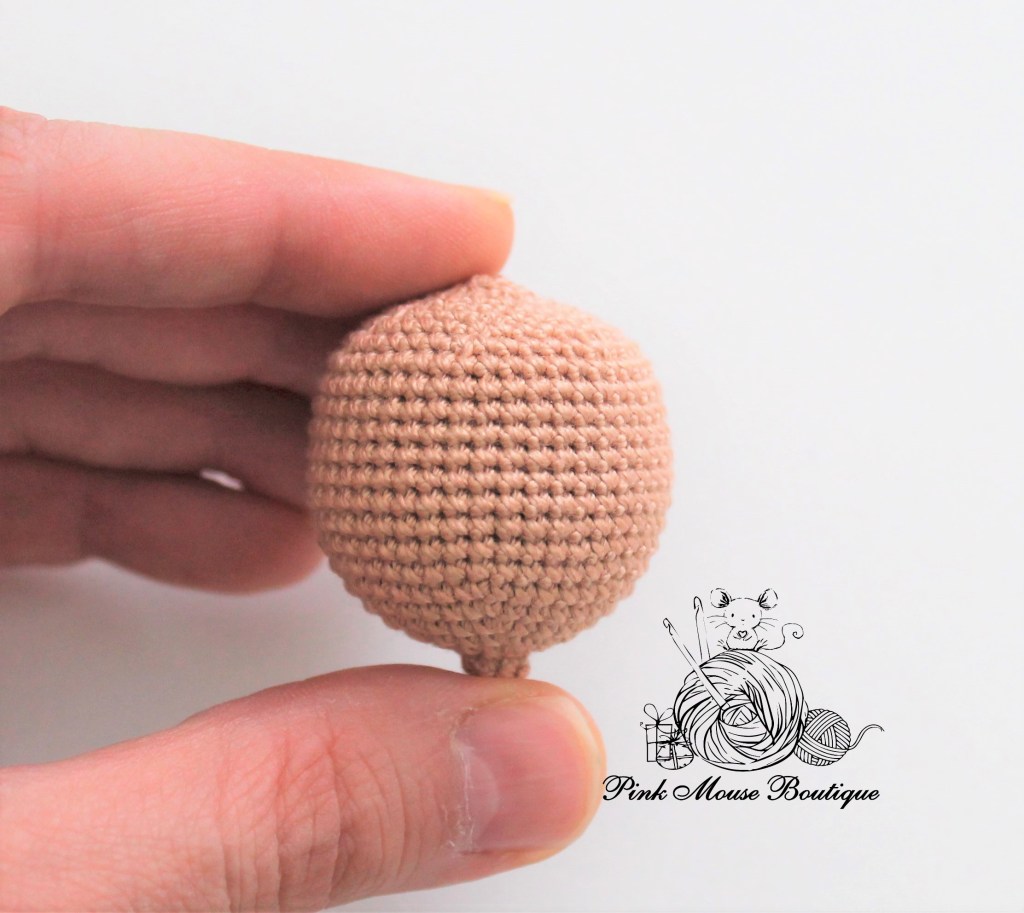
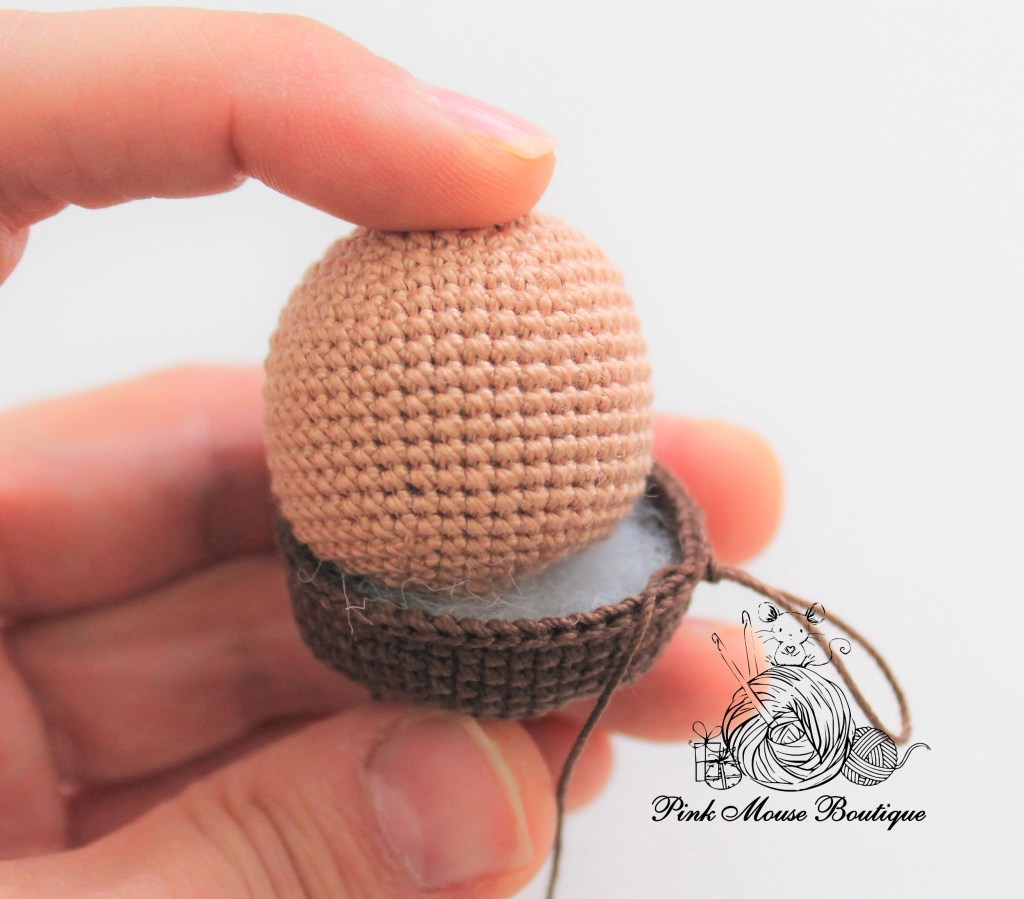
ACORN
Crochet in continuous rounds.
Round 1: (RS) with light brown 6 sc in a mr – 6 sts
Round 2: sc around – 6 sts
Round 3: 6 inc – 12 sts
Round 4: (sc, inc) x 6 – 18 sts
Round 5: (2 sc, inc) x 6 – 24 sts
Round 6: (3 sc, inc) x 6 – 30 sts
Round 7: (4 sc, inc) x 6 – 36 sts
Round 8: (5 sc, inc) x 6 – 42 sts
Rounds 9 – 18: sc around – 42 sts (10 rounds)
If you are using safety eyes, attach them between Rounds 11 and 12, 7 spaces apart.
Round 19: (5 sc, dec) x 6 – 36 sts
Round 20: (4 sc, dec) x 6 – 30 sts
Round 21: (3 sc, dec) x 6 – 24 sts
Round 22: (2 sc, dec) x 6 – 18 sts
Stuff firmly. You may need to stuff more before finishing the last round.
Round 23: (sc, dec) x 6 – 12 sts
Round 24: 6 dec – 6 sts
Fasten off, finish off, and secure the stitches.
Images are as follows, Left to Right and Top to Bottom: A, B, C, D, E, F
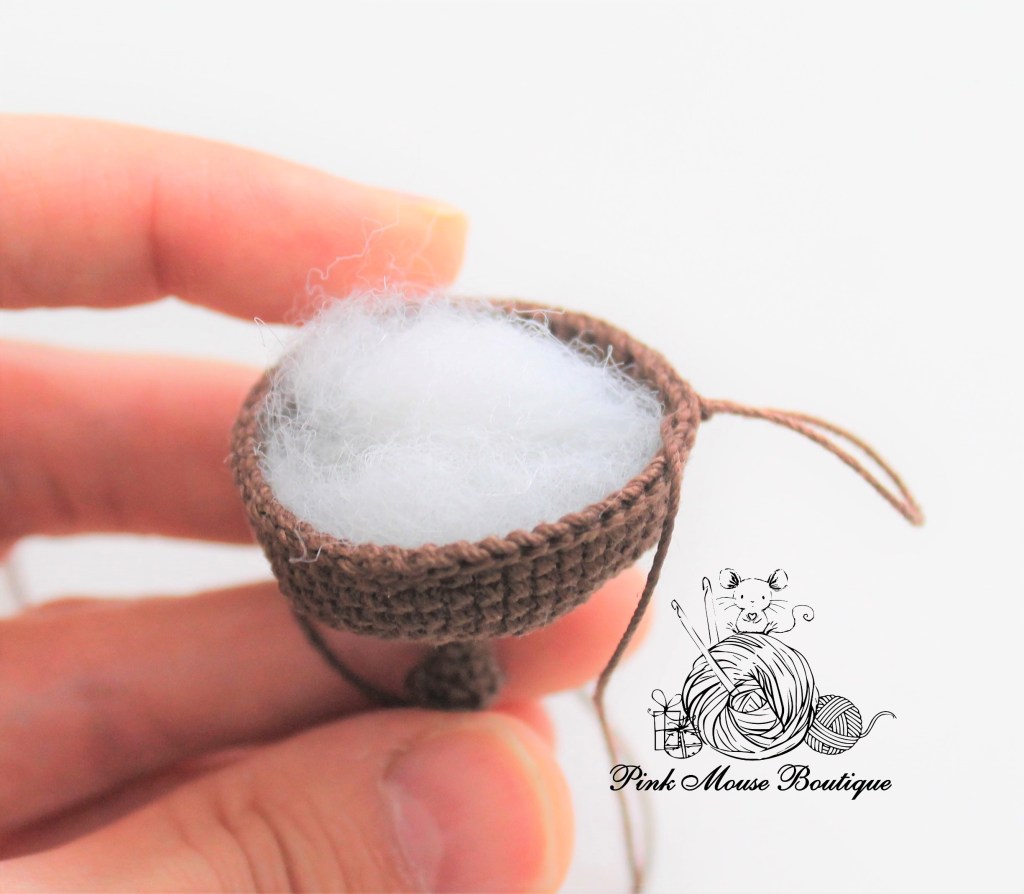
STEM
Crochet tight. The stem is not stuffed.
Round 1: with dark brown 4 sc in a mr – 4 sts
Round 2: 4 inc; ch 1 and turn – 8 sts
Round 3: sc in BLO – 8 sts
Round 4: (2 sc, dec) x 2 – 6 sts
Rounds 5 – 7: sc around – 6 sts (3 rounds)
ACORN CAP – Continue crocheting from where you stopped with the stem.
Round 8: 6 inc – 12 sts
Round 9: (sc, inc) x 6 – 18 sts
Round 10: (2 sc, inc) x 6 – 24 sts
Round 11: (3 sc, inc) x 6 – 30 sts
Round 12: (4 sc, inc) x 6 – 36 sts
Round 13: (5 sc, inc) x 6 – 42 sts
Round 14: (6 sc, inc) x 6 – 48 sts
Rounds 15 – 18: sc around – 48 sts (4 rounds)
Round 19: (6 sc, dec) x 6 – 42 sts
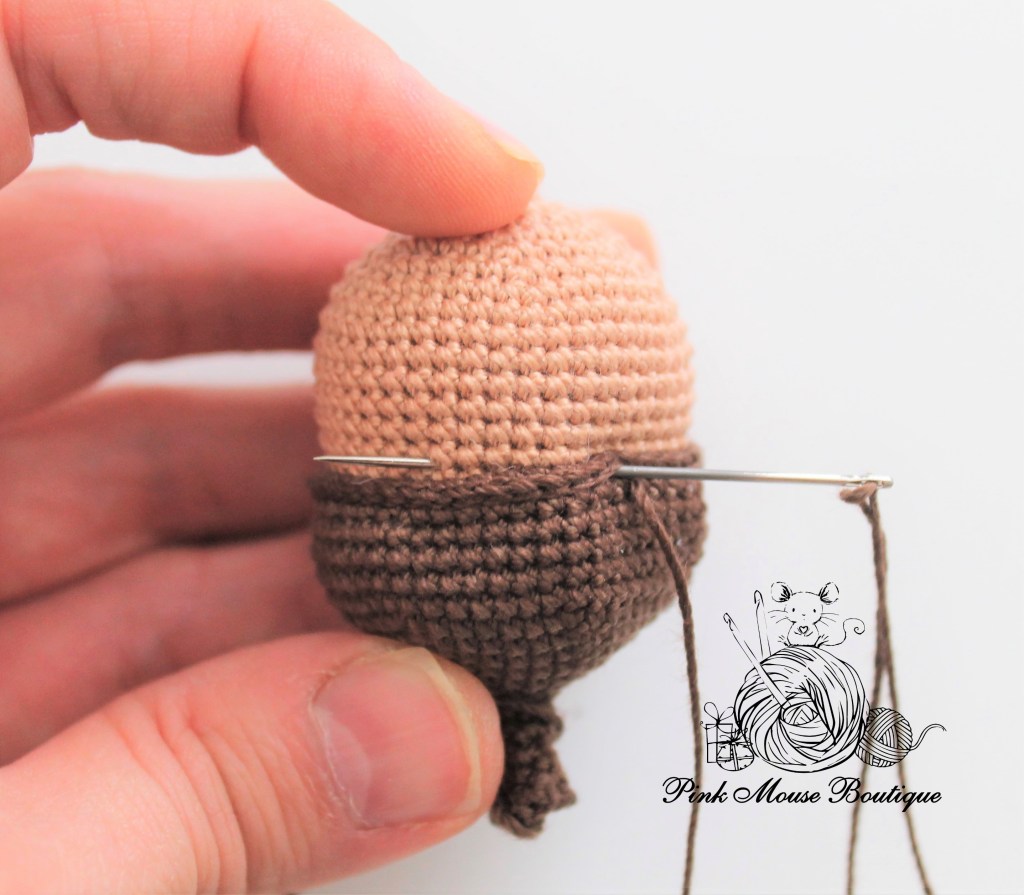
Stuff the cap and place it on the acorn. Hold in place while crocheting the last round. Pictures B and C
Round 20: sl st around – 42 sts (Picture D)
Fasten off leaving a tail for sewing.
Sew Round 19 of the acorn cap to the space between Round 15 and Round 16 of the acorn. Because we did a round of slip stitch, we don’t need to sew every single stitch. Sew every 4 or 5 stitches. (Picture E)
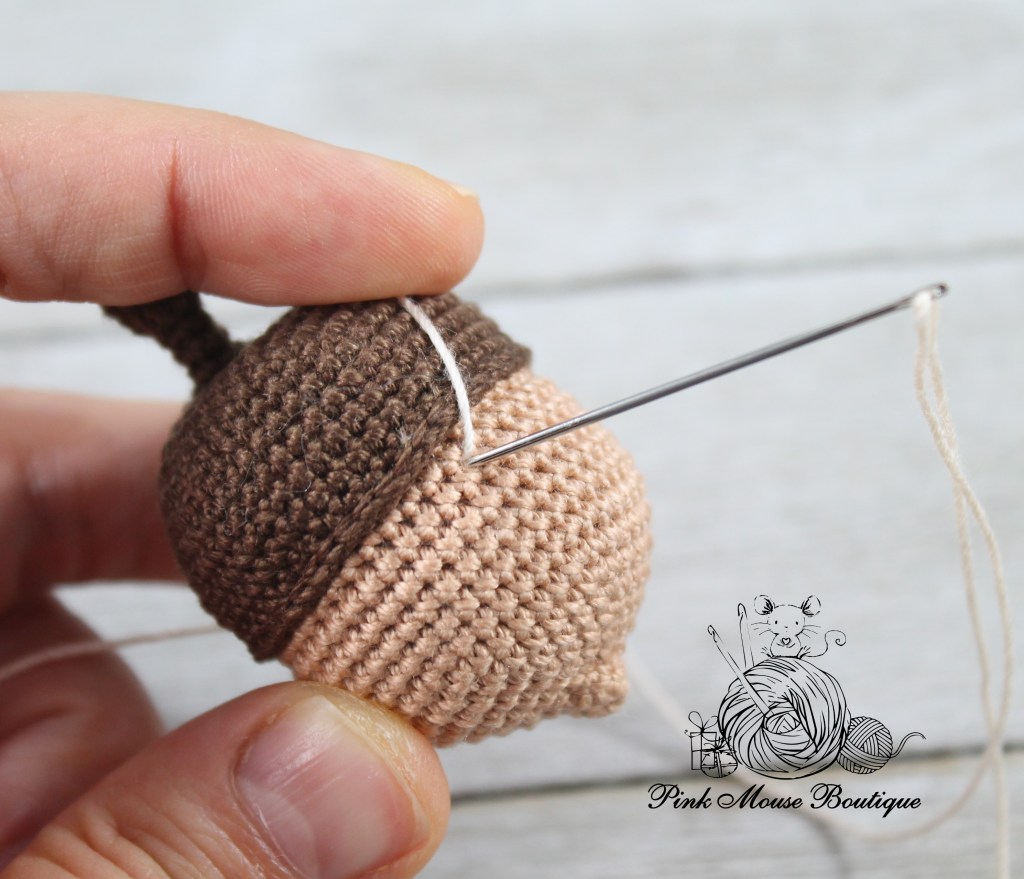
SHAPING THE ACORN CAP
You can leave the acorn cap as is (Picture F) or you can create a slight indentation and add more shape to it (Picture G).
To do that, we will sew between Rounds 8 and 9 of the acorn cap pulling tightly to create the indentation. Use the same color thread you used to make the cap. I used ecru for the step by step pictures to show the process better.
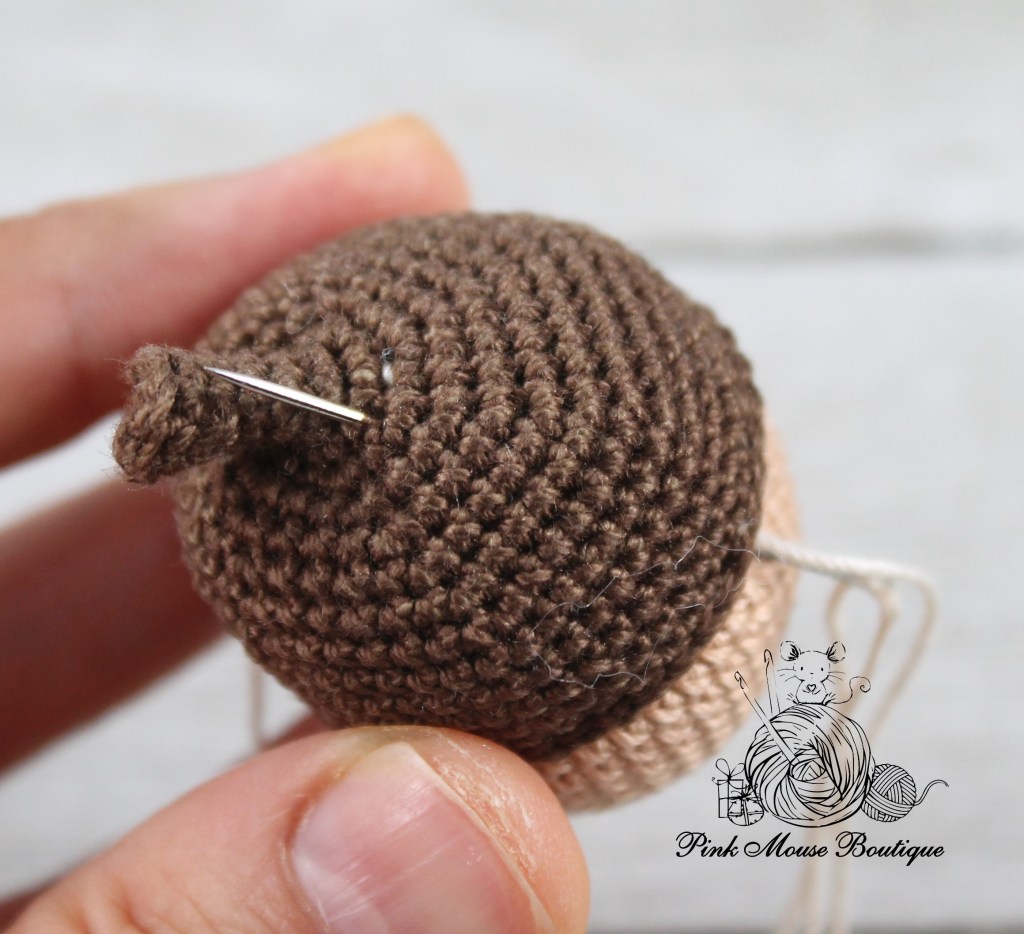
Insert your needle through a stitch in the acorn and through a space between Rounds 8 and 9 of the acorn cap (Picture H). Insert the needle through the next stitch of the acorn cap (Picture I) and through any stitch of the acorn.
Pull tight while holding the beginning tail (Picture J).
Insert your needle through the same stitch in the acorn you just pulled it out of (Picture K) and through the next space in the acorn cap (Picture L).
Pull tight and insert your needle through the next space between Rounds 8 and 9 of the acorn cap and any one stitch of the acorn. Pull tight. (Picture M)
Repeat until you create an indentation all around the stem. Make sure to pull tight to create the indentation but be careful not to break the thread.
Images are Left to Right and Top to Bottom: G, H, I, J, K, L, M, and N
LEAVES (x 2)
Ch 6
Round 1: 1 sc in 4 sts, 3 sc in last st; going around the chain 1 sc in 4 sts; sl st to join sides and ch 1 – 11 sts
Round 2: 1 sc in 1st st; 3 hdc in 2nd st, sl st in next, (3 dc in 4th st, sl st in next) x 3; 3 hdc in 2nd to last st, 1 sc in last st; sl st in the sl st you made earlier; ch 3 and 1 sc in 2nd ch from hook, 1 sc in next; sl st in the sl st where you began the ch
Fasten off leaving a tail for sewing.
Sew the stems of the leaves together and then to Round 8 of the acorn cap. The leaves are to the right of the eyes.
EYES: Glue the eyes between Rounds 11 and 12, 7 spaces apart if you have not done so already.
CHEEKS: With light pink thread sew three times a round below each eye, about 3 stitches long.
MOUTH: Use DMC cotton perle 12 black thread (or single strand DMC floss).
Insert both ends a stitch away from each eye. Pull until you have enough thread to form the smile.
Put clear tacky glue on the black thread and press on the acorn’s face with the back of your hook forming a cute smile.
Images are Left to Right and Top to Bottom: O, P, Q, R, and S
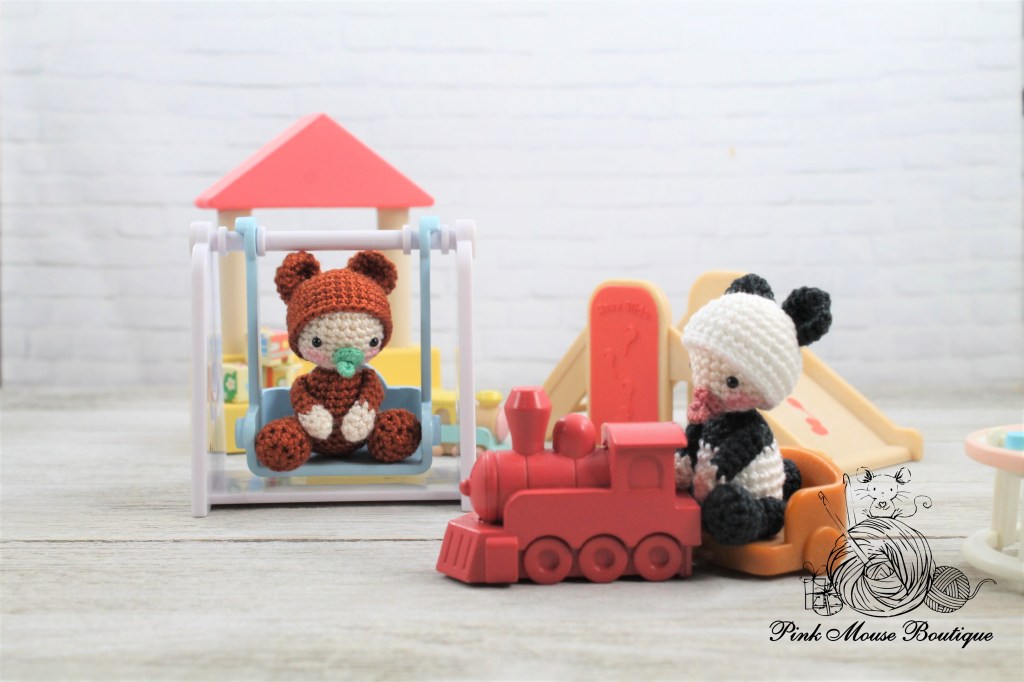
Baby Panda and Baby Bear were a special request from my daughter.
Because they are only 1.5 inches tall (in sitting position), they fit perfectly in her dollhouse and she loves playing with them over and over and over.
The pattern is a quick and easy one to make. I used Copper for Baby Bear and White and Black for Baby Panda, but Curio has so many beautiful colors that you can make a whole collection of colorful baby bears. If you sew the eyes with Curio Black thread instead of using plastic eyes, these bears made in all of Curio colors can be used to teach little ones colors and counting and sorting and make math more fun!
You can download the PDF file here for free: BABY ANIMALS
MATERIALS:
Thread – Curio size 10 (various colors)
Natural – face and hands
Copper – bear costume
Black and White – panda costume
Pistachio/Tea Rose – binky
Plastic eyes – 2 mm
Hook: Clover Amour, 1.50 mm
Stuffing
Tacky glue
Cotton swab and blush
ABBREVIATIONS:
MR – magic ring Inc – increase
Ch – chain Dec – decrease
St(es) – stitch(es) Sc – single crochet
Sl st – slip stitch Hdc – half double crochet
HEAD
Join rounds with a slip st and chain 1.
Round 1: with ecru 6 sc in a mr – 6 sts
Round 2: 6 inc – 12 sts
Round 3: (sc, inc) x 6 – 18 sts
Round 4: (2 sc, inc) x 6 – 24 sts
Rounds 5 – 10: sc around – 24 sts (6 rounds)
Round 11: (2 sc, dec) x 6 – 18 sts
Round 12: (sc, dec) x 6 – 12 sts
Stuff the head.
Round 13: 6 dec – 6 sts
BODY
Change color depending on animal costume. Continue crocheting in spiral.
If you are making a baby panda, use black thread for Rounds 14 – 17. Then change color to whiteto finish the body.
Rounds 14: 6 inc – 12 sts
Round 15: (2 sc, inc) x 4 – 16 sts
Rounds 16 – 17: sc around – 16 sts (2 rounds)
Round 18: (3 sc, inc) x 4 – 20 sts
Round 19: (4 sc, inc) x 4 – 24 sts
Rounds 20 – 23: sc around – 24 sts (4 rounds)
Round 24: (2 sc, dec) x 6 – 18 sts
Round 25: (sc, dec) x 6 – 12 sts
Stuff the body.
Round 26: 6 dec – 6 sts
Fasten off and secure the stitches. Set aside.
ARMS (x 2):
Round 1: with ecru 5 sc in a mr – 5 sts
Round 2: (inc, sc) x 2, inc in last st – 8 sts
Round 3: sc around – 8 sts
Change color depending on animal costume.
Round 4: (2 sc, dec) x 2 – 6 sts
Rounds 5 – 9: sc around
Leave a tail for sewing and fasten off.
LEGS (x 2):
Use the color for animal costume.
Round 1: (2 sc, 3 hdc, 2 sc) in a mr – 7 sts
Round 2: sc inc in 2 sts, hdc inc in 3 sts, sc inc in 2 sts – 14 sts
Rounds 3 – 5: 14 sts (3 rounds)
Round 6: 1 sc in 3 sts, 4 sc dec, 1 sc in 3 sts – 10 sts
Stuff the foot.
Round 7: 1 sc in 3 sts, 2 sc dec, 1 sc in 3 sts – 8 sts
Rounds 8 – 10: sc around – 8 sts (3 rounds)
Stuff the leg lightly.
Round 11: 4 dec – 4 sts
Leave a tail for sewing and fasten off.
EARS (x 2):
Use the color for animal costume.
Round 1: 6 sc in a mr – 6 sts
Round 2: 6 inc – 12 sts
Rounds 3 – 5: sc around – 12 sts (3 rounds)
Round 6: sl st around – 12 sts
Leave a tail for sewing and fasten off.
TAIL:
Use the color for animal costume.
Round 1: 6 sc in a mr – 6 sts
Round 2: 6 inc – 12 sts
Rounds 3 – 4: sc around – 12 sts (2 rounds)
Round 5: 1 sl st in next 2 sts
Leave a tail for sewing and fasten off.
HAT:
With animal color
Round 1: 6 sc in a mr – 6 sts
Round 2: 6 inc – 12 sts
Round 3: (sc, inc) x 6 – 18 sts
Round 4: (2 sc, inc) x 6 – 24 sts
Round 5: (3 sc, inc) x 6 – 30 sts
Rounds 6 – 10: sc around – 30 sts (5 rounds)
Round 11: 1 sl st in next 2 sts
BINKY:
Leave a long tail before you begin.
Round 1: with pistachio 8 sc in a mr
Sl st to join and fasten off.
ASSEMBLY:
Glue the eyes between Rounds 8 and 9, about 5 stitches apart.
Use the eyes as a guide when sewing the legs and arms.
The legs are sewn between Rounds 22 and 23. Turn the doll to one side. The very back of the leg should be about 6 stitches away from the eye (the foot would be closer to the animal’s tummy that way). Sew several times and in several places so the leg is securely attached to the body. Then repeat with the other leg.
Sew the arms on Rounds 15 and 16. Turn the body to one side (just like we did with the legs). The back end of the arm should be about 4 stitches away from the eye. I sewed the back of the arms to the body and then I sewed the “hands” to the belly, so they stay snugged.
Position the hat so it’s about 4 rounds above the eyes and sew it to the head.
Using the whip stitch, sew the ears on Rounds 2 through 5 of the hat. Once you finish, wet the ears and press the middle with the back of a metal hook. This will give the ears a nice shape.
Sew the tail at the back of the bear, between the legs. Before finishing, insert a little stuffing.
Before attaching the binky to the face, insert the mr tail through the mr.
Insert the needle through a front loop on any stitch on the right side of the piece. Refer to the picture on the right.
Before pulling the needle all the way through the stitch, wrap the thread around it 10 times. Carefully pull the needle through the thread and the stitch. Then insert the needle back through the mr and pull.
Attach the binky to the face, a round below the eyes. I used tacky glue in addition to sewing it to the face.
Use a cotton swab and blush to add a little pink to the cheeks.
This blog is for crochet mostly. But I also love baking. So I decided to share with you a few of my favorite recipes.
I am not a professional baker. I am just typing these recipes the way my grandma and my mom have written them in their notebooks. I hope you like them.
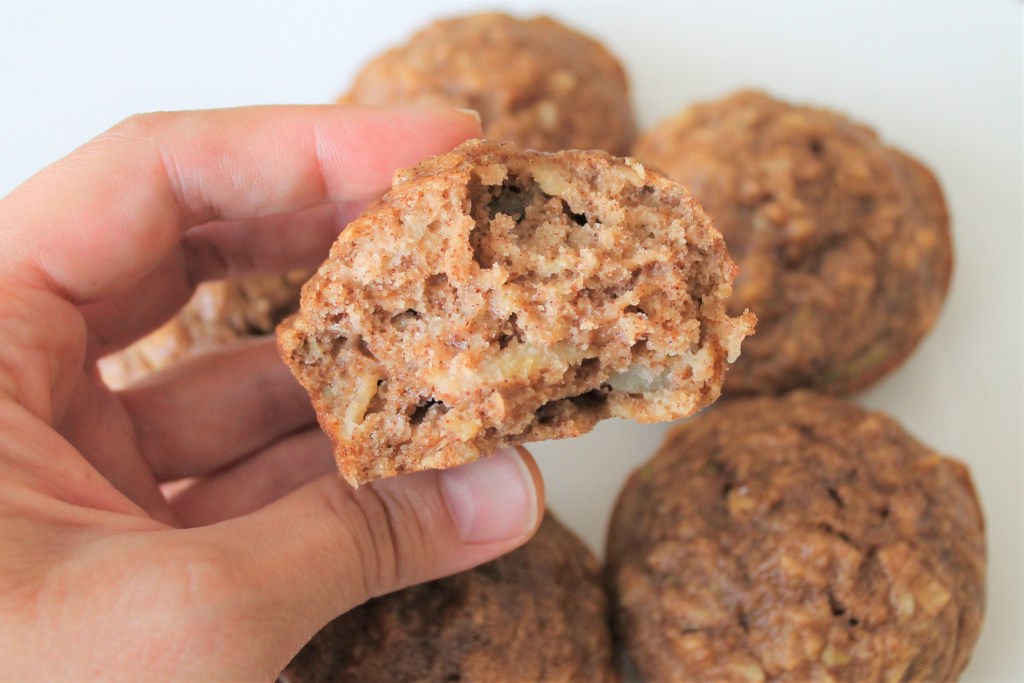
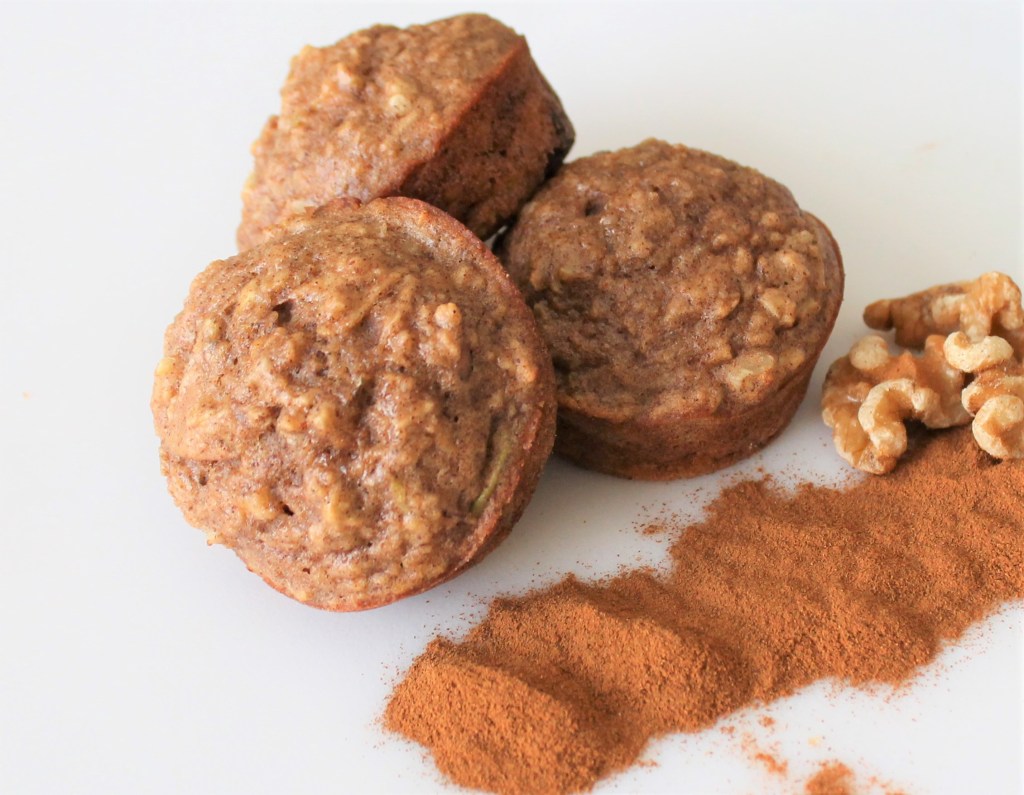
The first recipe comes from one of my grandma’s friends. I made this apple cake for the first time when I was a kid. My mom used to make it a lot too. It is truly a family favorite.
The only thing I have changed is the amount of sugar. I only add 1/2 cup sugar so I can use the cake (or muffins) for breakfast. To me, they are sweet enough that way.
Ingredients:
4 eggs
3/4 cup white sugar (I only add 1/2 cup)
1/2 cup vegetable oil
4 apples (medium size)*
2 tblsp cinnamon
2 cups flour (scoop with the measuring cup and level with a butter knife)
1 tsp baking soda
Optional: walnuts and/or dried cranberries
*You can use whatever apples you have. I have made these with just granny smith, or just fuji, golden delicious, or even a mix. The muffins always come out delicious.
Instructions:
Heat oven to 350F and spray your muffin tin or cake pan with cooking spray.
Beat eggs and sugar until white.
In the meantime, grade the apples.
Add the oil and graded apples.
Add the cinnamon, flour, and soda and beat until well mixed.
Add chopped walnuts and/or cranberries.
Bake at 350F until a toothpick comes out clean. If you are making muffins, it takes about 15 minutes to bake.
NOTE: I have only made this recipe the way I have written it here. I don’t know if you can substitute the oil for something else, or the flour, etc. You can try different substitutions if you’d like, but I don’t know what would work and what wouldn’t.
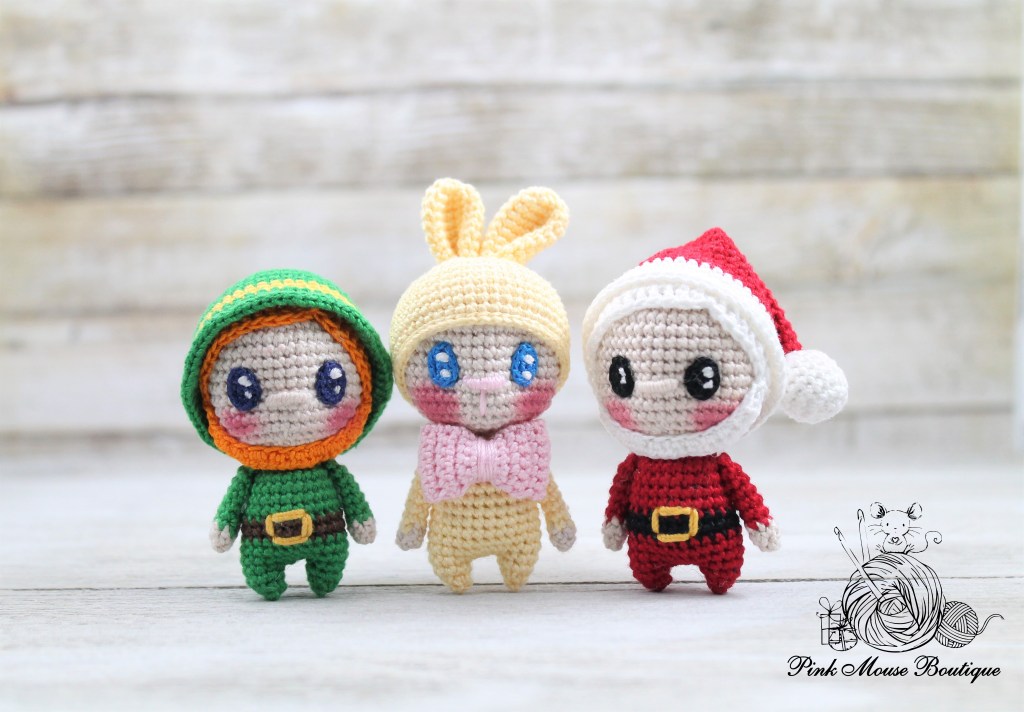
Last week, I had a CAL on Facebook and Instagram and I loved seeing everyone’s wips as they followed along and made these cute little dolls – a leprechaun, a bunny, and a Santa.
Now that the CAL has ended, I thought it will be much more convenient to have the pattern in one place and not spread out in several different social media posts. So, I have put together a PDF file with detailed instructions and many step by step pictures. Just click on the link below to access the file.
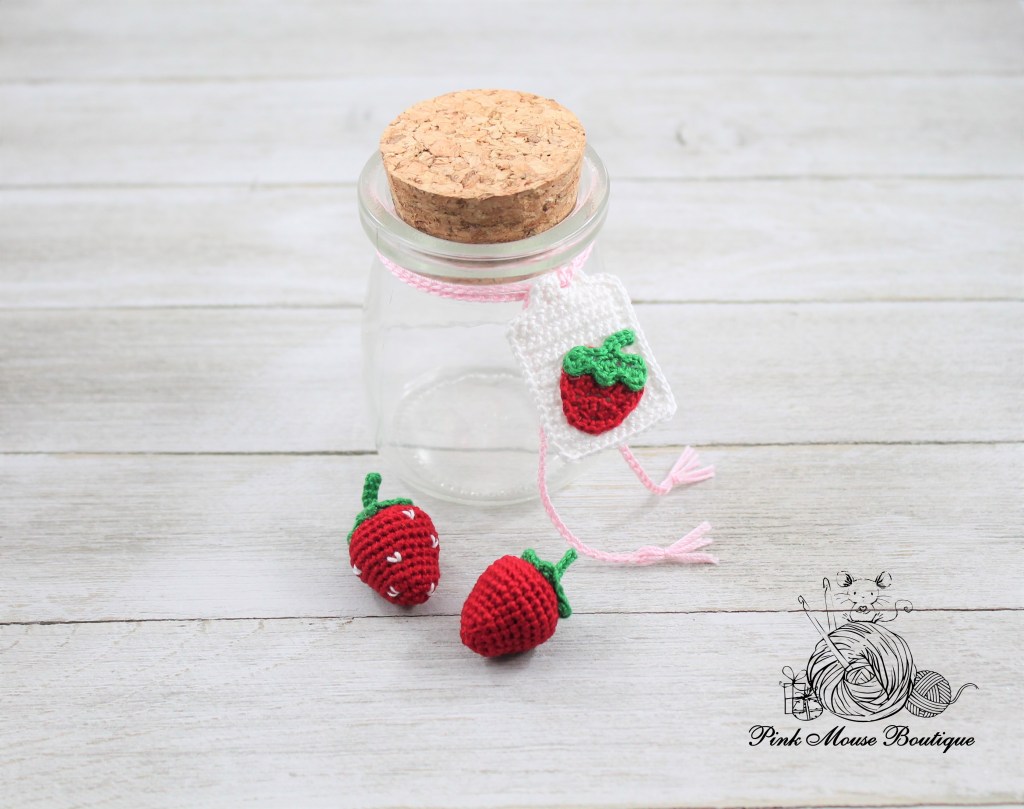
These tiny strawberries are very quick to make. You need under an hour to finish one (I am slow at crochet; some of you might need less than 30 minutes). But they are super cute! I am planning on making at least 10 and putting them in a small favor jar (the one in the picture is 3.4 oz).
Materials:
Aunt Lydia’s size 10 thread – red, green, and white
Clover Amour crochet hook, 1.5 mm
Stuffing
Sewing needle
Hot glue gun (or tacky glue if you prefer)
Abbreviations:
mr – magic ring
ch – chain
st – stitch
sl st – slip stitch
sc – single crochet
hdc – half double crochet
trbl – treble crochet
inc – increase
dec – decrease (invisible)
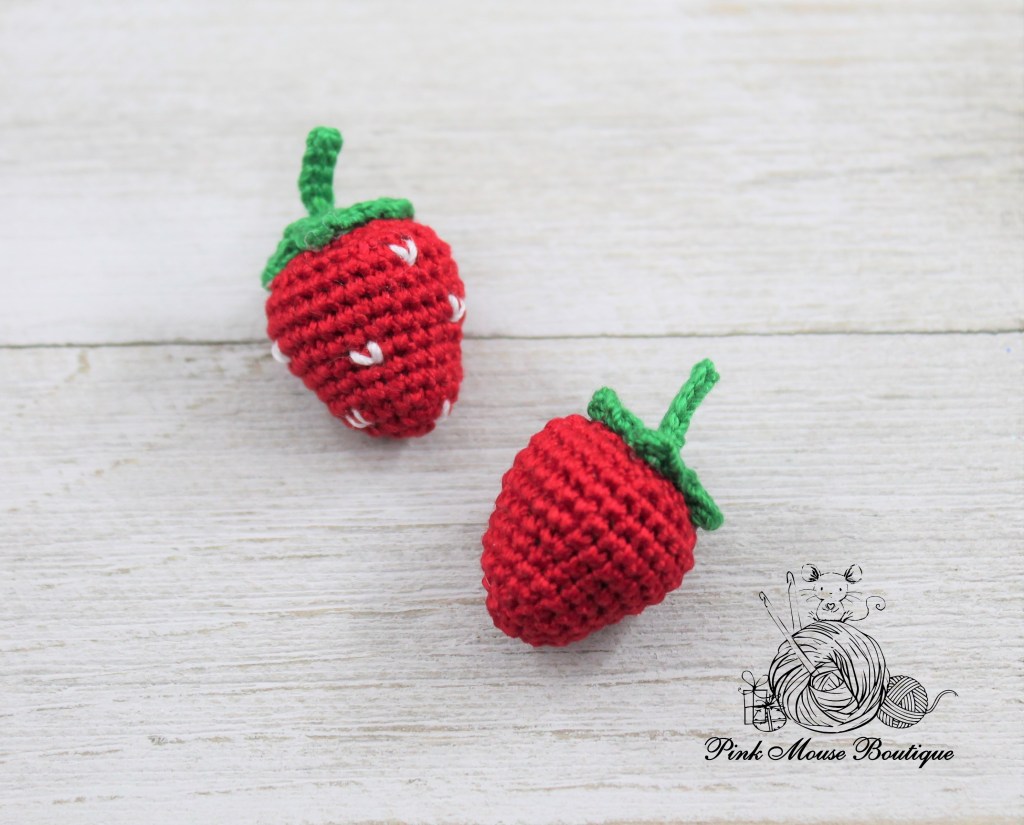
Strawberry Pattern:
Crochet in spiral.
Round 1: with red 6 sc in a mr – 6 sts
Round 2: 6 inc – 12 sts
round 3: (sc, inc) x 6 – 18 sts
Rounds 4 – 5: sc around – 18 sts
Round 6: (2 sc, inc) x 6 – 24 sts
Round 7: (3 sc, inc) x 6 – 30 sts
Rounds 8 – 10: sc around – 30 sts
Round 11: (3 sc, dec) x 6 – 24 sts
Round 12: (2 sc, dec) x 6 – 18 sts
Start stuffing the strawberry. You will need to stuff more before finishing the last round.
Round 13: (sc, dec) x 6 – 12 sts
Round 14: 6 dec – 6 sts
Fasten off and finish off. Insert the beginning and end tail through the same stitch, tie a knot, and stuff the ends inside the strawberry.
Leaves Pattern:
Round 1: with green, 10 sc in a mr; sl st to join and ch 1 – 10 sts
Round 2: *in same stitch (1 hdc, 1 trbl, ch 1, and 1 hdc), sl st in next* repeat 5 times
Fasten off and tie a knot securing the beginning and end tail. Set aside.
Stem Pattern:
With green, ch 6
1 sl st in the back bump of the 2nd ch from hook, 1 sl st in back bump of each ch – 5 sts
Fasten off.
Insert the ends of the stem through the mr hole of the leaves. Tie knots with the ends of the leaves and the stem and cut excess thread.
Glue to the top of the strawberry. Do not glue down the tips of the leaves.
OPTIONAL: Use white to sew small Vs around the strawberry.
And your tiny strawberry is finished! Now make a whole bunch more! These are FUN.
This Baby Penguin pattern happened by accident. I was actually trying to make a little puppy but somewhere in the process, I decided that the puppy looks more like a penguin. I am loving this little guy! He is super cute and very, very quick to make. There is almost no sewing which to me is always a plus!
This is a free version of the pattern. If you would like a downloadable or printable version of this pattern, an inexpensive PDF file could be downloaded from my Etsy or Ravelryshops. The premium version also includes more step by step pictures as well as a pattern for a tiny Santa hat to go with your little Baby Penguin.
MATERIALS:
Thread:
DMC Baroque size 10, white – body
Aunt Lydia’s size 10, color of your choice – coat and flippers
Aunt Lydia’s size 10, yellow – beak
Aunt Lydia’s size 10, light pink – cheeks
Hook: 1.5 mm (Clover Amour)
Plastic eyes, 2 mm (or use black thread to sew the eyes)
Stuffing
Sewing needle and scissors
Tacky glue
ABBREVIATIONS:
MR – magic ring Trbl – treble crochet
Ch – chain Inc – increase
St(es) – stitch(es) Dec – decrease
Sl st – slip stitch
Sc – single crochet
Hdc – half double crochet
NOTES:
Crochet in continuous rounds unless otherwise specified.
This doll is crocheted with the RS (right side).
When decreasing (sc2tog), use the invisible decrease technique.
PATTERN
BODY
Round 1: with white 6 sc in mr – 6 sts
Round 2: 6 inc – 12 sts
Round 3: (sc, inc) x 6 – 18 sts
Round 4: (2 sc, inc) x 6 – 24 sts
Rounds 5 – 6: sc around – 24 sts
Round 7: (3 sc, inc) x 6 – 30 sts
Round 8: (4 sc, inc) x 6 – 36 sts
Rounds 9 – 11: sc around – 36 sts
Round 12: (4 sc, dec) x 6 – 30 sts
Round 13: (3 sc, dec) x 6 – 24 sts
NOTE: Stuff the body well. You may need to stuff more before finishing the last round.
Round 14: (2 sc, dec) x 6 – 18 sts
Round 15: (sc, dec) x 6 – 12 sts
Round 16: 6 dec – 6 sts
Fasten off. Finish off and secure stitches. Set aside.
COAT
Do not cut the tail from the magic ring. We will need it later.
Round 1: with pink 6 sc in mr – 6 sts
Round 2: 6 inc – 12 sts
Round 3: (sc, inc) x 6 – 18 sts
Round 4: (2 sc, inc) x 6 – 24 sts
Round 5: sc around – 24 sts
NOTE:We will start crocheting in rows, but the count will continue from where we stopped with the rounds.
Row 6: 1 sc in 16 sts; ch 1 and turn – 16 sts
Row 7: (3 sc, inc) x 4; ch 1 and turn – 20 sts
Row 8: (4 sc, inc) x 4; ch 1 and turn – 24 sts
Rows 9 – 11: sc in each st; ch 1 and turn – 24 sts
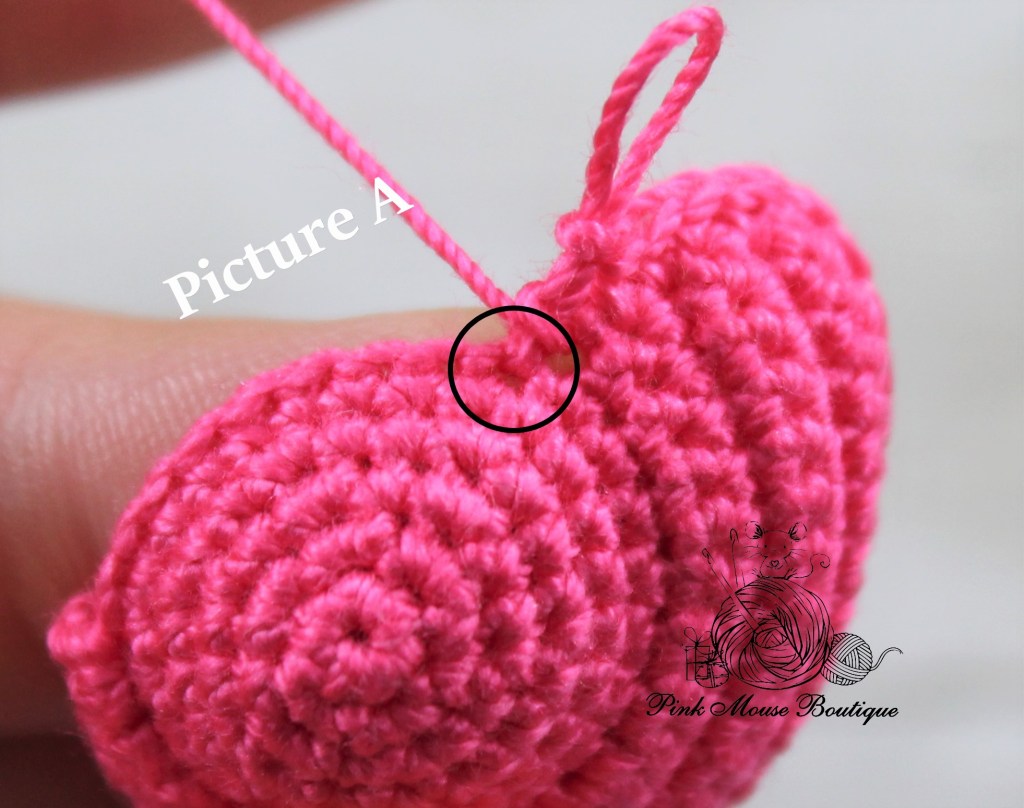
Row 12: sc in each st do not turn but continue up the side
Sc 5 sts evenly spaced
1 sc in last worked st of Round 5. See Picture A.
1 sc in next 2 sts, 1 hdc in next, 1 trbl in next, 1 hdc in next, 1 sc in next 3 sts. You should have 9 sts across the top.
Continue down the side. Sc 5 sts evenly spaced. SeePicture B
NOTE:We will go back to rounds. The count continues from where we stopped with the rows.
Insert the beginning tail of the coat through the magic ring of the body and out through another stitch.
Then place the coat on the body and continue with the next round.
Round 13: 1 sc in next 24 sts, ch 8 and 1 sc in 1st st of Round 13 (that counts as the 1st st of Round 14) – 32 sts See Picture C
Round 14: (2 sc, dec) x 8 – 24 sts
Round 15: (sc, dec) x 8 – 16 sts
Round 16: 8 dec – 8 sts
Fasten off and finish off.
Secure the stitches by inserting the beginning and ending tails through the same stitch, tying a knot, and stuffing it inside the body.
FLIPPERS (x 2)
With pink, 8 hdc in mr
Do not join to other side. Leave a tail for sewing. Fasten off and set aside.
ASSEMBLY:
Using the yellow thread, sew the beak starting with the treble stitch from the coat and going one round down on the body. I sewed a few times.
Glue the plastic eyes with tacky glue a round below the coat and 2 sts away from the beak.
With pink thread, sew twice directly under each eye to create the cheeks.
Sew the flippers 2 sts from the edge of the coat, about a round under the round where you glued the eyes. The flippers are sewn with the wrong side facing out. Picture D shows the left flipper. When you finish sewing, insert both ends through the same stitch of the coat, tie a knot, hide the excess thread inside the coat.
NOTE: For the right flipper, weave the ending tail through a few loops to get to the other end of flipper. That way you can sew it to the penguin with the wrong side facing out. See Picture E
OPTIONAL: Make it an ornament by inserting a thin ribbon through the top of the penguin.
FINISHED MEASUREMENTS:
If you have used the materials suggested, your baby penguin should be about 1 inch (about 2.5 cm) tall.
Thank you for visiting my blog! I hope you enjoyed this pattern.
Let me know in the comments section below. I would love to hear from you!
I thought little Mr. Chatters needed a house so I made him one.
This is a super quick and easy project. I am even thinking of making several to create a village. Wouldn’t that be fun?!
Note, this house will fit a squirrel made with Oren Bayan cotton perle 12 (or Lizbeth 40) and a 1 mm hook.
Materials:
1. Lizbeth 10 thread: light brown
2. Crochet hook, 1.5 mm
3. Oren Bayan cotton perle 12 (or Lizbeth 40): green and dark brown
4. Crochet hook, 1 mm
5. Acorn top (have several handy to pick the one that will fit your house)
Abbreviations:
mr – magic ring
ch – chain
st – stitch
sl st – slip stitch
sc – single crochet
BLO – back loop only
FLO – front loop only
House:
With Lizbeth 10 light brown thread and a 1.5 mm hook
Round 1: mr, ch 1, 8 sc; sl st to join and ch 1 Round 2: 8 inc; sl st to join and ch 1 – 16 sts Round 3: (sc, inc) x 8; sl st to join and ch 1 – 24 sts Turn your work. We will leave the wrong side at the bottom and the right side will be on the inside of the house.
Round 4: in BLO sc around; sl st to join and ch 1 – 24 sts Round 5: (2 sc, inc) x 8; sl st to join and ch 1 – 32 sts Rounds 6 – 10: sc around; sl st to join and ch 1 – 32 sts Round 11: sl st around Fasten off and weave in the ends.
Door:
With Oren Bayan 12 green and a 1 mm hook Ch 4 Row 1: 1 sc in 2nd ch from hook, sc in next; 4 sc in last ch; on opposite side of chain 1 sc in last 2 chains; ch 1 and turn Row 2: 1 sc in 2 sts; 4 inc; 1 sc in last 2 sts
Leave a long tail for sewing and fasten off. Sew to house.
Cross stitch two windows with dark brown Oren Bayan thread on either side of the door, about 2 stitches apart in the following pattern
XX XX
Pick an acorn top that fits for the roof of the house.
And your wee little acorn house is finished!
Make several and create a village! Make some taller, some shorter, some wider, some thinner! Use your imagination!